
My AC is broke, what would you do?
 10-30-2007, 06:49 AM
#31
Instructor
Thread Starter

Join Date: Aug 2006
Location: Fairfax Virginia
Posts: 165
Likes: 0
Received 0 Likes
on
0 Posts
I thought that I should read the instructions that came from RennAire. The first page of the instructions from RennAire talk about the Thermal Wrap for the evaporator. This is the insulating blanket that I mentioned. This is supposed to keep the heat within the smugglers box, from diluting the cooling power of the evaporator.
On page two of the RennAire instructions, it talks about that mysterious return air duct that gave me trouble. Here is what the RennAire instruction says.
"The return air duct is in the right hand floor board, right behind the wooden floor, which is held on by a small nut. Remove the four phillips head screws and slide this plastic duct out, to let the evaporator housing be lifted out of the smugglers box."
Hmmm, I wish I had known this last week.
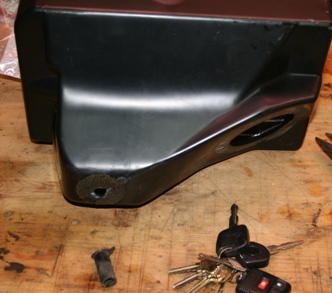
Here is a pic of the little black drip tube that was broken due to the missing step in the manual.
Attachment 229123
I will need to glue this drip tube in place before re-installing the evaporator box. I will pick up some JB-Weld this week to glue it back on.
Before reinstalling - I will Remove the four phillips head screws and slide this plastic duct out, to let the evaporator housing be installed in the smugglers box.
On page two of the RennAire instructions, it talks about that mysterious return air duct that gave me trouble. Here is what the RennAire instruction says.
"The return air duct is in the right hand floor board, right behind the wooden floor, which is held on by a small nut. Remove the four phillips head screws and slide this plastic duct out, to let the evaporator housing be lifted out of the smugglers box."
Hmmm, I wish I had known this last week.
Here is a pic of the little black drip tube that was broken due to the missing step in the manual.
Attachment 229123
I will need to glue this drip tube in place before re-installing the evaporator box. I will pick up some JB-Weld this week to glue it back on.
Before reinstalling - I will Remove the four phillips head screws and slide this plastic duct out, to let the evaporator housing be installed in the smugglers box.

 11-01-2007, 12:06 PM
#34
Drifting
Well, I just finished replacing hoses, new evaporator, new desert duty condensor, new receiver/drier. Just need to get it charged now. It was time consuming - and a few little trouble spots (like the bracket that holds the hose right be the steering rack) my hands are too big.
Didn't break anything - which was good - I can't imagine trying to replace the blower motor in the smugglers box without removing the whole evaporator.
All in all - took me a total of about 9 hours that included alot of cleaning - (I figured the only thing the 20 year old hoses were good at was retaining road debris). Anyway - I'll report back once we get it charged.
11-01-2007, 12:15 PM
#35
Instructor
Thread Starter
Join Date: Aug 2006
Location: Fairfax Virginia
Posts: 165
Likes: 0
Received 0 Likes
on
0 Posts
G-50cab: Congratulations, I plan to hit it hard this weekend, and hopefully make some good progress. It takes a bit longer when you are trying to document the process.
Last edited by D.C.; 11-02-2007 at 08:24 PM. Reason: spelling
11-01-2007, 06:02 PM
#36
Racer
Join Date: Oct 2007
Location: Atlanta burbs
Posts: 329
Likes: 0
Received 0 Likes
on
0 Posts
D.C. I'm reading with interest. Great work. The car I'm trying to buy doesn't blow cold; so, I may duplicate your adventure eventually. But, I'm not sure I can do what you're doing.
11-01-2007, 11:27 PM
#37
Drifting
OK - just finished charging - was thrown a little bit of a curve - my temp switch decided to take a siesta. I have a temporary switch in there now to turn the compressor on. The good news is my system held a vacuum - and I have vent temps after a trip around the block in the upper 30's. I'm pleased.
11-02-2007, 08:42 PM
#38
Instructor
Thread Starter
Join Date: Aug 2006
Location: Fairfax Virginia
Posts: 165
Likes: 0
Received 0 Likes
on
0 Posts
G50-Cab has given me a shot of motivation. I made some progress this week, and I have a couple pics and stuff from last week to post.
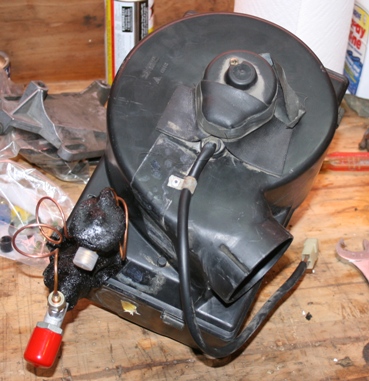
Here is a shot of the old evaporator. It actually looks to be in pretty good shape and is not corroded. You can see that two small sections are clogged with dust, and there is even a leaf in there providing a bit of restriction.
Here is a shot of the old evaporator. It actually looks to be in pretty good shape and is not corroded. You can see that two small sections are clogged with dust, and there is even a leaf in there providing a bit of restriction.
11-02-2007, 09:23 PM
#39
Instructor
Thread Starter
Join Date: Aug 2006
Location: Fairfax Virginia
Posts: 165
Likes: 0
Received 0 Likes
on
0 Posts
I spent a little time cleaning the plastic housing for the evaporater. Just a little soap and water in the kitchen sink. I installed the new evaporator in the plastic housing and it fit like a glove. I had to install the new expansion valve and then wrap that area with the black sticky cork tape. I installed the cork tape by cutting it into smaller pieces and covering one area at a time. It was not that hard to do.
Here is a shot of the bottom of the evaporator. The round hole on the bottom left allows input air from the tunnel, the triangular shaped port on the lower right leads to the passenger footwell. The round port on the upper left will direct cool air into the cabin. Or at least that is what I hope will happen when this project is completed.
Also on the right side of the picture you can see one of those high velocity retaining clips, that hold the two halves of the plastic housing together. I wonder if there is some special porsche tool that is used to remove and reinstall these clips? I used a screwdriver to remove them, and that is the easy part. Re-Installing them required a bit more finesse. I used some pliers and a screwdriver to reinstall them, and I was really careful not to send one flying across the room. I still need to wrap this with the insulating blanket before reinstalling it in the car. I will post a pic of that when I get to it.
Last edited by D.C.; 11-02-2007 at 09:27 PM. Reason: adding detail
11-04-2007, 06:05 PM
#40
Instructor
Thread Starter
Join Date: Aug 2006
Location: Fairfax Virginia
Posts: 165
Likes: 0
Received 0 Likes
on
0 Posts
I pulled the front condensor, and it does not look very good. It is pretty beat up and corroded. I am not sure if I should reuse this or not. The fins are bent in such a way as to indicate that the tubes have been smashed together. I am really tempted to order the Desert Duty front condensor on Monday to replace this mess. You should be able to see what I am saying from this photo. The rear condensor is in good condition and I will send it out to get it cleaned.
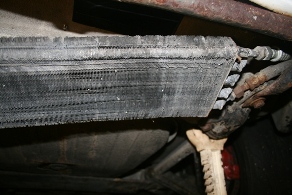
The rear condensor is in good condition and I will send it out to get it cleaned.
I installed the compressor yesterday, and then I spent most of the afternoon crawling under the car working on the hoses.
I have some more pictures to share, but I have run out of space to store them on this site.
Can anyone help me to get a bit more space for my pictures? Thanks
Last edited by D.C.; 11-05-2007 at 06:21 AM.
 11-04-2007, 07:25 PM
#43
Professor of Pending Projects
Rennlist Member
Rennlist Member
Not sure if it is too late... I have a compresor that I took off an 83 SC... yours for the cost of shipping if you want it...
11-04-2007, 07:26 PM
#44
Professor of Pending Projects
Rennlist Member
Rennlist Member
Forget about my previous post... I see here that you ordered a complete system. Best of luck!!
Everyone, thanks for all the terrific advise.
I have made my decision and will proceed as follows.
I ordered the Rennaire replacement system for my 86 Carrerra. This system consists of the following.
New compressor. I really needed this as the seal was leaking badly.
New barrier hoses. Complete set. Replacing these should be interesting!!!!
New evaporator. I am pulling the old one out tonight and will report.
New expansion valve.
Pro Cooler. I agonized over the Pro Cooler decision, but based on the input here decided to go with it.
This kit also includes some refridgerent oil, new foam, insulation, and other various bit and pieces. It seems to be a really nice kit. I talked to the Rennaire guy on the phone, I dont recall his name (Jim?). He was really nice and extremely helpful, and most of all honest. When we discussed my situation and location, he said he did not think I needed the desert duty front cooler. You got to respect a guy who is willing to tell you the truth, and forgo the sale of some extras that you dont need. I asked a bunch of questions and he had good solid answers. He said if I had any issues or questions with the install, to give him a call. I felt real comfortable doing business with him.
I plan to pull the old evaportor out tonight, The Bently manual made it sound fairly straight forward. The only thing I am worried about is my back, leaning over that smugglers box for a long period could be a problem.
11-04-2007, 07:40 PM
#45
Racer
Join Date: Sep 2006
Location: Knoxville, TN
Posts: 251
Likes: 0
Received 0 Likes
on
0 Posts
to answer your question directly, I would remove it completely, like I did a few weeks ago... I also removed my rear bumperettes and some misc, so I dropped about 90lbs total...i could really tell a difference when I AX'd the car a few weekends ago.