
Battery-area surprise!
 08-26-2011, 03:53 PM
#181
RL Community Team
Rennlist Member
Rennlist Member
Thread Starter
Yay!!
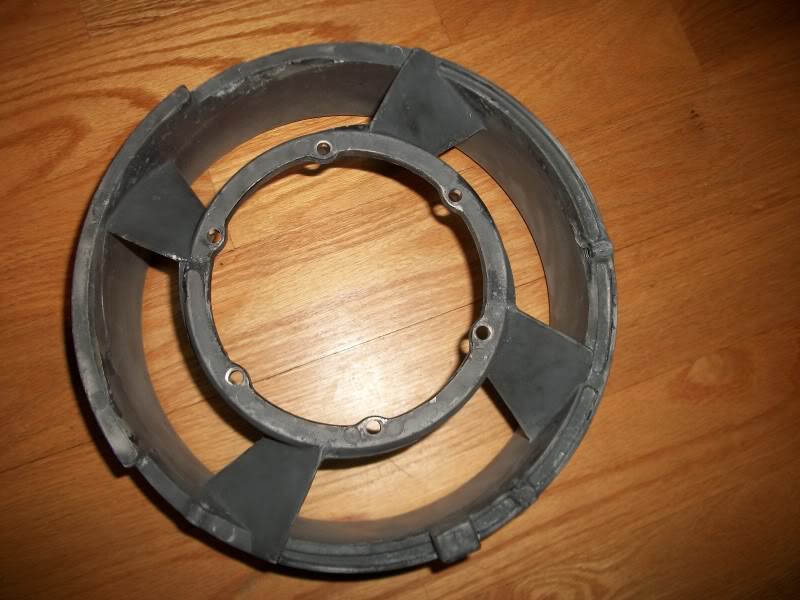
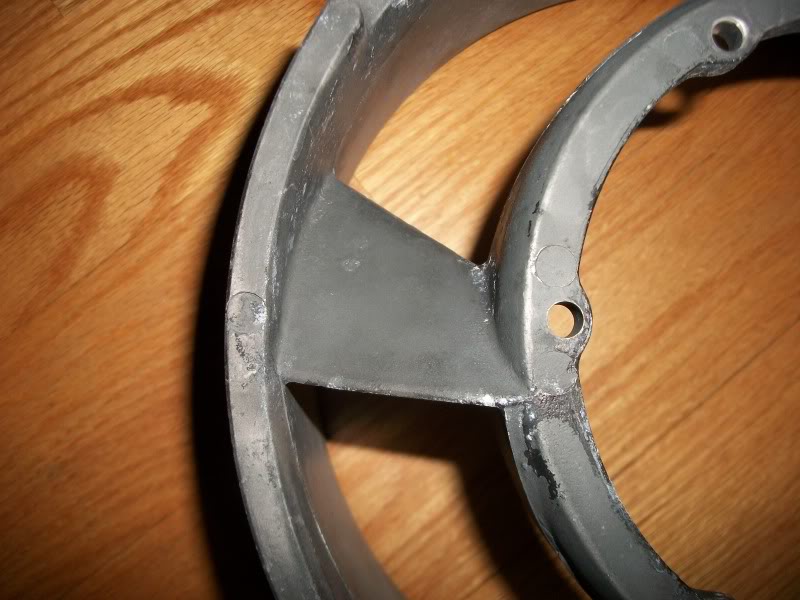
I have found the holy grail! I had pretty much given up tracking down an un-cracked 3.2 magnesium fan housing and was already trying to figure out how to explain to my wife why I needed an aftermarket aluminum fan housing from Vertex costing the better part of $600
Then, I received an email from Tom Butler who managed to find one after all! He sent me close up photos of every vane... Whew, that is a nice turnaround:
BTW, if you are looking for parts, I find Tom a very responsive individual who can find many items and I would recommend giving him a try:
butlertl@sbcglobal.net
One might ask: "Won't this one crack eventually too?"
Well, it certainly may. However, I plan to not over-tighten the fan belt and, as a result, extract good service from this one...
I seperated the transaxle from the motor, which was very easy actually. The clutch disc and pressure plate look quite new, but the flywheel face is pretty rough. I think a new clutch was put in without a flywheel resurfacing, which seems a little slipshod. At first I was pretty sure the grooves in the flywheel were going to be too deep, but upon checking with a precise micrometer, it looks like it should be possible to resurface it. If there are any readers that know a good shop for this work in the Toronto area, please let me know!
As for the clutch, i am going to examing the disc & pressure plate very carefully before I decide what to do, although I am leaning towards just putting a whole new clutch kit in there. At the very minimum I will replace the T.O. bearing, pilot bearing and flywheel bolts.
 08-26-2011, 04:20 PM
#182
Burning Brakes
BTW, if you are looking for parts, I find Tom a very responsive individual who can find many items and I would recommend giving him a try:
butlertl@sbcglobal.net
butlertl@sbcglobal.net
09-01-2011, 11:15 AM
#183
RL Community Team
Rennlist Member
Rennlist Member
Thread Starter
Arrgghh... I am now having extreme doubts about NOT doing a top-end rebuild... Taking a closer look at the exhaust ports makes me think it is almost time...
I would appreciate all thoughts and opinions. I started another thread with pictures of each port:
https://rennlist.com/forums/911-foru...-opinions.html
I would appreciate all thoughts and opinions. I started another thread with pictures of each port:
https://rennlist.com/forums/911-foru...-opinions.html
09-01-2011, 06:53 PM
#184
RL Community Team
Rennlist Member
Rennlist Member
Thread Starter
OK, decision's been made: The motor is coming all the way apart. The top end will be rebuilt, head studs replaced, as well as bearings and piston rings at a minimum. Hopefully the pistons and cylinders will be in good shape for re-use. This will cost $$, even with much of the labor being done by me. The machine work, head assembly and spec'ing will be done by a pro (Brent Hunter @ http://huntermotorsports.ca/index.html).
Really, why did I ever think it would not come to this?
Although this car should be one very solid, compehensively refreshed Carrera when (if?) it is back on the road, my experience certainly is an illustration of how over-excitement and over-confidence on my part lead me into a very expensive Porsche after all.
Everytime I see a REALLY nice SC or Carrera where the asking price is in the mid- to high-twenties and many people are saying "Too much" I find myself thinking "Could be a bargain!"
Being pretty handy with cars, and having read a plethora of good books (like Peter Z's), I fancied myself more than capable of buying a Carrera without a PPI. Boy, was I stupid! I missed the battery area rust (admittedly it was hard to see, but not impossible either), bought a car that apparently needs a top end and had a rough-looking, unloved interior. And, I paid too much considering how much I have spent since. And remember, I (so far) have done all the work myself.
Granted, I am a picky perfectionist, but I have seen plenty a truly nice 911 since (and some in person) which I could have had for less than what I've spent so far. And clearly I am not done with the spending!
So, the big lessons for others who don't want to repeat my mistakes?
1) PPI, PPI, PPI, PPI... No matter how smart you think you are, an unbiased pro without rose-tinted glasses is a very valuable resource.
2) Don't feel that you got to buy the first car that is remotely "right" out of fear you may not find another. There are plenty out there. My biggest regret is that I did not take my time, let the first one possibly slip away to another buyer and instead look at multiple 911s. If I had, I more likely would have seen my choice's shortcomings.
Thing were a little weird in my life (long story) when I bought this car and I really don't think I was in my best frame of mind for making a rational decision.
OK, rant off, just had to vent!!
I am buried in this car now and can only see it through.
09-02-2011, 01:05 PM
#187
RL Community Team
Rennlist Member
Rennlist Member
Thread Starter
The reality is though, I would not have had the go-ahead to spend the extra money back then that I have ended up spending over time anyway. That said, I still think I could have chosen better.
I am WAY too buried in this car to contemplate selling at this point. Luckily, my little guy firmly believes that Porsches, particularly 911s, are the best cars ever. Poor kid, he never really had a chance� I stared indoctrinating him when he was in the crib�
09-02-2011, 01:41 PM
#188
OK, decision's been made: The motor is coming all the way apart. The top end will be rebuilt, head studs replaced, as well as bearings and piston rings at a minimum. Hopefully the pistons and cylinders will be in good shape for re-use. This will cost $$, even with much of the labor being done by me. The machine work, head assembly and spec'ing will be done by a pro (Brent Hunter @ http://huntermotorsports.ca/index.html).
Really, why did I ever think it would not come to this?
Although this car should be one very solid, compehensively refreshed Carrera when (if?) it is back on the road, my experience certainly is an illustration of how over-excitement and over-confidence on my part lead me into a very expensive Porsche after all.
Everytime I see a REALLY nice SC or Carrera where the asking price is in the mid- to high-twenties and many people are saying "Too much" I find myself thinking "Could be a bargain!"
Being pretty handy with cars, and having read a plethora of good books (like Peter Z's), I fancied myself more than capable of buying a Carrera without a PPI. Boy, was I stupid! I missed the battery area rust (admittedly it was hard to see, but not impossible either), bought a car that apparently needs a top end and had a rough-looking, unloved interior. And, I paid too much considering how much I have spent since. And remember, I (so far) have done all the work myself.
Granted, I am a picky perfectionist, but I have seen plenty a truly nice 911 since (and some in person) which I could have had for less than what I've spent so far. And clearly I am not done with the spending!
So, the big lessons for others who don't want to repeat my mistakes?
1) PPI, PPI, PPI, PPI... No matter how smart you think you are, an unbiased pro without rose-tinted glasses is a very valuable resource.
2) Don't feel that you got to buy the first car that is remotely "right" out of fear you may not find another. There are plenty out there. My biggest regret is that I did not take my time, let the first one possibly slip away to another buyer and instead look at multiple 911s. If I had, I more likely would have seen my choice's shortcomings.
Thing were a little weird in my life (long story) when I bought this car and I really don't think I was in my best frame of mind for making a rational decision.
OK, rant off, just had to vent!!
I am buried in this car now and can only see it through.
Really, why did I ever think it would not come to this?
Although this car should be one very solid, compehensively refreshed Carrera when (if?) it is back on the road, my experience certainly is an illustration of how over-excitement and over-confidence on my part lead me into a very expensive Porsche after all.
Everytime I see a REALLY nice SC or Carrera where the asking price is in the mid- to high-twenties and many people are saying "Too much" I find myself thinking "Could be a bargain!"
Being pretty handy with cars, and having read a plethora of good books (like Peter Z's), I fancied myself more than capable of buying a Carrera without a PPI. Boy, was I stupid! I missed the battery area rust (admittedly it was hard to see, but not impossible either), bought a car that apparently needs a top end and had a rough-looking, unloved interior. And, I paid too much considering how much I have spent since. And remember, I (so far) have done all the work myself.
Granted, I am a picky perfectionist, but I have seen plenty a truly nice 911 since (and some in person) which I could have had for less than what I've spent so far. And clearly I am not done with the spending!
So, the big lessons for others who don't want to repeat my mistakes?
1) PPI, PPI, PPI, PPI... No matter how smart you think you are, an unbiased pro without rose-tinted glasses is a very valuable resource.
2) Don't feel that you got to buy the first car that is remotely "right" out of fear you may not find another. There are plenty out there. My biggest regret is that I did not take my time, let the first one possibly slip away to another buyer and instead look at multiple 911s. If I had, I more likely would have seen my choice's shortcomings.
Thing were a little weird in my life (long story) when I bought this car and I really don't think I was in my best frame of mind for making a rational decision.
OK, rant off, just had to vent!!
I am buried in this car now and can only see it through.

Brett
09-02-2011, 01:51 PM
#189
Rennlist Member
IMO, going to the expense of taking the top end down, warrants taking the entire engine down after this long a time. You get to inspect everything, and refresh. Provided the p's and c's spec out, it doesnt add that much in cost. Easier to do new chain ramps, chains, etc. But, many have done top end only.
09-02-2011, 04:33 PM
#190
RL Community Team
Rennlist Member
Rennlist Member
Thread Starter
IMO, going to the expense of taking the top end down, warrants taking the entire engine down after this long a time. You get to inspect everything, and refresh. Provided the p's and c's spec out, it doesnt add that much in cost. Easier to do new chain ramps, chains, etc. But, many have done top end only.
And, if the P's & C's don't spec out... well, that's part of a top-end anyway and if they need to be replaced, I guess there won't be much I can do about it. However, based on the low leakdown numbers (all 4 or 5%), I am hopeful.
This morning I started taking the chainboxes apart.
09-07-2011, 03:54 AM
#192
RL Community Team
Rennlist Member
Rennlist Member
Thread Starter
Now that I have calmed down I have just continued with the teardown. The engine is getting right down to the core now:
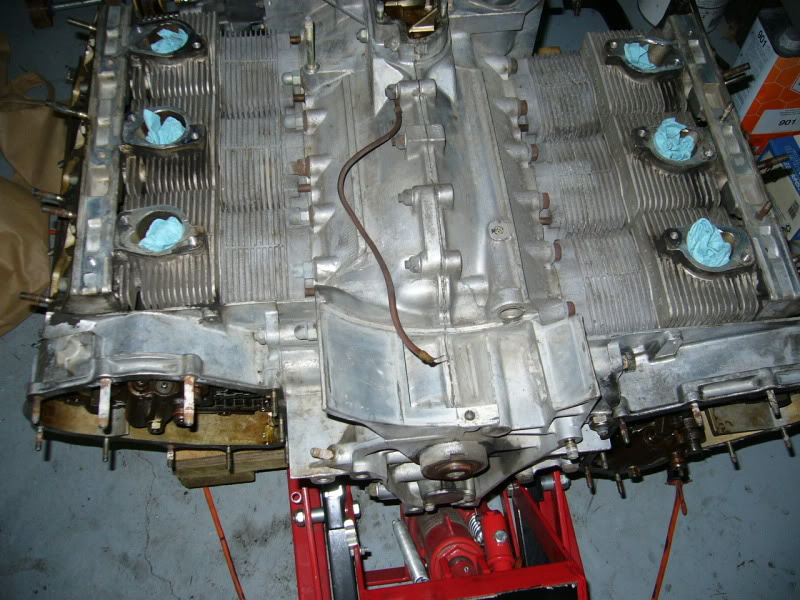
The next step will be removing the cams. I took out all the rockers, being careful to keep their location sorted.
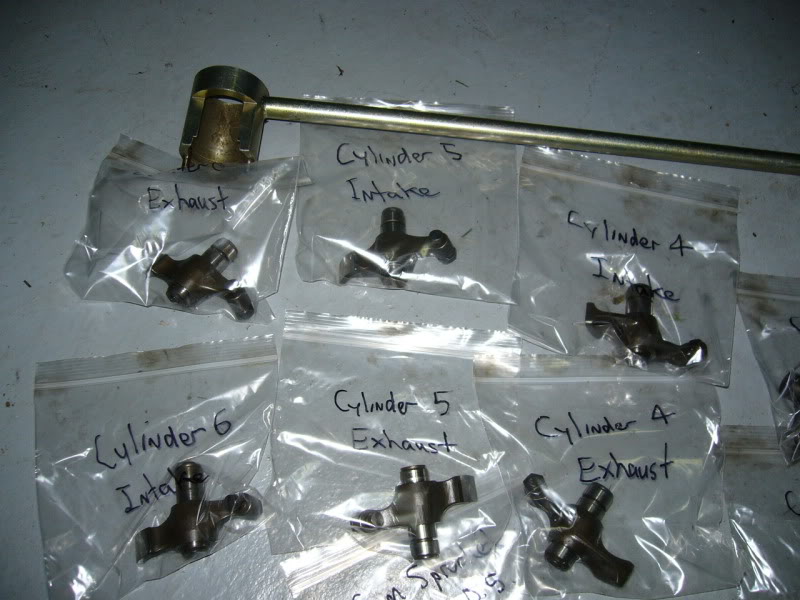
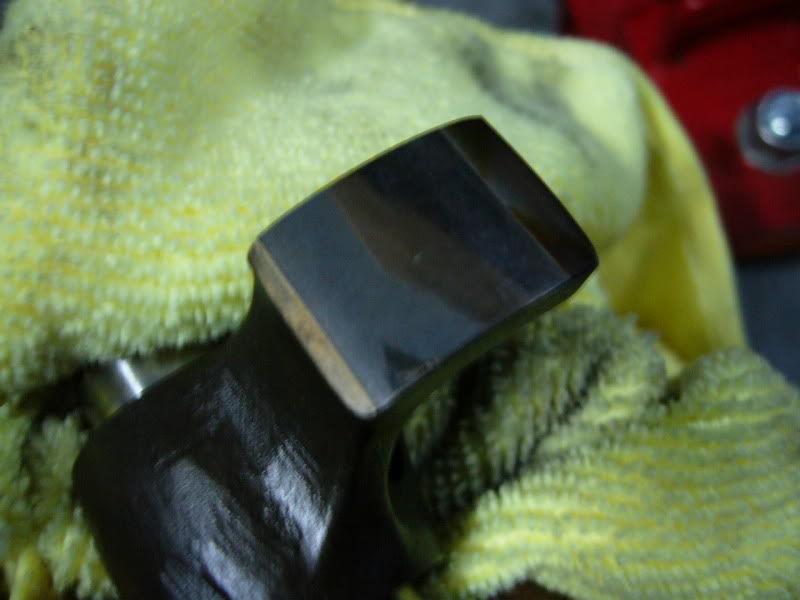
Happily both the rocker faces and the cam lobes all appear to be in excellent condition with no pitting or discernable wear marks:
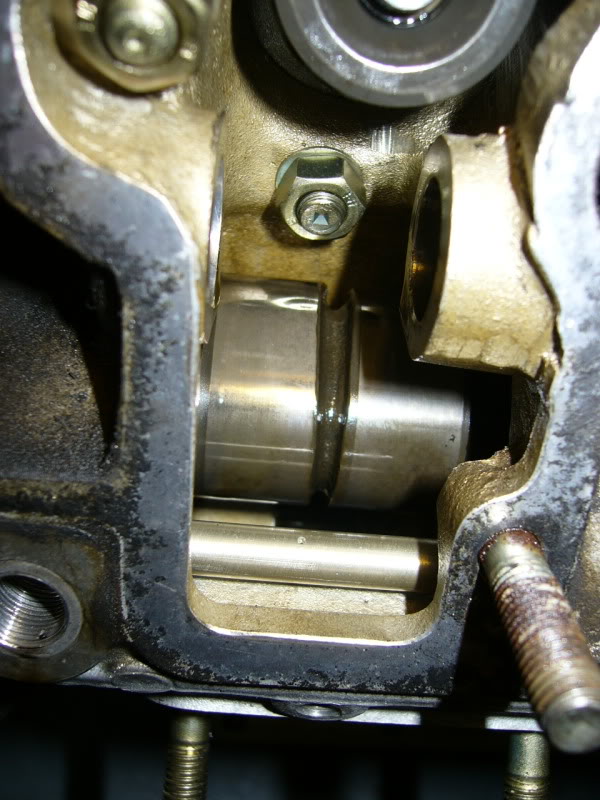
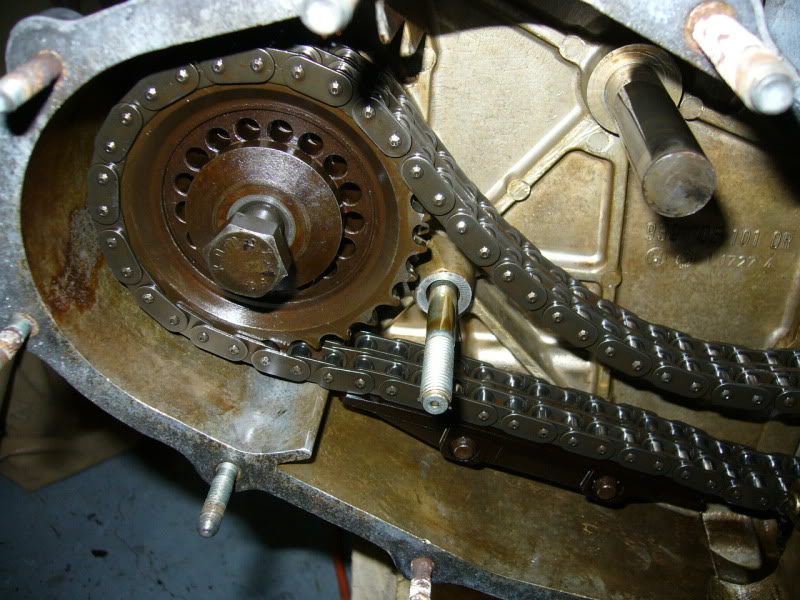
The chain tensioners are not highly extended, which means the timing chains are only moderately stretched (I suspect new chains and sprockets might still be called for):

I am finding Brent Hunter at Hunter Motorsports incredibly generous and helpful. I asked him about renting the cam sprocket holding tool so I could remove the cam nuts and he just handed it to me to borrow! I loosened the cam nuts (they are TIGHT) and used the little threaded tool for pulling the sprocket pins, but now I have to decide how best to "collapse" the chain tensioners so I can proceed with the camshaft removal. After that it will be chainboxes, cam towers and cylinder heads, in that order.
The next step will be removing the cams. I took out all the rockers, being careful to keep their location sorted.
Happily both the rocker faces and the cam lobes all appear to be in excellent condition with no pitting or discernable wear marks:
The chain tensioners are not highly extended, which means the timing chains are only moderately stretched (I suspect new chains and sprockets might still be called for):
I am finding Brent Hunter at Hunter Motorsports incredibly generous and helpful. I asked him about renting the cam sprocket holding tool so I could remove the cam nuts and he just handed it to me to borrow! I loosened the cam nuts (they are TIGHT) and used the little threaded tool for pulling the sprocket pins, but now I have to decide how best to "collapse" the chain tensioners so I can proceed with the camshaft removal. After that it will be chainboxes, cam towers and cylinder heads, in that order.
09-07-2011, 02:53 PM
#193
You don't need to collapse the tensioners (even the spring only ones). I thought the same thing. Wayne Dempsey says just to remove them, which I thought odd. Aren't they under tension... So I began to pull on mine, and they didn't budge. Then I pulled less hard and tried to evenly pull on each side of the shafts, and they fell right out in my hands (to my surprise). They bound easily on the shafts as I was pulling.
Brett
Brett
09-08-2011, 11:31 AM
#194
RL Community Team
Rennlist Member
Rennlist Member
Thread Starter
Thanks to Brett’s tip, I just pulled off the hydraulic tensioner on the driver’s side. At first it didn’t seem to budge and I started wondering if there was something other than the one nut that I still needed to remove. I pulled a little harder and then yeah, it just came off smoothly:
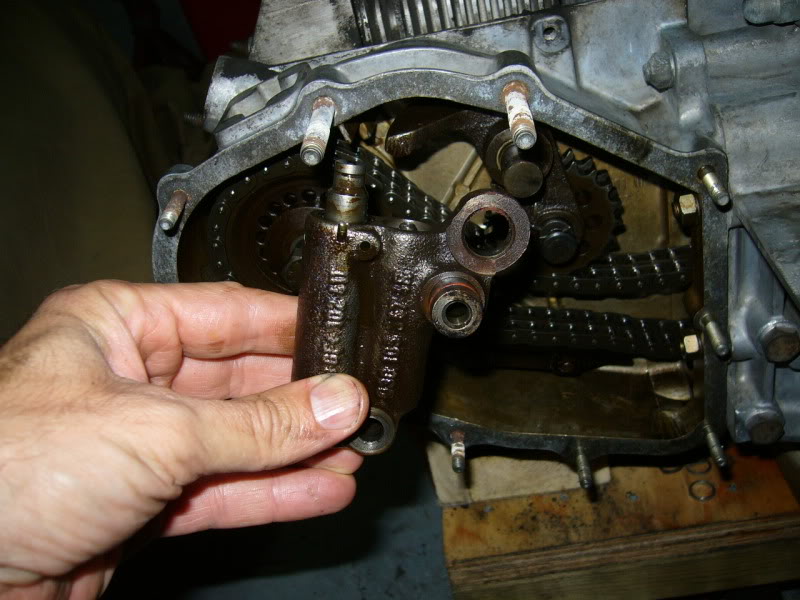
I had already loosened the cam bolt with the aid of the 9191 tool. So, with the tensioner and idler sprocket out of the way, the removal of the cam sprocket, retraining flange and thrust washers was pretty straightforward.
There are a bunch of shims etc. that I will need to keep track of, and of course that large O-ring to replace!

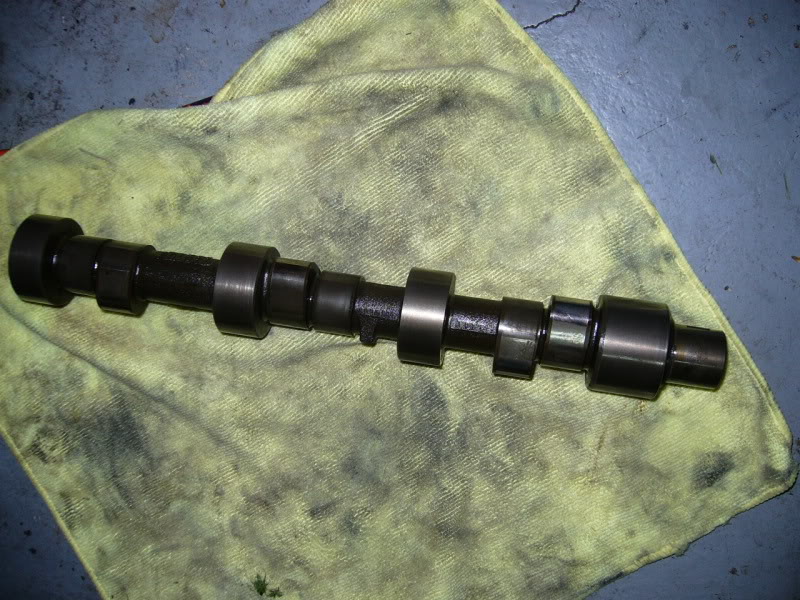
Next, it was a simple matter to slide out the cam shaft. I am very happy with the appearance of the cams. No pitting or discernable wear evident at any point. I am not “hotting up” the motor at all, so I won’t be having the cams ground to a different profile (e.g. the much-discussed 964 spec). At this point, I will just have Brent take a second look after I have cleaned it and if he concurs that they are good to go, I will just re-use them.
Next up was the cam tower housing. Very straightforward removal: A plethora of hex nuts and three barrel nuts later, the whole thing popped off nicely with just a few taps of the rubber hammer.
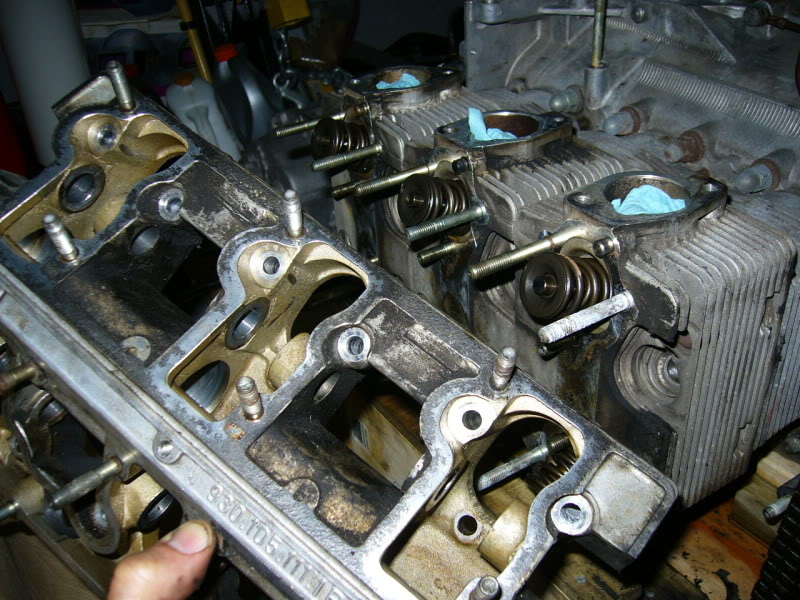
Those of you following Brett’s excellent head stud thread will note that he removed the cam tower and cylinder heads as one complete assembly. I would think that is just as good as breaking it down piece by piece as I am doing (instead of disassembling the rockers, cams etc. once off of the car). I found it worked well for me to go this route.
Now it was time to remove the cylinder heads, (which we all know is a normal part of fixing damage from a leaking battery in the front trunk, right?)…
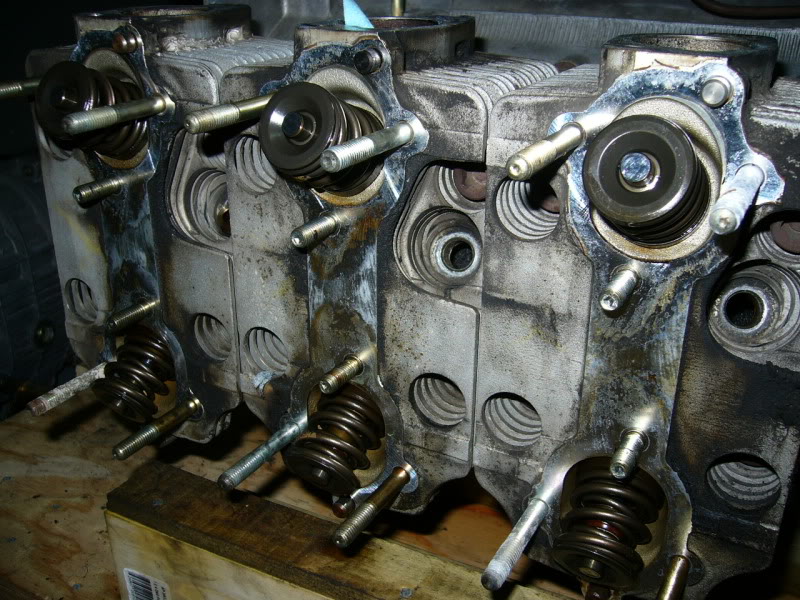
The barrel nuts all loosened off without problem (but a good amount of noise – metal “squeaking”) The heads just slid right off then, no tapping with a rubber mallet necessary.
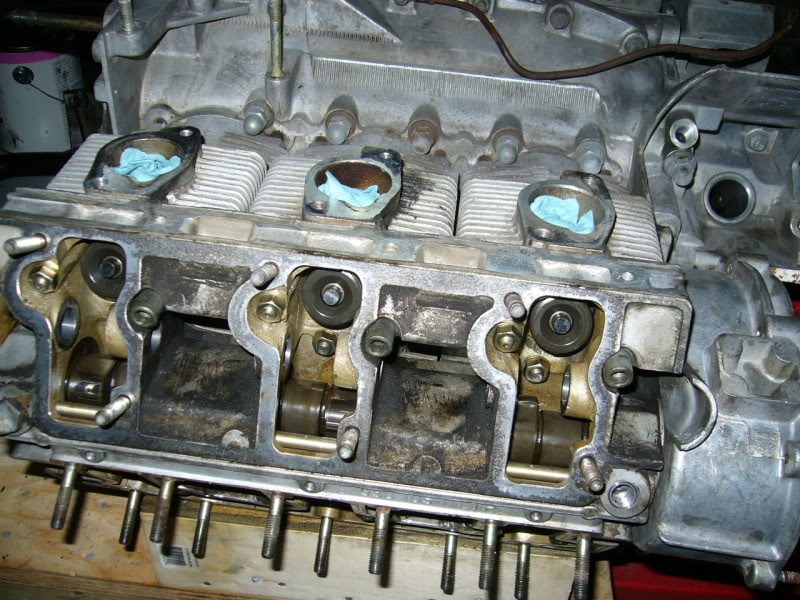
Here is cylinder number 1:
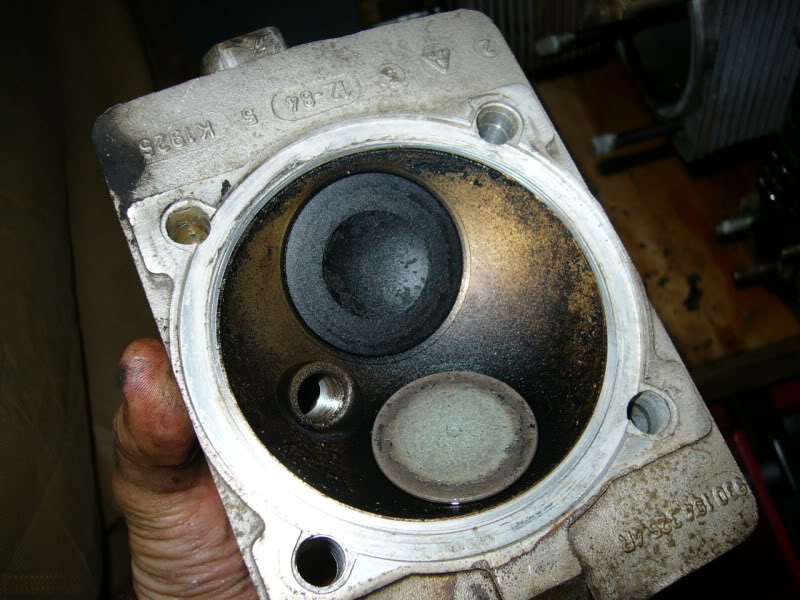
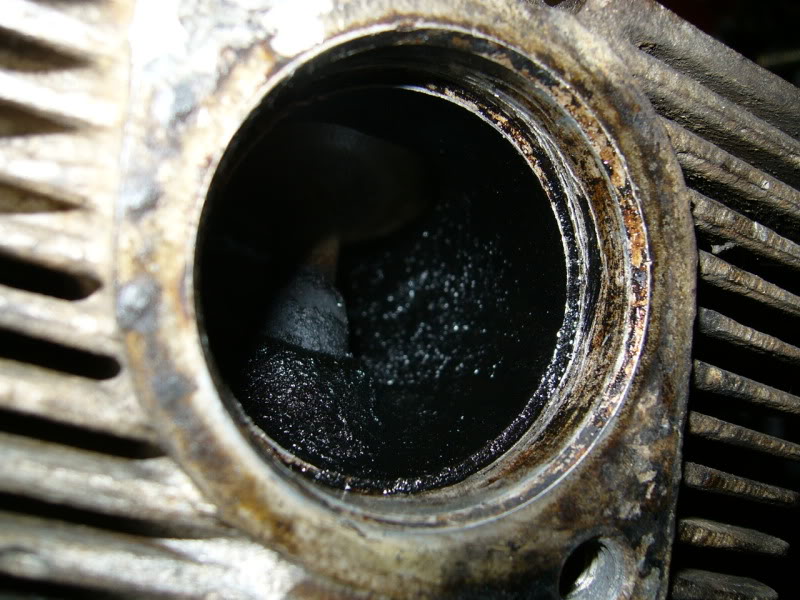
Not super awful looking actually. For comparison sake here is the associated exhaust port, it was one of the “wetter” looking ones:
Other than all the carbon build up, I did not see any damage on the valves of the first three heads (all I’ve done so far). The cylinders looked OK, I think. The piston tops of course need a nice cleaning… This is cylinder 1 again:
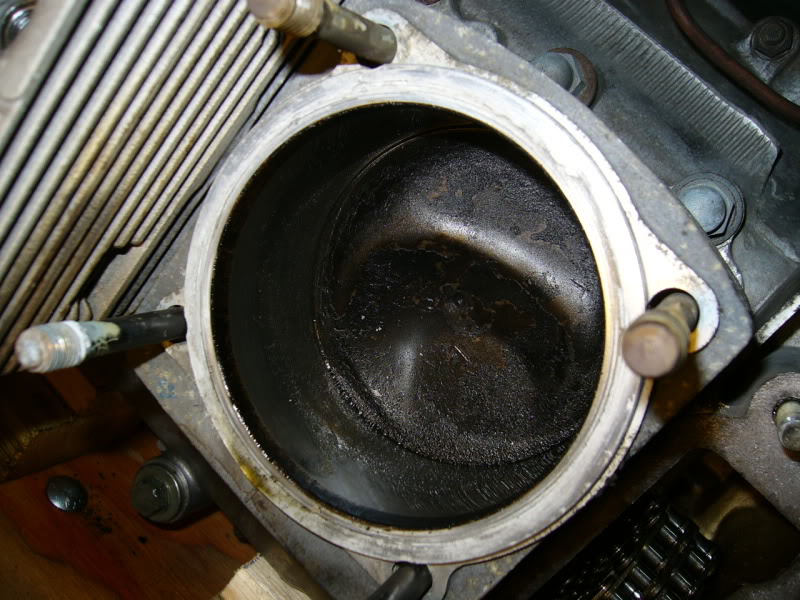
I used a microfiber cloth and wiped away some of that semi-solid oily deposit at the top of the cylinder (after the picture was taken). To my eternal delight, it rubbed off pretty easily to reveal that there was absolutely no discernable wear ridge. Plus, I am pretty sure at this stage these are Mahle cylinders (i.e. nikasil). I won’t really know one way or the other about the P’s & C’s until it is all apart and everything is measured, but at least the signs are good.
You can also see the head studs in that picture a bit… The exhaust-side studs are coated (Dilavar? Need to check with a magnet…) and the intake side look like bare steel. They show slight corrosion, but overall the studs look pretty solid, but I don’t have any real context for comparison. Either way, they will be changed…
So the heads are removed for cylinders 1 through 3 and I will now have to repeat the whole process on the passenger side of the motor.
I had already loosened the cam bolt with the aid of the 9191 tool. So, with the tensioner and idler sprocket out of the way, the removal of the cam sprocket, retraining flange and thrust washers was pretty straightforward.
There are a bunch of shims etc. that I will need to keep track of, and of course that large O-ring to replace!
Next, it was a simple matter to slide out the cam shaft. I am very happy with the appearance of the cams. No pitting or discernable wear evident at any point. I am not “hotting up” the motor at all, so I won’t be having the cams ground to a different profile (e.g. the much-discussed 964 spec). At this point, I will just have Brent take a second look after I have cleaned it and if he concurs that they are good to go, I will just re-use them.
Next up was the cam tower housing. Very straightforward removal: A plethora of hex nuts and three barrel nuts later, the whole thing popped off nicely with just a few taps of the rubber hammer.
Those of you following Brett’s excellent head stud thread will note that he removed the cam tower and cylinder heads as one complete assembly. I would think that is just as good as breaking it down piece by piece as I am doing (instead of disassembling the rockers, cams etc. once off of the car). I found it worked well for me to go this route.
Now it was time to remove the cylinder heads, (which we all know is a normal part of fixing damage from a leaking battery in the front trunk, right?)…
The barrel nuts all loosened off without problem (but a good amount of noise – metal “squeaking”) The heads just slid right off then, no tapping with a rubber mallet necessary.
Here is cylinder number 1:
Not super awful looking actually. For comparison sake here is the associated exhaust port, it was one of the “wetter” looking ones:
Other than all the carbon build up, I did not see any damage on the valves of the first three heads (all I’ve done so far). The cylinders looked OK, I think. The piston tops of course need a nice cleaning… This is cylinder 1 again:
I used a microfiber cloth and wiped away some of that semi-solid oily deposit at the top of the cylinder (after the picture was taken). To my eternal delight, it rubbed off pretty easily to reveal that there was absolutely no discernable wear ridge. Plus, I am pretty sure at this stage these are Mahle cylinders (i.e. nikasil). I won’t really know one way or the other about the P’s & C’s until it is all apart and everything is measured, but at least the signs are good.
You can also see the head studs in that picture a bit… The exhaust-side studs are coated (Dilavar? Need to check with a magnet…) and the intake side look like bare steel. They show slight corrosion, but overall the studs look pretty solid, but I don’t have any real context for comparison. Either way, they will be changed…
So the heads are removed for cylinders 1 through 3 and I will now have to repeat the whole process on the passenger side of the motor.