When you click on links to various merchants on this site and make a purchase, this can result in this site earning a commission. Affiliate programs and affiliations include, but are not limited to, the eBay Partner Network.
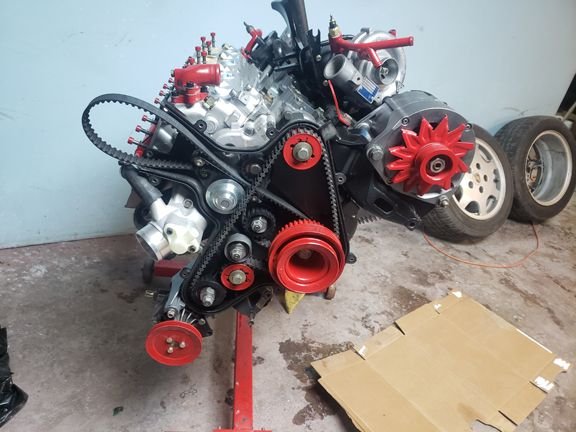
Got some more parts in so I was able to get the engine assembled a little more
Got a good deal on a 26/8 turbo so I am going with that.
Quick note on installing the OPRV. I bought the plastic alignment tool and I can assure you it is a piece of garbage. There is a good 1/4 play in the fit which is WAY too much. It does not work!! I ended up using the OPRV to align the housing. With the "tool" I could never even get the threads started, it would bind almost immediately. Using the OPRV (one piece) it goes in and out and only gets hard on the last half turn to tighten it down, hopefully it is aligned good enough.
Put the cross member on.
Now all I have to do is drop the engine on to a dolly, put the clutch in so I can find TDC, install cam tower, wiring, hoses and install. Plus I am sure I will need to make a couple more "final order" for the parts I am missing or I lost. I just got the shipping notice on my last "final order" and noticed two of the items were not included. One of them was the mount for the ICV. I hope they find one!! Most of the parts I am ordering now are specific bolts and crush washers, not too important. I need to look more but I do not think I have the bolts for the Speed and ref sensors. At $15 each I would prefer not to buy them. I was thinking about using the oil pan gasket spacers since they were made for m6 bolts. Anyone try this yet? Would this work?
Sad, but you can see the engine is puking oil everywhere, I have cardboard covering most of it up. Before I put the head on I filled the oil feed up with oil. Then it started pouring out the oil cooler area, oil cooler was not installed as I was waiting for new o rings for the oil transfer tube. So I tilted the engine. So oil started pouring out of the turbo oil lines. They were just mocked up while I waited for new crush washers. Lesson learned!
Should have the engine in this weekend, unless I need another "final order" first!
Filming, even the crappy job I am doing, makes the job take 10x longer then normal! Will start editing when I get the car running.
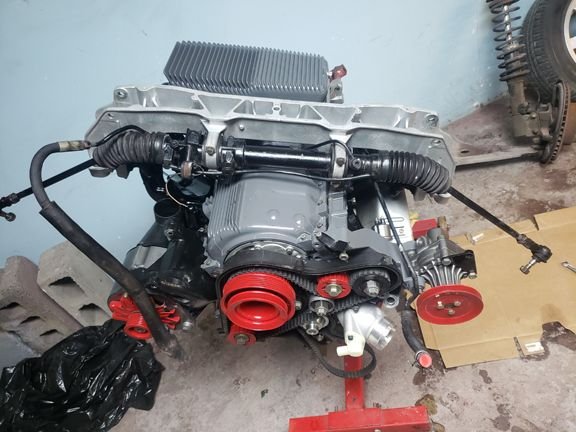
Meanwhile, I got the cam tower on and dropped the engine onto a dolly so I can Install.
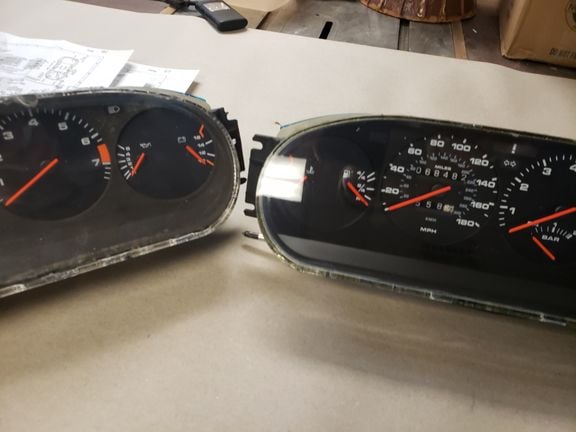
I had bought a 951 cluster so I can have the boost gauge. It, and my old cluster, had the same disease that the Thing had! I cleaned, repainted and polished it out.
Much better! Now I have to figure out all the wiring!
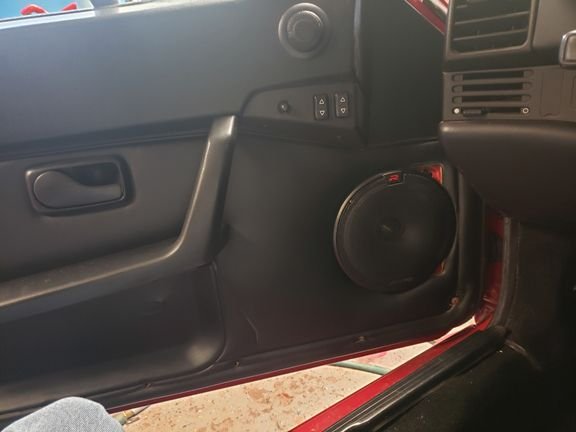
Since the door panels were off I went ahead and installed 6.5" comp. speakers. Not 100% sure on the final stereo configuration but I do know I need 6.5" in the front.
I went with the moveable tweeter mounts so I can point them where I want. You can see I am trying to figure out how to make all the computers fit. The alarm module on the S2 is huge compared to other 944's. You can see it on top of the KLR.
I think it looks good, with the door closed....
With the door open, not so much. At this point I am only doing what is necessary on the interior, when I get the car running I will start redoing the interior.
Had A hard time removing the clutch fork bearings.
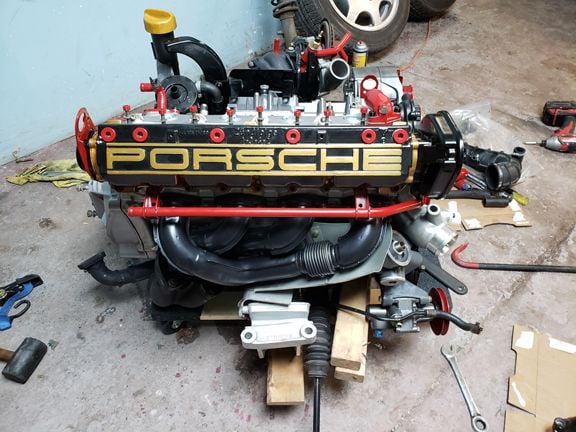
Got it done. Should have clutch installed, along with the engine, this weekend if I can get the flywheel resurfaced today.
Awesome. I always appreciate members like you who post in such detail. It's one thing to be focused on the work and another to think to take pics along the way.
I went to install the engine, did not go as planned. Short story - lifted front of car with cherry picker - rolled engine under car - was under passenger wheel well with hand on top of crossmember mount making final alignment - straps holding car up broke, trapping my hand between subframe and frame rail - took the only action available to me, lifted the car up with my back to free my hand.
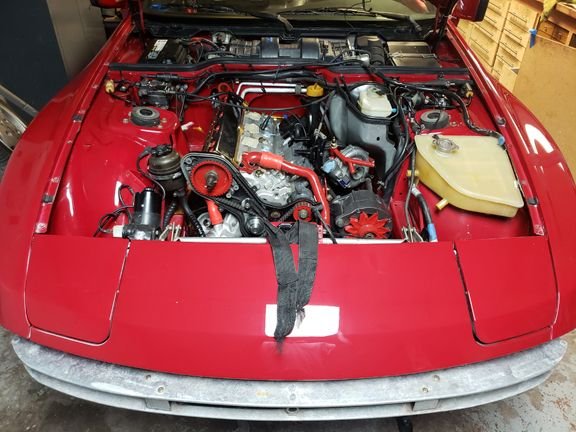
Here is picture of engine finally installed, along with the broken straps
Got lucky with the car. Here is a picture of paint scraped off the frame rail. This seems to be most of the damage.
I have been nursing my wounds for a bit so have not done a lot recently.
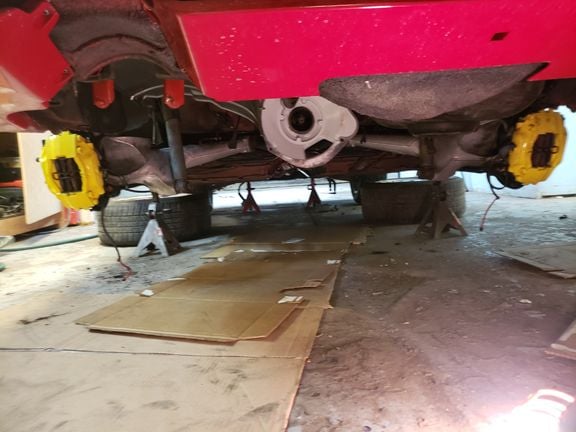
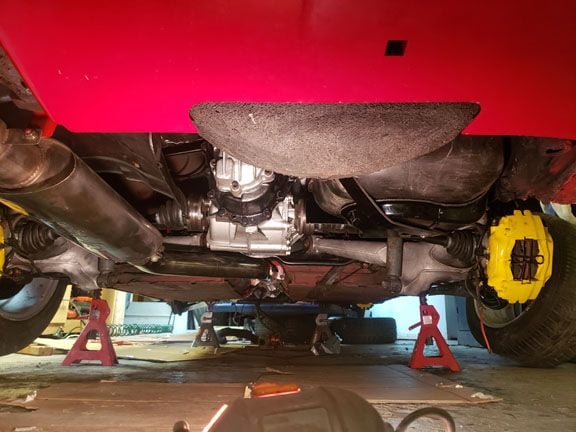
I did manage to remove the rear suspension and install the TT.
The TT is crooked in the tunnel which means I need to loosen the subframe and move it a little bit. For some reason I have been putting that off! It took me a while before I could watch the video of the car falling on me.
I finished the 997 seat mounts.
I had bolts welded to the plate to provide a mounting stud.
I was able to rewire the drivers seat and heater controls, fairly easy. I am working on the lumbar controls, not that easy for my pea brain! I think I have the six wires on the circuit board soldered correctly, now I have to figure out where they connect to the seat. If I figure it out I will post a how to ASAP otherwise I will never remember what I did.
Man....hope you hand is ok. You can always get another car.
Lesson learned - always inspect your lifting equipment and use softeners when using synthetic slings/straps on metal surfaces.
Thanks for the thought. I think the problem was cheap straps. They may have been compromised by other uses, but I think they were just cheap! I uses two, but looking at the video they stretched to two or three times the static length. ALWAYS have a backup strap!
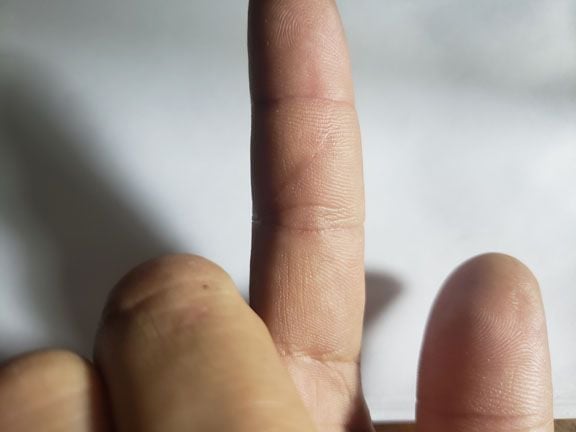
I got real lucky with my fingers. Another inch and the frame would have just cut my fingers off. I am mostly healed, as you can see from the picture below.
That finger was split (not cut) open diagonally from joint to joint from the pressure of the hit. Looking at it initially made me think of a song my father would play. The chorus went like this "You gotta have skin, to keep your insides in" My skin was not keeping my insides in! Healed up pretty good though. Knuckles still hurt.
Oh damn, hope your back is alright, get better soon.
Thanks. Initially I never noticed my back, pain in hand was overpowering everything else. The next day however...As you see in the video below, I noticed the hit I took on my back. When the car fell (no bumper) the corner of the fender landed in the middle of my shoulder blade. That left a big hole along with a 12" welt on my back from the impact of the wheel arch. Then the lifting of the car with my back strained several discs.
Since everyone enjoys watching people fail, here is the raw video of the install! Keep in mind the hood struts are new.
Dayum...you were extremely lucky it wasn't worse. Had that been me, I'm confident that my response would not have been as controlled as yours was (numerous f bombs and a plethora of other words I learned while in Uncle Sams Underwater Canoe Club).
Since everyone enjoys watching people fail, here is the raw video of the install! Keep in mind the hood struts are new.
OMG! Crazy video man. I jumped!
The "related thread" underneath popped up a picture of another lift method using chains... not sure where they are attached to--maybe wrapped around the frame rails?--but if I ever do this, I'll be thanking you for making me realize the danger. Thanks for filming & posting
I'm confident that my response would not have been as controlled as yours was
I was shocked at my lack of colorful words myself. Only thing I can think of is that nobody was there to hear my poetry so I did not bother?!
I jumped!
You think you jumped, I jumped.....actually I tried to jump but could not
Anyway here are some mechanical updates.
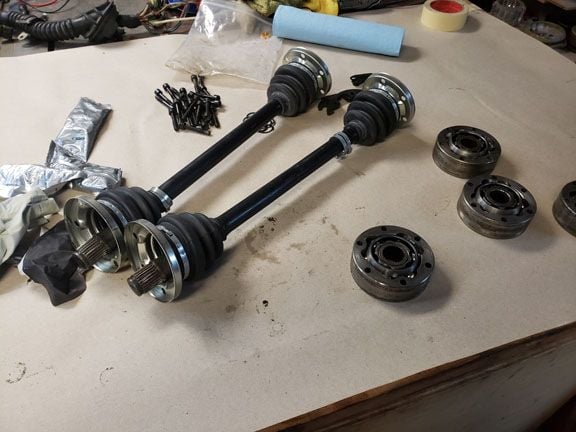
I rebuilt the axles
and installed the rear end
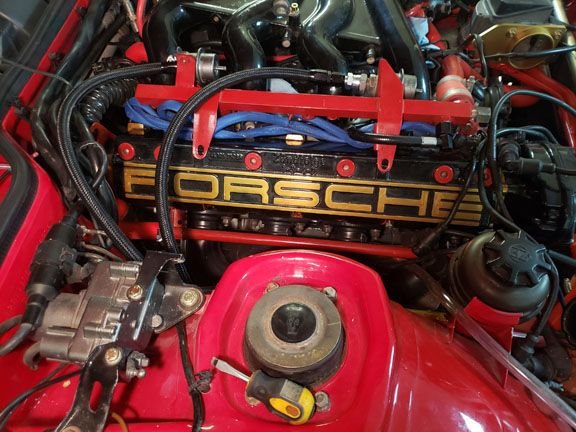
Finally got the rest of the coolant hoses and fuel lines in
Installed
Actually just mocked up. I reversed the damper so both hoses come from the left. The fuel system is now new from front to back, with the exception of the damper. Even replaced the injector wiring harness. I have a 3 bar regulator I will put in after I change chips. The damper is going to remain used until it breaks!
When I got the engine it came with a complete service history. The most common repair was "replace burst hose". This appeared from beginning to end. Over and over again. Looking at the factory hoses it seems obvious as they are the thinnest hoses I have ever seen. I think they are thin because of clearance issues a lot of the time. I replaced everything with the LR silicone hoses. Being thicker, the silicone hoses are very close fitting in some areas. I still have not done the heater hose, do not think it will fit.
I had already replaced the rear shift linkage with a short shift and linkage from only944 which removed all the slop back there. Unfortunately there was still a four or five inch range of motion in the shift lever from the slop up there. I took advantage of the holiday sale and got the front shift lever/bearings.
There is NO slop anywhere!!!
I initially bought all new clutch components, should have test fitted when I got them. Unfortunately the hard line from master on a S2 will not work, much less the line from a S2 cab! So had to get a hard line from a turbo. All brakes and clutch are now bleed. I will need to revisit the front brakes though. I had bought new lines front and back and ended up with a set for the bigger brakes. So I just installed the rear lines for now and need to order the proper front ones.
The biggest lesson I have learned from this project is to test fit and verify the component when it comes IN, not six months later when you can not return them.
I just spent the last couple hours writing up all the electrical changes just to get a message that it can not be posted because I took too long and the page expired!!!!!
Will repost in smaller sections when I get the time
WTF
MATING '91 CAR TO '86 ENGINE
Mechanical
Other then the obvious you will need a throttle cable and bracket from a turbo. You will also need clutch hard line from a turbo. The rest should be the same, more or less. You do want to double check your radiator. It has the extra port needed for the turbo engine, but check to make sure it is actually working. Someone checked and the radiator they had was plugged (there is a rubber plug covering it, you need to remove the plug and make sure there is actually a hole going into the radiator.)
Electrical
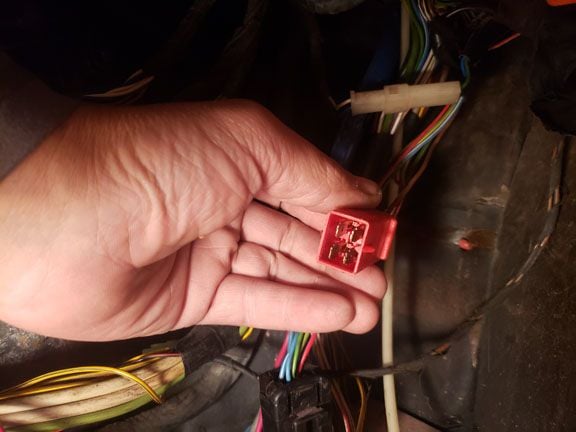
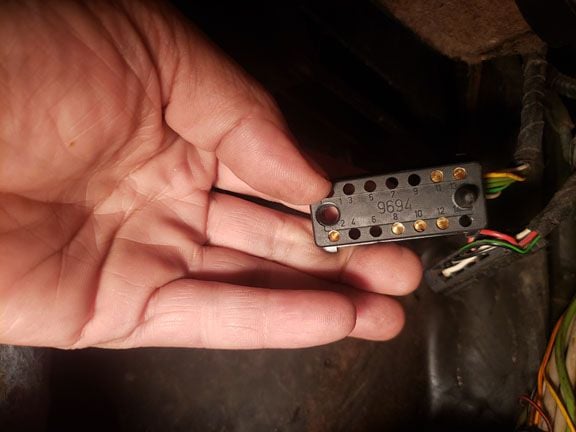
Need to deal with dme plugs in passenger footwell
red 4 pin plug
white 2 pin
black 2 pin
Black 2 pin not really used.
White two pin goes to altitude sensor. This is not used on the S2. I had one hanging around so I plugged it in, you can see it in the picture. Unfortunately with the extra wiring in the S2 I could not get it to bolt to the bracket and had to use zip ties.
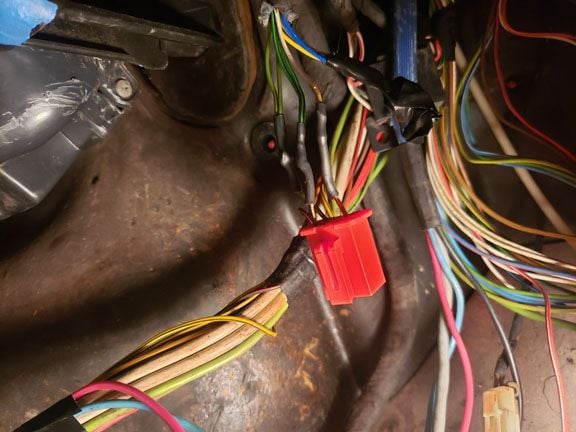
Red 4 pin (only '86) needs to connect to the flat 14 pin in the S2
On the red 4 pin, pin one is for fuel consumption gauge (I assume the gauge optional to replace boost gauge), pin 2 goes to tach and 3 and 4 are for boost gauge. I got the other side of the red connector and took apart the S2 14 pin plug.
I connected pin 2 green/black wire to pin 2 of the red plug. Note there are two green/black wires there. One goes to the gauge and the other goes to the diagnostic plug.
Now I needed to get the boost gauge signals over to the gauges. I took the white/yellow wire in pin 8 (14 pin S2 footwell connector) and put it into pin 3 of the red plug. This wire is connected to the oil level idiot light which is not used on the '86. It goes to pin 15 plug A (cluster). I removed it and put it into pin 1 plug A (cluster). (this will cause problems we will deal with in a minute)
I then took the green wire from pin 11 (14 pin S2 footwell connector) and attached to pin 4 of the red 4 pin connector. This normally goes to plug c pin 6 (cluster) and is used for the check engine light. Again not used on '86. I moved this to plug A pin 2 (cluster).
Since we removed the oil idiot light wire the light will now come on along with the [!] light. To fix this we need to ground plug A pin 15. So I removed the brown/blue wire from A 16 and put it into A 15. This wire is normally for the trailer blinkers, since I am not towing with this car it is not needed.
 08-22-2019, 10:57 PM