944 Rear Hatch Reseal Step By Step Guide
 02-14-2020, 05:30 PM
#16

The posts here have got me pretty worried. I REALLY like the way this turned out and do not want to have to do it again, so there has GOT to be a better way to setup this hatch than the struts that force it apart.
Now I'm looking at 10" linear actuators.
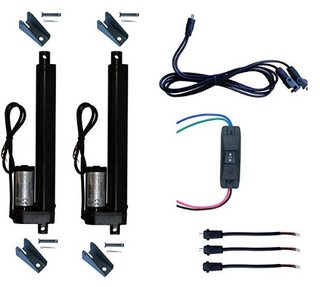
I think a pair of these on each side would work well since they are the same length compressed as the stock struts. They would be ~1" shorter extended which shouldn't make much of a difference. The only issues I can see are needing to wire in some kind of cutoff switch and maybe a spring or electric popper to make sure the motors don't start until the latches release... I think I could figure that out. Does anyone have an working solutions.
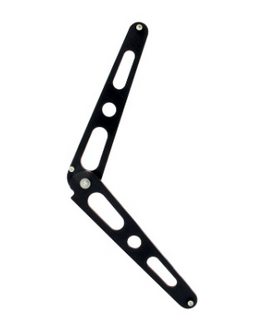
Maybe I could reorient the pistons so they mount to the car near the back? I would need longer pistons and they would get in the way of access. Or maybe some kind of cantilever bracket that changes the direction of the piston force the the hatch?
Other idea would be to just give up on it ever opening automatically and put in a mechanical hood prop:
Someone with more engineering skills than myself has got to have figured this out.
Now I'm looking at 10" linear actuators.
I think a pair of these on each side would work well since they are the same length compressed as the stock struts. They would be ~1" shorter extended which shouldn't make much of a difference. The only issues I can see are needing to wire in some kind of cutoff switch and maybe a spring or electric popper to make sure the motors don't start until the latches release... I think I could figure that out. Does anyone have an working solutions.
Maybe I could reorient the pistons so they mount to the car near the back? I would need longer pistons and they would get in the way of access. Or maybe some kind of cantilever bracket that changes the direction of the piston force the the hatch?
Other idea would be to just give up on it ever opening automatically and put in a mechanical hood prop:
Someone with more engineering skills than myself has got to have figured this out.
 02-14-2020, 05:59 PM
#17
Intermediate
Excellent! I'm looking to do the same in the future and this is helpful. When I bought the car, previous owner had removed the struts and I should have known better. First time I tried to install them back, the window lifted from the frame.
02-14-2020, 08:25 PM
#18
Rennlist Member
I wonder if the DIY job might last longer if weaker struts are used? I'm thinking weaker struts might reduce the horizontal forces pulling the frame from the glass. I replaced the OEM struts in my 931 with those of a '90s Cherokee and while I don't have a push-button release like 944s, it lifts up slowly and goes down with ease.
03-04-2020, 11:18 AM
#20
Rennlist Member

Rennline makes a product that, while not for the 944, is an intriguing solution to the problem: https://www.rennline.com/Rennline-Fu...ductinfo/E187/
I don't know what it would take to get something like this for the 944 hatch but it seems like the right concept. My rear hatch leaks and I anticipate having to address this at some point.
eshane speaks from long time experience, and I believe everything he says about what's been observed in the field. That said, this still boils down to getting the right chemistries in the adhesive and paint. After all, the thing you're trying to reattach (the hatch glass) is a silicate. I wonder if part of the issue in the delamination process isn't coming from the frit paint and the adhesive. If I understand the problem correctly, the trick would be to find something that adheres well to both aluminum oxide and silicon oxide and find a different way to make things look pretty (the frit part of things).
The other thing that you can try in order to activate the surface would be something like hydrogen peroxide, if you're worried about getting enough adhesion on something that has seen silicones. It's probably a bit of a pain in the butt, but that should be pretty good for producing a good number of active sites on a silicone contaminated surface. If you could get really crazy with available equipment, an oxygen plasma treatment would produce a good number of adhesive sites on the surface.
I'm just thinking out loud here.
03-04-2020, 02:00 PM
#21
Three Wheelin'
GPA951s in an older posting, thttps://bit.ly/37qJVKr, you wrote that you "made my rear hatch for the racecar out of Dupont Marklon ... I drilled though the frame and pop-Riveted it.... 2 years now no issues".
Is this the the rear hatch job you are referring to now?
Could you post any photographs of the pop-riveting?
Is this the the rear hatch job you are referring to now?
Could you post any photographs of the pop-riveting?
03-04-2020, 02:05 PM
#22
Racer
Join Date: Oct 2003
Location: Palm Beach, FL / Hamburg, DE
Posts: 418
Likes: 0
Received 9 Likes
on
9 Posts
Rennline makes a product that, while not for the 944, is an intriguing solution to the problem: https://www.rennline.com/Rennline-Fu...ductinfo/E187/
One approach would be to use lower force struts for the rear hatch. Sachs SG214008 (no association) have been recommended by many. (Received but not yet installed.)
03-04-2020, 03:39 PM
#25
Drifting
There's something I don't understand: the struts are attached to the frame holding the glass, not the glass itself. How can the struts push the glass rearward out of the frame?
Mine isn't leaking... but has started squeaking when warm out. My hatch has never gone up by itself after pushing the button (ok, maybe a handful of times over the years) yet easily goes up with a little hand-lift. I hope the squeaking is hatch fit or pins and not this delamination.
Can you tell the delimination by looking at it? Anyone got a pic?
03-04-2020, 04:30 PM
#26
Nordschleife Master
As for spotting the de-lamination well that usually is the case when it leaks and you see droplets of water on the inside of the hatch near the top. Also, if you look at the top edge of the glass you will see tiny indentations which is where Securit supported the hatch when it was being hardened. The indentations are usually 3-5mm from the frame. Another sign of de-lamination is when the indentation-frame gap grows bigger. You can also check by opening the hatch and pulling rearward on the two hatch pins while a helper looks for signs of separation at the top.
03-04-2020, 06:04 PM
#27

Mine lasted a year after re-seal.. 3m.. Never again... There is just not enough surface area of the frame to hold.. I will try again with a different adhesive... It was really nice having the hatch work for at least one year.. Worked so well the inside button worked... Bummer.
1) (as mentioned before) if silicon has previously been used to try and seal the window, you might as well throw the glass away, it won't hold no matter what you do. I have yet to find a cleaner or prep solution that works to make a silicon'd glass adhere to the hatch
2) In addition to the 3-M Window Weld adhesive, there are actually two different 3-M primers required. One is for the glass, the other is needed to prep the hatch frame (both made by 3-M and referenced in the product instruction sheets). This is the real key to making the repair last, it makes a huge difference.
3) I'd strongly suggest remounting the hatch frame on the car before applying the adhesive, as that will make sure its properly aligned with the body once the glass is back in place. Its possible to get the glass misaligned on the frame so that it doesn't fit quite right when doing it with the frame off the car, and this will cause both short term and long term problems.
4) A power caulk gun is *really* nice to have when applying the adhesive unless you have GI Joe Kung Fu grip. Assuming you don't have a power gun (most folks don't and I wouldn't buy one just for this project), get a second tube of adhesive and a second typical hardware store caulk gun with a buddy to help you. Both start at the middle top of the frame and each person works down their side of the car and try to meet in the middle of the bottom of the frame. Use plenty of adhesive, you do not want to go sparingly.
5) Once you have the glass back on the car and positioned, a couple of pieces of blue masking tape (two on each side) taping it down to the body will do the trick, leave it 24 hours and it will be cured plenty well.
6) I suggest a strip of black paint on the outside of the glass at the top edge where the adhesive is visible through the glass as that helps protect it from UV.
I've done this procedure a number of times for various hatches, and the one on the Sherman (the 951 that I sold to Ben) was done back in 2003 and is still holding strong. I know of at least two other hatches that I did around the same time that are still holding as well.
The following users liked this post:
Karl_W944 (03-05-2020)
03-04-2020, 06:32 PM
#28
Rennlist Member
=13pxI've done this procedure a number of times for various hatches, and the one on the Sherman (the 951 that I sold to Ben) was done back in 2003 and is still holding strong. I know of at least two other hatches that I did around the same time that are still holding as well.
03-04-2020, 07:22 PM
#29
I’d be willing to bet in all those cars, none of them used the correct hatch frame primer. The hatch frame prep is the key, if you strip the finish down to bare metal, you have to use an aluminum primer, paint it and then use the 3-M primer. Ideally, you try to leave the original finish on the hatch (way easier said than done) and then just use the correct 3-M primer.
I'll absolutely guarantee that if you follow the correct process, the hatch glass will hold for many years. Come to KC and I'll show you proof.
I'll absolutely guarantee that if you follow the correct process, the hatch glass will hold for many years. Come to KC and I'll show you proof.
The following users liked this post:
d4vid (04-29-2024)
03-05-2020, 08:22 AM
#30
Three Wheelin'
1) Its Flimsy and needs the re-enforcement in the middle. hence the aluminum channels running down the back of mine.
2) You would have to use butyl or some sort of sealer on it, All I did after I put mine together was put some flat black Vinyl that I picked up from a shop nearby. ( This hides the rivets and provide a water seal)
I just snapped this pic last night but it is the only spot where the rivets actually show.
