Monster Volvo fan installation
 02-11-2013, 05:09 PM
#1
Rainman
Rennlist Member
Rennlist Member
Thread Starter
Hi all,
Before telling about the installation of the fan, figured you could use some backstory as to why I did this.
As you may know I am in the midst of a supercharger project, visible in my avatar, that has been several years in the making. Well, in December I got most of it knocked out (only remaining thing to work out is intake plumbing to supercharger). As you are aware, projects tend to snowball into other parts. I wanted to keep AC with the supercharger installed, but with a lack of room on the driver's side of the engine with the orientation of the blower I chose, that forced me to relocate the alternator to the passenger side of the engine in place of the power steering pump. (You can see that in this thread Click me)
To fit the alternator over there, I had to cut the lower radiator hose slightly to pull it away from the alternator pulley. In doing so, the hose was pulled into the passenger side cooling fan blade which nicked the hose and wore down the edge of the fan blades. Unplugging that fan caused me to run hot in traffic with only the driver's side fan operational. With that I decided it was time to use a different fan.
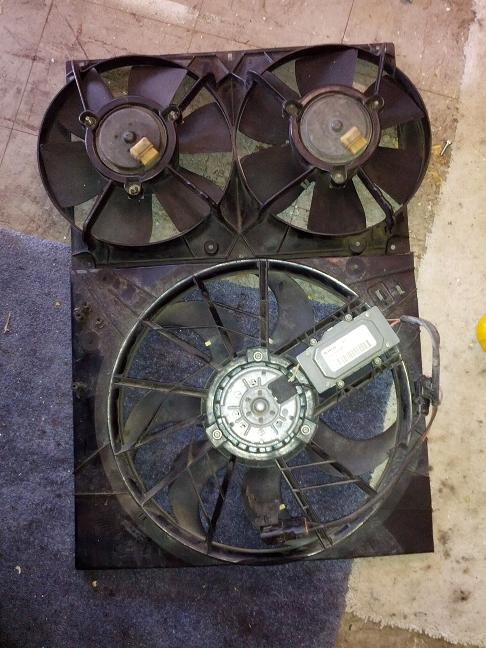
The fan in question is off an early 2000's Volvo S80. It appears to be used on the various XC models as well, meaning it is intended for turbocharged 5 and 6 cylinder engines and even a 4.4L V8 producing in excess of 300HP. The blade itself is about 16.5" in diameter, compared to the Porsche's 11" dual fans.
The installation of this fan is actually pretty simple. The Volvo fan shroud is ~24x17" and has various brackets coming off it for mounting.

I cut off all the ears and roughly 4" off the longer side of the shroud to make it fit the 944 radiator, as you can see here compared to the stock Porsche fans.
The fan from furthest motor point to front of blade is only 3" deep. The shroud is about another inch or so. Since part of the shroud was cut off, some 1x1x1/16" angle aluminum works nicely to close the gap and provide a new mounting surface. (attached picture #1)
I have a piece of 2" angle as the bottom of my rad frame, so I used more of the 1" to attach the fan shroud to the rad frame. I'd suggest you do something similar. (attached picture #2, you can also see my ghetto-rigged "air duct" made out of a Cheez-it box painted black and cut to fit, along with the lower frame that holds up my intercooler. When I finish the supercharger there will be nicer ducting from metal or fiberglass sheet )
)
For the top mount, I used some simple brackets I found at the Home Depot and some extra Porsche radiator speed nuts. I cut off one of the legs of the bracket, then used the OEM Porsche screw to attach the bracket to the 944 radiator, then another screw of the same size to attach the shroud to that bracket. (attached #3-7)
Now, the fan is still slightly taller than my radiator and 2" lower frame, so I used a piece of plastic to block off the front of the shroud there from oncoming air flow. The shroud is deep enough that air from the radiator can travel to the bottom edge of the fan to escape there. With a 951 radiator installed it will be just right (the distance sticking down is the same as the height difference of 944/951 radiators). My car has 215/60/15 tires at proper pressure, and Weltmeister 200# lowering springs (about 1" lower than stock) and the bottom of the shroud still has 4.25" clearance from the ground.
With the fan mounts done, you can check your clearances. My radiator is probably slightly closer to the engine than a factory car due to my front frame structure, but there is still about 1/2" to the PS pulley and plenty of room to the AC compressor, etc. (attached #8-10)
For wiring, you remove the Volvo control box on the fan (a few small Torx screws) and cut the wires coming out of the motor. I have attached a rough wiring diagram to show how I did it. Very easy. Wiring it with the Porsche plug has advantages - factory-style fan control (via thermoswitch, with a resistor it would be possible to make this a 2-speed operation like stock) and the resistance of the relay coil means the Porsche fan wiring is now only carring about 150mA current. Even with a direct power line to the battery the Volvo fan doesn't seem to draw any more current than the pair of Porsche fans would.
Overall this was a pretty straightforward modification and after a 30-minute test drive all around town, up hills in high gear etc the temperature gauge never got much past the first mark. While sitting at a light, the needle crept above the first hash and the fan clicked on, and within 5 seconds it was well down again. You can feel the air being sucked in through the bumper, through 2 oil coolers, a 3" intercooler, an AC condenser and my radiator. Nice. See video below for sound of it running too.
Before telling about the installation of the fan, figured you could use some backstory as to why I did this.
As you may know I am in the midst of a supercharger project, visible in my avatar, that has been several years in the making. Well, in December I got most of it knocked out (only remaining thing to work out is intake plumbing to supercharger). As you are aware, projects tend to snowball into other parts. I wanted to keep AC with the supercharger installed, but with a lack of room on the driver's side of the engine with the orientation of the blower I chose, that forced me to relocate the alternator to the passenger side of the engine in place of the power steering pump. (You can see that in this thread Click me)
To fit the alternator over there, I had to cut the lower radiator hose slightly to pull it away from the alternator pulley. In doing so, the hose was pulled into the passenger side cooling fan blade which nicked the hose and wore down the edge of the fan blades. Unplugging that fan caused me to run hot in traffic with only the driver's side fan operational. With that I decided it was time to use a different fan.
The fan in question is off an early 2000's Volvo S80. It appears to be used on the various XC models as well, meaning it is intended for turbocharged 5 and 6 cylinder engines and even a 4.4L V8 producing in excess of 300HP. The blade itself is about 16.5" in diameter, compared to the Porsche's 11" dual fans.
The installation of this fan is actually pretty simple. The Volvo fan shroud is ~24x17" and has various brackets coming off it for mounting.
I cut off all the ears and roughly 4" off the longer side of the shroud to make it fit the 944 radiator, as you can see here compared to the stock Porsche fans.
The fan from furthest motor point to front of blade is only 3" deep. The shroud is about another inch or so. Since part of the shroud was cut off, some 1x1x1/16" angle aluminum works nicely to close the gap and provide a new mounting surface. (attached picture #1)
I have a piece of 2" angle as the bottom of my rad frame, so I used more of the 1" to attach the fan shroud to the rad frame. I'd suggest you do something similar. (attached picture #2, you can also see my ghetto-rigged "air duct" made out of a Cheez-it box painted black and cut to fit, along with the lower frame that holds up my intercooler. When I finish the supercharger there will be nicer ducting from metal or fiberglass sheet
)For the top mount, I used some simple brackets I found at the Home Depot and some extra Porsche radiator speed nuts. I cut off one of the legs of the bracket, then used the OEM Porsche screw to attach the bracket to the 944 radiator, then another screw of the same size to attach the shroud to that bracket. (attached #3-7)
Now, the fan is still slightly taller than my radiator and 2" lower frame, so I used a piece of plastic to block off the front of the shroud there from oncoming air flow. The shroud is deep enough that air from the radiator can travel to the bottom edge of the fan to escape there. With a 951 radiator installed it will be just right (the distance sticking down is the same as the height difference of 944/951 radiators). My car has 215/60/15 tires at proper pressure, and Weltmeister 200# lowering springs (about 1" lower than stock) and the bottom of the shroud still has 4.25" clearance from the ground.
With the fan mounts done, you can check your clearances. My radiator is probably slightly closer to the engine than a factory car due to my front frame structure, but there is still about 1/2" to the PS pulley and plenty of room to the AC compressor, etc. (attached #8-10)
For wiring, you remove the Volvo control box on the fan (a few small Torx screws) and cut the wires coming out of the motor. I have attached a rough wiring diagram to show how I did it. Very easy. Wiring it with the Porsche plug has advantages - factory-style fan control (via thermoswitch, with a resistor it would be possible to make this a 2-speed operation like stock) and the resistance of the relay coil means the Porsche fan wiring is now only carring about 150mA current. Even with a direct power line to the battery the Volvo fan doesn't seem to draw any more current than the pair of Porsche fans would.
Overall this was a pretty straightforward modification and after a 30-minute test drive all around town, up hills in high gear etc the temperature gauge never got much past the first mark. While sitting at a light, the needle crept above the first hash and the fan clicked on, and within 5 seconds it was well down again. You can feel the air being sucked in through the bumper, through 2 oil coolers, a 3" intercooler, an AC condenser and my radiator. Nice. See video below for sound of it running too.
Last edited by V2Rocket; 02-11-2013 at 05:48 PM.

 02-11-2013, 07:01 PM
#3
Rainman
Rennlist Member
Rennlist Member
Thread Starter
it is huge, but the nice thing is that you can trim the shroud down a good bit to bring it about an inch closer to the radiator. also, now there is space between the fan and the sides of the radiator, which is where i mounted the relay for the fan
02-12-2013, 11:30 AM
#5
Rennlist Member
this is pretty good. I was thinking of running a SPAL fan, but this looks like a good idea. nice job and good write up. How much was the fan?
02-12-2013, 12:04 PM
#6
Rainman
Rennlist Member
Rennlist Member
Thread Starter
$20 fan + $2 relay
fuse holder and a few fuses was another $3, aluminum $5, maybe $5 worth of wire...
Trending Topics

 Has your top speed increased from the forward thrust is provides?
  02-12-2013, 05:49 PM
#11
Rainman
Rennlist Member
Rennlist Member
Thread Starter
you can hear the sound it makes in the video above. it might be louder than stock fans but that might be because it is running on a single speed for now. i might wire it up to have dual speeds like the factory fans which should quiet it down on low setting.
02-12-2013, 06:45 PM
#13
Rainman
Rennlist Member
Rennlist Member
Thread Starter
Nope. I go to the local boneyards every week or so and so the inspiration was all there. Not to mention this turned out to be 1/5 the price of their stuff and will likely last longer. Don't underestimate OEM quality for most stuff.
10-29-2014, 10:11 AM
#15
Rainman
Rennlist Member
Rennlist Member
Thread Starter
Yes this is lighter than stock since there is only one motor versus two.
I don't know the weight offhand but if you really want it I can weigh my spare assembly.
I don't know the weight offhand but if you really want it I can weigh my spare assembly.