
Warped glove box lid repair on OB with leather option
 05-29-2019, 04:31 PM
#1
Racer
Thread Starter
Join Date: Apr 2009
Location: Indianapolis
Posts: 288
Likes: 0
Received 0 Likes
on
0 Posts
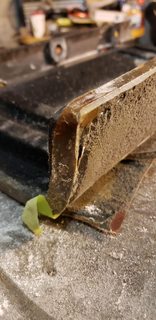
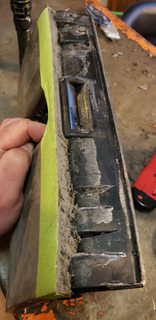
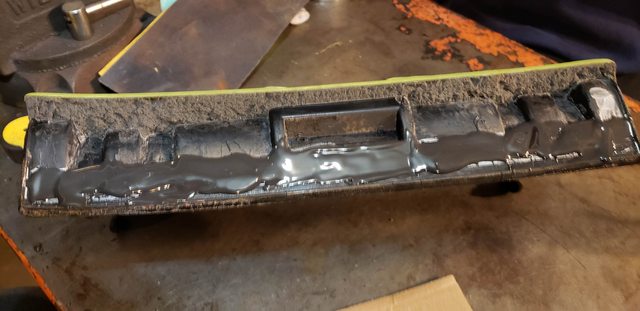
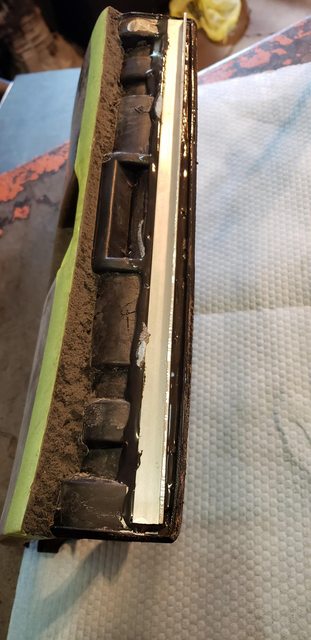
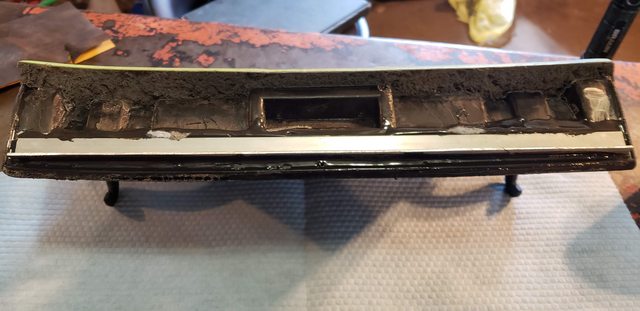
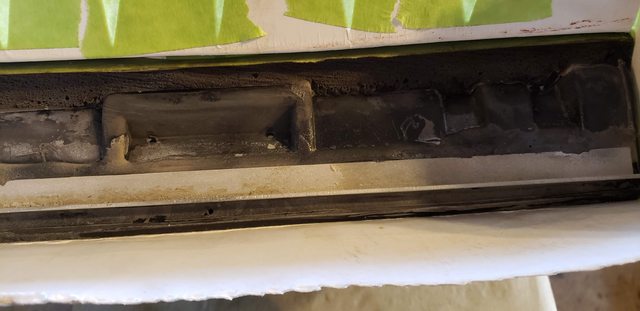
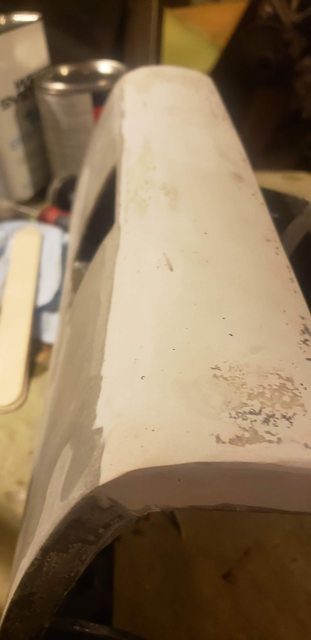
Hey all long time no post or thread. I'm doing some interior work for a friend/customer. Per usual with time on this '84 the leather shrunk and needed reupholstered. After disassembly and removing the original leather I was frustrated to find the glove box lid itself didn't fit flush with the dashboard. The left and right edge at the top shrunk and opened up a gap, as well it bowed out towards the rear (like curled back). The door was built more or less as a plastic frame, then had injection molded foam applied, and finally was coated in a hard clear coating. I believe, but don't know, that the original coating was polyester resin which may explain the shrinking with time and heat.
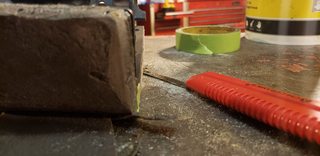
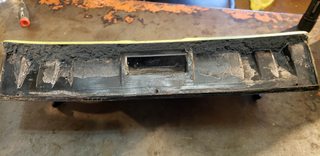
Here is the original coating being pealed back:

And the broken down foam:
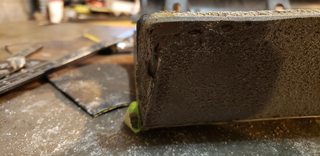
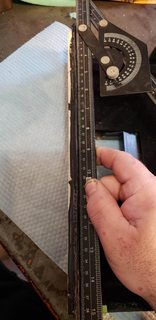
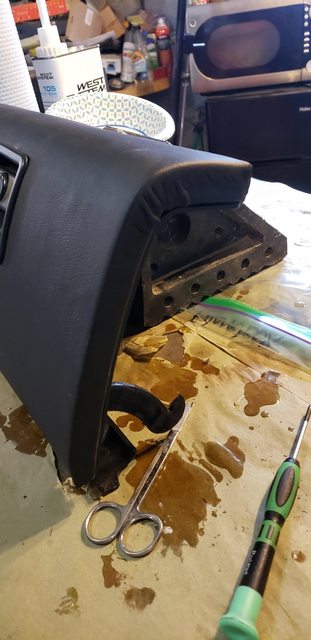
Here a couple poor shots of how warped it is:
More on the way...
Here is the original coating being pealed back:
And the broken down foam:
Here a couple poor shots of how warped it is:
More on the way...
 05-29-2019, 04:38 PM
#2
Racer
Thread Starter
Join Date: Apr 2009
Location: Indianapolis
Posts: 288
Likes: 0
Received 0 Likes
on
0 Posts
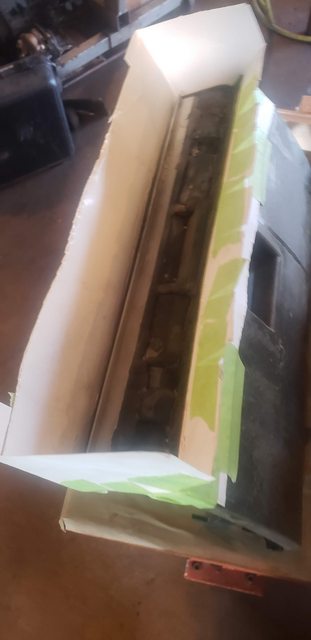
Now take a deep breath and ruin it completely:
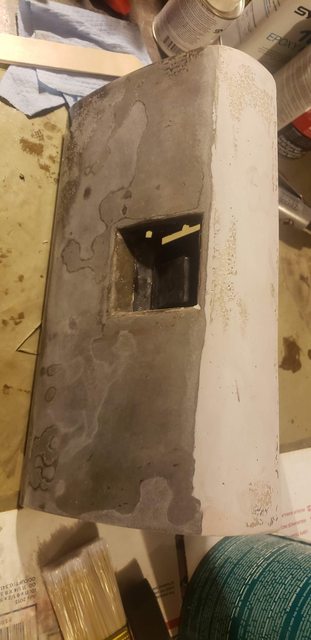
I sandblasted the surface for the coming work. It's worth noting just cutting the old epoxy and foam off let the plastic relax closer to the correct shape.
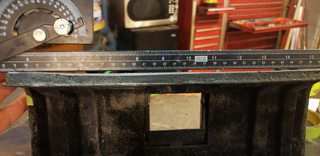
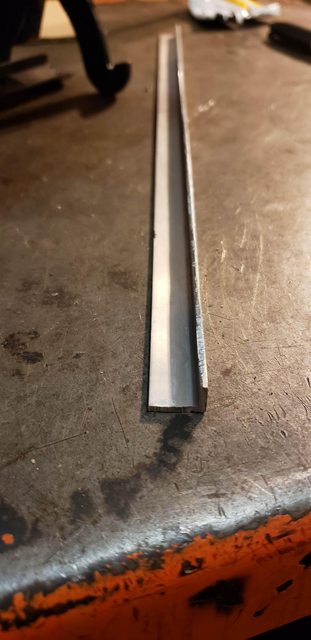
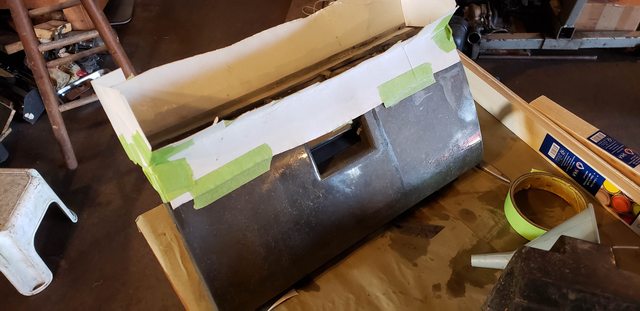
Next I used a 1/4" 1/4" piece of aluminum angle and JB Weld epoxy to pull the housing straight and reinforce it:

I sandblasted the surface for the coming work. It's worth noting just cutting the old epoxy and foam off let the plastic relax closer to the correct shape.
Next I used a 1/4" 1/4" piece of aluminum angle and JB Weld epoxy to pull the housing straight and reinforce it:
05-29-2019, 05:05 PM
#3
Racer
Thread Starter
Join Date: Apr 2009
Location: Indianapolis
Posts: 288
Likes: 0
Received 0 Likes
on
0 Posts
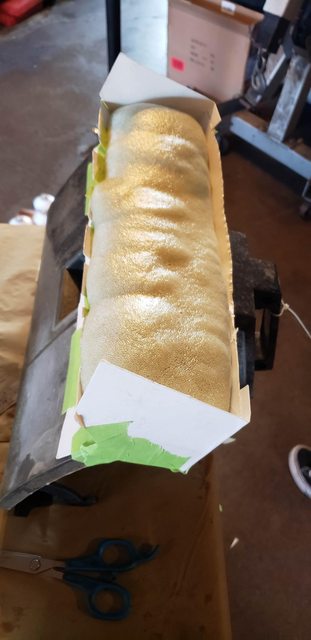
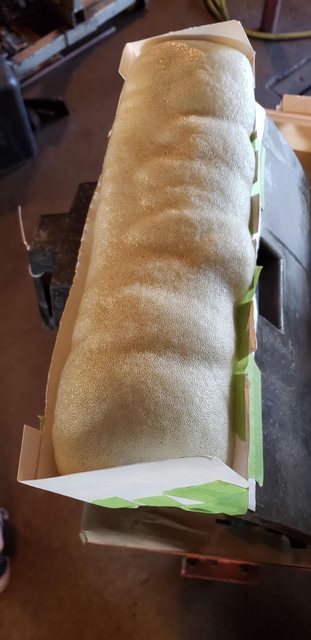
Now if you're a complete lunatic try building it back up with expanding foam from a hardware store:
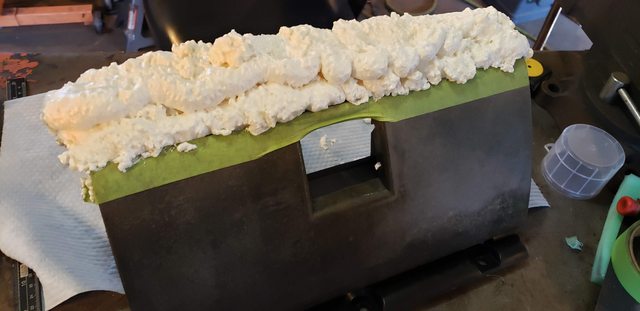
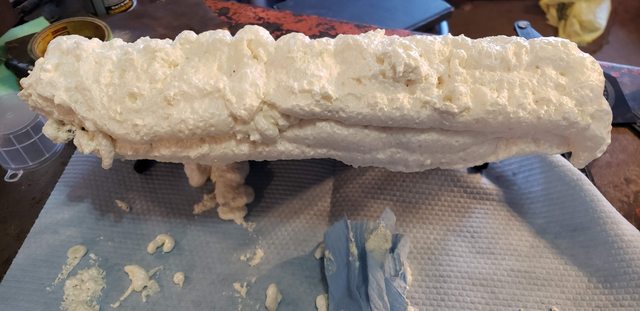
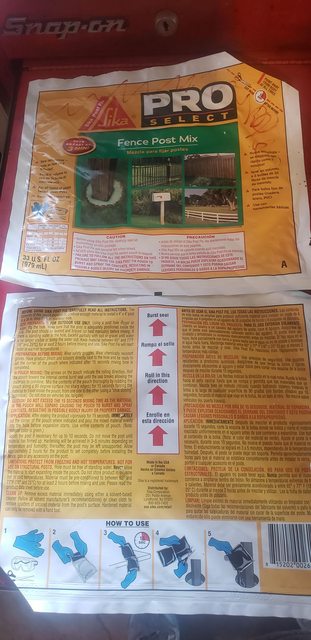
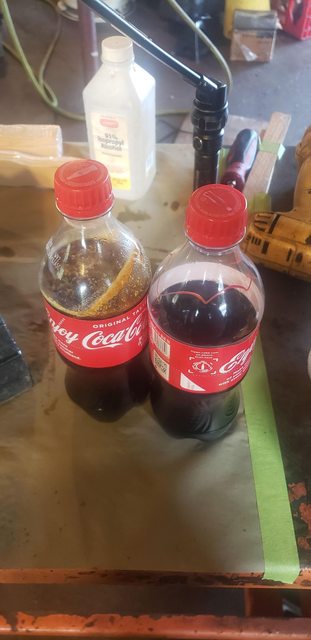
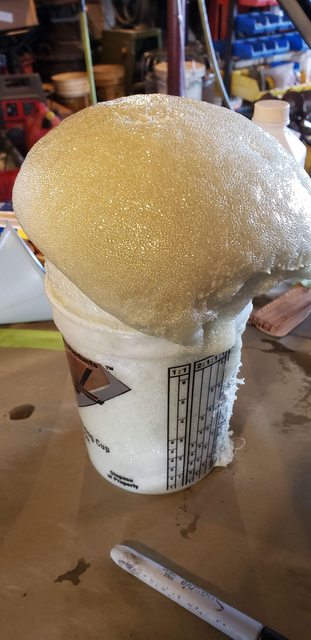
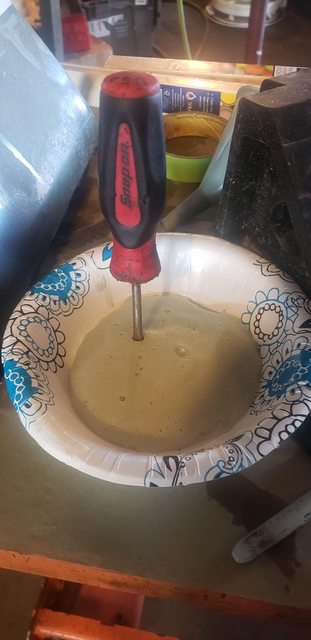
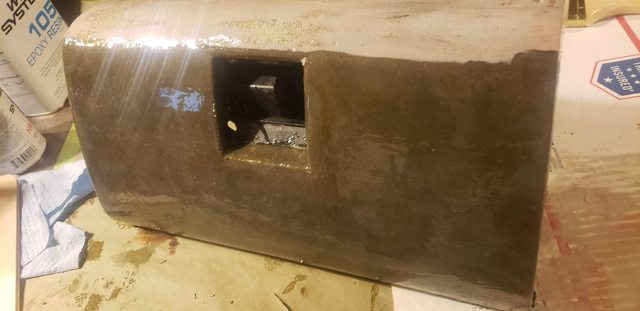
That turned out way too porous and just didn't work for me...so I cut it off and started over. This time I wanted some higher density two part polyurethane foam I could pour in to control the porosity better. The easiest way I found to buy it in a reasonable quantity is to purchase a bag from the local home improvement store for cutting fence posts. When the internal seal is broken this stuff can make a HUGE mess in a hurry. I cut the corners instead and carefully poured the contents into a couple old 20oz coke bottles to dispense only what I thought I need.
My fiance and I built a form from heavy cardstock and got this:
This:
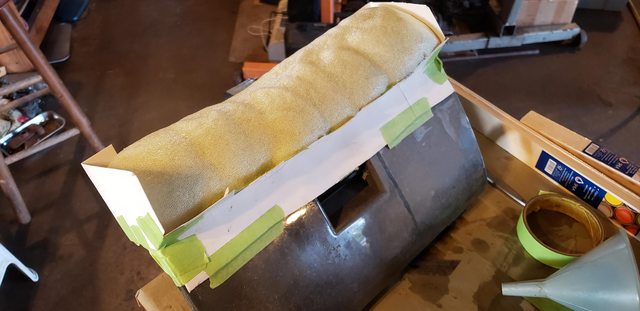
And this:

A little of that left over (looks like a brain or something):
That turned out way too porous and just didn't work for me...so I cut it off and started over. This time I wanted some higher density two part polyurethane foam I could pour in to control the porosity better. The easiest way I found to buy it in a reasonable quantity is to purchase a bag from the local home improvement store for cutting fence posts. When the internal seal is broken this stuff can make a HUGE mess in a hurry. I cut the corners instead and carefully poured the contents into a couple old 20oz coke bottles to dispense only what I thought I need.
My fiance and I built a form from heavy cardstock and got this:
This:
And this:
A little of that left over (looks like a brain or something):
05-29-2019, 05:10 PM
#4
Racer
Thread Starter
Join Date: Apr 2009
Location: Indianapolis
Posts: 288
Likes: 0
Received 0 Likes
on
0 Posts
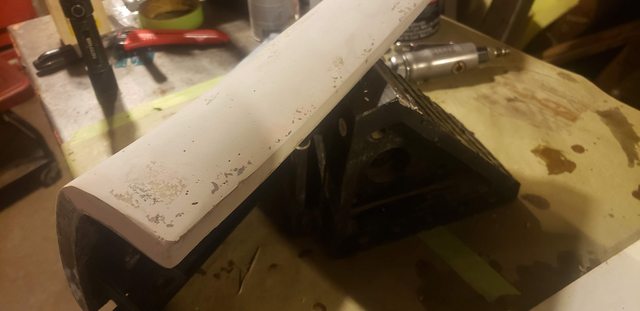
The foam dries pretty strong:
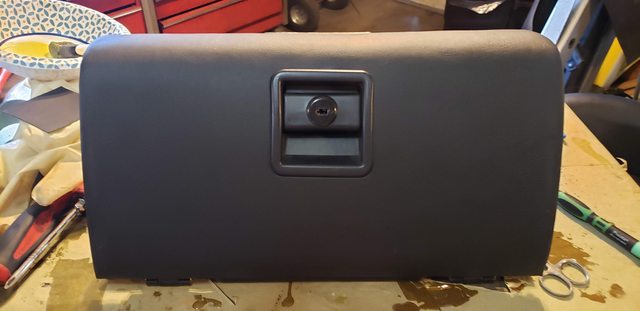
It still needs to be hardened. We applied West Systems two part epoxy to the surface, followed by a couple rounds of light Evercoat filler, then another epoxy round to seal it in. The epoxy is important because I use (and highly recommend) Weldwood HHR to bond the upholstery on, and it will rip the foam off if not coated first.
It still needs to be hardened. We applied West Systems two part epoxy to the surface, followed by a couple rounds of light Evercoat filler, then another epoxy round to seal it in. The epoxy is important because I use (and highly recommend) Weldwood HHR to bond the upholstery on, and it will rip the foam off if not coated first.
 05-30-2019, 01:42 AM
#6
Rennlist Member
Beauteous!
Fyi - expanding foam of every density is available from Smooth-On dealers like Reynolds locally. Looks like you got it right and cheaply. I used a similar technique to build up and shape the airbag door for my dash recovering project.
Nice work.
Fyi - expanding foam of every density is available from Smooth-On dealers like Reynolds locally. Looks like you got it right and cheaply. I used a similar technique to build up and shape the airbag door for my dash recovering project.
Nice work.
05-30-2019, 07:13 AM
#7
Pro

Very nice!
I'll have to keep this method of repair in mind...
I'll have to keep this method of repair in mind...
Trending Topics
05-30-2019, 09:12 AM
#8
Racer


This might be a silly question (I'm loaded with them) BUT,,, is there a good place folks here have learned to source vinyl for these machines where they are aware of our colors? I need a few lenghs...
05-30-2019, 04:32 PM
#9
Racer
Thread Starter
Join Date: Apr 2009
Location: Indianapolis
Posts: 288
Likes: 0
Received 0 Likes
on
0 Posts
Thank you for the kind words. I use www.globalupholstery.com. They have oem carpet and backing material as well. I rehabbed a set of carpet recently and plan to make a thread on that. Another tip I forgot about...the vinyl is stretchable in one direction only. If I had cut the section from my roll 90 degrees off what I did it could have stretched while being applied top to bottom and made less puckering on the side where it "rounds the bend".
05-30-2019, 06:09 PM
#11
Rennlist Member

Could that be used in repairing and recovering our dashes and pods?
05-30-2019, 06:13 PM
#12
Racer
Thank you for the kind words. I use www.globalupholstery.com. They have oem carpet and backing material as well. I rehabbed a set of carpet recently and plan to make a thread on that. Another tip I forgot about...the vinyl is stretchable in one direction only. If I had cut the section from my roll 90 degrees off what I did it could have stretched while being applied top to bottom and made less puckering on the side where it "rounds the bend".
It's been like 2-3 years that I have turned into the restoration of 4 amazing machines. XJS, XK8 Jaguars, the 928, and now the bike and I just can't get enough. Pretty new for me and my learning curve is huge. It's posts like this that teach me what I need to know. So yeah, thank you!
I'll be calling these folks. 86 Prussian Blue 928 interior. Needs lots of tucks and folds. Ont etc interesting thing about the vinyl... I will have some stretching to do. Can you say a bit more about direction? What's "90degrees off"?
Last edited by JayPoorJay; 05-30-2019 at 07:03 PM.
05-31-2019, 01:08 AM
#13
Rennlist Member
For filling cracks, I am using original red can Plastic Wood, low tech as it is. The cracks just need to be filled. There is no demand on them beyond being nice and flat since the foam underlayment and the leather skin are absorbing all the stress. I used Bondo on my test dash and it was WAY too hard - hours to sand.
Summary: The OP did a very similar job as my airbag door and the expanding foam works great for that. For filling cracks, Plastic Wood Red I think will be the bomb.
06-01-2019, 02:00 PM
#14
Racer
Thread Starter
Join Date: Apr 2009
Location: Indianapolis
Posts: 288
Likes: 0
Received 0 Likes
on
0 Posts
A couple quick follow up notes. When vinyl is manufactured and wound onto rolls (think like a printing press almost) it will be stretchy lengthwise (the direction it's rolled) and not very stretchy in the other direction. You can grab a small sample at the end and feel it. Window tint works the same way. JoAnn fabrics locally actually carries some great quality black vinyl I also like. If it has a woven backing it won't stretch the same. I haven't tried the other filler, but in my experience Bondo brand filler is not my favorite. The lightweight Evercoat filler works pretty good. Then again, I also do body work and have the associated tools so sanding is pretty easy here. Good tip on looking for a local Smooth-On dealer.
Anyone interested in using Alcantara, which is now only available in black unless you have some stockpiled , comes in Panel and Cover. One is backed and one not. The backed one is good for seats and high stress areas, while the other conforms to surfaces really well. Ultrasuede is the same material invented by the same person from the same parent company (Toray) but manufactured elsewhere, therefore lacking the clout of being Italian. The colors are slightly different. Some say the dye process doesn't hold as well in direct sunlight, some say it does. In my (limited) experience and research so far it's fine...given that it's genuine Toray UltraSuede.
Anyone interested in using Alcantara, which is now only available in black unless you have some stockpiled
, comes in Panel and Cover. One is backed and one not. The backed one is good for seats and high stress areas, while the other conforms to surfaces really well. Ultrasuede is the same material invented by the same person from the same parent company (Toray) but manufactured elsewhere, therefore lacking the clout of being Italian. The colors are slightly different. Some say the dye process doesn't hold as well in direct sunlight, some say it does. In my (limited) experience and research so far it's fine...given that it's genuine Toray UltraSuede.