When you click on links to various merchants on this site and make a purchase, this can result in this site earning a commission. Affiliate programs and affiliations include, but are not limited to, the eBay Partner Network.
I didn’t really want to start a thread about this but I couldn’t see an alternative. I have attached pics of the three bumpers I just bought. I’m in Australia so transporting large parts like this is across the world is very expensive. Many of you would know that these bars are NLA. So the new option doesn’t exist.
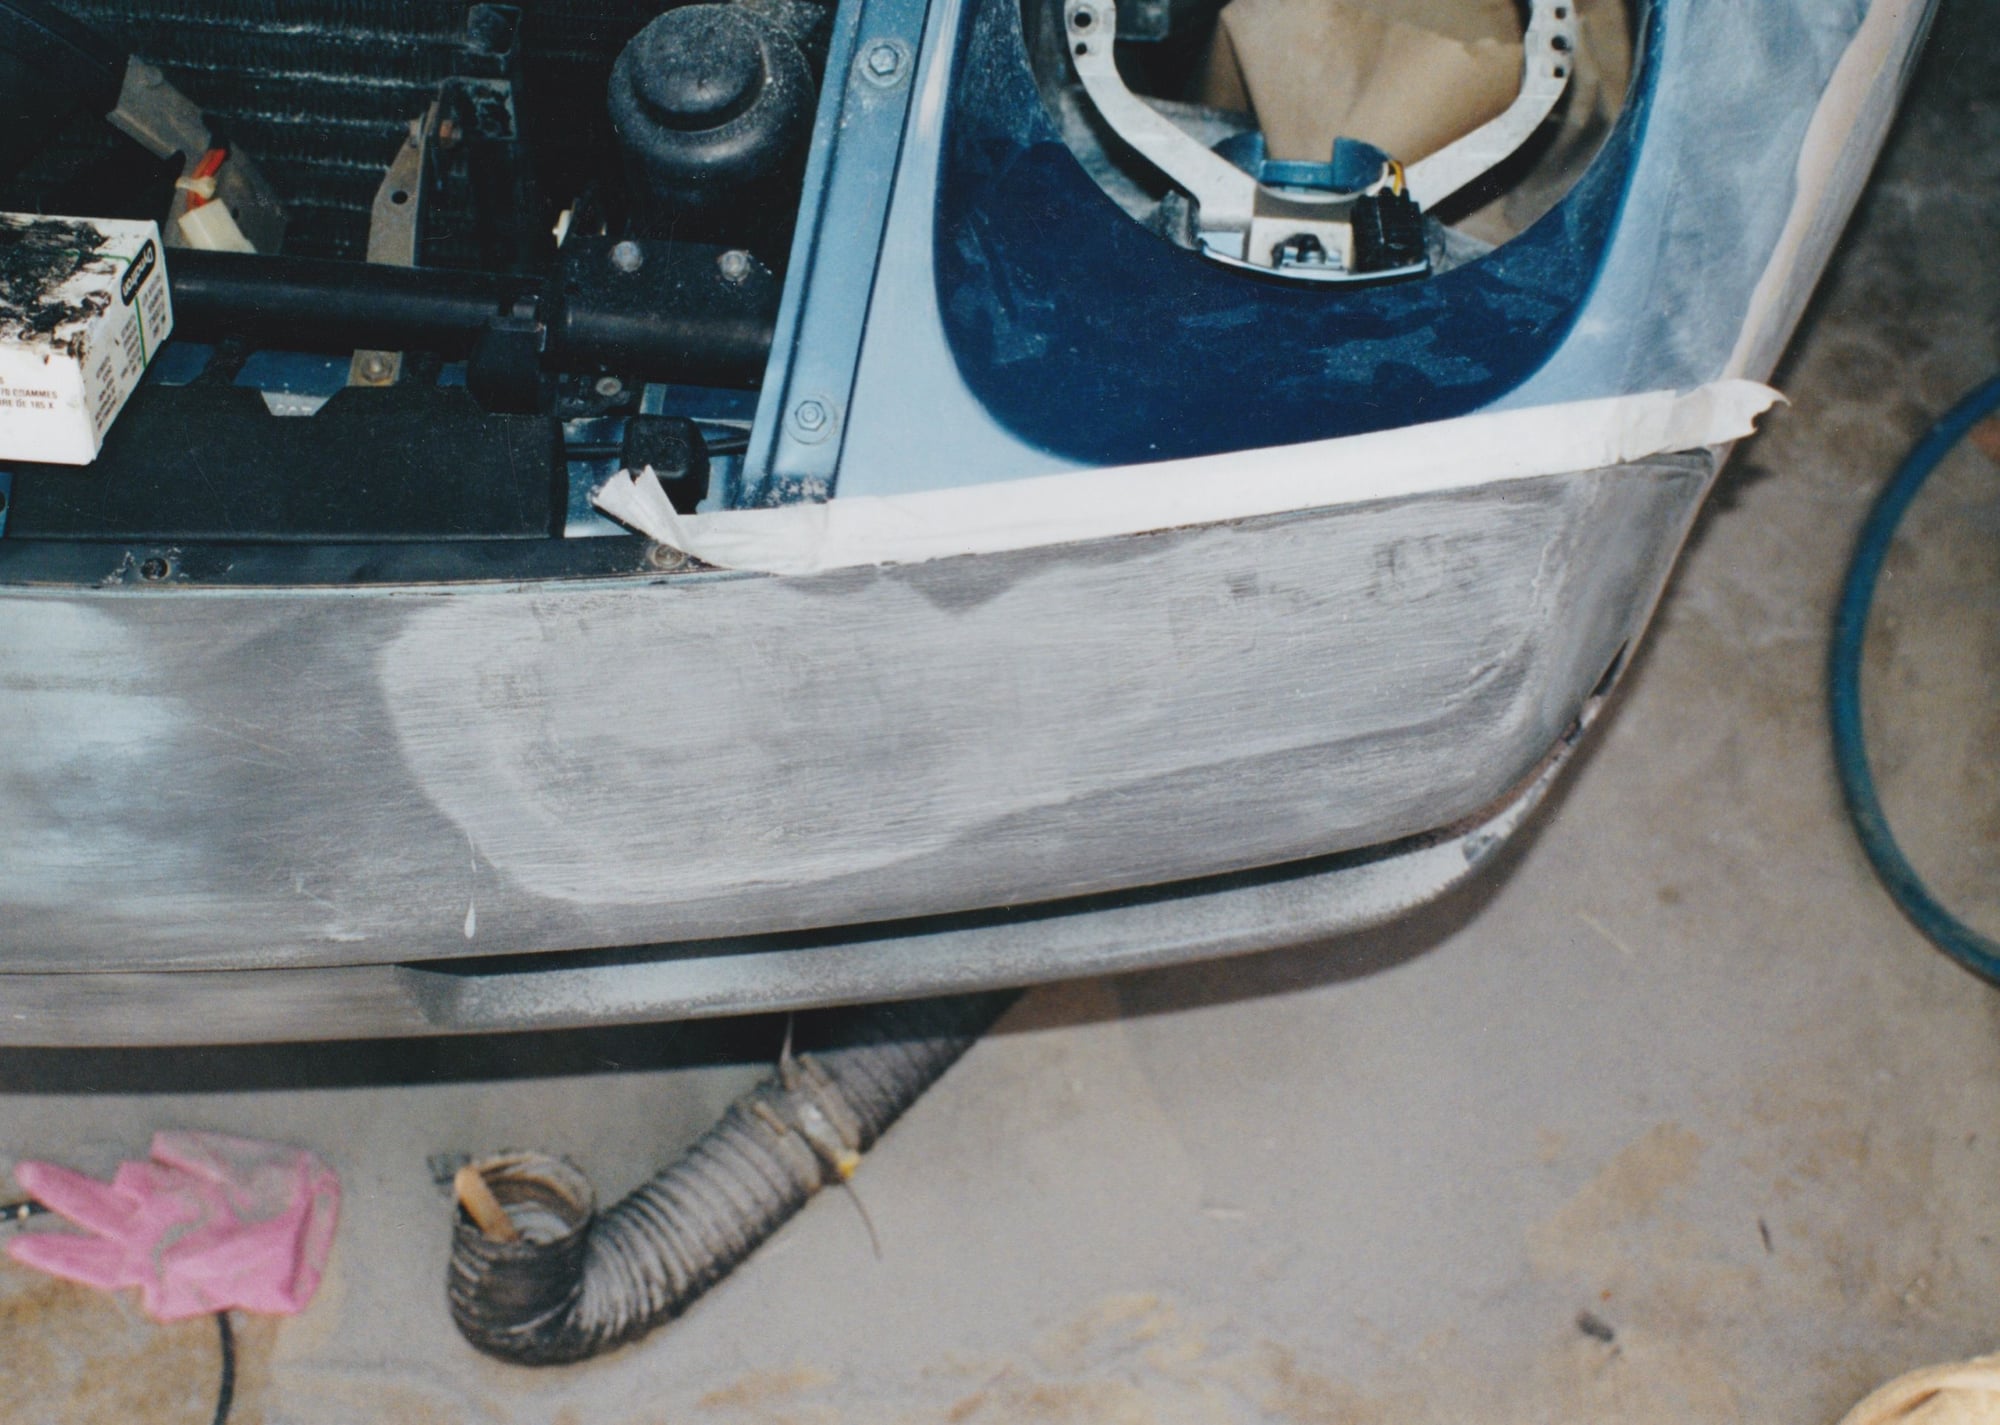
When restored this car, I bought new bars front and rear. It only had 55,000 Kms or about 30K miles. So the sun kills b/bars, there is lots of sun in Australia. Here is what I had to do even to brand new bars as the early bars were the first of their kind and didn’t hold their shape very well. So I filled them and blocked them out. This greatly improved them. Here’s some pictures, everyone loves pictures...
This brings me to my problems I faced, firstly there isn’t many bars in Australia for sale and they are not very good due to the sun. However the bars I bought came from the UK and as such they haven’t been exposed to the harsh sun that we have here. That means they are decent candidates to save. However they have fog lights. I don’t want fog lights so I need to fill them. I can do some plastic welding and the best way to do this is to use the parent material from which they are made.
When I bought the bars, sight unseen btw, I was told the black bar should be the one I cut up for the material to repair the other two. However after getting them home. I think I should repair all three. After all I will need one bar and then having spares for the future will be a great luxury. It also seems a waste to cut up a bar that could be saved.
So what I’m after is a early bar that has been badly damaged and shouldn’t be repaired. I am only after material that can be used to fill the holes that these bars have. The curves need to be roughly matching etc. I need surplus material to cut thin slivers to use as welding material.
Has anybody got an early bar (part of) that could be cut up and shipped to DE. I have a shipment waiting to go in DE so this would be convenient and cost effective to do ASAP.
Hi Greg. You seem to have lots of 928 stuff going on. First, the items you are discussing are called the bumper "COVERS." The BAR is the aluminum . . .bar. . .under them that the covers cover. Second, almost everything I found on-line about fixing various bumper covers says that they are made of polyurathane and it cannot be welded. "Almost," because there is one video on u-tube showing a guy welding bumper covers like you are planning to do. The others say the poly is thermo set rather than thermo formed and when it is melted it changes the chemestry in such a way that its properties are destroyed.
It turns out that the best way to join pieces of the bumper cover, rather than welding, is something more like brazing. In fact it seems a lot more like simply hot-gluing them but with particular materials that are as tough or toughter than the base material. That is what I used to modify the rear bumper cover for my Radical Custon 928 project, and I posted some pictures of that recently in that thread. After the joint is made with the tough brazing material then the joint can be reinforces with some fine mesh stainless steel hardware cloth cut into strips to lay over the joint, in the back, Then I covered the joint front and rear with another good product called Fiberflex. Both materials are melted on with small hot irons that look kind of like wood burners from my cub scout days. but have broader tips. One of them has a hole in it that you push the first brazing material through so it melts and is spread under the iron. I strongly recommend you using this process rather than trying to weld your patches on. The Fiber Flex is supposed to be sandable, so a layer on the outside of your joints will help you get a nice finish, probably without much or any flex bondo.
As to the patches like you hope, since I was sectioning my bumper cover, I used pieces of the 2-inch section taken out to fill in the areas left when I narrowed the license plate recess. Unfortunately I used just about all of it in that process. However, before, I have simply used some black ABS plastic that I happen to have a lot of, in scraps from making Spare Tire Covers for you guys, and it is about the same thickness as the Poly in the bumper covers. It is 3/16 inch thick and I think is quite suitable for the partches you need. I'll send you some pieces of it shortly when I go to the P.O. to mail some other items later today. In fact, since the ABS is thermo formed I think your joints with it may end up more welded on the ABS side and brased on the Poly side.
One other suggestion I have for you is that rather than filling and sanding the bumper covers where they are deformed from the sun and sucn I find that with a heat gun under the deformed area you can soften the Poly and push it around to set in a different position. I think that with some care you can fix your cover in this manner and then need either none or very little filler to finsh the cover like new. I used this process to take the curvature out of the Poly patches I brazed into my rear Cover to fill the holes left with the license plate recess narrowing.. I heated each patch up with my heat gun then pressed it between two blocks of wood to flatten it. So far they don't seen to have any memory for their original curved form and the bomper cover has been out in the sun for quite a while.
I'll try to send you some pictures of the materials and tools I bought to do this poly brazing. In the meantime I have your DE address and will put the ABS in the mail for you.
is all that I will ever use for the front and rear covers. I have used this product for many years for many applications and found it to be effective for virtually all plastic covers. The polyurethane 928 covers are no exception. Works great. Forget about welding!
I just did a bumperette delete with the Fusor. Grind the back side and "V" the existing plastic out where the new product will meet. Cover the area with reinforcement tape, then apply the glue. This is heat set, so apply heat with a heat gun. Back is finished. No grinding, sanding, or any further effort required.
Now, turn the RBC over and grind down the glue and V this out the same as the back side. Again, cover with reinforcement tape, apply the glue. Set it with heat. Grind.. Now just finish it out and you'll have as good of a bumper as any!
Jerry much appreciate your input, I am no expert when it comes to plastics. My knowledge has come from trial and error experimentation. I had great success when welding the rear tail light housings with ABS filler material but the same didn’t apply to the wheel well covers. Until I found another cover and cut it into slivers and then it welded quite nicely. It was from those two experiences I decided to try and find the parent material to weld in. I use a soldering iron but I do have a heat gun also. Regarding the covers, I don’t have anything to practice or experiment on as I have no sample material. So all I can say is I had/have no idea that it was going to fail.
An an area I can add actual information, is the filling of the bars, d’oh I mean covers. I did try heat gunning them with very limited success. I then bought specific bumper bar plastic filler and that was successfully applied on both my cars. I have close to 20 years on them now. What I found with the heat gun was that I couldn’t get the shape right, certainly not good enough and that the cover drifted back to its old shape over time. Now that is only been verified on the early covers, I have no idea about the later ones as they look to be improved as they hold their shape better.
Thanks very much much for posting that material, I got held up at my end so I decided to wait for my last shipment and ship everything together.
Any other info on the brazing I am happy to look at, I will search your thread also. Much appreciated. I can send you some money for your trouble.
I appreciate your input, as I said above, I have limited experience and knowledge when it comes to plastic welding but have has some decent success too. Is that product flexible in keeping with the covers? The product I used in the first pictures is really a filler not a fixer. As a filler it works great, when my then girlfriend now wife ran my 928 (after it was painted) into another one of my cars. The filler never fell out or cracked. It was a decent hit as it bent the reinforcement in the Holden that it hit. The front bar on the Porsche flexed extensively, it had to be heatgunned back into shape. The paint, that is the clear coat and the primer had lots of flex add in them. However you could see hair line cracks under the clear but not in the clear. That gives you an idea of how well that product works as a filler. It with mesh was also good to get rid of the small holes for the washer jets. I wouldn’t trust it for more than that. Can you add anything?
Greg,
I have a white rear cover in same layout as your red one in pic - holes for Euro rear fogs lights, but otherwise undamaged. In Melb, PM me if interested.
jp 83 Euro S AT 57k
The Fuzor isn't particularly flexible, but not brittle either. It WILL crack, but it takes a pretty good shot to make this happen. It doesn't behave like body filler that has been piled on where it will shatter at the first shopping buggy encounter. It's resistant to shrinkage when applied correctly, also. That's key for 'deletes'.
Greg,
I have a white rear cover in same layout as your red one in pic - holes for Euro rear fogs lights, but otherwise undamaged. In Melb, PM me if interested.
jp 83 Euro S AT 57k
Hi John,
i don't need anymore covers, I will have at least one spare and need o work out the best way to fill these holes. Thanks GG
Hi Greg. You seem to have lots of 928 stuff going on. First, the items you are discussing are called the bumper "COVERS." The BAR is the aluminum . . .bar. . .under them that the covers cover. Second, almost everything I found on-line about fixing various bumper covers says that they are made of polyurathane and it cannot be welded. "Almost," because there is one video on u-tube showing a guy welding bumper covers like you are planning to do. The others say the poly is thermo set rather than thermo formed and when it is melted it changes the chemestry in such a way that its properties are destroyed.
It turns out that the best way to join pieces of the bumper cover, rather than welding, is something more like brazing. In fact it seems a lot more like simply hot-gluing them but with particular materials that are as tough or toughter than the base material. That is what I used to modify the rear bumper cover for my Radical Custon 928 project, and I posted some pictures of that recently in that thread. After the joint is made with the tough brazing material then the joint can be reinforces with some fine mesh stainless steel hardware cloth cut into strips to lay over the joint, in the back, Then I covered the joint front and rear with another good product called Fiberflex. Both materials are melted on with small hot irons that look kind of like wood burners from my cub scout days. but have broader tips. One of them has a hole in it that you push the first brazing material through so it melts and is spread under the iron. I strongly recommend you using this process rather than trying to weld your patches on. The Fiber Flex is supposed to be sandable, so a layer on the outside of your joints will help you get a nice finish, probably without much or any flex bondo.
As to the patches like you hope, since I was sectioning my bumper cover, I used pieces of the 2-inch section taken out to fill in the areas left when I narrowed the license plate recess. Unfortunately I used just about all of it in that process. However, before, I have simply used some black ABS plastic that I happen to have a lot of, in scraps from making Spare Tire Covers for you guys, and it is about the same thickness as the Poly in the bumper covers. It is 3/16 inch thick and I think is quite suitable for the partches you need. I'll send you some pieces of it shortly when I go to the P.O. to mail some other items later today. In fact, since the ABS is thermo formed I think your joints with it may end up more welded on the ABS side and brased on the Poly side.
One other suggestion I have for you is that rather than filling and sanding the bumper covers where they are deformed from the sun and sucn I find that with a heat gun under the deformed area you can soften the Poly and push it around to set in a different position. I think that with some care you can fix your cover in this manner and then need either none or very little filler to finsh the cover like new. I used this process to take the curvature out of the Poly patches I brazed into my rear Cover to fill the holes left with the license plate recess narrowing.. I heated each patch up with my heat gun then pressed it between two blocks of wood to flatten it. So far they don't seen to have any memory for their original curved form and the bomper cover has been out in the sun for quite a while.
I'll try to send you some pictures of the materials and tools I bought to do this poly brazing. In the meantime I have your DE address and will put the ABS in the mail for you.
Ok Jerry I re-read your thread relating to the modified bar cover. If you could supply the details when you get time that would be great. I will then evaluate the best solution as some of your materials may not be available in Australia. The material Kiln Red mentioned is but there is just one supplier a 1,000 kms away. Many of these type products cannot be imported by normal means, they need dangerous goods permits. Thanks GG
Greg, here are some pictures of what I bought for my Poly covers that I am sectioning and changing about for my Radical Custom 928. I bought one setup which includes the clear plastic filler rod that is melted as you push it thru the ho iron. That setup also includes some fiber flex and some stainless screen for reinforcement. The pictures show who it ame from. Then I also bought some extra materials and another kinf of hot iron that has a broader tip and that you done need to push the filler thru. Then from one of them I bought some extra materials.
Greg, here are some pictures of what I bought for my Poly covers that I am sectioning and changing about for my Radical Custom 928. I bought one setup which includes the clear plastic filler rod that is melted as you push it thru the ho iron. That setup also includes some fiber flex and some stainless screen for reinforcement. The pictures show who it ame from. Then I also bought some extra materials and another kinf of hot iron that has a broader tip and that you done need to push the filler thru. Then from one of them I bought some extra materials.
Thanks Jerry,
I watched several of the Polyvance videos, from the videos it seems best to use the clear polyurethane material they supply. It seems amazingly strong on these PU thermoset covers. However from your thread, I think you used the Fiberflex? Have a got this right or back to front? Do you think it would be best to use a PU patch material given that or will your ABS material stick well also? Or is that why you are using Fiberflex given it sticks lots of materials? I bought the airless welder you suggested. Looks great. Thanks for the education.
Greg, I used the clear rod first on both sides of the joint, inside and outside, then I used the clear again to lay the stainless screen on the inside of the joint. Then I covered both inside and outside with the fiberflex.. I think muich of the fiber flex on the outside will get sanded off in the final finish, but I may not have to use any flexible bondo. jfeather@bresnan.net
Last edited by Jerry Feather; 08-14-2019 at 11:56 AM.
Greg, I posted by Priority Mail a small flat rate box of 3/16 inch thick ABS sheet pieces each of which should be enough to patch a fog lite hole, or maybe two of them. It is supposed to be delivered to your shipper today. The tracking number is 9505 5110 5761 9224 3665 51, with USPS. I see no reason why this stuff will not be suitable to fill the holes, and I think it can suitably be welded or brazed into the the PU covers. jfeather@bresnan.net
P.S. By the way, as to the fine stainless hardware cloth provided with much of the welding/brazing material, it comes in little rectangles folded a couple of times. The usual manner of preparing it to be melted into the joint is to cut it straight across. What occurs to me is that when you do that only half of the strands of tiny wire cross the joint. So, I cut mine on the diagonal, 45 degrees, so that all the strands cross the joint. I think that also might make the joint a tiny bit more flexible with the screen cut on the bias.

 08-10-2019, 09:26 AM