When you click on links to various merchants on this site and make a purchase, this can result in this site earning a commission. Affiliate programs and affiliations include, but are not limited to, the eBay Partner Network.
I am going out of order a bit,
so I can test the driveline,
I was waiting for some trans parts so I have yet to disable the engine,
in the mean time I decided to start the interior work.
this will entail fixing as many things as I can find,
and replacing the seats with a different color set.
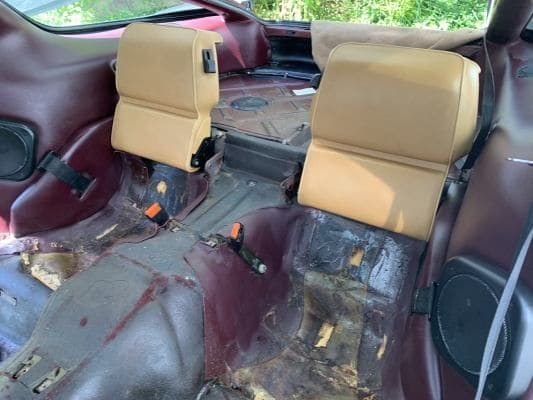
I am reusing the carpet set as they appear to be original and they look like new just smelly and dirty,
I did remove all the carpets and wash them in bleach and tide they came out great.
I also went through the door latches and lubricated then and lift motors,
and I replaced the window stops, new vapor barriers and panel clips.
The tan seats will go well with the ruby red (beautiful color) exterior. I also have not been a fan of the burgundy - the first 928 I owned was black with burgundy interior. Sold it after about 15 months (at Hershey swap meet) and bought a black with silver grey.
Will watch your thread with a lot of interest.
Gary
I second that burgundy interior thought, never my favourite as well. I was originally thinking about changing my original colour "Ruby red" to someting dark grey or blue. On a grey or very cloudy day it looks red/brown. But then I saw the car gleaming in the sun and Ruby red is beautiful colour. Totally changed my mind. It also is the original "Special colour X7" so I will ofcourse keep it in my original-custom restoration..
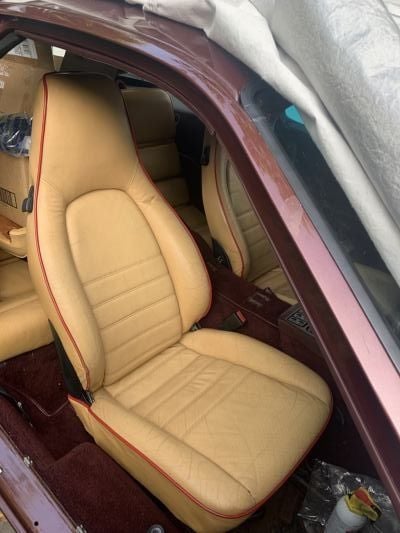
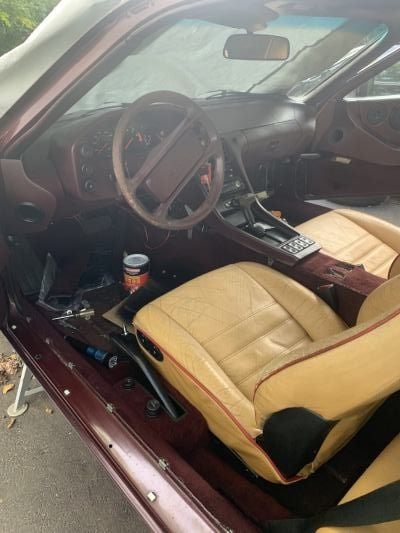
Well i have been working on the seats/ interior for a few days , finally got the driver seat fitted and wired up.
rear seats came from 928 INTL they are in good condition they took some time to fit then make the center console fit ,
I had to trim a few layers of foam on the rear edges of the console so it would fit inside the later style rear seats.
I washed all the carpets,
they were really dirty and smelled,
I used bleach and oxy cleaner now they are looking good with minimal to none fading from sun.
anyway some more progress shots.
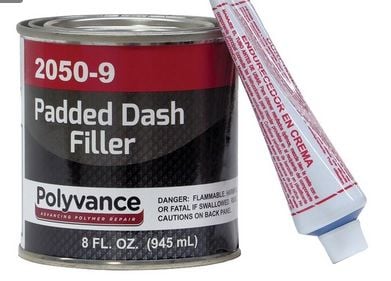
I pulled out the dash and fixed the cracks with the polydash filler
Planning to SEM texture coat the dash then SEM satin Black the dash.
The Pod is gonna get recovered in Black Alcantera
The console and glove box will stay Bgundy.
I replaced all 5 of the HVAC pods,
this was the the first car I found where the defroster pod was damaged.
removed the blower box and resealed it with 3M seal strip caulk
I cleaned the blower motor and lubed the end shaft bushings.
I super glued the console sides back to the console ,
these come loose after heat cycles,
I use a few paint sticks and C clamps and quick dry super glue to perform this,
then let the part cure for a few hours before I do the other side
What was the origin of those front seats? Clearly 85+ . Was the piping original you think? Odd, but I've only had one 928 come across my plate with contrast piping, and it was not factory.
Hi Stan - is this the polly filler you'll be using? I used angel hair bondo with SEM texture spray on my 84 and it looked great for about a year, and then ghosts of the crack repairs started showing through. I'm thinking this polly filler is much better because it'll expand/contract (unlike the bondo.)
Yes thats exactly what I am using , I used it on another dash that I covered with leather ,
so I dont know if the cracks ever came back as it was covered.
This will be my first spray covering try on a dash..
I got that stuff from Amazon.
If the cracks come back maybe I will get a velour cover .
This wont be a concourse machine by any stretch but just making it a nice driver,
and fixing all the broken or worn parts.
The seats came from a 964 Porsche, the red piping is original.
Mark A from 928 INTL told me he had seen some 928 seats with the same red piping over the years.
I got the S4 rear seats from him,
the fronts came from a shop in Sterling VA.
so I guess you did some modification to the mounting situation for the rears to go in the OB? I know the "inboard" mounting design is different.
If so, how'd you tackle this?
so I guess you did some modification to the mounting situation for the rears to go in the OB? I know the "inboard" mounting design is different.
If so, how'd you tackle this?
I put rear seats from a 90 GT from Kevin B in Atlanta into my 79 Spyder and don't recall doing anything really special to make that work.
Put newer later rears from Mark A into my 81 Euro S too.
to put the later rear seats in my 84 with an early console,
it required to drill 4 holes, 2 for each bracket.
I used 10mm head sheet metal screws and locktited them in.like the kind used in the wheel well block off plates bolts.
I had to trim the foam for the chassis rib so the new brackets would fit also I had to trim the vinyl cover .
Then to fit the console in,
I removed the rear edge of the covering and sliced the foam by about 1/2 inch on each side so it would fit between the inner seat brackets.
I reglued the covering then slid the console into position.
The outer mounting holes are the same on the seats.
Yes thats exactly what I am using , I used it on another dash that I covered with leather ,
so I dont know if the cracks ever came back as it was covered.
This will be my first spray covering try on a dash..
I got that stuff from Amazon.
If the cracks come back maybe I will get a velour cover .
This wont be a concourse machine by any stretch but just making it a nice driver,
and fixing all the broken or worn parts.
Thanks, Stan. I was living in Texas when I did mine and I'm sure the summer heat didn't help. Cars going to look great when you're finished - that's one of those colors that "pops" when detailed.
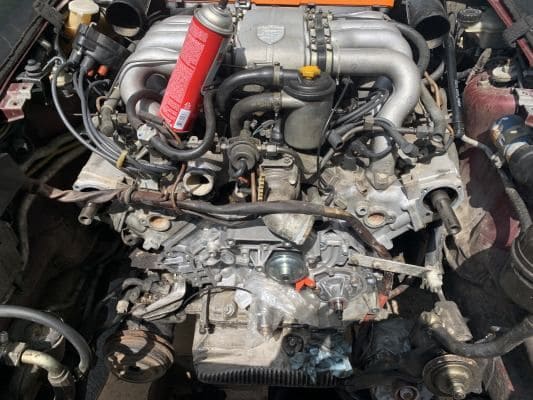
I am tearing down the front of the engine to replace the seals and WP oil pump seals and main seal,
new tensioner boot and gasket, new oil pump pulley and cam pulleys
intake has been removed for Porsche silver with clear PC.
The belly pan will be matte black PC and the cross bar gloss black and the injector hold downs a cool Ruby color
WB is getting a refresh,it looks like it had some kind of leak sealer in it,
I filled in the seal grooves at the heads with JB weld as one of the edges was cracked off so the seal wouldnt be supported.
I got a good used radiator.
Added a timecert to one of the Air guide mounting pads that sheared off.
got lots of cleaning to do,
and added rear gaskets to the cam tower rear caps.
replacing the fuel lines and painting the fuel rails gold.
More pictures to follow
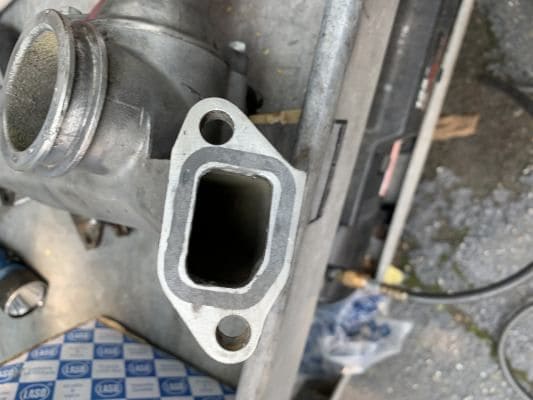
Notice the broken flange for the seal groove, JB welded it JB welded T belt installed, 5-8 bank just cleaned off new standoffs for the air guide assembly

 05-26-2023, 09:49 AM