When you click on links to various merchants on this site and make a purchase, this can result in this site earning a commission. Affiliate programs and affiliations include, but are not limited to, the eBay Partner Network.
Hi,
87 S4 auto euro.
In the middle of removing WP & TB.....
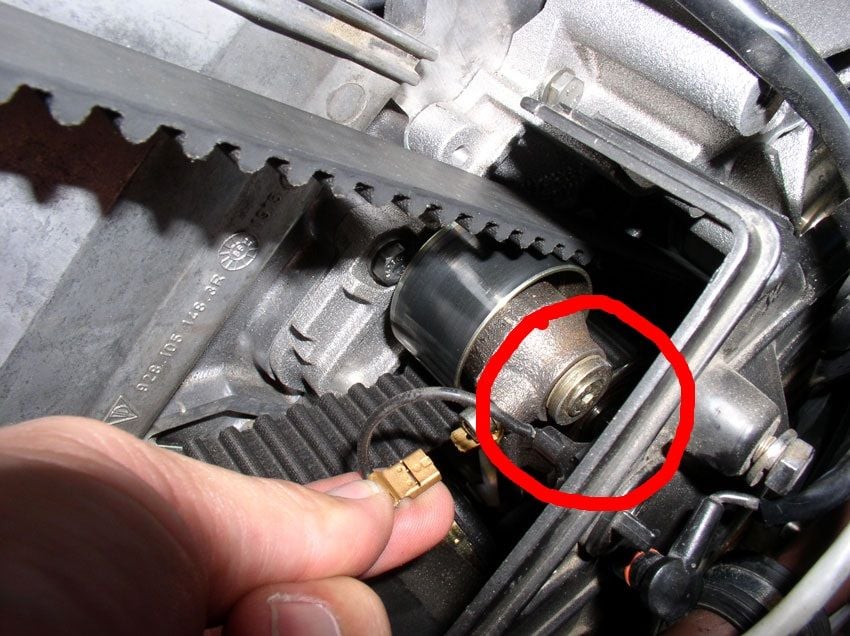
I think this 4mm Allen head is holding the tensioner arm in place.
It looked slightly damage when I got to it and I have not improved it by trying to loosen it.
Is it correct that this holds the arm and pullies to the WP?
Seems small.
If it needs to come out I'm going to have to hack it up.
Similar thing happened to me last time I removed the timing belt system- I used my Dremel to cut a slot in the head and used a flat blade screwdriver to remove the small bolt.
Similar thing happened to me last time I removed the timing belt system- I used my Dremel to cut a slot in the head and used a flat blade screwdriver to remove the small bolt.
WARNING your engine is not at 45BTDC.
get it there before belt removal would be a great idea.
NOTE while facing the engine ,
put the keyway facing 3 O clock for 45BTDC,
and to 430 for TDC
first remove the 10 mm bolt on that bracket ,
then turn the bracket CCW as you unscrew the allen bolt,
it should twist loose as you more the arm ,
spray it with PB blaster first
WARNING your engine is not at 45BTDC.
to get it there before belt removal would be a great idea.
NOTE put the keyway facing 3 O clock for 45BTDC and to 430 for TDC
I'm having an 'uh oh' moment here.........
That bracket Wavey is trying to remove. How critical/important is it??
I am sure my '88 S4 doesn't have it (cause the bracket is sitting in a small box of bits on my bench). The previous owner clearly left it off. I have receipts for a tensioner and water pump rebuild kit etc.
However, looking at 'Dwaynes garage' photos his '87 doesn't have that bracket either.
Hi,
87 S4 auto euro.
In the middle of removing WP & TB.....
I think this 4mm Allen head is holding the tensioner arm in place.
It looked slightly damage when I got to it and I have not improved it by trying to loosen it.
Is it correct that this holds the arm and pullies to the WP?
Seems small.
If it needs to come out I'm going to have to hack it up.
Common/simple.
Remove the 6mm bolts, bend the bracket away from the bolted area and lift up. The countersunk screw will loosen enough to remove it, easily.
New factory water pumps come with a new bracket and screw.
Semi-retired, as of Feb 1, 2023.
The days of free technical advice are over.
Free consultations will no longer be available.
Will still be in the shop, isolated and exclusively working on project cars, developmental work and products, engines and transmissions.
Have fun with your 928's people!
I'm having an 'uh oh' moment here.........
That bracket Wavey is trying to remove. How critical/important is it??
I am sure my '88 S4 doesn't have it (cause the bracket is sitting in a small box of bits on my bench). The previous owner clearly left it off. I have receipts for a tensioner and water pump rebuild kit etc.
However, looking at 'Dwaynes garage' photos his '87 doesn't have that bracket either.
Install it.
The shaft that supports the idler arm is in "single shear" without it.
And as the offset of the arm and the tensioner increased (in 1987), the leverage increased on the pin for the idler.
The extra bracket puts that pin into a double shear situation....much stronger!
I've never read Dwayne's writeup, but he should have installed one.
WARNING your engine is not at 45BTDC.
get it there before belt removal would be a great idea.
NOTE while facing the engine ,
put the keyway facing 3 O clock for 45BTDC,
and to 430 for TDC
first remove the 10 mm bolt on that bracket ,
then turn the bracket CCW as you unscrew the allen bolt,
it should twist loose as you more the arm ,
spray it with PB blaster first
WARNING your engine is not at 45BTDC.
to get it there before belt removal would be a great idea.
NOTE put the keyway facing 3 O clock for 45BTDC and to 430 for TDC
Arrgghh I got caught up trying to hold the flywheel and lost track of 45 BTDC...
I have marked 45 on the cam sprockets.
How can I tell when the crank is at the correct 45 position?. 2 crank turns for 1 cam sprocket turn tight?
Also why do some documents suggest the belt is installed when everything is at TDC and others refer to 45BTDC?
Similar thing happened to me last time I removed the timing belt system- I used my Dremel to cut a slot in the head and used a flat blade screwdriver to remove the small bolt.
I stole your idea with pride -Thanks Fred.
Screw is out - although now butchered.
I stole your idea with pride -Thanks Fred.
Screw is out - although now butchered.
I was working on the premise that as the bolt fastener was buggered it would be easy enough to do what I chose to do. Once the bolt was out I popped it in a vice, squared up the cut and used it again upon reinstallation given it might be a struggle to find a replacement and the cut would not cause any weakening on the bolt's ability to do its job. That being said I would encourage you to acquire a new bolt rather than do what I did.
With regard to your current situation I always lock the crank at 45 BTDC whenever I have the timing belt/water pump out. Not sure if you are aware but at this position you can rotate the cams for ever and a day with no fear of clouting valves on pistons. Another good reason to do this is that as per my experience when the crank is at TDC on No1 cylinder the 1/4 exhaust cam has a tendency to jump under valve spring pressure about 3 teeth in the retarded direction and is just another thing to deal with rather than a problem per se. I find that at 45 BTDC re-threading the cam belt is a doddle. Stan raises a useful point about the orientation of the keyway at 45 BTDC- pay attention to that - I never had any need to because I was where I needed to be.
So, put the belt tensioner back on, tighten it up to a point where it sort of looks reasonable [you cannot set the tension correctly where you are but that does not matter ], refit the damper and pulley assembly and then hand crank the motor forwards until you get to 45 BTDC- it does not matter whether you land on No1 firing stroke or No 6 firing stroke TDC wise- just fit the bolt and tighten it until the crank starts to move clockwise as viewed from the front of the engine- no need to fully torque it up. Lock the crank and then remove the bits you put back on. Leave the egnine there until you refit the belt. I presume you must have a crank locking tool to hand by now.
With respect to setting the belt tension this has to be done at TDC on No1 cylinder firing stroke. Belt tension checked at this position is inferential that belt tension is correct- do it on No 6 firing stroke and you will get a false reading [too slack if I recall correctly]. I presume you will have a belt tension tool available to you. If you do not I know of a get you by dodge to work around this using the timing belt tension feature but I do not recommend that per se - beg, steal or borrow a Kempf cam belt timing tool or the correct factory 5201 tool . So when you reinstall the belt fit it at 45 BTDC, tension it using common sense, move the crank forwards to TDC on No1 cylinder and then set the tension. To know whether you are on No1 cylinder firing stroke just temporarily mount one of the rotor arms - when at the correct position the contact finger should point towards the 3 O'clock position on both banks.
For your further info the cam sprocket has 48 teeth at intervals of 7.5 cam degrees or 15 crank degrees. Thus when the cranks sits at 45 BTDC the cam sprocket sits three teeth before the cam timing marks. If you are serious about 928 ownership just get yourself one of Ken's 32VR kits together with his bumpstick stick from Roger then you can time the cams effortlessly without having to go down the tedious factory method route. You do not need this if your cam timing is correct already but just having this kit to check that all is in order is a good enough reason to have one.
Hi Fred,
I think I am understanding but please check my understanding....
I am following Dwaynes guide for TB & WP replacement.
Before removing the belt I put the crank at 45 and marked this position on both cam sprockets. Always turning CW.
I then removed the belt but did not keep crank and cams in the same relative positions. My bad....
To rectify this I replaced the harmonic balancer and put the crank back to 45.
Without the belt in place, I then rotated the cams back to my 45 mark. Always turning CW. (Dwayne's manual states CCW for this movement and I don't understand why).
I worry that I am not back to my original position as I may be 45BTDC of firing stroke as opposed to intake.
Does this matter?
As I stated once the crank is at 45 degrees BTDC you can do whatever you want with the camshafts. If you rotate the camshafts independently you allegedly must do so using the 30mm flange- not the smaller bolt that secures the sprocket onto the camshaft. I find this a bit strange but given it is just as easy to use the 30mm flange I just do so- period- consider it good established practice.
If you remove the belt at 45 BTDC and then rotate the crank that is just plain dumb on an interference engine. That being said you would have to rotate the crank some way to create interference- to my knowlege 45 crank degrees of rotation from the 45 BTDC position will not cause interference but why take any chance ? Lock the crank at 45 BTDC and never move it unless and until the belt is back on in the correct position.
With the belt removed it is my understanding that you can rotate the cams and the crank either way a few teeth as and when needed for cam alignment purposes but again by choice only do so with the crank locked unless one has got oneself in a pickle [as seems to happen on this list quite often despite the warnings] . Once the belt is strung only rotate the crank clockwise as viewed from the front of engine- cranking in reverse direction runs the risk of the belt jumping the teeth on the crank sprocket. If the cam sprocket jumps due to valve spring tension reaction the cam can be moved a few teeth to recover position with no problem but one needs to ensure that recovery is in the correct direction. The 32VR tool is also very useful in such circumstances.
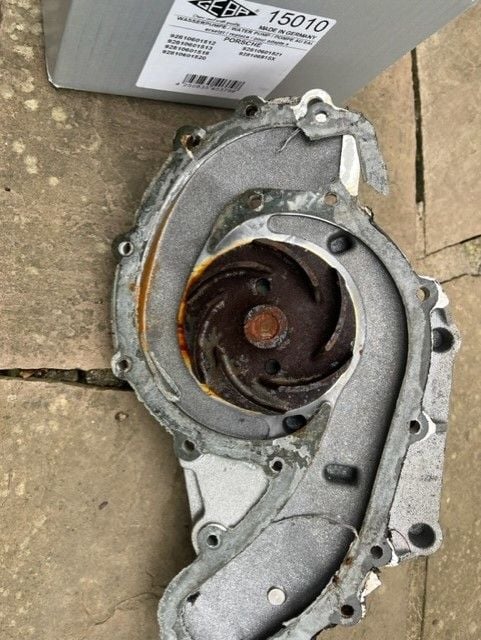
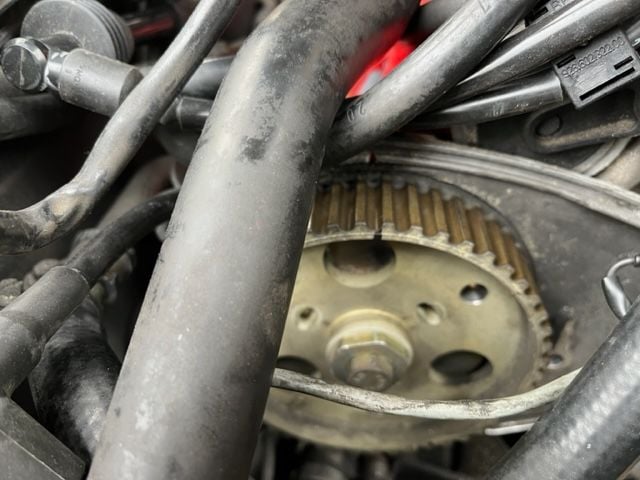
The 5/8 sprocket is more heavily loaded than the 1/4 sprocket due to the fact that it is also pulling the 1/4 cam bank. Although difficult to say from your photo that 5/8 sprocket is probably at the end of its useful life given the coating has seemingly gone. The coatings can be re-done if metal has not been removed.
The water pump shaft corrosion is interesting in that such should just not happen whilst the chemical package is viable. Is the impeller steel or plastic? I am guessing it is plastic.

 10-01-2023, 10:00 AM