When you click on links to various merchants on this site and make a purchase, this can result in this site earning a commission. Affiliate programs and affiliations include, but are not limited to, the eBay Partner Network.
Data dump (Sensor/Gauge tests, MegaSquirt, Parts Cross Reference and Other Things)
This is a consolidated post of information that I've collected over the last year+. The following lists the topics, with detailed descriptions after the list:
-Parts Cross Reference
-CLT Sensor Measurements and Dash Gauge Values (dual element and single w/ trigger element)
-Clutch
-Oil temperature and pressure sensor
-Oil breather performance
-HVAC vacuum solenoid alternatives
-Alternator step-by-step and technical updates (parts diagram and regulator/brush mounting screws)
-MegaSquirt and Turbo
Attachments:
-Parts Cross reference
-Thermistor specs (dual element, single element w/ trigger)
-Full MS project zip file including TS custom actions/triggers, power management script, bootloader updater, etc
-Updated alternator documents
-Oil pressure/temperature sensor specs
-Blowby Calculator
Parts Cross Reference
Attached is a "Consolidated 928 Parts Cross Reference.xlsx" spreadsheet. It contains items that I have personally confirmed.
CLT Sensor Measurements and Dash Gauge Values (dual element and single w/ trigger element)
Attached is a "Porsche 928 OEM Thermistor Values.xlsx" spreadsheet containing actual measured values of several used and new temperature sensors. These are the two sensors that are mounted in the water bridge.
It also has a drawing of the dash temperature gauge and what each hash mark actually measures out to be.
This is useful if you want to know what your gauge's unlabeled lines actually mean, or if you need to plug sensor values into an aftermarket ECU, or you want more specific test values for your thermistors.
For the dual element sensor (passenger/right side of bridge, applicable to all model year 928's), I included the WSM test values and the NTC M12 specifications for comparison. Of all of the sensor specifications that I reviewed, the NTC M12 most closely matched the actual measured values of the sensors. I've attached th NTC M12 specification sheet as well.
The Dual output sensor worksheet also has a drawing of the connector on the sensor to properly identify the two pins by number and connector shape.
For the dash gauge sensor with warning trigger, I couldn't find test values in the WSM. But I did find that one of the sensor's alternate part #'s is VDO 92-027-004, which specs can be found for online. The warning switch point is marked on the sensor and you can the sensor with different trigger values. OEM value is 115C (239F).
The method for testing the thermistors was to use boiling distilled water, an ice bath of distilled water with distilled water ice cubes, and room temperature water. I measured these temperatures using a thermocoupler, and rescaled the measured values for known values. For example, pure water boils at 210.6F at my altitude. The rescale calculator is included in the spreadsheet.
The method for testing the dash gauge was to use a potentiometer connected to the plug at the water bridge and vary the resistance until each line or mid-point was hit. I had a toggle switch wired in to flip the connection to my multi-meter to avoid any variances in resistance from differeing connections. I flipped the switch back and forth several times at each gauge target in order to confirm stable readings on the gauge and the multimeter. I then took those resistance readings and matched them up to the full thermistor curve. All contact points on the car were recently and thoroughly cleaned (pod connections, grounds, etc). Connections that are not clean can generate different values. The higher the resistance, the "colder" the gauge will indicate.
Clutch
I've been running the Spec Stage 2 (model # SP142) since 2019. No shuddering, no slipping (even with my ~600+ ftlb of torque), no issues. It's a slightly more on/off experience than the factor clutch, but not by much and is very easy to feather. No problem with slow and smooth starts on steep hills, or inching along in traffice or low traction surfaces. And very positive engagement when making more aggressive starts. Shifting is smooth with very consistent engagement points and characteristics. Easy for up-shifts and heel-toe downshifts. I'm extremely happy with it. Not all "Spec" clutches are the same, so getting the correct one makes all the difference.
Oil temperature and pressure sensor
I placed a Bosch 131-005 combination temperature/pressure sensor in the oil cooler line with the flow that exits the block. It gets a good oil temperature reading anytime the oil pump is turning. The thermostat isn't a perfect seal by design, so it's always letting some oil by.
This is a very important tuning tool. The WSM specifies that tuning should only be done once the oil is at operating temperature. And I've observed that the volumetric efficience (VE) of the engine doesn't stabilize until the oil is at operating temperature. Most notably at low load and idle. In my case, I've found that 40F above ambient to be the ideal minimum, but 25F has been acceptable. Actual oil temperature when fully warmed up has varied between ~100F in freezing weather, up to ~200F in very hot weather and run very hard. But, usually it's around 180F after a long drive and warm ambient temperatures. And this is with new oil thermostat components.
The oil pressure is as expected and matches the OEM specs laid out in the WSM. The pressure relief valve works as expected. I have lots of data recorded on temperatures and pressures, but there are no surprises.
Here are the details on the sensor, and the specification sheet is attached:
Bosch: 0 261 230 340
131-005
Used in: 2013-2015 Porsche 918 Spyder, 2016-2021 Mazda 2/3/6/CX-3/CX-5/CX-9/CX-30
Alternate part #'s: HY539G756AA, SH0118541, 13F0517CP, 9A160620300
Standard Motor Products: PS661
VEMO: V32730026
WVE: 1A16076
Mazda: PY8V18541B
Best search results are with the Mazda part #: PY8V18541B
Oil breather performance
Attached is a blow-by calculator. It's based on publicly available documents that detail the technical aspects of blow-by management and provide formulas for it. I can post those documents as well, but they are out there for discovery as well. The point is...the math is not only theoretically correct, and not only proven by many others, but it also works on my own setup.
Zero oil comes out through the breather line or is caught in the catch can when there are zero knocks. If I have knocks, the increased blowby does cause oil to get caught in the catch can (but still none out of the breather line) proportional to the knock severity and count.
Water and fuel condensate does get caught in the catch can in the winter when it's below freezing. Which is exactly why I don't let the drain go back into the oil sump. That would create a closed loop that never lets the moisture out. Even a heated oil separator doesn't stop that. It takes much higher temperatures to keep the water suspended long enough to get out of the separator.
HVAC vacuum solenoid alternatives
I identified some alternatives to the stock HVAC vacuum solenoids back in 2020 (which mj1pate reported on in his thread: https://rennlist.com/forums/928-foru...solenoids.html). I've been using them in my car since then and they have worked very well. No failures or leaks. Can't beat the price. Just search for "dc12v normally closed water air mini valve".
Alternator step-by-step and technical updates (parts diagram and regulator/brush mounting screws)
Attached are the latest versions of the step-by-step and technical guides for the Ford 3G alternator. Including a parts diagram and the specifics on the voltage regulator and brush mounting screws.
The alternator has been phenomenal. Plenty of power for all scenarios, including max load while idling in 100+ weather in traffic and fully heat soaked. The OEM wires are sized more than adequately for the stock demands placed on the system, so it's an easy change for a very reasonable price.
The biggest benefit to the alternator is the idle output. No issues with system voltage dipping below battery voltage or pulling down the battery while idling, no matter what is turned on or what the ambient conditions are.
If heat soak is really a concern due to far far above stock load (lots of big stereo amps, light bars, etc) in super hot ambient temperatures and no air flow, you can always get a remote rectifier for the 3G alternator that has more robust components and a fan, in addition to being able to mount it somewhere cooler. But, that would be overkill even for my setup, and I feel that my car is on the upper end of the load it places on the alternator.
MegaSquirt and Turbo
My 1987 928 S4 5 Speed is converted to MegaSquirt using an MS3 Pro Ultimate and a PMAS 2600 MAF. The turbo is a Comp Oil-Less 6767 with a Tial wastegate. I've got a small touchscreen mounted next to the OEM pod, with a custom layout giving me all the data I need while driving.
I can't say enough good things about the setup. Even without the turbo, the MegaSquirt completely transforms the driving experience. And it makes troubleshooting 100x easier. But, with the turbo, the car is just outstanding. ~600 ftlb, boost threshold below 1.5k rpm, 5+ psi by 2k, max boost by 2,900. Smooth, easy to manage, and lots of power immediately available when needed.
There hasn't been a single hiccup that wasn't self-induced. And troubleshooting those has been trivial with the visibility a modern ECU provides.
Anyway, the car drives extremely well. Super smooth, incredibly responsive, very reliable, modern features, just overall oustanding.
The full project is attached to this post. It can be used as a reference for anything from AFR targets to startup configuration and more. The on board computer power management script is also included, as are the custom dashboards, triggers and logging channels.
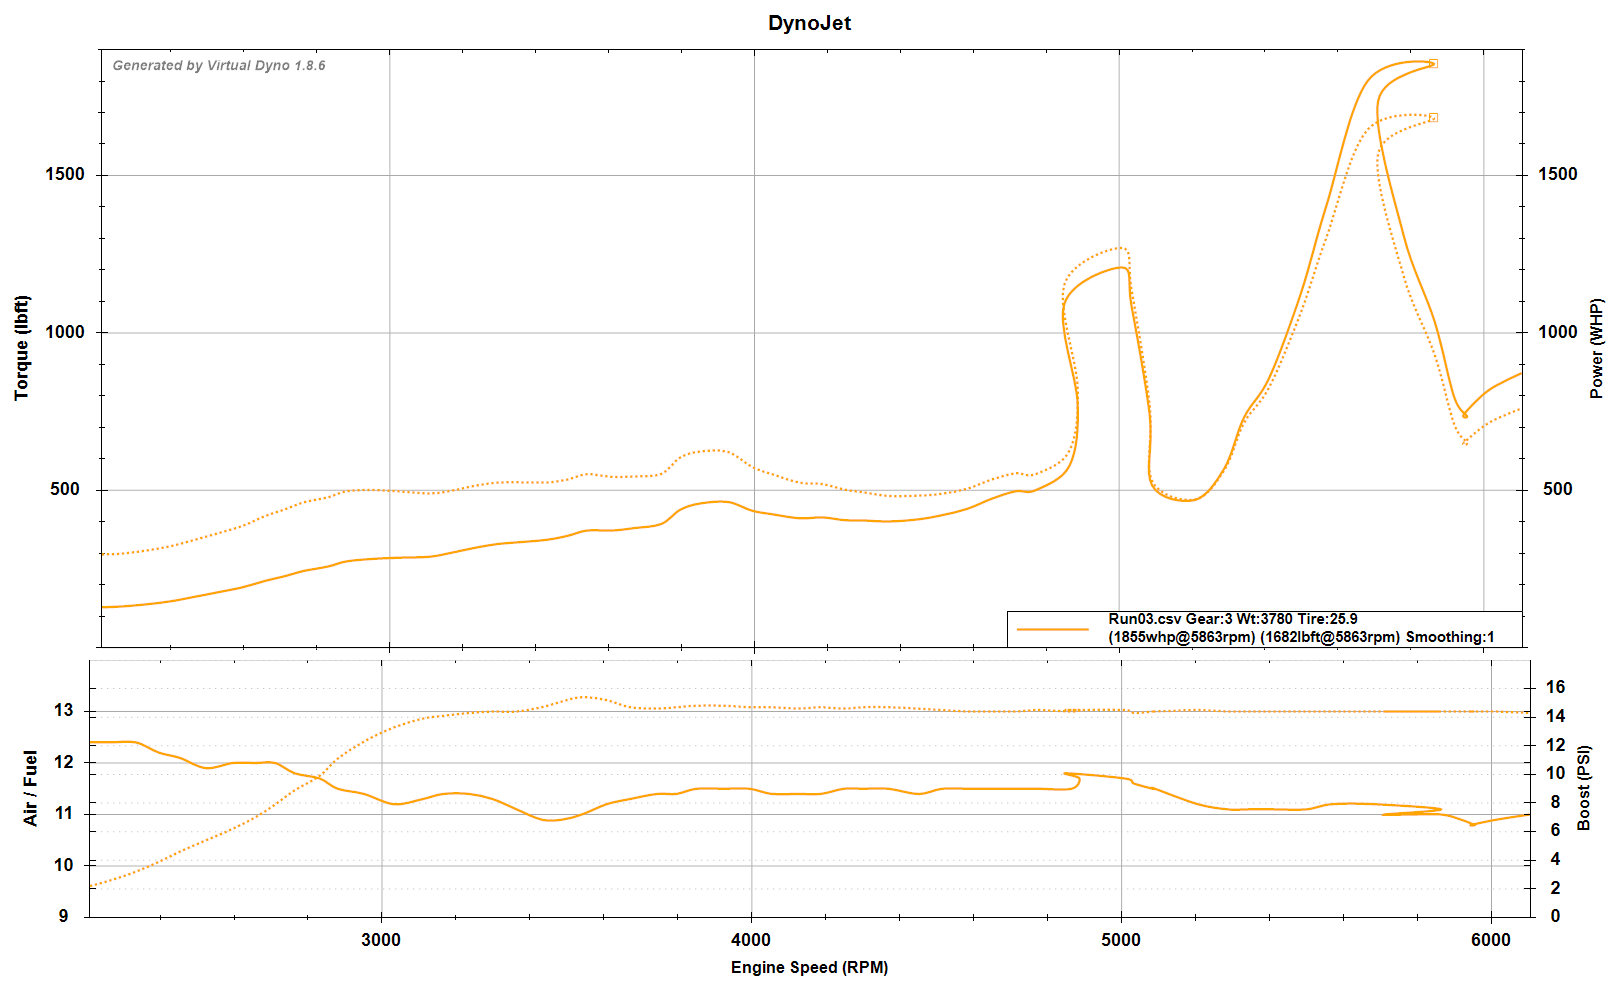
Here's a recent Log-to-Dyno graph. Disregard the hump at 4,300, that's wheel spin. Also keep in mind that this began on a slight hill before leveling out, so the first part of the torque graph isn't as flat as it normally looks.
The ECU dashboards are below. The screen dims/brightens when the headlights are turned on/off. If something is wrong, like AFR's are too far off for too long or there are too many knocks or a sensor is bad etc, the background of the screen goes red and the error pops up on the screen. the "Check Engine" icon also illuminates.
The main screen that is up most of the time:
The secondary screen that I bring up if I want more detail on something specific:
The "CEL" screen that I can switch to if something goes amiss, like a failing sensor. I also have some buttons on here I can tap to change things like summer/winter wheel size, ignition retard for lower octane fuel, etc.
Thanks guys. This will probably be the last time I log in this year. I hope that it's a great year for everyone!
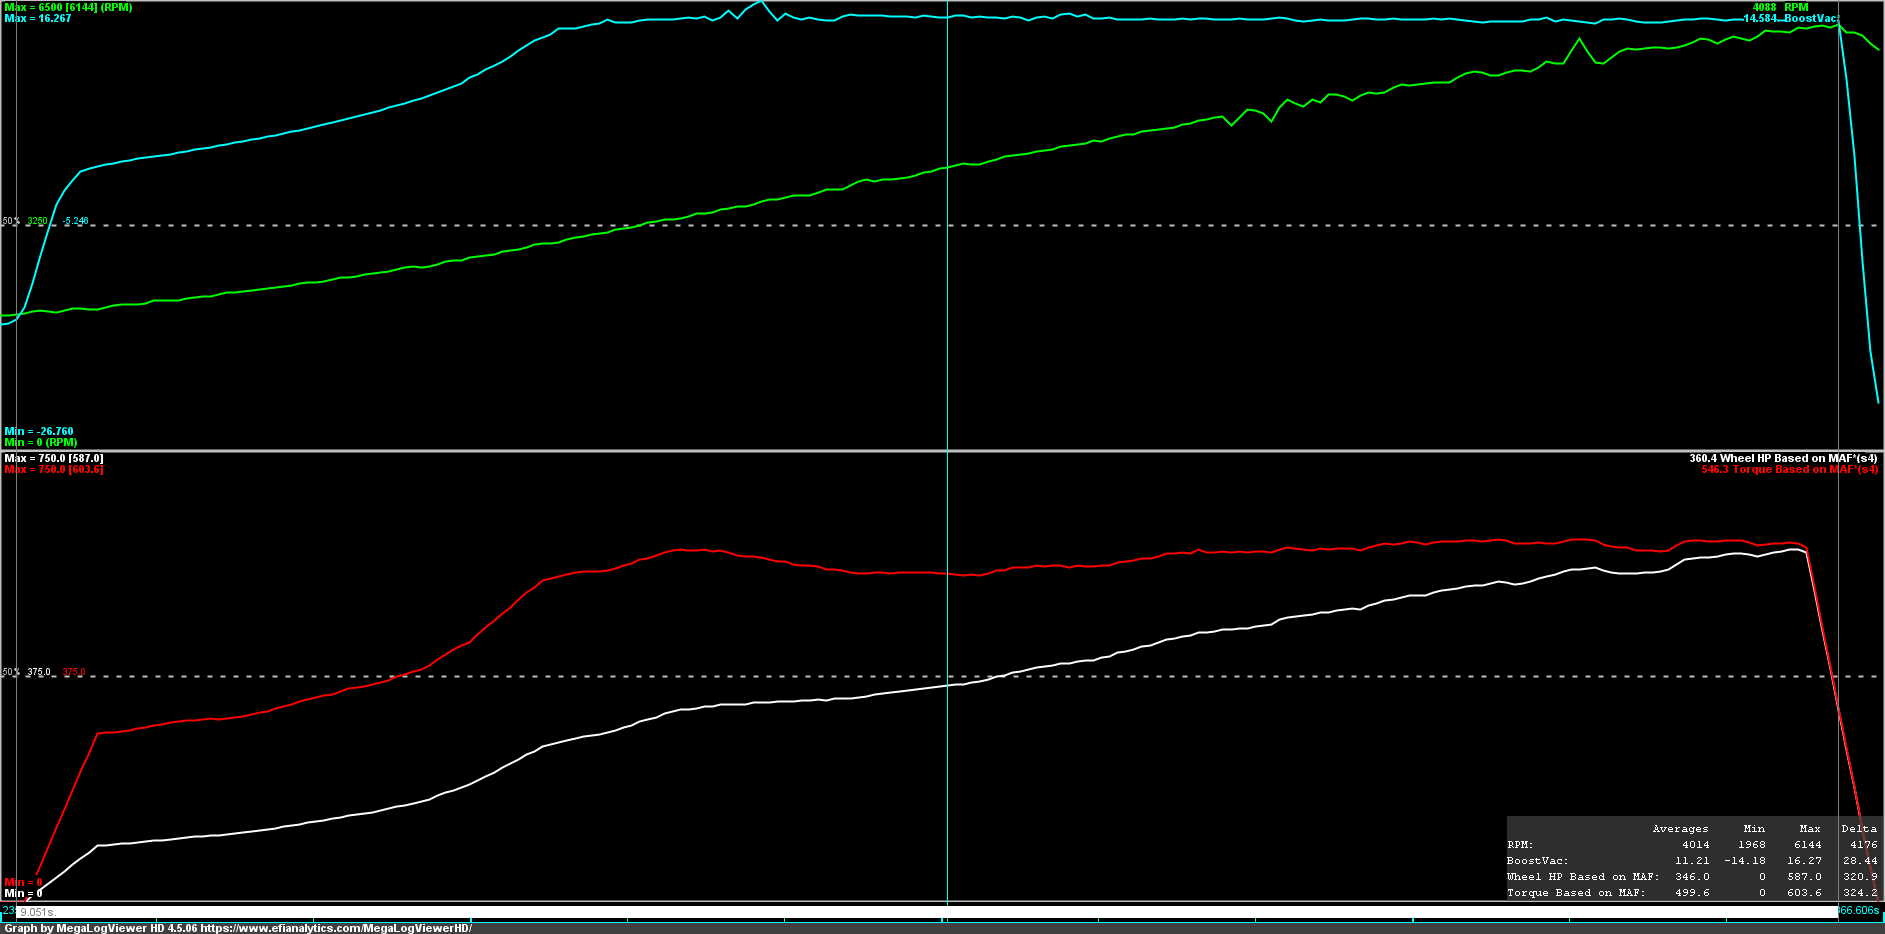
As a parting gift, I thought that these two graphs were interesting. From a recent run on flatter ground.
The first is a VirtualDyno conversion from ECU logs into Torque/HP. Using the Dynojet scaling and all the correct data for the car (weight, wind resistance, tire size, etc). The spikes are wheel spin in third gear.
This second one is the calculated power using the MAF data. You can see the wobbles in RPM (green line) from the wheel spin. Bottom right of this graph shows the maximums. Red is torque, white is WHP.
Hey Brother, you dropping a goldmine of info then turning and burning might not be in our best interest.
I for one would really appreciate your participation here.
When you post you usually make a difference that you might not see right away.
I know that your wisdom will benefit many,
I would hope you will reconsider your path.
Thank you very much for all that you have provided to our 928 owners.
NOTE I sure wish I knew your name.....
Esp since the car your driving had a nice interior installed by me.
Anyway, I hope your path is filled with goodness...Be well....
Stan
Revised tune project attached. For those that come later and want a starting point. It's very dialed in. There is even an SD version of the tune, but that's NOT dialed in. The SD version is just a base map for emergencies (e.g. the MAF fails).

 01-02-2024, 12:45 PM