
Steering Rack question

 01-07-2010, 12:03 PM
#48
Rennlist Member
I agree that radial play is common. But I also believe that it is commonly mis-diagnosed as tie-rods.
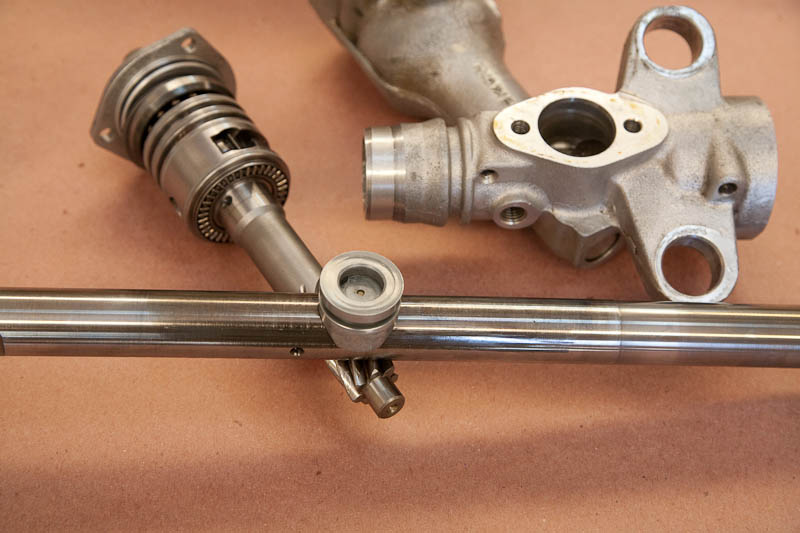
The problem is that the bore, where an external rack-rod bushing could be fitted, is a cast bore which is not machined. The surface is pretty smooth but the bore is tapered and the rod is not centered in the bore. You need to disassemble the rack assembly to really see this.
Here is what the driver's end looks like, with the rack, pinion and guide-block or "saddle" arranged as they are were in the housing:
Here's what that "saddle" assembly looks like. The plastic part is a wear item and is apparently replaced by the rebuilders-- although I have not found a source. The washer is a shim, and is selected for proper clearance.
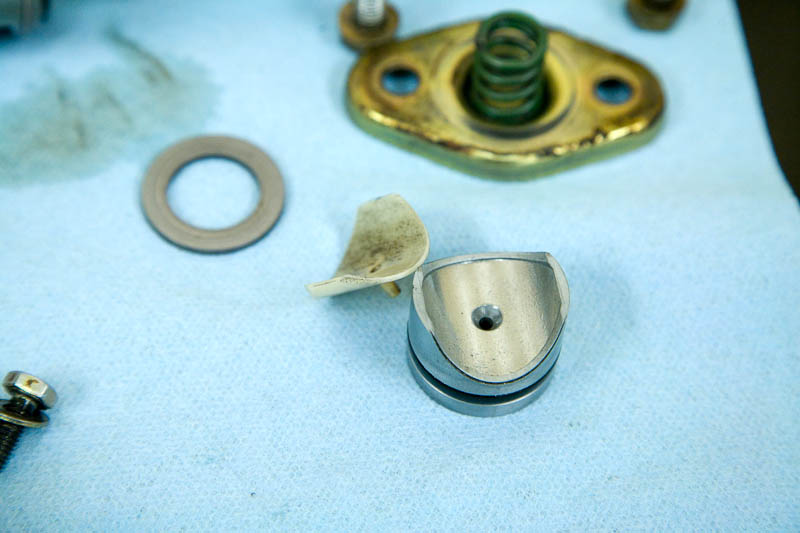
For the rack to move freely without play, the clearance between that saddle-block and the cover plate must be set correctly. ZF does this by selecting the appropriate washer. I don't have the ZF spec but a similar Volvo rack is spec'ed at 0.004" clearance. If it is too loose then the rack rod moves around and the steering is vague, too tight and it binds and you crash the car.
So radial play at the driver's end means that the guide-block is worn in its bore, or the clearance is too large. Fitting a new, secondary bushing is discussed earlier in this thread. The way to make it work (as Earl discussed) is to sand/grind a machined bushing to fit a particular rack. Then drill for a setscrew or find some other way to keep it in place. The results would depend on how carefully this was all done. I have to agree with Earl, this is not a good characteristic for an aftermarket part.
Alternately, I believe that a bushing with an undersized OD could be epoxied in place. The problem is that the ID of the bore, while not machined, is not all that rough either. So maybe it will just pop out-- I have not tried this. And again, some care is required to properly clean the housing and not get epoxy where it doesn't belong.
The other issue is that the rack rod needs to "float" a bit to maintain proper mesh of the rack/pinion teeth. This done by making the pinion itself- along with that saddle- part of the mechanism that supports the driver's end of the rack rod. So if the rod is not perfectly straight, it is still (in theory) properly supported with the desired pinion lash. If an additional external bushing is fitted, then the straightness of the rod becomes an issue.
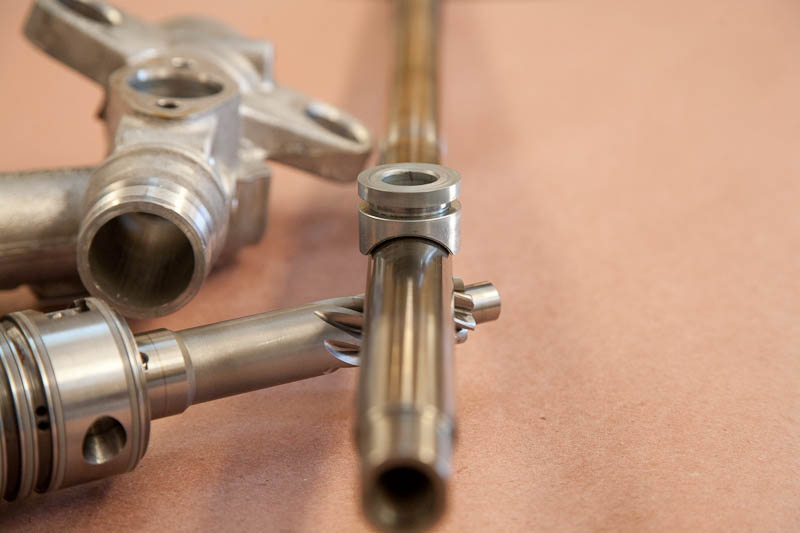
Here's the pass-side bushing. It is a thin plastic bushing inside a steel housing (for support). This is also a wear item but easily replaced (with the rack disassembled) and easily machined if NLA. It's the dirty white part in the middle of this picture:

The rack in these pictures the high-mileage rack from our GT that suffered from a lot of tramlining. It was replaced with a 928int'l rebuild, solid mounting bushings (details to follow) and realigned with new tires. It now runs on rails.
As for this rack, I got a seal kit from Roger, machined a new saddle block and pass-side bushing from fancy plastic and had the rod plated and ground (which cost as much as a new rebuild...). It is not yet reassembled and tested but I am hoping it will be good-as-new.
Cheers,
 01-07-2010, 12:44 PM
#49
Rennlist Member
Join Date: Jul 2002
Location: Deep in the Heart of Texas!
Posts: 3,266
Likes: 0
Received 5 Likes
on
4 Posts
I talked with Grif a bit in 2008 and at that time he told me he had stopped doing 928 racks and was selling his last two. I have noticed that they seem to be back on his website, so maybe that changed, not sure.
Jim, this is great info! If I'm asking this correctly ... isn't the pressure of the "saddle block" against the rack provided entirely by the big spring under the cover? Not sure I understand how "clearance between the saddle-block and the cover plate (is by) selecting the appropriate washer". Does the spring compress to the extent that the saddle block bears on that washer?
I'm curious on this point, because thinking I might have a leak at the cover plate, I took it off and replaced the washer with a big o-ring. I couldn't comprehend the purpose of the washer at that time and haven't noticed any difference in the steering since running without the washer.
01-07-2010, 01:16 PM
#50
Rennlist Member
Many many many supposedly reputable companies don't bother to peen the OEM rack bushes after fitting a new rack and new bushes. This failure then allows the rack to move vertically and results in lousy steering and excess tramlining.
I've read on rennlist previously that the aftermarket aluminium bushes - with no ability to peen and limit vertical movement - initially perform well but over time allow excess vertical movement.
The Delrin bushes that I am aware of likewise offer no facility to peen to limit vertical movement - but when tightened the are forced shorter and fatter so may stop the vertical movemement in the long term. Who knows?
I think that making sure this bush part of the system is properly limiting rack movement would have to be the 1st thing to address in any improvement program (especially if excess tramlining is being felt even WITH correct 65ET front wheels).
A plastic bushing may get fatter and tighten against vertical movement as the bolts are torqued, but this also is going to be subject to machining tolerances. And torquing a 10mm bolt against plastic makes me a bit uncomfortable.
The washer trick is not reliable either, in my experience. The rack in our GT had washers to lock it down (fit by the PO), and seemed solid on the lift, but it was still moving on the road-- when disassembled the surfaces of all four washers were nicely polished where it was trying to clamp the rack bushing.
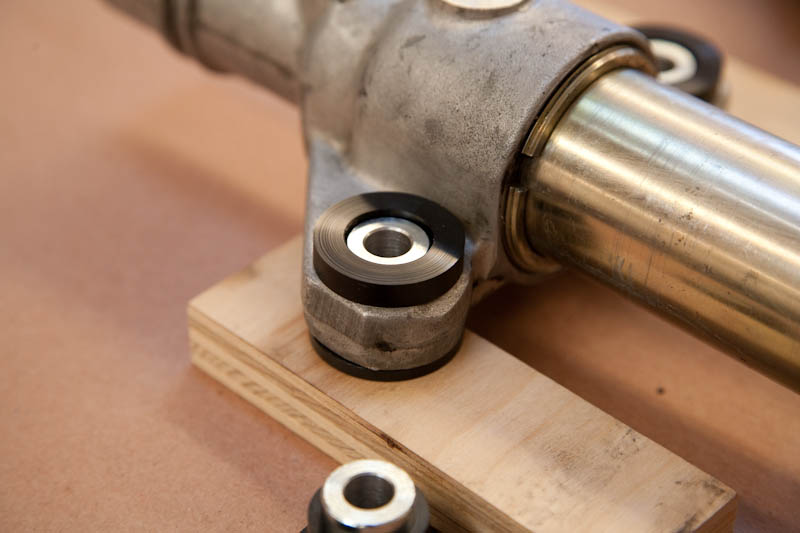
What I wanted was a metal sleeve for the mounting bolts to tighten against (like the factory design), but Delrin against the casting-- aluminum is not a good bearing material. The top of the "feet" are also not machined, so some compliance on that side is needed.
Here's what I came up with. This is a 3/4" OD x 1" long steel sleeve (original was 25.4 mm) bored to 10.3 mm, with a machined Delrin "top hat" bushing to fit the bore and machined lower surface, and a urethane "spring washer" against the cast top surface of the mounting foot.

Here's the bottom side, the delrin flange against machined surface. This goes against the cross-member cover plate.
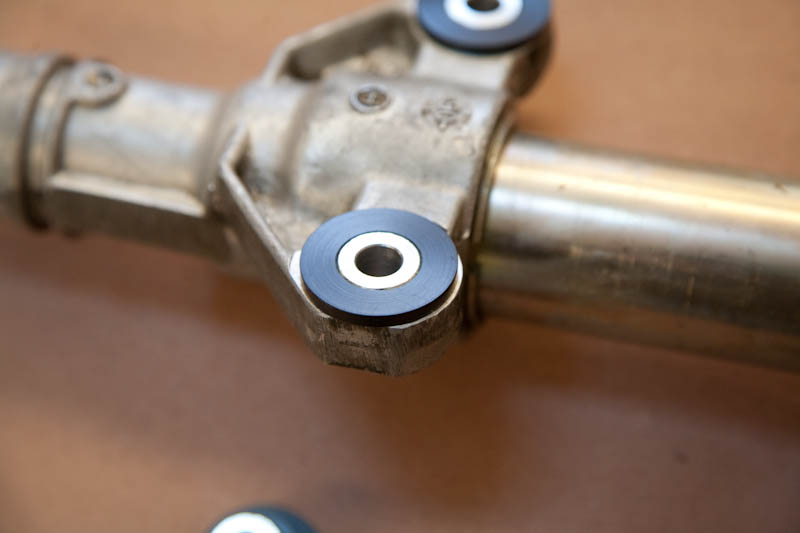
And here's the top side, the urethane washer gets sandwiched between the cast surface of the mounting foot and the crossmember. This one was the thickest of the four feet on this rack, and provided just under 1 mm compression.
What is unknown is how the urethane holds up over time. It doesn't matter if it "takes a set", as long as it doesn't collapse. I don't think it will, and my first set has been in service now for about 6 months and about 8,000 miles.
Cheers,
01-07-2010, 01:34 PM
#51
Three Wheelin'
Join Date: Mar 2006
Location: Happy To Be Home in Sumter, SC
Posts: 1,489
Likes: 0
Received 1 Like
on
1 Post
01-07-2010, 01:43 PM
#52

Very nice. Care to make more of those plastic pieces? Also - I have thought about getting the rod re-surfaced (rechromed) - but how did you get the grinding done?
01-07-2010, 01:47 PM
#53
I had a similar design in emachineshop.com's simple cad program, but I never finished it because I was thinking about trying to move the rack up a bit to offset some bumpsteer from a lowered car. Do you care to make a few sets of those for public use? I think 3 sets would do me just fine.
01-07-2010, 02:04 PM
#54
Rennlist Member
Jim, this is great info! If I'm asking this correctly ... isn't the pressure of the "saddle block" against the rack provided entirely by the big spring under the cover? Not sure I understand how "clearance between the saddle-block and the cover plate (is by) selecting the appropriate washer". Does the spring compress to the extent that the saddle block bears on that washer?
So when the rack is lightly loaded, i.e. when you are checking for play on a lift or cruising down a smooth flat highway, the spring works fine and keeps everything tight. But when a tire rolls across a rut or groove in the road, the forces are high and overcome the spring pressure and the wheels change direction-- and Voila! tramlining!
The shim-washer is needed to keep the rod in place against the pinion even with large forces, and provide enough clearance to avoid binding between rack and pinion.
I'm curious on this point, because thinking I might have a leak at the cover plate, I took it off and replaced the washer with a big o-ring. I couldn't comprehend the purpose of the washer at that time and haven't noticed any difference in the steering since running without the washer.
The o-ring, depending on how much it got compressed, may actually be doing much of the same job as the washer. It will likely still allow things to move under load, but that might be no worse than a too-small shim-washer.
The proper fix is to get the correct shim in there. Hopefully the rebuilders are doing that, but it is also something that you can do if you have access to a lathe. Remove the plate, spring and washer, make sure the guide-block/piston-thingie is shoved all the way in, and measure the depth at various points around the bore with calipers. Then make a new shim which is some amount thinner than the smallest depth measurement. The only number for this clearance that I have is 0.004", that comes from a Volvo version of a ZF rack that looks pretty similar.
(And if the depth measurements vary by more than a few thou, pull that puppy out and face off the backside on a lathe... I had one that was 0.015" out of flat, I have no idea how it got that way).
And finally, with everything assembled and the car lifted (front wheels in the air) check carefully for any sign of binding over the full rack travel.
And then maybe seal the plate with a bit of RTV or gasket-goo, to make sure everything leaks into the boot

Cheers,
01-07-2010, 02:33 PM
#55
Rennlist Member
I had a local hydraulic shop do the rack rod (farm and industrial equipment). The pass-side is a simple hydraulic rod so they chrome-plated that half and ground it to spec, and just polished the rack half. They said the half with the rack teeth could not be plated because the plating would flake off the teeth. There was some wear from the saddle, what I am not sure is whether they got rid of the resulting taper or perhaps made it worse...
I had a similar design in emachineshop.com's simple cad program, but I never finished it because I was thinking about trying to move the rack up a bit to offset some bumpsteer from a lowered car. Do you care to make a few sets of those for public use? I think 3 sets would do me just fine.
Cheers,
01-07-2010, 07:06 PM
#57
Nordschleife Master
01-08-2010, 06:40 AM
#59
Addict
Rennlist Member
Rennlist Member
Join Date: Oct 2003
Location: Gone. On the Open Road
Posts: 16,322
Received 1,542 Likes
on
1,006 Posts
I don't know to which "one supplier" you refer, but I've installed three racks from the rebuilder now used by 928 Specialists (ATE Eng.) and each of those three racks was nice and tight. However, ATE is, apparently, cranky and slow when it comes to 928 racks, presumably because its super-low volume, so you need to order a rack weeks in advance.
01-08-2010, 07:23 AM
#60
Three Wheelin'
Join Date: Mar 2006
Location: Happy To Be Home in Sumter, SC
Posts: 1,489
Likes: 0
Received 1 Like
on
1 Post
See my post above regarding "ATE" = Automotive Technologies and Engineering Inc. I wouldn't call Howard cranky and slow, it's more like seasoned and meticulous.