
1987 Oil Pressure Sensor Adapter (Screw Plug) Repair Procedure w/pics
 11-24-2011, 12:28 AM
#1
Rennlist Member
Thread Starter
Join Date: Sep 2007
Location: Ridgecrest, California
Posts: 1,363
Likes: 0
Received 143 Likes
on
28 Posts
Hello all,
It's been quite a while since I've posted a procedure due to an insane work schedule and car projects. I've been on leave this last week and decided to catch up on posting some procedures and pictures I took of projects earlier this year.
This one's a repair of the M48 threads in the engine block that the large Screw Plug threads into. Enjoy!
OIL PRESSURE SENSOR ADAPTOR (SCREW PLUG) THREAD REPAIR
Version 1, November 2011
EXECUTIVE SUMMARY
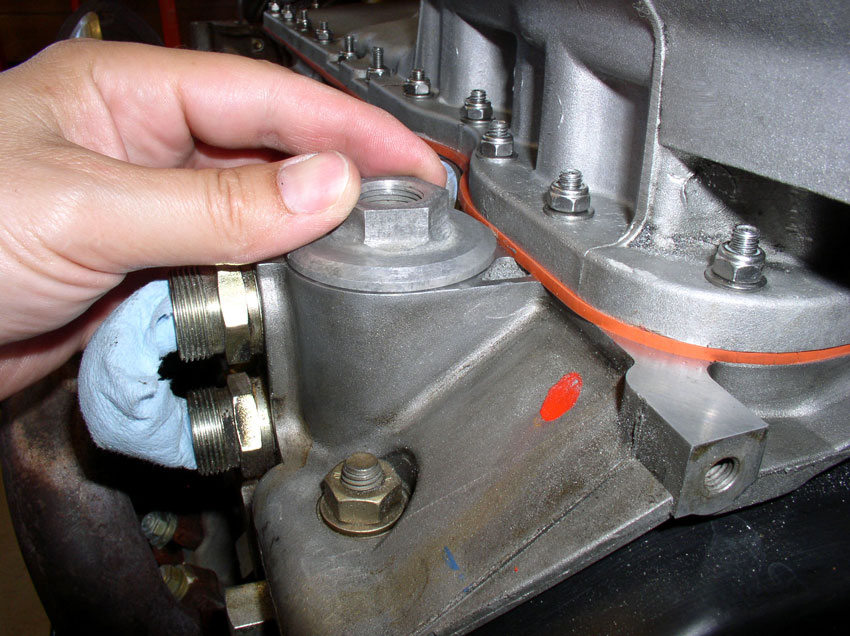
I don�t know if anyone has had this problem before but I thought I�d post my experience and solution to fixing a jammed �Screw Plug Thermostat Housing� (as the WSM calls it). It�s the adaptor that the Oil Pressure Sensor screws into on the underside of the engine � next to the oil filter. My Screw Plug was somehow jammed and would not tighten or loosen even after applying considerable torque in both directions. I ended up having to cut the Screw Plug out of the engine block. Once out, I repaired the threads in the engine block to take a new (used) Screw Plug. The repair was completed and there have been no signs of leaks since the repair (about 3K miles as of this writing). This procedure documents the steps I took. I left out the pictures of the hack job (literally) it took to remove the jammed Screw Plug but I do have the pictures. They are so graphically ugly, I couldn�t bring myself to post them in this write up.
BACKGROUND
I�m always up for a mechanical adventure with the 928 and this repair was no exception. My adventure started when I began working on Oregon (1987) to prepare it as my new DD. You know, the usual checklist - Intake refresh, TB/WP, Silicone OPG, Motor Mounts, Steering Rack, and, of course, a new oil pressure sensor. After removing the pressure sensor and the Screw Plug, I re-installed the thermostat and spring assembly on the Screw Plug and began to torque the Screw Plug to the recommended torque setting. I didn�t torque the Screw Plug to the full recommended torque (80 Nm or 59 Ft Lbs) because it did not feel like the screw plug was going to take that level of torque � it just didn�t feel right. I was perplexed � a common occurrence � on the one hand, the WSM says 59 Ft Lbs but on the other hand, the threads on the Screw Plug seemed awfully shallow (i.e., not many threads) and both engine block and screw plug are made of aluminum � not a very strong metal anyway. But the screw plug was plenty tight by feel so I left it for a while and continued working on other areas.
Later on, when it was time to install the oil pressure sensor into the Screw Plug, I decided to revisit the Screw Plug torque conundrum. And that was my mistake � I just couldn�t leave well enough alone. In reality, I believe the Screw Plug was plenty tight to prevent leaking and I could have just installed the pressure sensor and been done. But the fact the Screw Plug was not fully torqued to 59 Ft Lbs was bugging me. So, I decided to remove the Screw Plug and see what was going on � that was my mistake! As I began to rotate the Screw Plug counter-clockwise to loosen, it would turn maybe a quarter of a turn then abruptly stop hard. It would not loosen any more. I tried turning it clockwise to tighten back up and the same thing � stopped hard. I tried this a couple of times with no success and concluded the Screw Plug was jammed. Being a newbie, this caused me a considerable amount of anxiety since I could not torque the screw plug in and therefore, considerable amounts of oil was leaking (I started the engine to test it out!). I could not remove the Screw Plug to understand the problem � much less fix it! Even more distressing; this was my latest acquisition � a non-sunroof 1987 S4 w/o rub strips and only 47K miles on the engine. It was perfect for my new DD and now I was afraid the engine was ruined.
After considerable thought and research, I decided I was going to have to cut the Screw Plug out of the block � as despicable as it sounded. I had to at least try. A giant drill bit seemed out of the question. After all, the Screw Plug is 48mm in diameter!
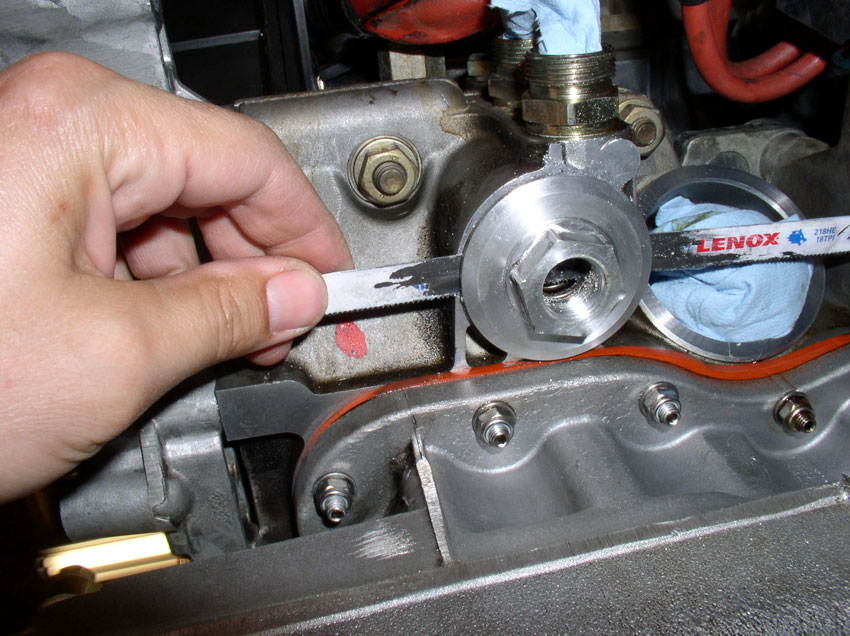
The most straight forward approach seemed to be simply use a hacksaw blade fitted between the crush ring and the Screw Plug flange � keeping the blade away from the mating surface on the engine block so as not to mar the surface. This seemed like a rather barbaric approach and I still cringe when I think about it but I was desperate and wanted to save the engine. Here�s a pic of the hacksaw blade in action. I took my time and exercised a lot of patience.
Once I was finished with the hacksaw blade, I used the Dremel to finish the job using a combination of a cut off wheel and the cutting bit that I use when cutting out the flappy bearings. I ended up removing the oil pan to gain better access � although I did seal off the crank/block to prevent filings from entering the crank area. If I have to do this repair again (i.e., cut off the Screw Plug, I�m just going to remove the engine from the car to make it much easier to work!
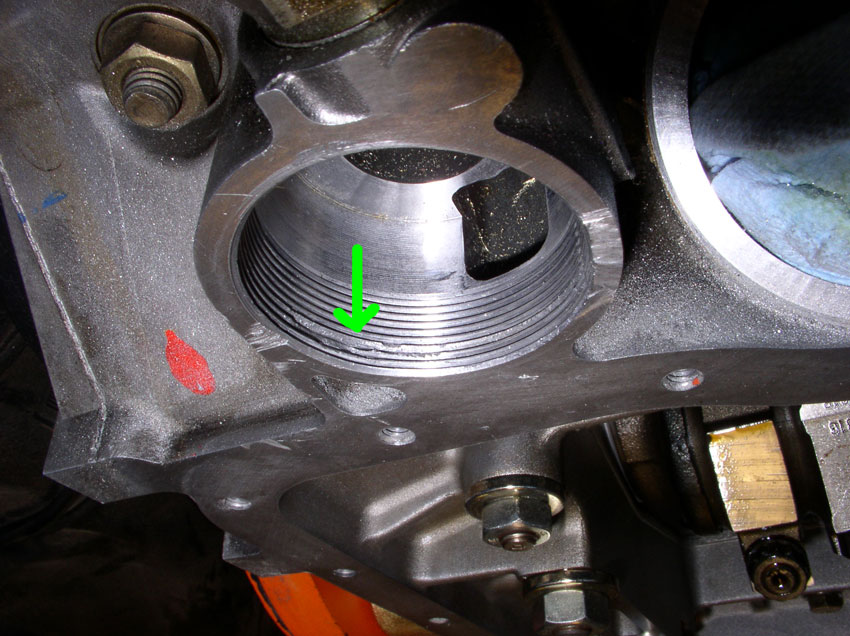
After it was out, I had a look at the threads in the engine block. You can see from the pic below that some of the threads were broken/damaged.
At this point, I decided to just pull the engine anyway to get better access to the threads and complete a few other repairs while the engine was out. Soooo, out came the engine.

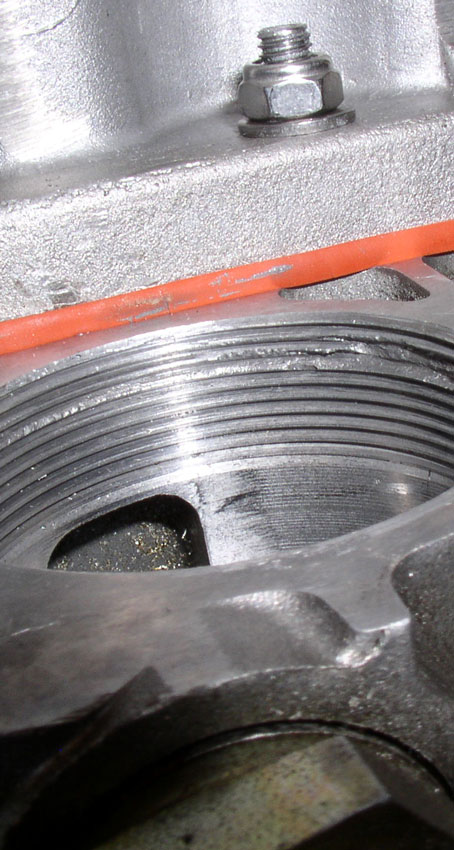
Once the engine was out and rotated upside down, I had a closer look at the thread condition. I confirmed there was not a lot of thread material (i.e., number of threads) to secure the Plug. These threads in the picture below were damaged and may have been causing the problem.
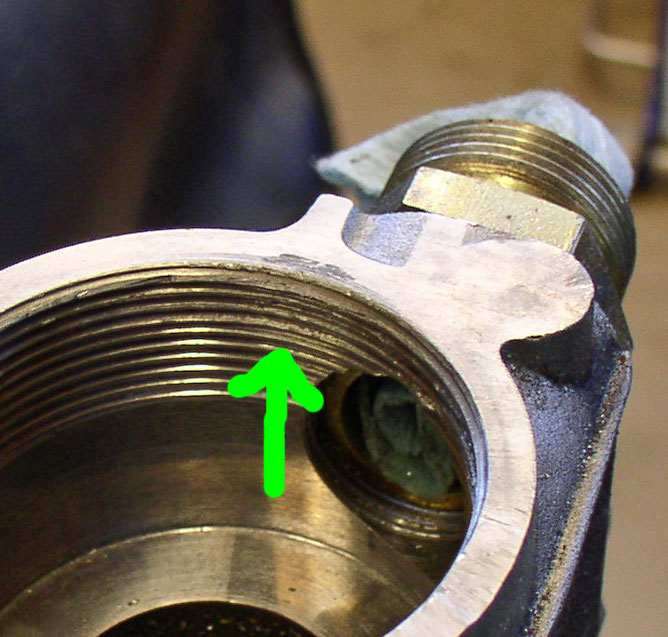
In another area, significant portions of the threads were missing! This did not look good.
I figured my options were to either replace the block � and therefore the engine. Or try to repair the threads. I had heard of the Helicoil method to repair threads but I did not have any experience with a Helicoil and I did not know if they made an insert big enough for this application (M48). After some research, I found a company that makes custom taps and dies. I gave them a call and they said they could make me just about any tap in a configuration to fit my needs. I took a few measurements and came up with a set of dimensions that would allow me to tap the Screw Plug threads in the block while the oil pan was in place. The shaft needed to be small enough diameter to not interfere with the edge of the oil pan and it needed to be long enough to clear the bottom of the oil pan in order to turn it. They built the tap for me and when it arrived, I was impressed with the quality and size. I decided to call it �Mega Tap�. The contact information for the company I used is:
WESTport Gage Corporation
510 Montauk Highway
West Islip, New York 11795
1- 800-876-8587
www.westportcorp.com
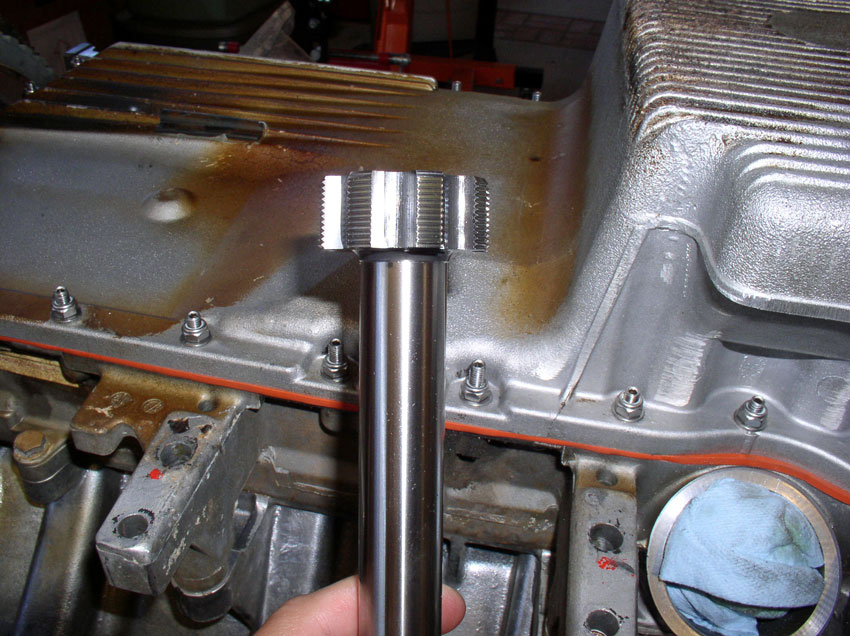
Here�s a picture of the custom Mega Tap they manufactured for me.
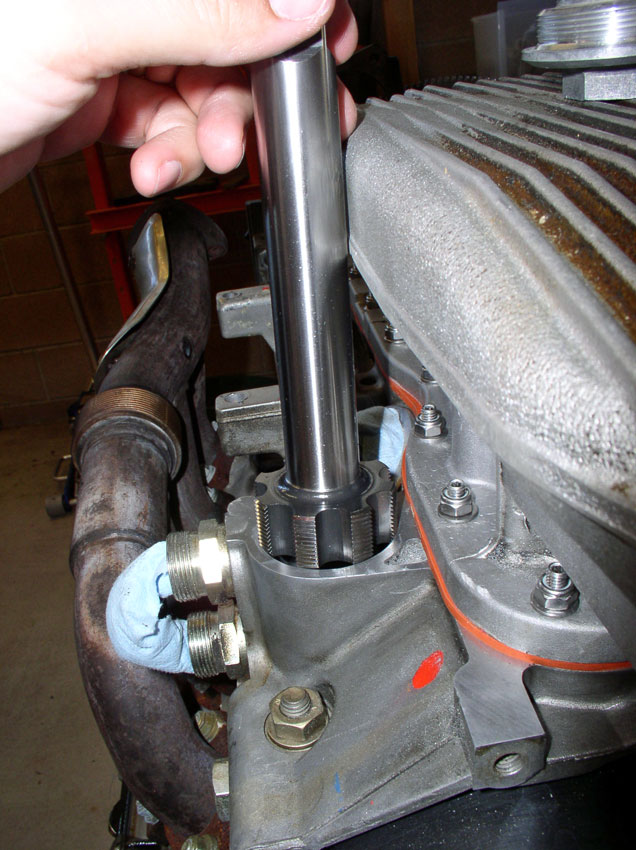
And a pic of Mega Tap in action. Best to stuff a cloth or paper towel down into the opening before taping in order to catch any filings.
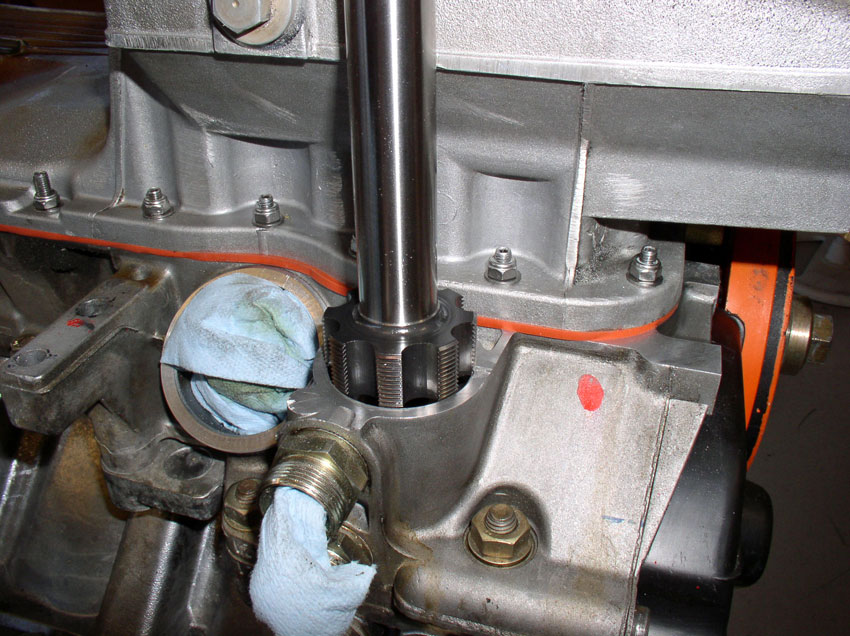
In this picture, I�m just getting the tap started. When it�s working down the threads, there�s about 1-2mm clearance between the oil pan and the tap�s shaft.
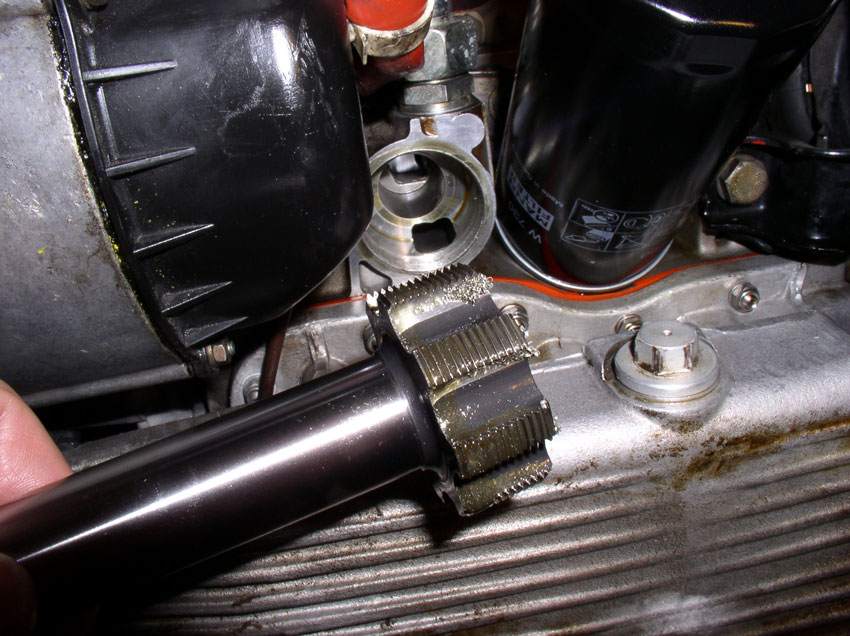
When I was done, the tap cleaned out the threads very well. Here�s a pic of the tap after treating my wife�s �87 that had the same problem only hers was not frozen � just much resistance to install and remove the Screw Plug. Mine had at least as many if not more filings.
After cleaning out the threads and washing away any remaining filings, I test fit the new (used) Screw Plug. It worked perfectly! No more jamming or resistance while tightening!
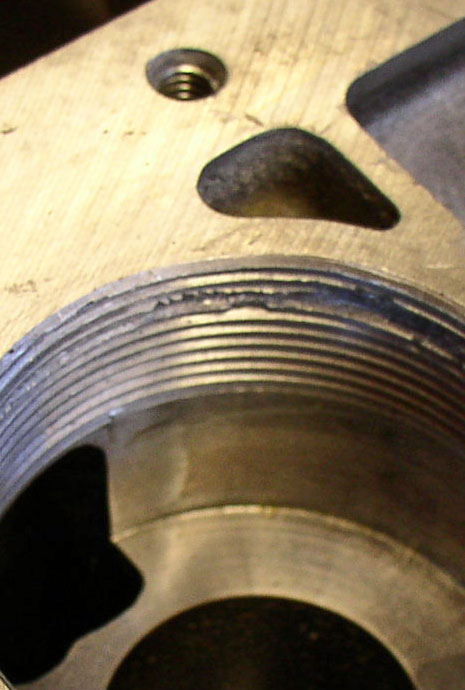
Even though the threads were operational now, as you can see in the after �Mega-Tap� pic below, there was still some missing thread material.
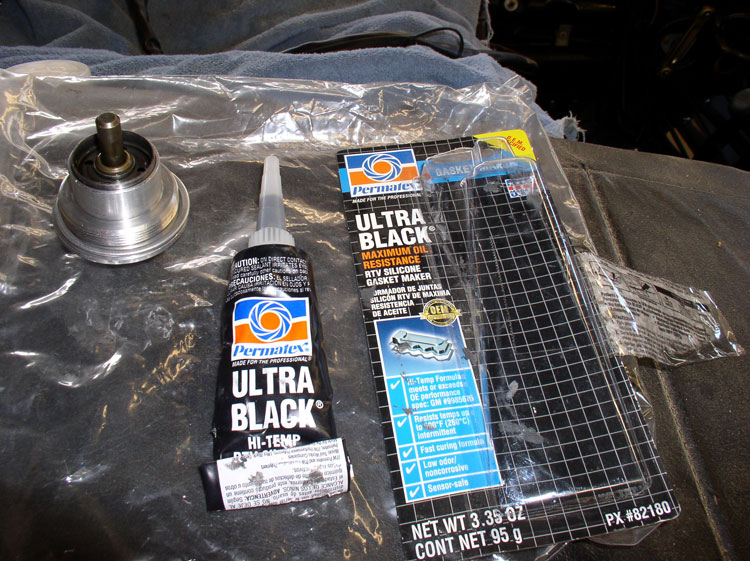
I decided to apply some Permatex Ultra Black sealant to the Screw Plug threads to ensure there would be no leaks. The Ultra Black compound is rated for maximum oil resistance, hi-temp, and is sensor safe.
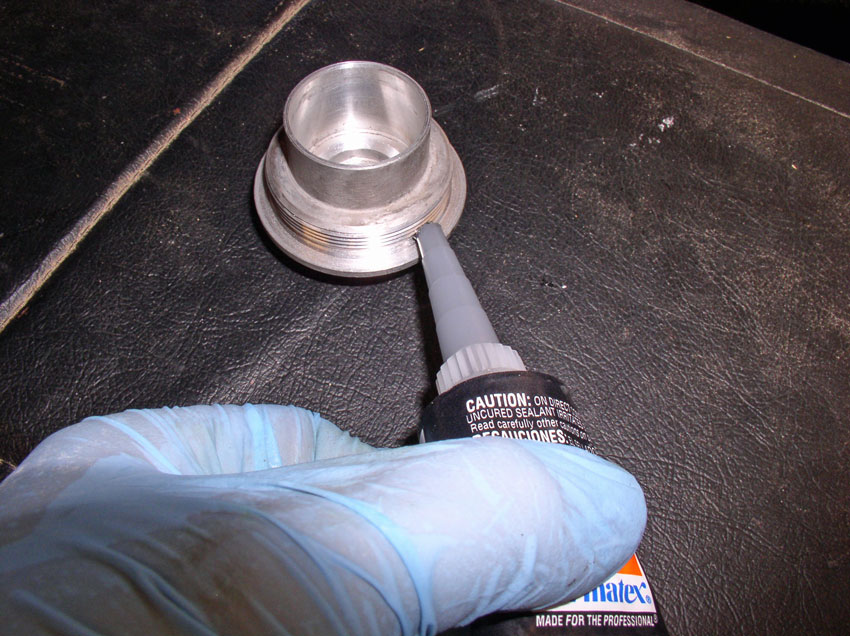
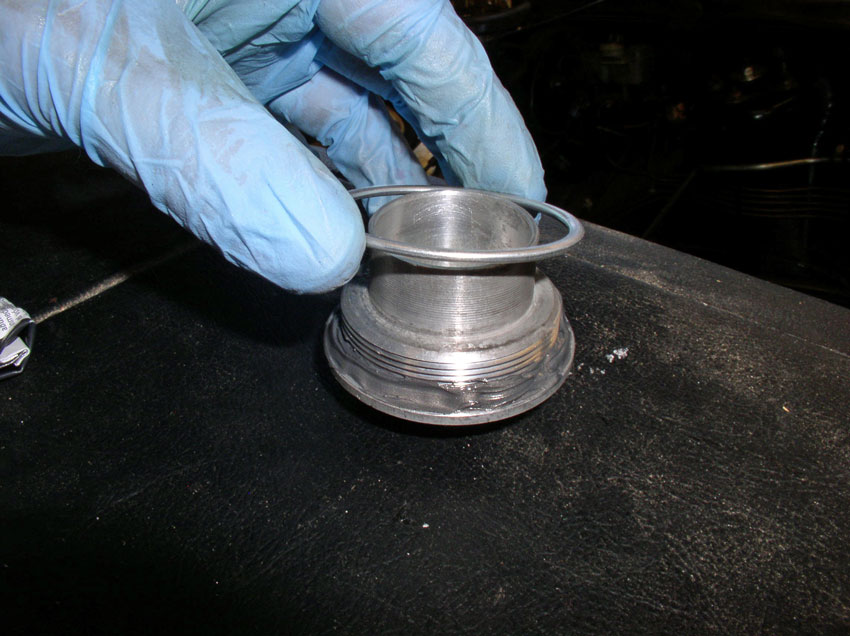
First, I applied a small bead around the base flange of the Screw Plug as shown in the pic below.
I then installed the crush ring/seal.
I then applied another bead of the Ultra Black on the threads above the sealing ring as shown below.
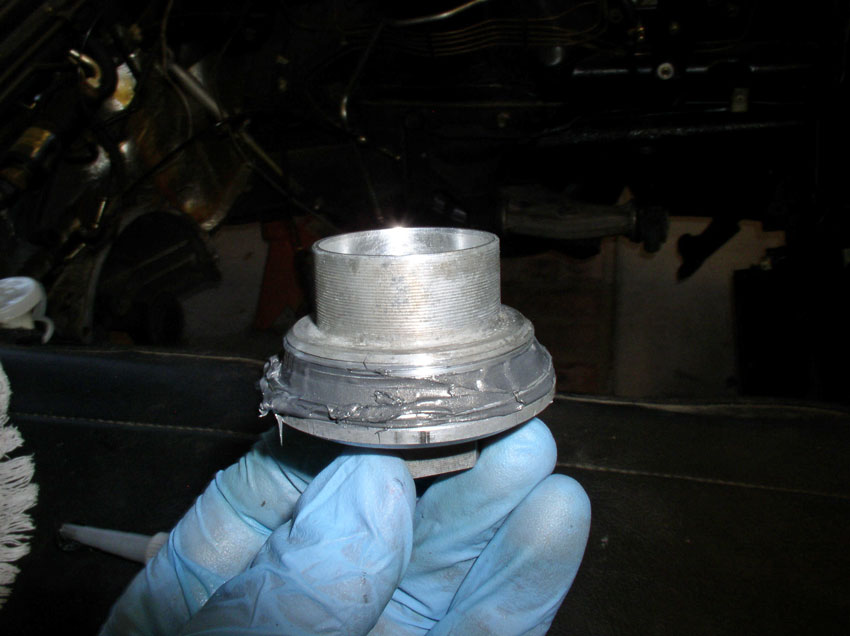
Continued...
It's been quite a while since I've posted a procedure due to an insane work schedule and car projects. I've been on leave this last week and decided to catch up on posting some procedures and pictures I took of projects earlier this year.
This one's a repair of the M48 threads in the engine block that the large Screw Plug threads into. Enjoy!
OIL PRESSURE SENSOR ADAPTOR (SCREW PLUG) THREAD REPAIR
Version 1, November 2011
EXECUTIVE SUMMARY
I don�t know if anyone has had this problem before but I thought I�d post my experience and solution to fixing a jammed �Screw Plug Thermostat Housing� (as the WSM calls it). It�s the adaptor that the Oil Pressure Sensor screws into on the underside of the engine � next to the oil filter. My Screw Plug was somehow jammed and would not tighten or loosen even after applying considerable torque in both directions. I ended up having to cut the Screw Plug out of the engine block. Once out, I repaired the threads in the engine block to take a new (used) Screw Plug. The repair was completed and there have been no signs of leaks since the repair (about 3K miles as of this writing). This procedure documents the steps I took. I left out the pictures of the hack job (literally) it took to remove the jammed Screw Plug but I do have the pictures. They are so graphically ugly, I couldn�t bring myself to post them in this write up.
BACKGROUND
I�m always up for a mechanical adventure with the 928 and this repair was no exception. My adventure started when I began working on Oregon (1987) to prepare it as my new DD. You know, the usual checklist - Intake refresh, TB/WP, Silicone OPG, Motor Mounts, Steering Rack, and, of course, a new oil pressure sensor. After removing the pressure sensor and the Screw Plug, I re-installed the thermostat and spring assembly on the Screw Plug and began to torque the Screw Plug to the recommended torque setting. I didn�t torque the Screw Plug to the full recommended torque (80 Nm or 59 Ft Lbs) because it did not feel like the screw plug was going to take that level of torque � it just didn�t feel right. I was perplexed � a common occurrence � on the one hand, the WSM says 59 Ft Lbs but on the other hand, the threads on the Screw Plug seemed awfully shallow (i.e., not many threads) and both engine block and screw plug are made of aluminum � not a very strong metal anyway. But the screw plug was plenty tight by feel so I left it for a while and continued working on other areas.
Later on, when it was time to install the oil pressure sensor into the Screw Plug, I decided to revisit the Screw Plug torque conundrum. And that was my mistake � I just couldn�t leave well enough alone. In reality, I believe the Screw Plug was plenty tight to prevent leaking and I could have just installed the pressure sensor and been done. But the fact the Screw Plug was not fully torqued to 59 Ft Lbs was bugging me. So, I decided to remove the Screw Plug and see what was going on � that was my mistake! As I began to rotate the Screw Plug counter-clockwise to loosen, it would turn maybe a quarter of a turn then abruptly stop hard. It would not loosen any more. I tried turning it clockwise to tighten back up and the same thing � stopped hard. I tried this a couple of times with no success and concluded the Screw Plug was jammed. Being a newbie, this caused me a considerable amount of anxiety since I could not torque the screw plug in and therefore, considerable amounts of oil was leaking (I started the engine to test it out!). I could not remove the Screw Plug to understand the problem � much less fix it! Even more distressing; this was my latest acquisition � a non-sunroof 1987 S4 w/o rub strips and only 47K miles on the engine. It was perfect for my new DD and now I was afraid the engine was ruined.
After considerable thought and research, I decided I was going to have to cut the Screw Plug out of the block � as despicable as it sounded. I had to at least try. A giant drill bit seemed out of the question. After all, the Screw Plug is 48mm in diameter!
The most straight forward approach seemed to be simply use a hacksaw blade fitted between the crush ring and the Screw Plug flange � keeping the blade away from the mating surface on the engine block so as not to mar the surface. This seemed like a rather barbaric approach and I still cringe when I think about it but I was desperate and wanted to save the engine. Here�s a pic of the hacksaw blade in action. I took my time and exercised a lot of patience.
Once I was finished with the hacksaw blade, I used the Dremel to finish the job using a combination of a cut off wheel and the cutting bit that I use when cutting out the flappy bearings. I ended up removing the oil pan to gain better access � although I did seal off the crank/block to prevent filings from entering the crank area. If I have to do this repair again (i.e., cut off the Screw Plug, I�m just going to remove the engine from the car to make it much easier to work!
After it was out, I had a look at the threads in the engine block. You can see from the pic below that some of the threads were broken/damaged.
At this point, I decided to just pull the engine anyway to get better access to the threads and complete a few other repairs while the engine was out. Soooo, out came the engine.
Once the engine was out and rotated upside down, I had a closer look at the thread condition. I confirmed there was not a lot of thread material (i.e., number of threads) to secure the Plug. These threads in the picture below were damaged and may have been causing the problem.
In another area, significant portions of the threads were missing! This did not look good.
I figured my options were to either replace the block � and therefore the engine. Or try to repair the threads. I had heard of the Helicoil method to repair threads but I did not have any experience with a Helicoil and I did not know if they made an insert big enough for this application (M48). After some research, I found a company that makes custom taps and dies. I gave them a call and they said they could make me just about any tap in a configuration to fit my needs. I took a few measurements and came up with a set of dimensions that would allow me to tap the Screw Plug threads in the block while the oil pan was in place. The shaft needed to be small enough diameter to not interfere with the edge of the oil pan and it needed to be long enough to clear the bottom of the oil pan in order to turn it. They built the tap for me and when it arrived, I was impressed with the quality and size. I decided to call it �Mega Tap�. The contact information for the company I used is:
WESTport Gage Corporation
510 Montauk Highway
West Islip, New York 11795
1- 800-876-8587
www.westportcorp.com
Here�s a picture of the custom Mega Tap they manufactured for me.
And a pic of Mega Tap in action. Best to stuff a cloth or paper towel down into the opening before taping in order to catch any filings.
In this picture, I�m just getting the tap started. When it�s working down the threads, there�s about 1-2mm clearance between the oil pan and the tap�s shaft.
When I was done, the tap cleaned out the threads very well. Here�s a pic of the tap after treating my wife�s �87 that had the same problem only hers was not frozen � just much resistance to install and remove the Screw Plug. Mine had at least as many if not more filings.
After cleaning out the threads and washing away any remaining filings, I test fit the new (used) Screw Plug. It worked perfectly! No more jamming or resistance while tightening!
Even though the threads were operational now, as you can see in the after �Mega-Tap� pic below, there was still some missing thread material.
I decided to apply some Permatex Ultra Black sealant to the Screw Plug threads to ensure there would be no leaks. The Ultra Black compound is rated for maximum oil resistance, hi-temp, and is sensor safe.
First, I applied a small bead around the base flange of the Screw Plug as shown in the pic below.
I then installed the crush ring/seal.
I then applied another bead of the Ultra Black on the threads above the sealing ring as shown below.
Continued...
 11-24-2011, 12:37 AM
#2
Rennlist Member
Thread Starter
Join Date: Sep 2007
Location: Ridgecrest, California
Posts: 1,363
Likes: 0
Received 143 Likes
on
28 Posts
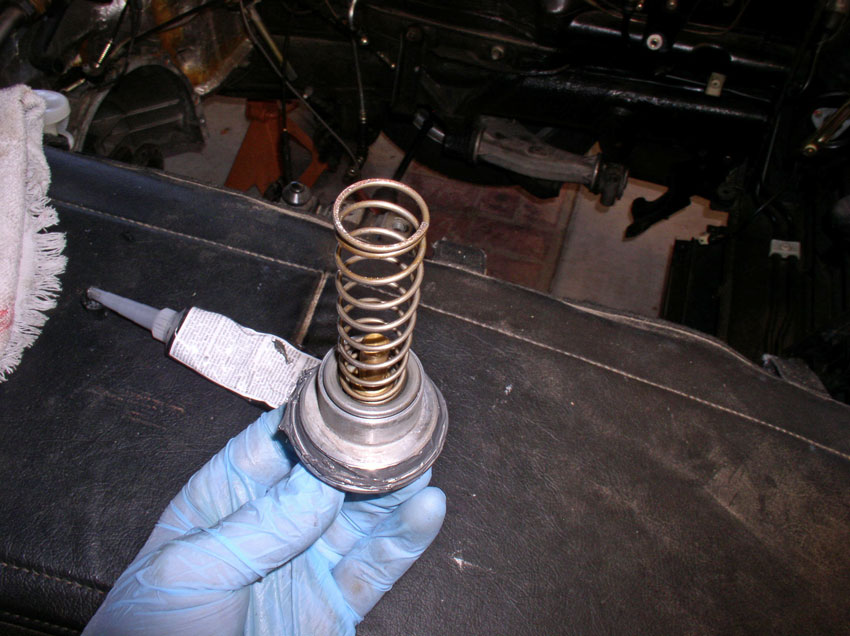
Next, I installed the cap and short spring as shown in the pic below.
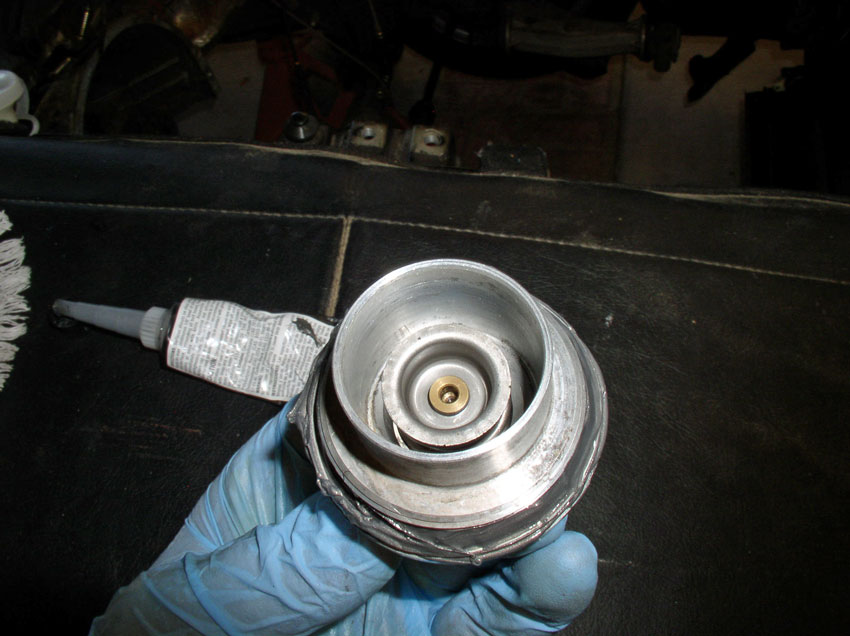
Followed by the thermostat as pictured below.
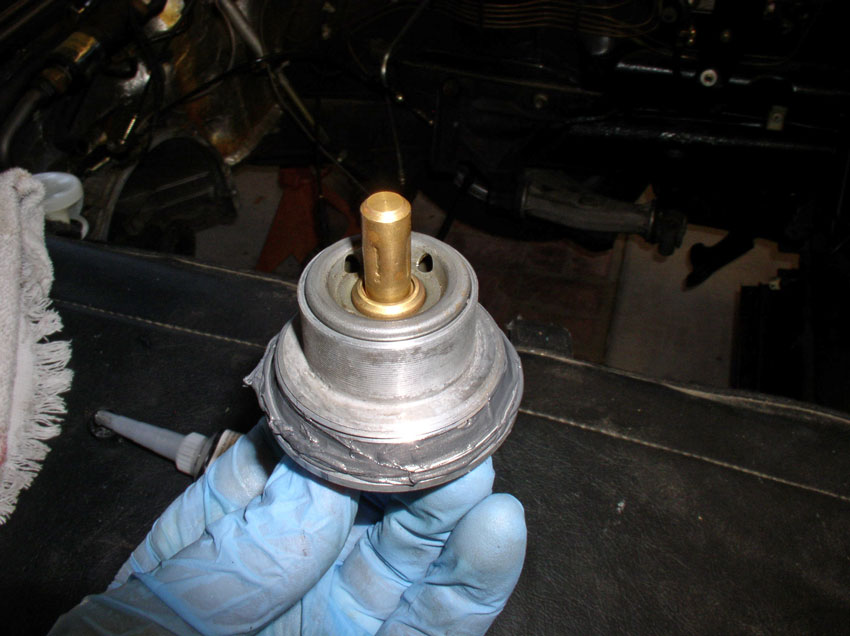
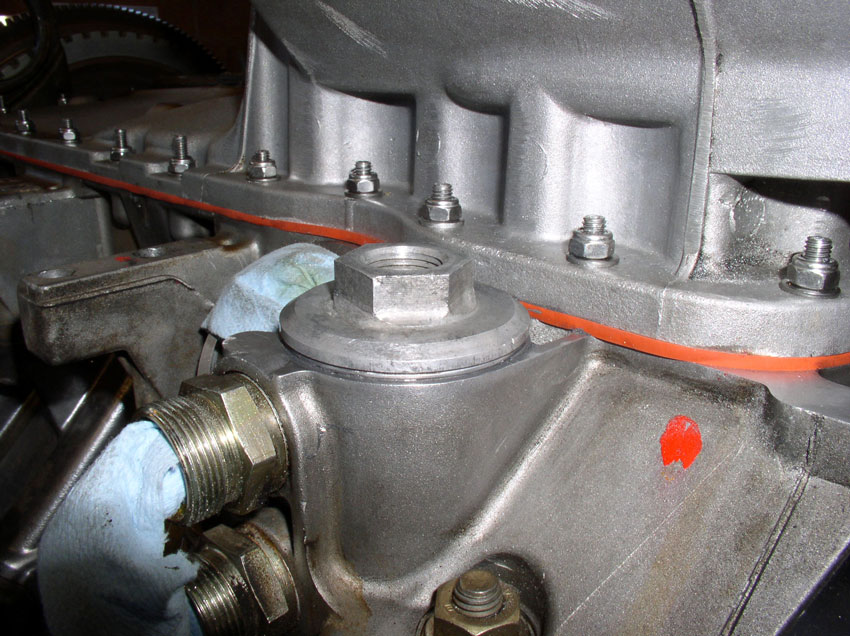
And finally the large conical spring. Notice how the small end of the spring is mated to the Screw Plug and the large end is mated to the engine block.
Next, I installed the spring into the block housing as shown below.
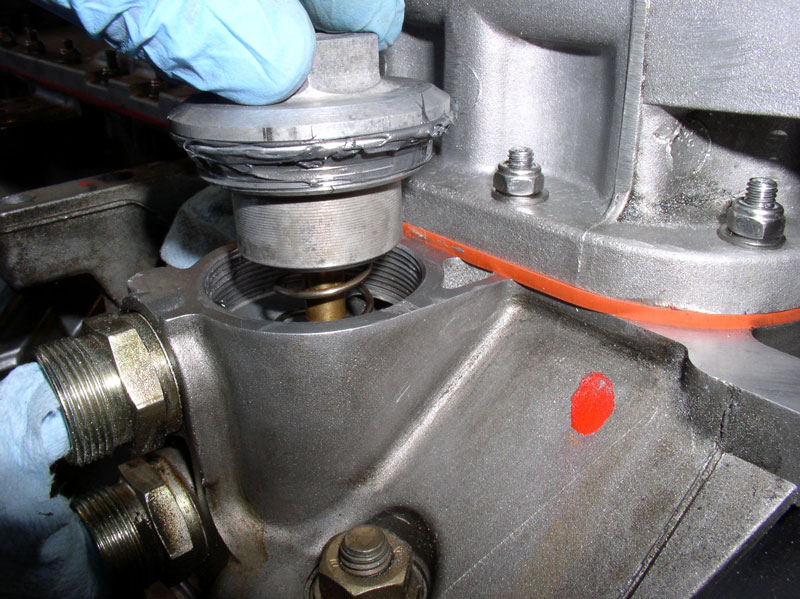
Then hand tightened the Screw Plug down as shown in the pic below.
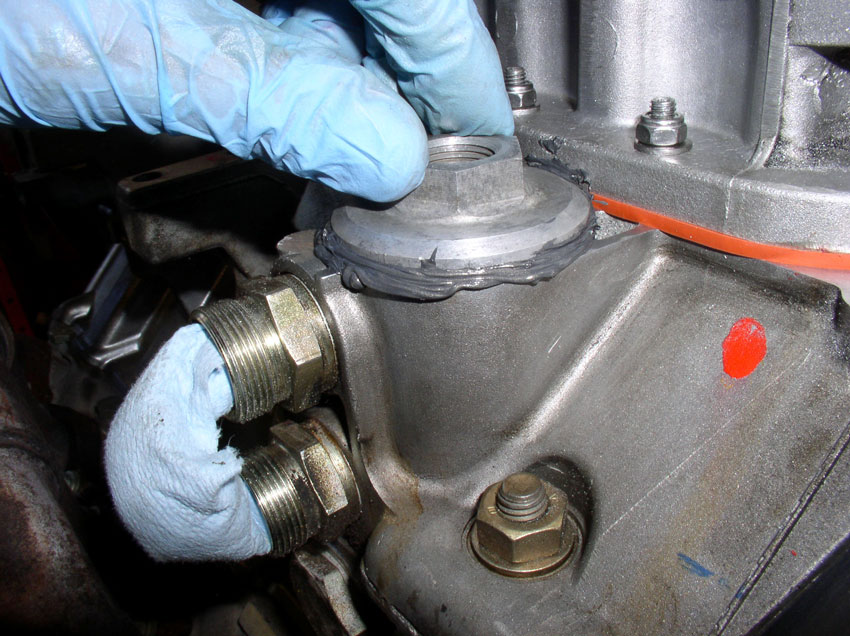
I then torqued the Screw Plug down. This time, I only went to about 28 Ft Lbs.
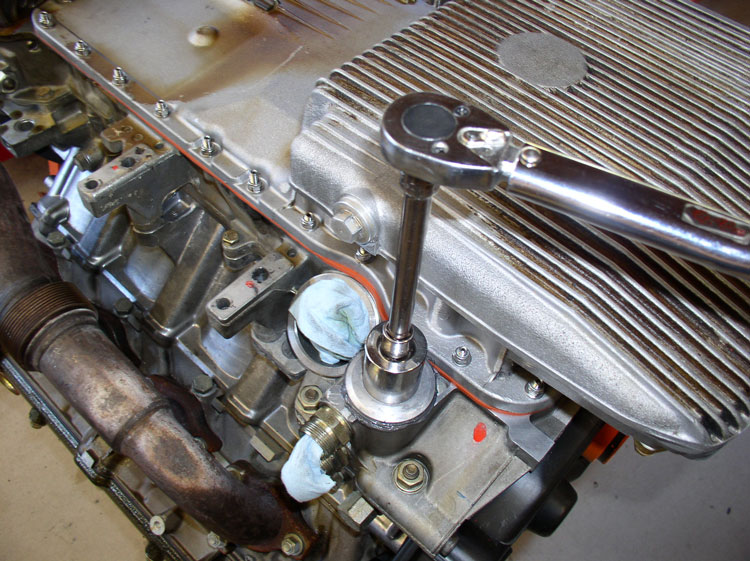
I cleaned off the excess Ultra Black and prepared to install the Oil Pressure Sensor.
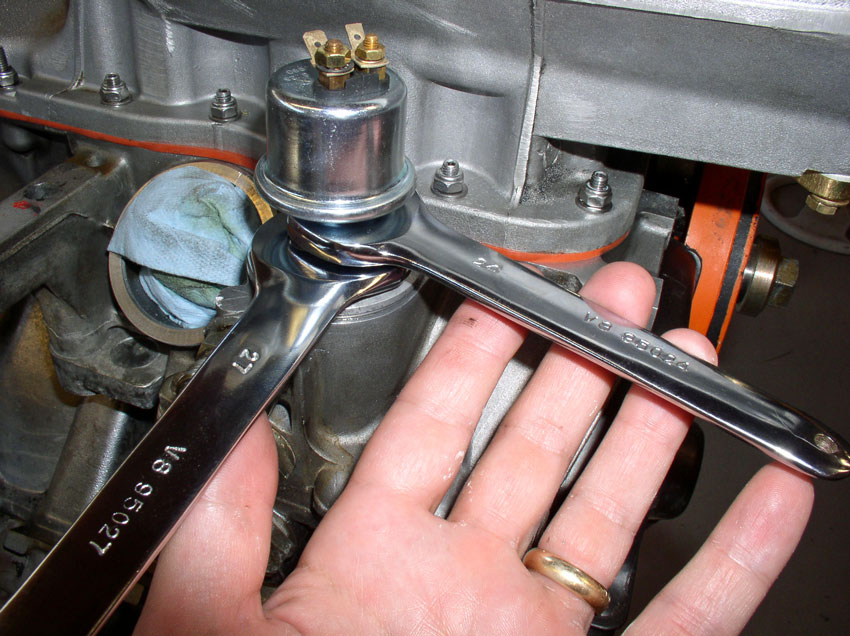
The Pressure Sensor should have a sealing ring attached. As an extra measure, I applied a small amount of Ultra Black to the threads of the pressure sensor as well being careful not to over do it and keep the compound away from the sensor inlet hole! I used a 27mm wrench to counter hold the Screw Plug while I used a 24mm �Service� wrench to tighten the sensor to approximately 24 Ft Lbs. The �Service� wrenches are thin enough to fit in between the sensor and the counterholding wrench. I could not fit a standard 24mm wrench and a standard 27mm wrench both in that tight space. The �Service� wrenches are also shorter so they work well to remove/install the sensor later by only removing the oil filter.
I�ve been driving the car now for about 3K miles and have no oil leaking or weeping issues around the Screw Plug or the Oil Pressure Sensor. Even though this repair was a PITA, it was worth it in the long run to save the original engine. I�m very happy with the repair.
As mentioned earlier, my wife�s �87 had a similar problem with some thread material missing on the block where the Screw Plug fit in. Her Screw Plug could be removed but with much resistance. I used the �Mega Tap� to clear the threads and now the Screw Plug installs much easier. I was able to perform the repair on her threads while the engine was in the car and the oil pan, alternator and oil filter all installed. I did need to remove the oil filter to remove and install the Screw Plug.
Well, that�s it for this repair. As always, please feel free to comment or recommend other approaches or techniques if you have performed this repair. THANKS for reading!
Followed by the thermostat as pictured below.
And finally the large conical spring. Notice how the small end of the spring is mated to the Screw Plug and the large end is mated to the engine block.
Next, I installed the spring into the block housing as shown below.
Then hand tightened the Screw Plug down as shown in the pic below.
I then torqued the Screw Plug down. This time, I only went to about 28 Ft Lbs.
I cleaned off the excess Ultra Black and prepared to install the Oil Pressure Sensor.
The Pressure Sensor should have a sealing ring attached. As an extra measure, I applied a small amount of Ultra Black to the threads of the pressure sensor as well being careful not to over do it and keep the compound away from the sensor inlet hole! I used a 27mm wrench to counter hold the Screw Plug while I used a 24mm �Service� wrench to tighten the sensor to approximately 24 Ft Lbs. The �Service� wrenches are thin enough to fit in between the sensor and the counterholding wrench. I could not fit a standard 24mm wrench and a standard 27mm wrench both in that tight space. The �Service� wrenches are also shorter so they work well to remove/install the sensor later by only removing the oil filter.
I�ve been driving the car now for about 3K miles and have no oil leaking or weeping issues around the Screw Plug or the Oil Pressure Sensor. Even though this repair was a PITA, it was worth it in the long run to save the original engine. I�m very happy with the repair.
As mentioned earlier, my wife�s �87 had a similar problem with some thread material missing on the block where the Screw Plug fit in. Her Screw Plug could be removed but with much resistance. I used the �Mega Tap� to clear the threads and now the Screw Plug installs much easier. I was able to perform the repair on her threads while the engine was in the car and the oil pan, alternator and oil filter all installed. I did need to remove the oil filter to remove and install the Screw Plug.
Well, that�s it for this repair. As always, please feel free to comment or recommend other approaches or techniques if you have performed this repair. THANKS for reading!
11-24-2011, 12:54 AM
#3
Rennlist
Basic Site Sponsor
Basic Site Sponsor
Dwayne:
You should have called. I had a tap made for that thread years ago. You could have borrowed it.
You should have called. I had a tap made for that thread years ago. You could have borrowed it.
__________________
greg brown

714 879 9072
GregBBRD@aol.com
Semi-retired, as of Feb 1, 2023.
The days of free technical advice are over.
Free consultations will no longer be available.
Will still be in the shop, isolated and exclusively working on project cars, developmental work and products, engines and transmissions.
Have fun with your 928's people!
greg brown
714 879 9072
GregBBRD@aol.com
Semi-retired, as of Feb 1, 2023.
The days of free technical advice are over.
Free consultations will no longer be available.
Will still be in the shop, isolated and exclusively working on project cars, developmental work and products, engines and transmissions.
Have fun with your 928's people!
11-24-2011, 12:55 AM
#4
Rennlist Member
Rennlist Site Sponsor

Perhaps a rental program for "Mega Tap" would be helpful to others...
A deposit to cover the cost of the tap, with refund of 90% of the deposit upon return in perfect condition might be the most logical approach.
A deposit to cover the cost of the tap, with refund of 90% of the deposit upon return in perfect condition might be the most logical approach.
11-24-2011, 01:02 AM
#5
Archive Gatekeeper
Rennlist Member
Rennlist Member
Mega-Tap, I love it. Great save! Actually, this exact thing happened to my stroker engine, Greg ended up milling out the stuck screw plug, but the engine was apart and so the girdle could be immobilized on the mill.
Here's a post on it, but the Cliff's notes version is DON'T TRY TO FORCE A STUCK OIL PRESSURE SENDER/THERMOSTAT SCREW PLUG.
https://rennlist.com/forums/6980393-post209.html

M48 x 1.5 bottoming tap:

Here's a post on it, but the Cliff's notes version is DON'T TRY TO FORCE A STUCK OIL PRESSURE SENDER/THERMOSTAT SCREW PLUG.
https://rennlist.com/forums/6980393-post209.html
M48 x 1.5 bottoming tap:
11-24-2011, 01:27 AM
#7
Drifting

Dwayne,
It looks like the hack saw blade damaged the seal seating area on the engine block side. Did you manage to resurface that?
For your case, I would have measured the percent of thread loss and reduced the WSM torque by that same percentage. You know the thread pitch, so you only need to measure the lengths of damaged threads. So, if 2% of the threads were damaged, then the max torque out be reduced to 57 ft-lbs (0.98 x 59).
When I torqued this adapter on my 90' S4 several years ago, I was also concerned about stripping the threads at 59 ft-lbs. So, I initially torqued it to 47 ft-lbs using a new seal ring, but after a few hundred miles it was apparent it was weeping oil. So, later I removed the pressure sensor and re-torqued it to 53 ft-lbs. That was enought to stop the leak on my car.
Trending Topics
11-24-2011, 01:55 AM
#8
Rennlist Member
Thread Starter
Join Date: Sep 2007
Location: Ridgecrest, California
Posts: 1,363
Likes: 0
Received 143 Likes
on
28 Posts
Hello Wally. A tool rental program is a great idea. I rented the water pump block drilling repair tool from Greg Brown and am so thankful it was available. I would certainly be willing to help with a loan or rental if someone had the need for a Mega Tap.
11-24-2011, 01:58 AM
#9
Rennlist Member
Thread Starter
Join Date: Sep 2007
Location: Ridgecrest, California
Posts: 1,363
Likes: 0
Received 143 Likes
on
28 Posts
Hi Rob. Thanks for the post and the link. What you describe is exactly what I experienced with the engine in Oregon. I'm wondering how common it is for these threads to fail? And what causes it?
11-24-2011, 02:08 AM
#10
Nordschleife Master
Ok, so I'm scared now. I removed the oil cooler fittings yesterday from my '87, and have the parts to replace the springs and piston inside the oil thermostat - which I was going to remove this evening after the kids go to sleep.
I think after reading this, I'll leave well enough alone as its not leaking and oil pressure is behaving as expected, rather than risk effing up the threads and going through this pain.
I think after reading this, I'll leave well enough alone as its not leaking and oil pressure is behaving as expected, rather than risk effing up the threads and going through this pain.
11-24-2011, 02:10 AM
#11
Rennlist Member
Thread Starter
Join Date: Sep 2007
Location: Ridgecrest, California
Posts: 1,363
Likes: 0
Received 143 Likes
on
28 Posts
Dwayne,
It looks like the hack saw blade damaged the seal seating area on the engine block side. Did you manage to resurface that?
For your case, I would have measured the percent of thread loss and reduced the WSM torque by that same percentage. You know the thread pitch, so you only need to measure the lengths of damaged threads. So, if 2% of the threads were damaged, then the max torque out be reduced to 57 ft-lbs (0.98 x 59).
When I torqued this adapter on my 90' S4 several years ago, I was also concerned about stripping the threads at 59 ft-lbs. So, I initially torqued it to 47 ft-lbs using a new seal ring, but after a few hundred miles it was apparent it was weeping oil. So, later I removed the pressure sensor and re-torqued it to 53 ft-lbs. That was enought to stop the leak on my car.
It looks like the hack saw blade damaged the seal seating area on the engine block side. Did you manage to resurface that?
For your case, I would have measured the percent of thread loss and reduced the WSM torque by that same percentage. You know the thread pitch, so you only need to measure the lengths of damaged threads. So, if 2% of the threads were damaged, then the max torque out be reduced to 57 ft-lbs (0.98 x 59).
When I torqued this adapter on my 90' S4 several years ago, I was also concerned about stripping the threads at 59 ft-lbs. So, I initially torqued it to 47 ft-lbs using a new seal ring, but after a few hundred miles it was apparent it was weeping oil. So, later I removed the pressure sensor and re-torqued it to 53 ft-lbs. That was enought to stop the leak on my car.
Great idea on measuring remaining thread to determine a more reasonable torque setting. Using your Torque-Test-Torque-Test method of slightly increasing torque until the leaking/weeping stops is another great idea so one only torques enough to complete the seal - without increasing risk of damaging the threads necessarily. Thanks for the tip.
11-24-2011, 02:22 AM
#12
Rennlist Member
Thread Starter
Join Date: Sep 2007
Location: Ridgecrest, California
Posts: 1,363
Likes: 0
Received 143 Likes
on
28 Posts
Words that I plan to live by! At least on an item like this. I do not plan to take any more of these off unless it's for reasons you describe - leaking or oil pressure problems. Perhaps they were not designed to be removed and re-torqued frequently.
Last edited by Dwayne; 11-24-2011 at 10:01 AM.
11-24-2011, 07:06 AM
#13
Addict
Lifetime Rennlist
Member
Lifetime Rennlist
Member
Hi Dwayne, nice write-up as always. I wonder how the threads got damaged, it seems to be a fine pitch. Another question: you seem to have left out the large air pump bolt on the tensioner, is the tensioner ok like that?
Many, including me have done this without a problem. Of course, that was before I read this thread 
Ok, so I'm scared now. I removed the oil cooler fittings yesterday from my '87, and have the parts to replace the springs and piston inside the oil thermostat - which I was going to remove this evening after the kids go to sleep.
I think after reading this, I'll leave well enough alone as its not leaking and oil pressure is behaving as expected, rather than risk effing up the threads and going through this pain.
I think after reading this, I'll leave well enough alone as its not leaking and oil pressure is behaving as expected, rather than risk effing up the threads and going through this pain.
11-24-2011, 07:57 AM
#14
Rennlist Member
Thanks for posting this solution.
Am probably going to need one of those taps myself due to 85 developing leak in that area.
So,you are sure its possible to do this work with the engine still installed?
Am probably going to need one of those taps myself due to 85 developing leak in that area.
So,you are sure its possible to do this work with the engine still installed?
11-24-2011, 08:54 AM
#15
Rennlist Member
Is this just a tricky as removing the water bridge allen bolts?
Should preheating the area be a part of any removal procedure?
In my experience with these engines is that when ever some thing feels stuck preheating has always worked for me to get thing to loosen up.
My compliments Dwayne
