
Need help with DME/KLR plug connector (Update: Problem solved [pics])
 06-03-2006, 10:58 AM
#1
Addict
Rennlist Member
Rennlist Member
Thread Starter
Join Date: Mar 2003
Location: South of the St-Lawrence river
Posts: 1,498
Likes: 0
Received 1 Like
on
1 Post
I'm in the process of installing the LR injector and knock sensor harness. The included instructions say to plug the new wires into DME pins #14, 15 and KLR pins #11, 12, 13.
My question is how do I remove the existing metal plugs in the DME and KLR connectors? I figured there must be an easy trick to this but I guess I'm just too thick to figure it out.

Below is a close-up picture of the KLR connector showing the metal plugs for pin # 11, 12, 13. I'm able to move them up and down a little bit but they seem to be catching on something.

My question is how do I remove the existing metal plugs in the DME and KLR connectors? I figured there must be an easy trick to this but I guess I'm just too thick to figure it out.
Below is a close-up picture of the KLR connector showing the metal plugs for pin # 11, 12, 13. I'm able to move them up and down a little bit but they seem to be catching on something.
Last edited by 951Porschiste; 06-03-2006 at 05:35 PM.
 06-03-2006, 11:35 AM
#3
Rennlist Member
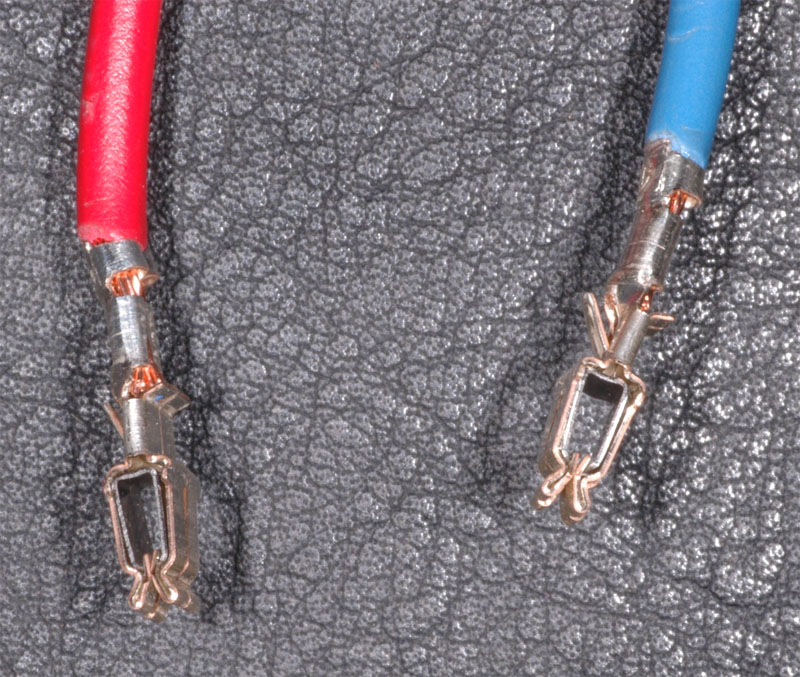
I don't know about Lindsey's products, but normally you need to cut and splice into the wire themselves, rather than replacing the little metal pins in the connectors. Unless Lindsey gave you new pins to put in the connector (something like the pic below), there is no way to "plug in" a piece of wire into the back of an assembled connector like that.
Also, the insulation on that white wire looks a bit torn. Might want to inspect that closely to make sure the wires are no fraying.
Also, the insulation on that white wire looks a bit torn. Might want to inspect that closely to make sure the wires are no fraying.
06-03-2006, 11:40 AM
#4
Addict
Rennlist Member
Rennlist Member
Thread Starter
Join Date: Mar 2003
Location: South of the St-Lawrence river
Posts: 1,498
Likes: 0
Received 1 Like
on
1 Post
Originally Posted by Tom M'Guinn
I don't know about Lindsey's products, but normally you need to cut and splice into the wire themselves, rather than replacing the little metal pins in the connectors. Unless Lindsey gave you new pins to put in the connector (something like the pic below), there is no way to "plug in" a piece of wire into the back of an assembled connector like that.
Also, the insulation on that white wire looks a bit torn. Might want to inspect that closely to make sure the wires are no fraying.
Also, the insulation on that white wire looks a bit torn. Might want to inspect that closely to make sure the wires are no fraying.
Here's a picture of the wires provided by LR:
Last edited by 951Porschiste; 06-03-2006 at 11:50 AM. Reason: Adding a picture
06-03-2006, 11:50 AM
#5
Rennlist Member
Wow, nice product! 
The pins in the picture you show are held in place with little barbs on the other side. They made special "pin extractors" to get them out, but sometimes you can push the barbs in with needles, etc. See an example of multi-purpose extractors here:
http://www.eagleday.com/ampconnectors.html
The pins in the picture you show are held in place with little barbs on the other side. They made special "pin extractors" to get them out, but sometimes you can push the barbs in with needles, etc. See an example of multi-purpose extractors here:
http://www.eagleday.com/ampconnectors.html
06-03-2006, 11:55 AM
#6
Addict
Rennlist Member
Rennlist Member
Thread Starter
Join Date: Mar 2003
Location: South of the St-Lawrence river
Posts: 1,498
Likes: 0
Received 1 Like
on
1 Post
Originally Posted by Tom M'Guinn
Wow, nice product!
The pins in the picture you show are held in place with little barbs on the other side. They made special "pin extractors" to get them out, but sometimes you can push the barbs in with needles, etc. See an example of multi-purpose extractors here:
http://www.eagleday.com/ampconnectors.html
The pins in the picture you show are held in place with little barbs on the other side. They made special "pin extractors" to get them out, but sometimes you can push the barbs in with needles, etc. See an example of multi-purpose extractors here:
http://www.eagleday.com/ampconnectors.html
06-03-2006, 11:59 AM
#7
The connectors on the LR wires are not installed correctly. the crimp closest to the insulation should actually be crimped over the insulation. It make for a much stronger union, but it will still work.
Trending Topics
06-03-2006, 05:34 PM
#8
Addict
Rennlist Member
Rennlist Member
Thread Starter
Join Date: Mar 2003
Location: South of the St-Lawrence river
Posts: 1,498
Likes: 0
Received 1 Like
on
1 Post
Problem solved!
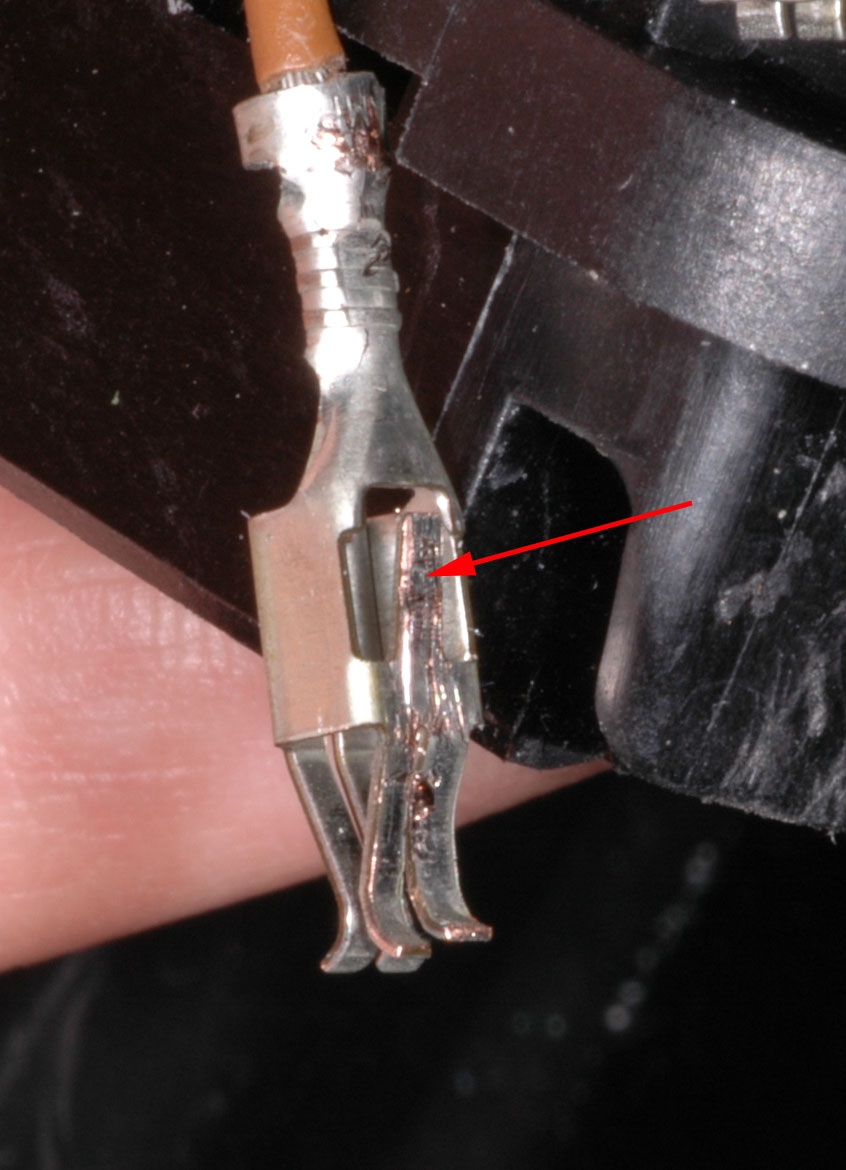
To remove the metal pins from the plastic connector, you need a special tool that will disengage the "locking tab" (see arrow in next picture):
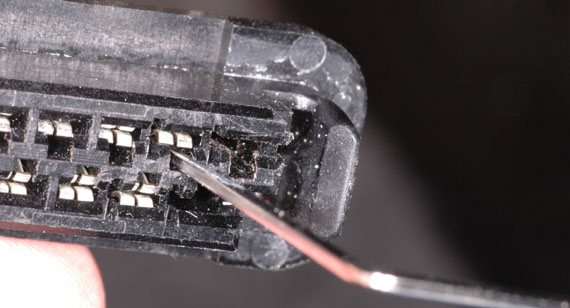
I went to the local electronic store (ex-Radio-Shack, they are now called "The Source by Circuit City" in Canada) and could not find an adequate tool. So I decided to fabricate my own using a 1.5 mm allen wrench which I tapered down (see next picture) using a Dremel rotary tool.

Once I had the modified allen wrench, I tend inserted this tool down the little plastic valley of the connector as seen in the next picture. This disengaged the "locking tab" and then I just had to pull on the wire to take it out.
And Voil�! Problem Solved!


To remove the metal pins from the plastic connector, you need a special tool that will disengage the "locking tab" (see arrow in next picture):
I went to the local electronic store (ex-Radio-Shack, they are now called "The Source by Circuit City" in Canada) and could not find an adequate tool. So I decided to fabricate my own using a 1.5 mm allen wrench which I tapered down (see next picture) using a Dremel rotary tool.
Once I had the modified allen wrench, I tend inserted this tool down the little plastic valley of the connector as seen in the next picture. This disengaged the "locking tab" and then I just had to pull on the wire to take it out.
And Voil�! Problem Solved!
06-03-2006, 08:03 PM
#9
Rennlist Member
Nice work making your own pin extractor. With you could make one for me so I could get the pin out of my broken Zeitronix connector. It's only 3mm, and none of my local electronics shops have an extractor small enough -- and I live in the heart of Silicon Valley...
06-05-2006, 01:26 PM
#10
Race Car
Join Date: Jun 2004
Location: State of Confusion
Posts: 3,696
Likes: 0
Received 0 Likes
on
0 Posts
Thanks for the write-up.
Beautiful MACRO shots! Can't beat the Nikons for Macros.
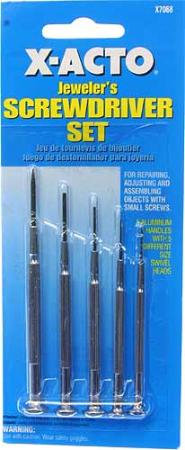
I used an xacto jewelers set of screw drivers for extracting my pins.(second to the smallest I think)
It is equipped with 0.7mm, 0.9mm, 1.2mm, 1.6mm, and 2.0 mm.
Some I think have used bobby pins(search..)
Beautiful MACRO shots! Can't beat the Nikons for Macros.
I used an xacto jewelers set of screw drivers for extracting my pins.(second to the smallest I think)
It is equipped with 0.7mm, 0.9mm, 1.2mm, 1.6mm, and 2.0 mm.
Some I think have used bobby pins(search..)
06-05-2006, 04:12 PM
#11
Addict
Rennlist Member
Rennlist Member
Thread Starter
Join Date: Mar 2003
Location: South of the St-Lawrence river
Posts: 1,498
Likes: 0
Received 1 Like
on
1 Post
Originally Posted by testarossa_td
Thanks for the write-up.
Beautiful MACRO shots! Can't beat the Nikons for Macros.
I used an xacto jewelers set of screw drivers for extracting my pins.(second to the smallest I think)
It is equipped with 0.7mm, 0.9mm, 1.2mm, 1.6mm, and 2.0 mm.
Some I think have used bobby pins(search..)
Beautiful MACRO shots! Can't beat the Nikons for Macros.
I used an xacto jewelers set of screw drivers for extracting my pins.(second to the smallest I think)
It is equipped with 0.7mm, 0.9mm, 1.2mm, 1.6mm, and 2.0 mm.
Some I think have used bobby pins(search..)
Macro shots: Nikon D70s with 105 mm Macro lens and ring flash.