
Design your own Dual Spring-Rate Coilovers
 04-07-2009, 12:45 PM
#31
Pro
Thread Starter
Join Date: Jun 2005
Location: Napa Valley, CA
Posts: 589
Likes: 0
Received 0 Likes
on
0 Posts
Well enough chit chat, it’s time for some video!!!… Ok, I’ll be the first one to admit that this video gets a little boring after the first 30 seconds, but if you start watching it after the 2:00 minute mark, I think it gives one a much better appreciation of what a large role such a small tender spring can play in a dual spring system.
I think the tender spring is the real “shock absorber”. Why the do we call dampers shock absorbers anyway?
http://www.youtube.com/watch?v=FEEFG...eature=related
Ok, so it's from an off-road vehicle, but just think, If you ever have an off track excursion, your ride will be so much smoother
I think the tender spring is the real “shock absorber”. Why the do we call dampers shock absorbers anyway?
http://www.youtube.com/watch?v=FEEFG...eature=related
Ok, so it's from an off-road vehicle, but just think, If you ever have an off track excursion, your ride will be so much smoother
 04-07-2009, 11:16 PM
#32
Racer
Join Date: May 2007
Posts: 491
Likes: 0
Received 0 Likes
on
0 Posts
Tight Video!
You obviously put some serious time into those calcs!
Motion ratio is not a constant over the entire range of travel. If you use Van's method you need to measure it over a range close to ride height. Also the control arm and the strut are not the exact same plane (unless you have zero degrees of caster) so you need to account for the longitudinal dimension.
04-08-2009, 08:42 AM
#33
Rennlist Member
Yeah, when I measured mine, I started 1/2" below ride height and went to 1/2" above ride height.
I found my technique: https://rennlist.com/forums/4317729-post65.html
Trucho, are you using dual rates on the rear, too? If I PM you my email, will you share your spreadsheet?
I found my technique: https://rennlist.com/forums/4317729-post65.html
Trucho, are you using dual rates on the rear, too? If I PM you my email, will you share your spreadsheet?
04-08-2009, 03:02 PM
#34
Pro
Thread Starter
Join Date: Jun 2005
Location: Napa Valley, CA
Posts: 589
Likes: 0
Received 0 Likes
on
0 Posts
Yeah, well, it was my winter project. I was bored and needed something to keep me busy. 
Nope only on the fronts, the rear 28 mm torsion bars provide a soft enough ride as they only rated at 254 #/in. wheel rate.
Van, of course! PM me your info.
So the way I use the spreadsheet is as follows: Once I have the �key to the Universe� (strut free travel) information for my car, I start playing around with spring stiffness, main and tender so that the total weight transfer at the outside front tire (see box at bottom middle of spreadsheet) is close to my corner weight 725 #.
However, before I can start plugging in spring stiffness, I make sure I have the proper specs for the springs of interest, namely Free Length, and Block Length.
Info. Obtained from Eibach or Hypercoil web sites, each spring manufacturer of course has different spring specs.
In a few minutes, I�m going to post �Section IV. Lowering a car to improve cornering potential.� I�ve included some example spreadsheet snap shots of what if scenarios. Let's see how the spreasheet helps in figuring out what spring stiffness I might need as I begin to lower the ride height.
04-08-2009, 05:41 PM
#35
Pro
Thread Starter
Join Date: Jun 2005
Location: Napa Valley, CA
Posts: 589
Likes: 0
Received 0 Likes
on
0 Posts
It’s time to start wrapping up this thread, here is Section IV.
I’m not going to subject you guys to any more physics mumbo jumbo, besides, Spring is here and we need to get out and start enjoying the outdoors a little more. So this section is going to be very, very brief.
It is assumed that anyone lowering their cars understands the need to do it with appropriate suspension geometry corrections, not only to retain a decent “roll moment”, but more importantly , it needs to be done so as to not stress out the ball joints. Take care of your boys! If the suspension geometry is not “corrected”, the ball joints operate at extreme angles as the suspension now dwells at the “bottomed out” range of bump travel.
Ok, here we go….
The big question for me was, “Now that I’ve got 550# springs, how low can I drop this puppy?”
Well, when I change from street tires to the 255/40-17 Toyo RA-1 track tires, the car ride height drops automatically by � “ due to the smaller sidewall from the 40 series tire (by the way, too bad they are discontinuing the RA-1's, these tires last forever!!!).
Ride height then drops from 25 � “ down to 25 � ” ground to fender lip (but the fender lip to hub cap centerline distance stays unchanged at 13 � “).
Recall from Section III, I said “The Bump Stop is Your Friend” , well, what do we do with friends? We borrow stuff from them! Since I said in that section that the first � “ of bump stop squish can be accomplished rather easily ("squish" is a technical term, isn't it? ). Then I’m going to “borrow � “ of that bump travel and use is to my advatange.
So if I were to lower the spring perch by � “, then although my strut free travel is reduced from 1 7/8 “ down to 1 1/8 “, my usable suspension travel in the bump direction remains unchanged at 1 7/8 “. Awesome!!!
Let's plug in some new numbers into the spreadsheet and see what we get:
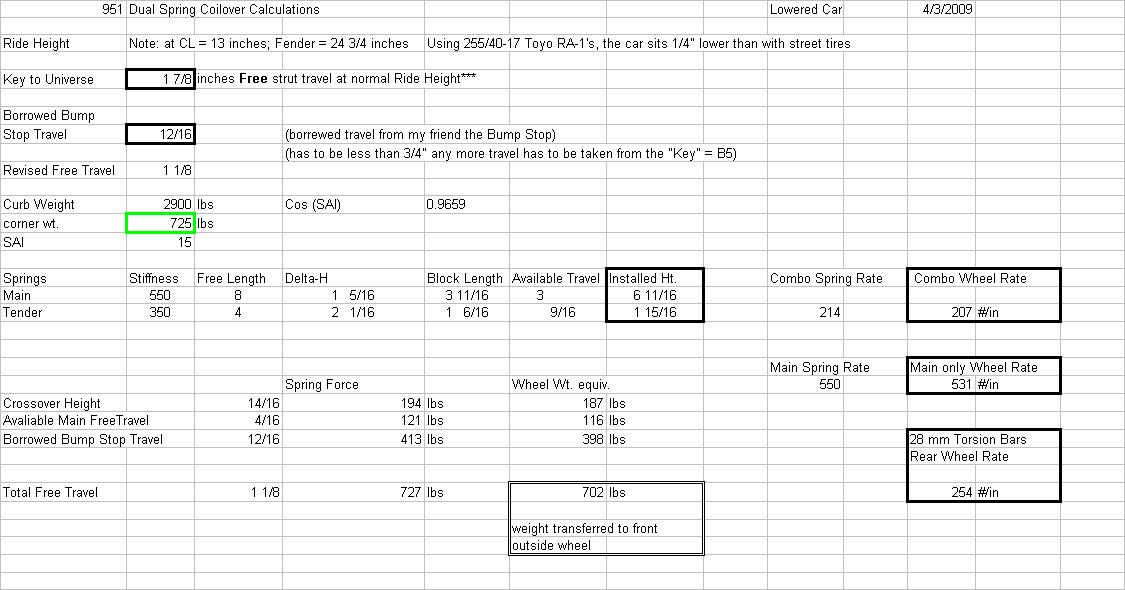
Yup, everything checks out fine. If you notice from the screen shot above, I still have � “ of free strut travel after using up my crossover height.
So what if I decide to drop the car another � “. Can I still get away with using the same springs, or do I need to go stiffer? Let’s find out:
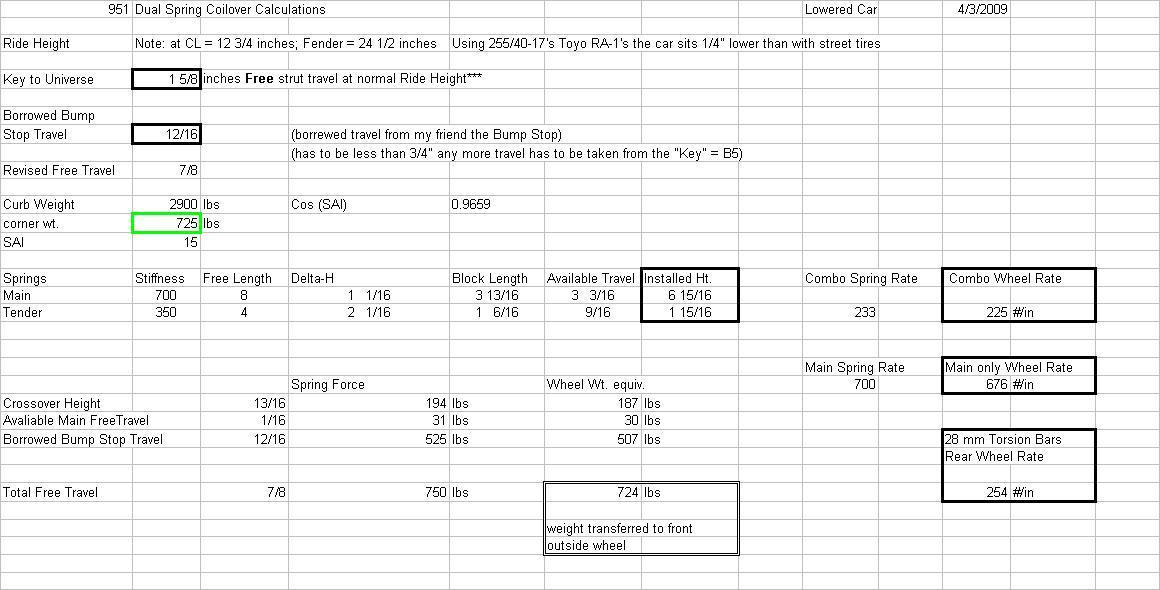
Well it looks like I would need to bump up my Main spring stiffness by another 150# up to 700 #/in.
So in order to drop it that last 1/4 " down to a ride height of 24 1/2", looks like I need to upgrade my springs again. In that case, I think I’ll pass. I’ll drive the car around for a while and just enjoy it the way it is now. However, the new combo wheel rate is still only 225#, so on paper it looks like the car will still handle well balanced out with only 28 mm rear torsion bars. I’ll let someone else give it a try, I’m good for now
I’m not going to subject you guys to any more physics mumbo jumbo, besides, Spring is here and we need to get out and start enjoying the outdoors a little more. So this section is going to be very, very brief.
It is assumed that anyone lowering their cars understands the need to do it with appropriate suspension geometry corrections, not only to retain a decent “roll moment”, but more importantly , it needs to be done so as to not stress out the ball joints. Take care of your boys! If the suspension geometry is not “corrected”, the ball joints operate at extreme angles as the suspension now dwells at the “bottomed out” range of bump travel.
Ok, here we go….
The big question for me was, “Now that I’ve got 550# springs, how low can I drop this puppy?”
Well, when I change from street tires to the 255/40-17 Toyo RA-1 track tires, the car ride height drops automatically by � “ due to the smaller sidewall from the 40 series tire (by the way, too bad they are discontinuing the RA-1's, these tires last forever!!!).
Ride height then drops from 25 � “ down to 25 � ” ground to fender lip (but the fender lip to hub cap centerline distance stays unchanged at 13 � “).
Recall from Section III, I said “The Bump Stop is Your Friend” , well, what do we do with friends? We borrow stuff from them! Since I said in that section that the first � “ of bump stop squish can be accomplished rather easily ("squish" is a technical term, isn't it?
). Then I’m going to “borrow � “ of that bump travel and use is to my advatange.So if I were to lower the spring perch by � “, then although my strut free travel is reduced from 1 7/8 “ down to 1 1/8 “, my usable suspension travel in the bump direction remains unchanged at 1 7/8 “. Awesome!!!
Let's plug in some new numbers into the spreadsheet and see what we get:
Yup, everything checks out fine. If you notice from the screen shot above, I still have � “ of free strut travel after using up my crossover height.
So what if I decide to drop the car another � “. Can I still get away with using the same springs, or do I need to go stiffer? Let’s find out:
Well it looks like I would need to bump up my Main spring stiffness by another 150# up to 700 #/in.
So in order to drop it that last 1/4 " down to a ride height of 24 1/2", looks like I need to upgrade my springs again. In that case, I think I’ll pass. I’ll drive the car around for a while and just enjoy it the way it is now. However, the new combo wheel rate is still only 225#, so on paper it looks like the car will still handle well balanced out with only 28 mm rear torsion bars. I’ll let someone else give it a try, I’m good for now
Last edited by Trucho-951; 04-08-2009 at 05:56 PM.
04-11-2009, 04:37 PM
#36
Pro
Thread Starter
Join Date: Jun 2005
Location: Napa Valley, CA
Posts: 589
Likes: 0
Received 0 Likes
on
0 Posts
As was pointed out by 2bridges on post #2 above, it may be necessary to use shorter springs for a lowered car. If you plan on running a lowered car, I would recommend switching from an 8 inch main spring over to a 6 inch spring.
Ok, Section V is now completed, I am uploading the photos. It will be posted shortly…
Edit: Sorry, the photo upload feature is not working for me right now. Will try again later today.
Ok, Section V is now completed, I am uploading the photos. It will be posted shortly…
Edit: Sorry, the photo upload feature is not working for me right now. Will try again later today.
04-11-2009, 07:26 PM
#37
Pro
Thread Starter
Join Date: Jun 2005
Location: Napa Valley, CA
Posts: 589
Likes: 0
Received 0 Likes
on
0 Posts
Ok, here is the last section. Section V. Converting from Koni Single Adjustable struts (Koni## 8641-1414) to Koni Dual Adjustable Race Struts (Koni #8611-1259).
As I mentioned in my original post, this mod is absolutely NOT necessary to run the dual spring coilover setup. Besides, this mod requires cutting and welding, so it may not be for everyone (but then again, there is always the helpful local machine shop).
The two reasons I upgraded to the Koni dual adjustables are: 1) the RACE struts have stiffer valving so it allows one to play with stiffer springs and, 2) benefits of having individually adjustable bump settings, i.e. unlike use of a sway bar, upping the bump setting allows one to tune the chassis by loading the outside tire for better turn in response, while NOT having the side effect of a sway bar that does so by trying to lift the inside front tire.
Dilemma #1) The standard Sport Koni #8641’s attaches at the bottom of the 951 strut tube with a bolt. The new 8611’s have their bump adjuster screws located at the bottom, so they cannot be mounted the same way.

Dilemma #2) The 8611’s are sold as inserts that require attaching at the top, but I had already cut the tops of my 951 strut tubes years ago when I installed the 8641’s.

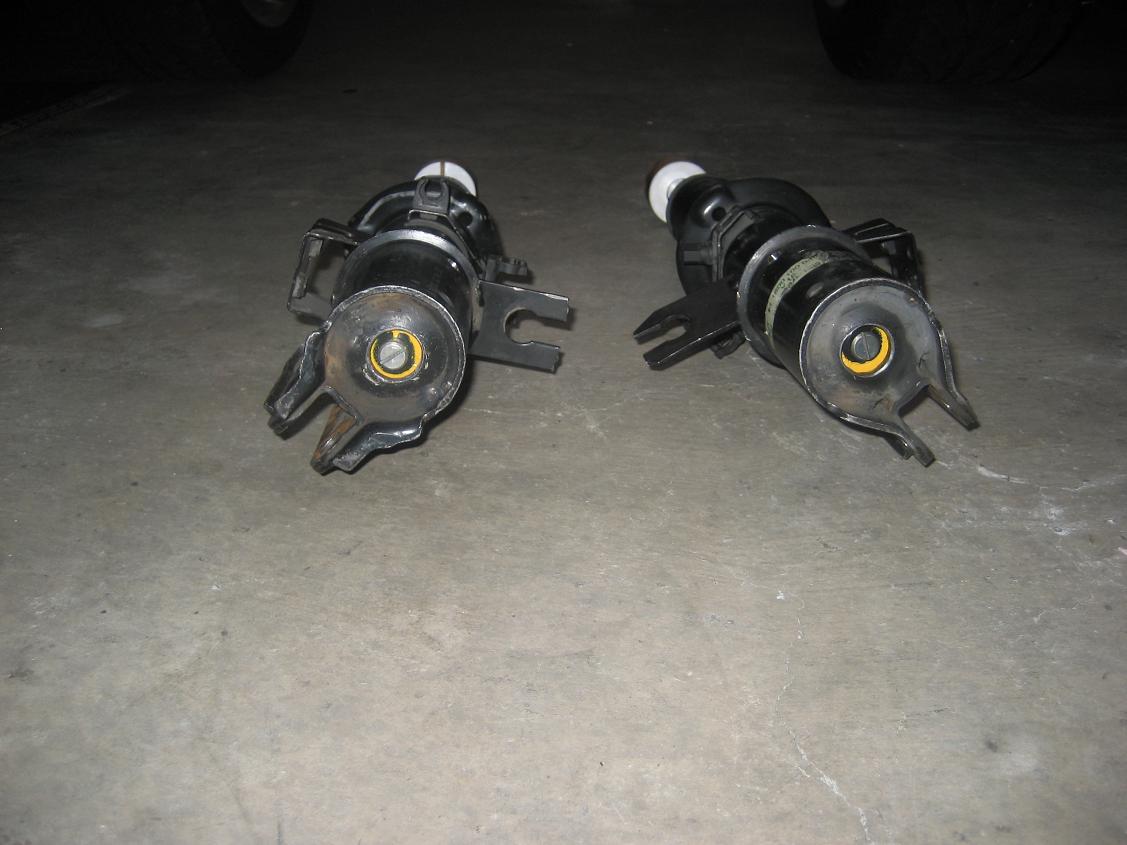
So I walked around disappointed for a few days Until the solution came to me. I’ll let the pictures tell the story:
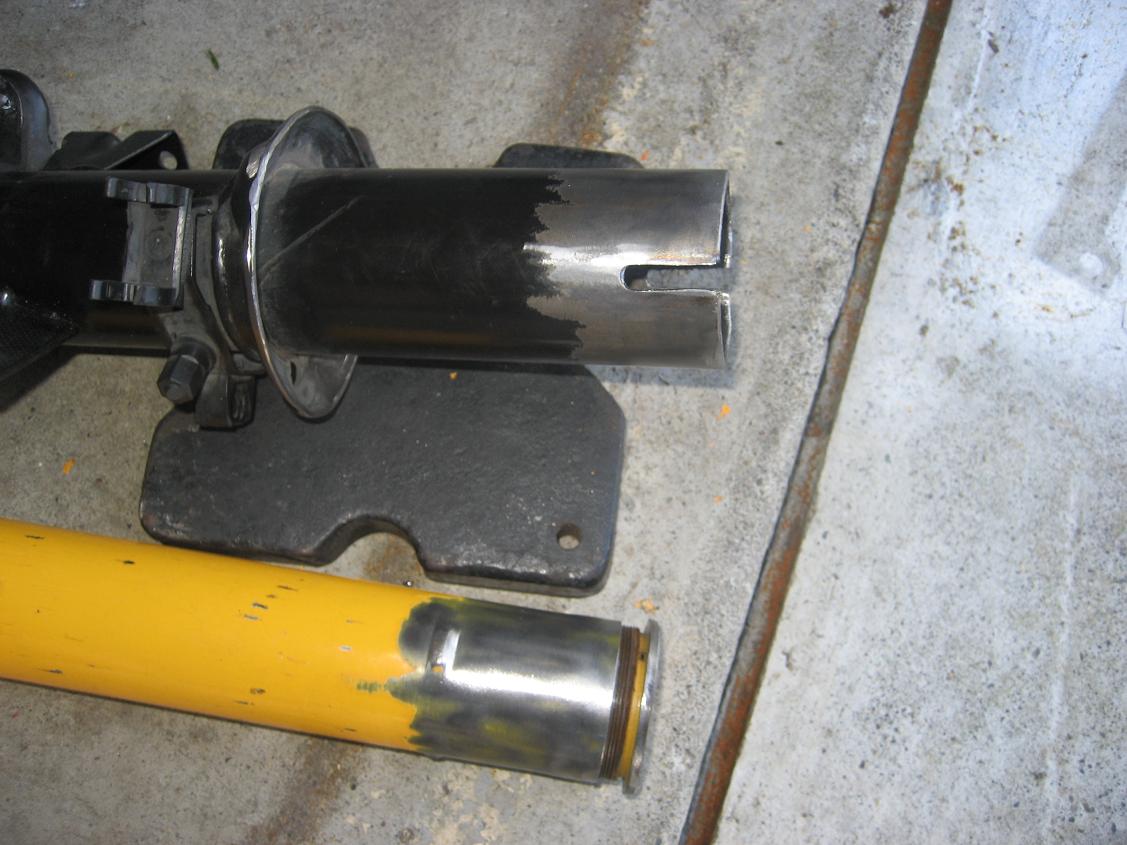
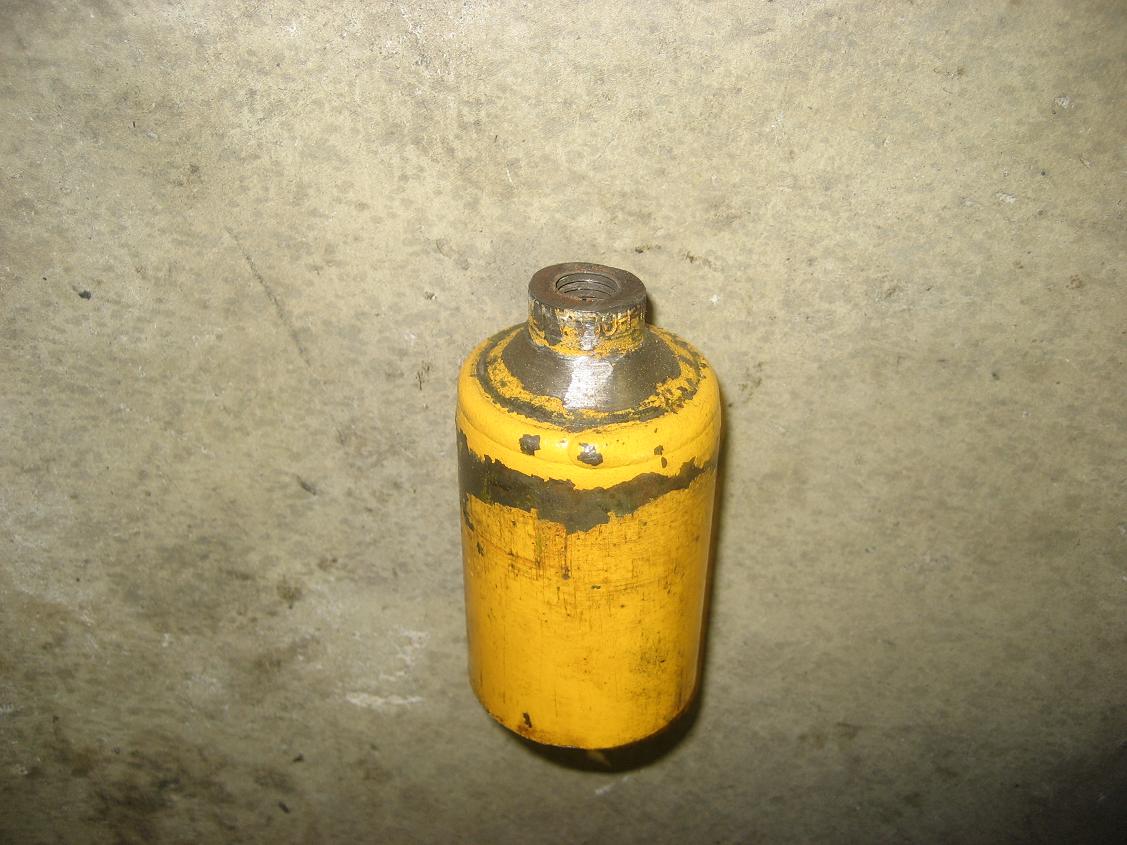
Cut the 8641’s in half, dump the insides and re-use the outer shell.

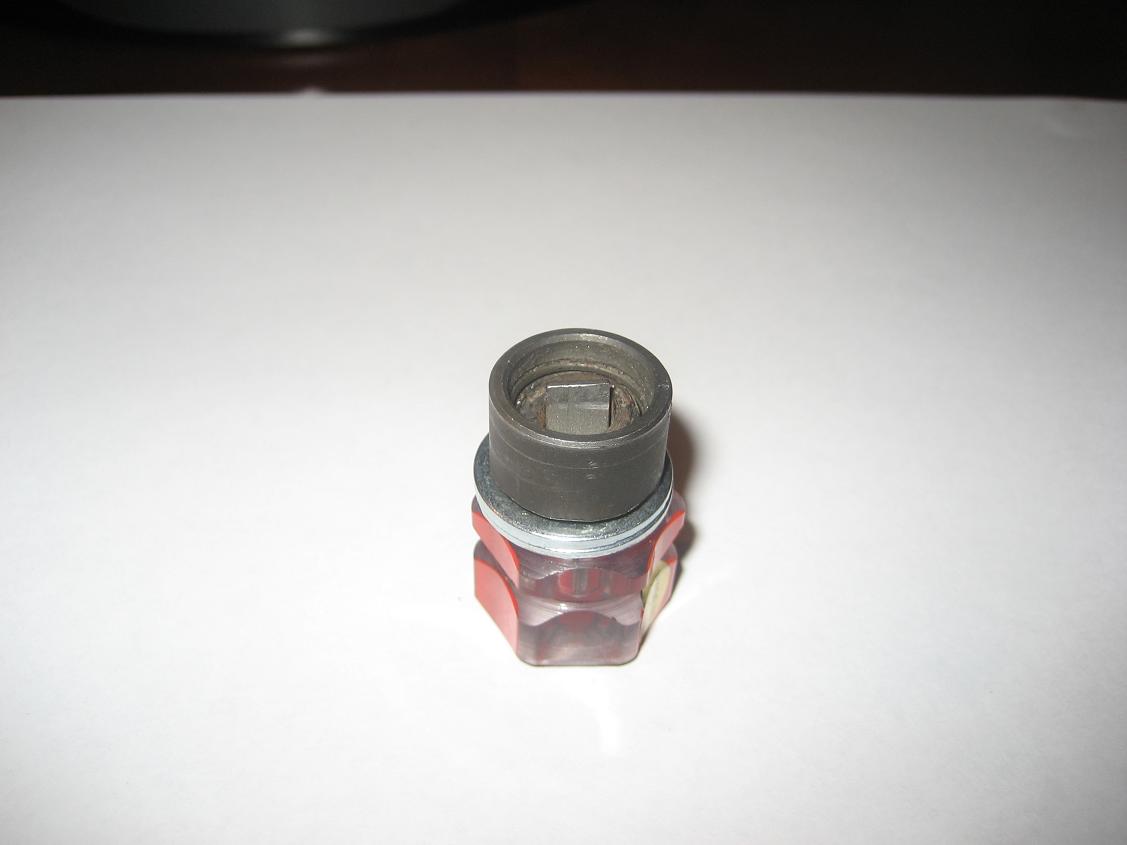
It turns out that not only does the 8611 fit inside the old 8641 shell, most importantly, the inside collar of the gland nut pictured in the lower left corner above fits perfectly onto the upper collar of the new 8611, a match made in heaven, awesome!!!
Some keen observers will notice that I had already taken the grinder to reduce the outside diameter of the gland nut. This is so that the Koni can easily slide through the spring divider/slider.
So now that we have a way of retaining the 8611 onto the 951 strut tube, it’s time to prepare these two and join them in holy matrimony.
Prepare for welding, notice the 1” x � “ slots cut into the 951 strut tube, these were cut in order to include 4 inches of “vertical welds” in order to increase the bonding strength of the two tubes being welded together (same principle as to why there is a vertical plate sandwiched in between two horizontal plates in an I-beam design). Anyway, these vertical welds act parallel to the strut axis in order to resist metal fatigue from the relentless stresses imposed by the Koni damping forces.
Let’s take a second look at the lower portion of the 8611, notice the reduced diameter of the bottom collar. It will be necessary to manufacture an annular spacer that will hold the bottom of the 8611 centered inside the 951 strut tube to prevent it from flopping around in there. A quick and dirty way to make such a spacer is by cutting a �” slice off the old 8641 tube, lay three or more �” long weld beads on the inside diameter and use a file to shave just enough metal so that your spacer fits snuggly onto the bottom collar of the 8611. Next lay three or more weld beads along the outside diameter of your annular spacer and file off enough metal so that the spacer can slide snuggly into the 951 strut tube. Sorry for not including a picture of the annular spacer, my welds are not that pretty to look at, so let’s move on.

The sawed off bottom part of the old 8641 makes a great driver to drive/push your nifty annular spacer down the 951 strut tube (the driver is necessary so that the � “ spacer doesn’t get cocked half way down the tube). I used a socket with a very long �” drive extension and a mallet. It was quite obvious once I had the annular spacer bottomed out at the bottom of the 951 strut tube.
Before firing up the MIG, it may be a good idea to mock-up the assembled unit. Back off at least 3 threads on the gland nut so that after welding the two tubes together, there is still adjustment on the gland nut allowing one to tightly secure the 8611 inside the assembled unit.
After all the welding is done, the assembled 8611’s:

We have now added separate “bump” adjustment to our suspension. However, Koni does NOT include an adjustment tool. So you are on your own on that one.
There is not much space in between the lower control arm and the bottom of the strut to stick a screwdriver in there. This homemade adjusting tool works really well. Made out of a 99 cent 1 � “ stubby screwdriver and some spare metal tubing.
The DIY collar helps keep the screwdriver from sliding off while one cranks on the adjuster. The bump adjustments gets progressively stiffer to turn after +6 clicks (it goes up to +12 clicks), so one needs all the help one can get keeping the screwdriver from sliding off.
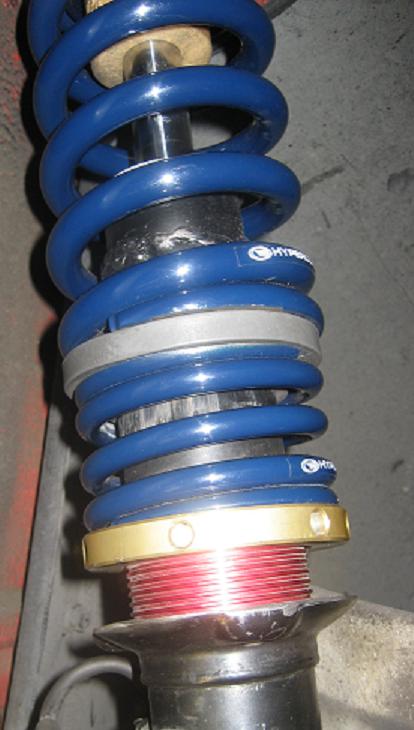
The final product with springs at their installed heights.
One last thought, I would like to say Koni’s commercially available Race Struts have shortened strokes, the longest available stroke is the 8611-1259 model with a 6 inch stroke. It would make installation of these two stacked springs so much easier if they made a 7 inch stroke race strut, but they don’t.
However, the guys at Koni were willing to swap out the 6” rod and instead swap in a 7” rod, with the warning that if it bottomed out, I would end up damaging the strut. Well I knew this would not be a problem, because the top spring hat and the fully compressed bump stop will take up enough space on the rod, so it cannot bottom out. Koni Service Center 859-586-4100. I came this close to sending in my struts to get modified, but perseverance won and I completed my installation without the needing to resort to the longer strut rods.
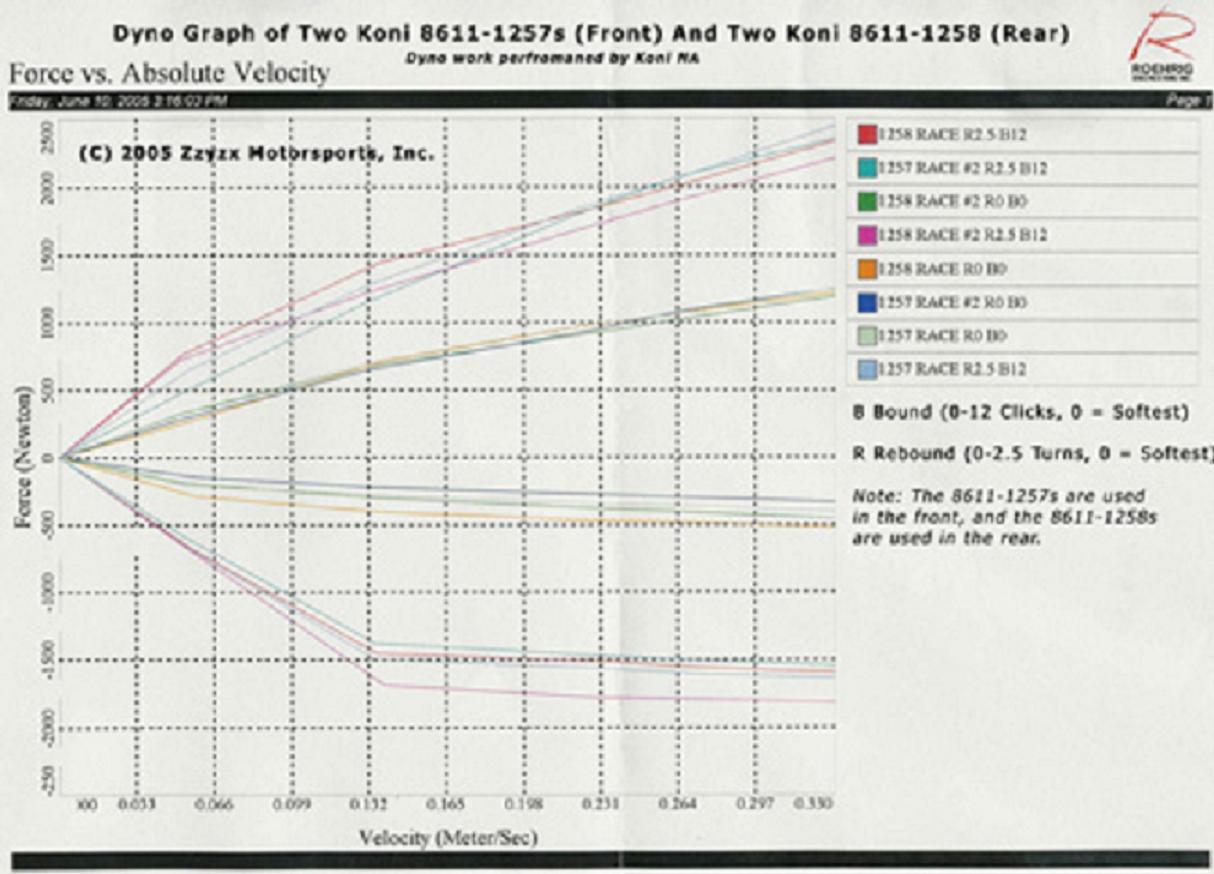
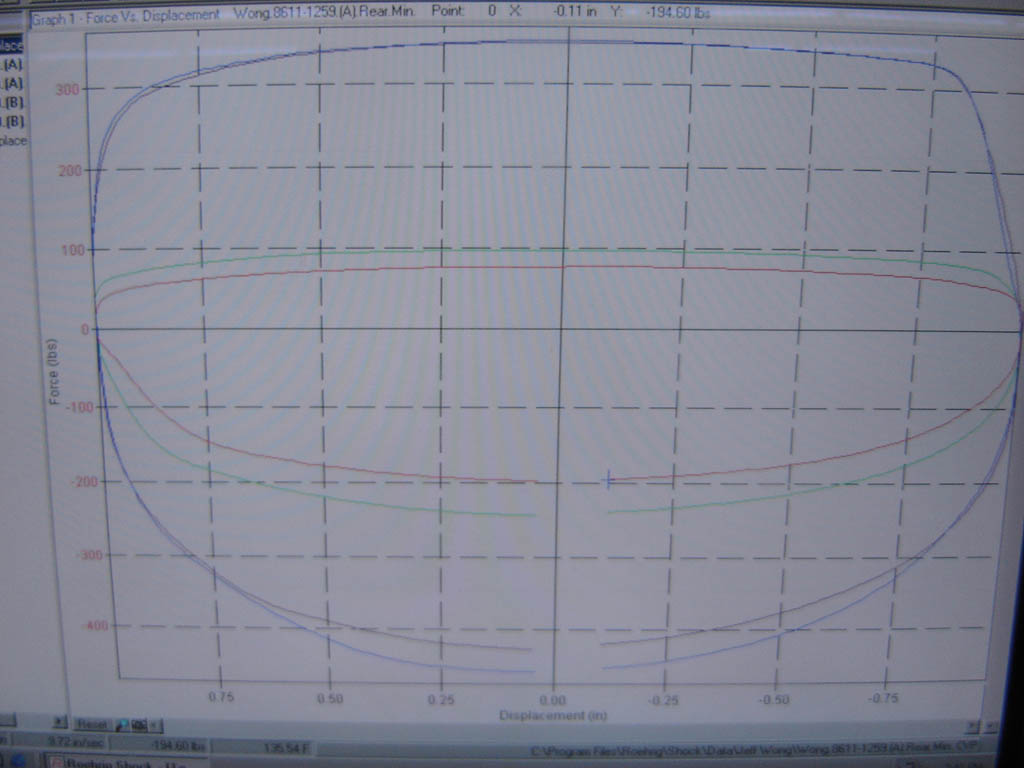
Gratuitous 8611 shock dyno graphs I’ve found on the web.
After converting the units, from Velocity in M/s to inches per second (ips) and Force from Newtons to pounds force (lbf), one can see from the lower knee bend that the 8611 can impart a bump force of 340 lbf at 5 ips.
Force vs. Displacement Graph
Now bump is depicted on the upper half and rebound on the lower half of the graph.
It’s time to go play.
As I mentioned in my original post, this mod is absolutely NOT necessary to run the dual spring coilover setup. Besides, this mod requires cutting and welding, so it may not be for everyone (but then again, there is always the helpful local machine shop).
The two reasons I upgraded to the Koni dual adjustables are: 1) the RACE struts have stiffer valving so it allows one to play with stiffer springs and, 2) benefits of having individually adjustable bump settings, i.e. unlike use of a sway bar, upping the bump setting allows one to tune the chassis by loading the outside tire for better turn in response, while NOT having the side effect of a sway bar that does so by trying to lift the inside front tire.
Dilemma #1) The standard Sport Koni #8641’s attaches at the bottom of the 951 strut tube with a bolt. The new 8611’s have their bump adjuster screws located at the bottom, so they cannot be mounted the same way.
Dilemma #2) The 8611’s are sold as inserts that require attaching at the top, but I had already cut the tops of my 951 strut tubes years ago when I installed the 8641’s.
So I walked around disappointed for a few days
Until the solution came to me. I’ll let the pictures tell the story: Cut the 8641’s in half, dump the insides and re-use the outer shell.
It turns out that not only does the 8611 fit inside the old 8641 shell, most importantly, the inside collar of the gland nut pictured in the lower left corner above fits perfectly onto the upper collar of the new 8611, a match made in heaven, awesome!!!
Some keen observers will notice that I had already taken the grinder to reduce the outside diameter of the gland nut. This is so that the Koni can easily slide through the spring divider/slider.
So now that we have a way of retaining the 8611 onto the 951 strut tube, it’s time to prepare these two and join them in holy matrimony.
Prepare for welding, notice the 1” x � “ slots cut into the 951 strut tube, these were cut in order to include 4 inches of “vertical welds” in order to increase the bonding strength of the two tubes being welded together (same principle as to why there is a vertical plate sandwiched in between two horizontal plates in an I-beam design). Anyway, these vertical welds act parallel to the strut axis in order to resist metal fatigue from the relentless stresses imposed by the Koni damping forces.
Let’s take a second look at the lower portion of the 8611, notice the reduced diameter of the bottom collar. It will be necessary to manufacture an annular spacer that will hold the bottom of the 8611 centered inside the 951 strut tube to prevent it from flopping around in there. A quick and dirty way to make such a spacer is by cutting a �” slice off the old 8641 tube, lay three or more �” long weld beads on the inside diameter and use a file to shave just enough metal so that your spacer fits snuggly onto the bottom collar of the 8611. Next lay three or more weld beads along the outside diameter of your annular spacer and file off enough metal so that the spacer can slide snuggly into the 951 strut tube. Sorry for not including a picture of the annular spacer, my welds are not that pretty to look at, so let’s move on.
The sawed off bottom part of the old 8641 makes a great driver to drive/push your nifty annular spacer down the 951 strut tube (the driver is necessary so that the � “ spacer doesn’t get cocked half way down the tube). I used a socket with a very long �” drive extension and a mallet. It was quite obvious once I had the annular spacer bottomed out at the bottom of the 951 strut tube.
Before firing up the MIG, it may be a good idea to mock-up the assembled unit. Back off at least 3 threads on the gland nut so that after welding the two tubes together, there is still adjustment on the gland nut allowing one to tightly secure the 8611 inside the assembled unit.
After all the welding is done, the assembled 8611’s:
We have now added separate “bump” adjustment to our suspension. However, Koni does NOT include an adjustment tool. So you are on your own on that one.
There is not much space in between the lower control arm and the bottom of the strut to stick a screwdriver in there. This homemade adjusting tool works really well. Made out of a 99 cent 1 � “ stubby screwdriver and some spare metal tubing.
The DIY collar helps keep the screwdriver from sliding off while one cranks on the adjuster. The bump adjustments gets progressively stiffer to turn after +6 clicks (it goes up to +12 clicks), so one needs all the help one can get keeping the screwdriver from sliding off.
The final product with springs at their installed heights.
One last thought, I would like to say Koni’s commercially available Race Struts have shortened strokes, the longest available stroke is the 8611-1259 model with a 6 inch stroke. It would make installation of these two stacked springs so much easier if they made a 7 inch stroke race strut, but they don’t.
However, the guys at Koni were willing to swap out the 6” rod and instead swap in a 7” rod, with the warning that if it bottomed out, I would end up damaging the strut. Well I knew this would not be a problem, because the top spring hat and the fully compressed bump stop will take up enough space on the rod, so it cannot bottom out. Koni Service Center 859-586-4100. I came this close to sending in my struts to get modified, but perseverance won and I completed my installation without the needing to resort to the longer strut rods.
Gratuitous 8611 shock dyno graphs I’ve found on the web.
After converting the units, from Velocity in M/s to inches per second (ips) and Force from Newtons to pounds force (lbf), one can see from the lower knee bend that the 8611 can impart a bump force of 340 lbf at 5 ips.
Force vs. Displacement Graph
Now bump is depicted on the upper half and rebound on the lower half of the graph.
It’s time to go play.
07-10-2009, 05:39 AM
#39
Rennlist Member
Man what a thread. Thanks for sharing all your hard work M. I mean for me it's like trying to decode a can of Alphabet soup, but it gives me faith that what you're telling me is well backed up. 
07-10-2009, 08:54 AM
#40
Rennlist Member
Patrick, if you think you want to go this route, let me know. I've done some research, and Hypercoil makes a setup where you can "control" when the switch from "combined rate" to "rate 2" takes place - as opposed to relying on compressing the lighter spring to its block length (coils touching).
I'm still on the fence about trying it (not because of the theory) but because of the expense and work.
I'm still on the fence about trying it (not because of the theory) but because of the expense and work.
07-10-2009, 09:30 AM
#41
Rennlist Member
Well whether it's single or twin spring setups is slightly immaterial to me and that's not out of any disrespect either. Quite the opposite. My bottom line is getting the best out of my car/s and whatever it takes within a budget of ?? will do for me.
I am very impressed by people such as Trucho and Van who go to a LOT of time and trouble to do their studies and also share it with the rest of the community. Great work!!
I am very impressed by people such as Trucho and Van who go to a LOT of time and trouble to do their studies and also share it with the rest of the community. Great work!!
06-20-2014, 12:41 PM
#42
Addict
Rennlist Member
Rennlist Member
I wanted to bump this thread because I am very interested in the dual coil approach. Has anyone here attempted to assemble a setup like this for their cars?
Would be great to hear some feedback on this. I wonder if there are any setup aids that would help in calculating what spring combo would work for our cars.
Would be great to hear some feedback on this. I wonder if there are any setup aids that would help in calculating what spring combo would work for our cars.
 06-22-2014, 12:41 AM
#44
Rennlist Member
I'm running a dual coil setup based on what I learned in this thread. I'm running a full intrax coilover setup, with the dual coils in front only. Traditional single spring rate in the back.
I'm very happy with it. It's been years since I installed it so I don't recall all the details, but I vaguely recall pairing a 750# main spring with a rising rate tender from Eibach. The car is mostly a track car but I live in manhattan and a livable ride on the street was a priority for me.
On track I'm getting something like an effective wheel rate in the 450lb range. It's a lot better in transition than the stock suspension was, and of course I get a lot less roll in the corners.
On the street I feel it's as livable as it was stock if not more so, despite being a lot lower and having very little roll. It's really compliant over the small stuff. Unfortunately, over really big bumps/holes, you get into the really stiff main spring rate and it will be harsh.
I recall the stock suspension was pretty stiff over the small stuff and still harsh on the big bumps. All that and it was fairly soft on track. Kind of felt like the worst of both worlds to me.
So, if I ever build a nice street 944/951/968 I would definitely do the dual spring rate thing again. Just a lighter combo to give me more of E36M3 ride/handling feel. I'll probably give the dual spring rate thing a shot in the rear too.
I used a spreadsheet that Trucho sent me to figure out the setup. I looked at the copy I have of it now, and honestly am a little challenged in remembering the logic of how it works. Happy to send it if you PM me an email address.
06-22-2014, 03:13 AM
#45
Addict
Rennlist Member
Rennlist Member
That's awesome!!
I've been exchanging emails with Marlon (Trucho) and unfortunately he doesn't have his spreadsheet anymore, so I'd really appreciate you sending it to me. I'll PM you with my email address.
I spoke with an Eibach rep yesterday and got some info about the dual spring approach. I will be speaking to their motorsports engineer on Monday about all the specifics.
According to Marlon's comments, having a 7" stroke makes the spring combo a lot easier to accomplish and thankfully my M030 Koni coilover has 7-3/8". I plan on having the struts converted to a double adjustable, but I need to determine if Koni's valving options will work with a 750# main spring and separate tender.
You must have some high spring rates in your combo to have a final rate of 450#!! I think I will be shooting for a 250-270 combined rate initially for street use.
Thanks for the input!