When you click on links to various merchants on this site and make a purchase, this can result in this site earning a commission. Affiliate programs and affiliations include, but are not limited to, the eBay Partner Network.
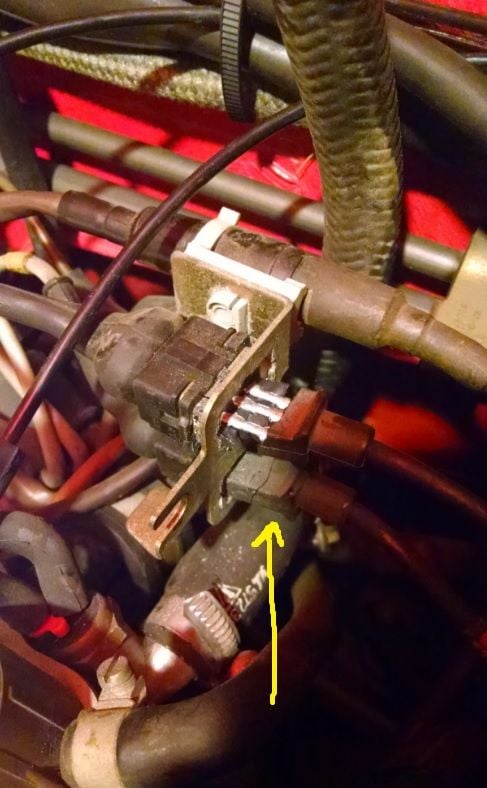
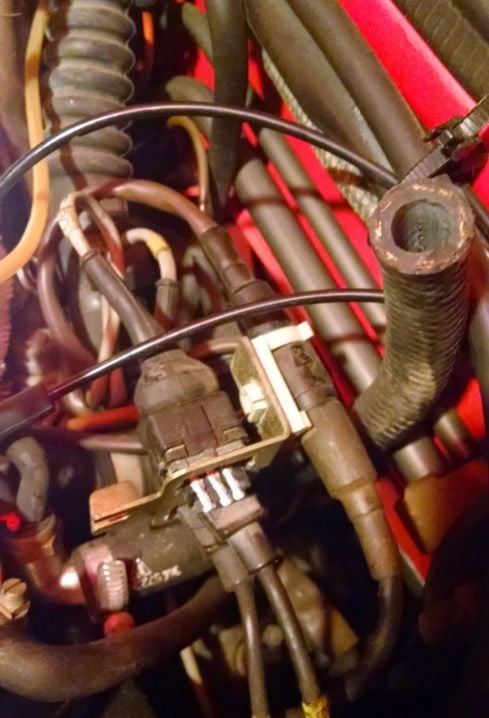
So I'm replacing the Vacuum Hoses and in the process of removing the stubborn Venturi hose that goes to the brake booster and runs under the cycling valve, the brittle plastic on some electrical connectors just fell apart. Pictures attached. After inspection even more plastic just fell right off and the three prongs are exposed now on each connector.
Do I need to buy something to replace these connectors? I imagine that I cannot just leave these exposed as is....
Also getting in there to replace the AOS top hose looks like it might be challenging. I'm not touching the AOS seals because I do not want to remove the turbo... I'm also having doubts about my ability to replace the Heater Control Valve as preventative maintenance.
That electrical connector is one of the crank sensors (speed and reference sensors). It happens all the time. Unfortunately there is no easy way to replace the connector - most people just replace both sensors.
The heater control valve should be pretty easy to replace especially if you have the intake off. It's well worth doing it because when it fails it can be pretty spectacular.
For the AOS top hose, if it's the same setup as my car has then the cylcing valve bracket has to come off. That is actually a bit more trouble than it looks because the bolts that hold it in also hold the water neck in place, and once you loosen that you'll probably need a new gasket. One of bolts goes through a lot of things - getting the CV bracket, brake booster hose strap, gasket and water neck all lined up at once is quite difficult. I think I ended up leaving out the hose strap - I just couldn't do it.
EDIT...BTW, if you don't already have replacments for the 2 AOS hoses, I think the originals are NLA, but Lindsey Racing has silicone versions.
Do I need two different Sensors or will two of the FAE sensors available at pelican (link below) replace both? Is the FAE wire long enough or must I go with the double price Bosch?
Not sure of the brand and length that is needed. Maybe easier to go with the Bosch 610mm sensors just to be safe.
These sensors are critical to the engine running properly so I wouldn't use the connector kit. Its much easier to replace the entire sensor anyway.
Do I need two different Sensors or will two of the FAE sensors available at pelican (link below) replace both? Is the FAE wire long enough or must I go with the double price Bosch?
So I ended up replacing the reference sensors with the Bosch parts, no one had the FAE parts in stock, but for future thread searches, it appears that they would fit fine and other people have mentioned that they work great.
Also, I ended up replacing the Heater Control Valve and you guys were right it wasn't that bad. However, taking the Cycling Valve mounting plate off and then having coolant drip everywhere was not fun at all. I also spent a while trying to get the rear water neck back on, i'm nervous about stripping the inside of where those bolts go. I ordered a new gasket so I'll wait to make progress there but any insight would be appreciated....
Two Questions as I work my way through things:
1. Can I leave off the Cycling Valve mounting plate? It was a real pain and If I ever need access to the AOS or those hoses I imagine it would be easier if the mounting plate was gone.
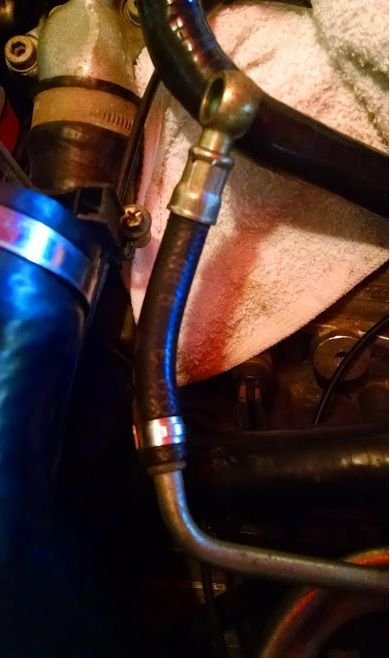
2. The hose off the tree with the banjo bolt (pictured). How do I go about replacing that hose? I already have the silicone hose from LR, but I don't want to take the hose off before I'm certain of how to properly re-use the banjo bolt.....
So I ended up replacing the reference sensors with the Bosch parts, no one had the FAE parts in stock, but for future thread searches, it appears that they would fit fine and other people have mentioned that they work great.
Also, I ended up replacing the Heater Control Valve and you guys were right it wasn't that bad. However, taking the Cycling Valve mounting plate off and then having coolant drip everywhere was not fun at all. I also spent a while trying to get the rear water neck back on, i'm nervous about stripping the inside of where those bolts go. I ordered a new gasket so I'll wait to make progress there but any insight would be appreciated....
Two Questions as I work my way through things:
1. Can I leave off the Cycling Valve mounting plate? It was a real pain and If I ever need access to the AOS or those hoses I imagine it would be easier if the mounting plate was gone.
2. The hose off the tree with the banjo bolt (pictured). How do I go about replacing that hose? I already have the silicone hose from LR, but I don't want to take the hose off before I'm certain of how to properly re-use the banjo bolt.....
I wouldn't leave out the CV bracket. The CV will move around a lot, and could get damaged (the ports are brittle). Just make sure you can install the bolts easily without any torque and you should be fine. If you do leave the bracket out, the bolt might not clamp the water neck in place because it's too long, so make sure you get a shorter one.
For the banjo fitting: cut the collar off with a hacksaw, pull the barbed banjo fitting out, then install it in the new hose with a hose clamp. When cutting those collars off, I usually don't cut quite all the way through at the top end, to avoid damaging the banjo fitting...then just break apart the last piece with a screwdriver, and peel it away with a couple of pairs of pliers.
So I finished all the vacuum lines and I put everything back together. I'm waiting to start up the car again until I've replaced the fuel lines and coolant...
I'm nervous about one of the bolts I put back into the cylinder Head. At the back of the cylinder head, the coolant tube that comes out to go to the heater core, the bottom bolt went in just fine but I had a HELL of a time getting the top front most bolt back in (behind the small elbow that goes into the AOS). I was really concerned that the bolt threads inside the cylinder head were stripped. Basically I forced the sucker back in as best as I could... it did not go in all the way and went in at a slight angle....
It seems to be holding the elbow and the new gasket very tightly against the cylinder head but obviously I haven't tested for leaks just yet.
Did I **** this up? Should I go buy a new cylinder head and drown my sorrows? Has anyone else had a similar thing happen?
Years ago we had a teenager kid that put in too-long a bolt for the water-elbow. He forced it in the last bit and snapped the head off. EVERYONE's suggestion was to pull the head in order to drill out the broken bolt properly without damaging the head.
Well, teenagers know everything right? So, he tried drilling it for an extractor. Due to location, you simply cannot drill a hole straight down the bolt's axis. Hole was partially in the bolt, partially in the water-fitting, partially in the head. Stuffed in the extractor anyway and started cranking on it... >SNAPPP!!!< Broken extractor.
Again, EVERYONE told to cut his losses and pull the head to repair. Nope, he knew better. Went and got one of those cheapo ti-nitride coated drill bits and tried to drill out the broken bolt AND extractor. Guess what??? >SNAPPP!!!< broken drill-bit.
So now, we've got a broken bolt in the head, and a broken extractor, and a broken drill-bit all crammed into one hole. Heck, if there was any more room in that hole, I bet he would've gone to a jackhammer!!! He finally listened to his wise elders and pulled the head for repairs. A simple $30-50 repair bill grew to over $500 due to the labour and welding needed to fix it.
In your case, if it doesn't leak, I wouldn't worry about it. The trick to getting the water-neck in is to put both bolts through the fitting first. Then line them up with the holes in the block and screw them in while holding the water-fitting away from the block so that the bolt-heads are flush against the metal-plate part. Then you have plenty of clearance between the bolt-head and the elbow to fit a wrench.

 04-22-2015, 11:36 AM