
Aussie 964C2 Maintenance Diary (pic heavy!)

 11-10-2011, 01:48 PM
#92
Three Wheelin'
Baba,
in the past few days I've been trying different thing in the pursuit of the "ideal" solution.
It looks like the only way to fool the system and avoid to get fault codes is this, but it generates too much heat, so I think it's too risky....!
The CCU knows if the blower is there through pin 87 of the original relay (thin yellow/green wire). The resistors you need to simulate the motor get dangerousely HOT
So, I chose to forget about fault-codes and get the system work fine and safe, and I ended up with this:

you can leave the original wiring as it is (so it is reversible) and simply rout the switched positive from the coil (thank you ) into pin 87. I also added a 7.5 fuse to protect this line. The original 30 amp fuse can be completely removed.
No need to use a relay, no need to modify the original wireness.
Very simple and it works
Thank you for the great inspiration
in the past few days I've been trying different thing in the pursuit of the "ideal" solution.
It looks like the only way to fool the system and avoid to get fault codes is this, but it generates too much heat, so I think it's too risky....!
The CCU knows if the blower is there through pin 87 of the original relay (thin yellow/green wire). The resistors you need to simulate the motor get dangerousely HOT
So, I chose to forget about fault-codes and get the system work fine and safe, and I ended up with this:
you can leave the original wiring as it is (so it is reversible) and simply rout the switched positive from the coil (thank you
) into pin 87. I also added a 7.5 fuse to protect this line. The original 30 amp fuse can be completely removed.No need to use a relay, no need to modify the original wireness.
Very simple and it works
Thank you for the great inspiration
Resurrecting this well trodden path
I'm going to put my bypass pipe on at the weekend
Am I right in saying from this that all I need do now is remove the old relay and run a fused cable from pin 87 to the coil?
Nothing else required for everything to function as normal?
11-21-2011, 01:06 AM
#95
Three Wheelin'
Have you had a few more miles since the engine drop/clutch work? I'm thinking you might have more to say regarding your shifting and your thoughts about whether it has reached its full potential. It is implied that you kept the DMF or did you go LW?
"But I picked up the car today and it's greeeeat! Finally, we have a nice, silky shift, and the lever flies around the gate like chopsticks at a noodle restaurant The pressure plate, clutch disc and throwout bearing are renewed too, so the pedal is lighter, and the biting point lower, more like in the middle of the pedal rather than the top. The 1-2 shift, is especially fast now compared to before, and no more sticking in gear on decel "
"But I picked up the car today and it's greeeeat! Finally, we have a nice, silky shift, and the lever flies around the gate like chopsticks at a noodle restaurant The pressure plate, clutch disc and throwout bearing are renewed too, so the pedal is lighter, and the biting point lower, more like in the middle of the pedal rather than the top. The 1-2 shift, is especially fast now compared to before, and no more sticking in gear on decel "
Last edited by c didy; 11-21-2011 at 01:39 AM.
 11-21-2011, 02:28 AM
#97
Burning Brakes
Thread Starter

Have you had a few more miles since the engine drop/clutch work? I'm thinking you might have more to say regarding your shifting and your thoughts about whether it has reached its full potential. It is implied that you kept the DMF or did you go LW?
"But I picked up the car today and it's greeeeat! Finally, we have a nice, silky shift, and the lever flies around the gate like chopsticks at a noodle restaurant The pressure plate, clutch disc and throwout bearing are renewed too, so the pedal is lighter, and the biting point lower, more like in the middle of the pedal rather than the top. The 1-2 shift, is especially fast now compared to before, and no more sticking in gear on decel "
"But I picked up the car today and it's greeeeat! Finally, we have a nice, silky shift, and the lever flies around the gate like chopsticks at a noodle restaurant The pressure plate, clutch disc and throwout bearing are renewed too, so the pedal is lighter, and the biting point lower, more like in the middle of the pedal rather than the top. The 1-2 shift, is especially fast now compared to before, and no more sticking in gear on decel "
- my driving is mostly in traffic, and I like the flexibility of the heavy flywheel at low speed; and
- the freaking spending has gotta stop somewhere
But the sticking shift from before is totally banished, and the clutch biting point is noticeably more consistent and crisp. I'd say that it isn't as fast or light a shift as say a little japanese hatch or anything, but is a lot better than it was, and when it warms up, you really don't give the shifter much of a thought on a winding road, and that's all we can ask I suppose.
As for whether I think it can be improved, the only thing I can think of is to change the gearbox oil again, since I drove a couple of thousand kms with the shifter getting quite sticky and bad, so possibly I have some swarf in there from that period, and it wouldn't hurt to get it out.


 11-21-2011, 05:47 AM
#100
Burning Brakes
Thread Starter
First I sourced a Sachs clutch kit from the UK (clutch disk, pressure plate & thrust bearing): A$800
Then the labour at the p-car specialist was for removal and reinstallation of engine/trans, de-rusting the old gearbox shaft, sanding the DMF, fitting the Sachs clutch, replacing the trans mount (with the RS one I supplied), removing the nosecone of the gearbox to replace the front gasket and also replacing the o-ring from the leaky oil pressure sender: 13hrs or A$1450.
So yes, I think of that everytime I feel tempted to drop the clutch for a smoking getaway But the pleasant surprise was that the DMF was in fine shape. If it needed replacement, then it would have added another A$1500 to the bill.
Then the labour at the p-car specialist was for removal and reinstallation of engine/trans, de-rusting the old gearbox shaft, sanding the DMF, fitting the Sachs clutch, replacing the trans mount (with the RS one I supplied), removing the nosecone of the gearbox to replace the front gasket and also replacing the o-ring from the leaky oil pressure sender: 13hrs or A$1450.
So yes, I think of that everytime I feel tempted to drop the clutch for a smoking getaway
But the pleasant surprise was that the DMF was in fine shape. If it needed replacement, then it would have added another A$1500 to the bill.
11-30-2011, 09:00 PM
#101
Burning Brakes
Thread Starter
So I drained out the old oil, and refilled with fresh Royal Purple MaxGear 75-90W. The old oil was a little black, but then again the RP is an indigo colour anyway, but the magnetic plug had quite a bit of metal particles stuck to it.
And with the fresh oil, it does feel noticeably smoother shifting, so it's been definitely an improvement. At this stage, I reckon it's as good as it's gonna get, and going back on some hazy memories of driving my Dad's 911 in the early 90s, this is pretty much how the G50 felt when they were new
Now that we have done the gearbox and clutch to death, we will move onto a new area of the car to work on
12-01-2011, 09:53 PM
#102
Racer
Join Date: Feb 2011
Location: Chester County, PA
Posts: 434
Likes: 0
Received 0 Likes
on
0 Posts
This board is so great, I dont really know how much money I saved over the last 3 years by not going to a shop,... but I'm guessing a lot.
12-01-2011, 10:32 PM
#103
Instructor
Join Date: Jan 2010
Location: Sydney, Australia
Posts: 118
Likes: 0
Received 0 Likes
on
0 Posts
The guys at Autohaus Hamilton are great, that's where I take my C4.
I tell you what, this car will be a good buy for someone one day when you are finished with it, there will be nothing left to do!
Unfortunately a gear box refurb is on the cards for me as 2nd to 3rd is getting notchy and the cluch is also heavier than normal. Maybe it will be a New Years resolution, but I can put this off as it is not my daily driver........
12-19-2011, 10:44 AM
#104
Burning Brakes
Thread Starter
One of the things I've always wanted to do, was convert the door cards to RS-look, and so recently when Carried By Six advertised an AppBiz DIY kit, I jumped on it
As you can see, what you get with the DIY kit is a backing board made of compressed cardboard, and you upholster it yourself.

I use a classic car trimmer in Sydney (T Wall & Sons), which is one of those places where the same family has run the place for 3 generations. Craig Wall did a great job upholstering the cards in nice black leather. Craig uses full-grain, natural leather, which is untreated and is silky to the touch and is wonderfully soft. It should also look better as it ages too. Most leathers nowadays are rolled with a pvc treatment to impart a uniform grain on it, and that is mainly why most modern leather things seem more plasticky than say a vintage leather chair. So full-grain leather is a nicer quality, but it comes at a price, naturally

The natural grain also means that if you look closely, one side has a different grain to the other, but then again I suppose it's no good sending a complaint to the cow at this stage

This is the underside of the door card, as you can see AppBiz sends it precut with all the holes for speakers etc, even if you choose not to use them.

So here we go...

First undo this plate at the front of the door, and it'll reveal a couple of screws underneath.

At the back of the door cap is a plastic mushroom, which you just prise out with your fingers and undo the screw under that, too.

Then the whole door capping lifts off, and you unplug the central locking wiring so that you can remove it.

Then remove the speakers...the cover for the bottom is prised out (yes, mine cracked during removal)

But the cover for the tweeter is just unscrewed by hand. It's also clear at this point that I'll be needing new speakers, too.

Then you unscrew the pocket...(there are three more screws on the bottom edge of the pocket)

...not forgetting that it attaches to the door handle at two spots (one here and one at the other end of the door bin lid)

...and then the door will look like this

Next step is to unhook the little rod that locates in the door handle. It just pops out by hand

Then undo the two allen screws behind...

...as well as at the top of the door grip

Then we prise the cap off the door lock with a blade (for god sake wear safety glasses during this step!). But the cap will prise off easily, it's not clicked in place that tightly.

That reveals a screw, which allows you to remove the ****, then you unscrew the bezel by hand.

Then the door panel should just be held in place by three pop studs (two in front, one at the back) which unpop by hand.

Don't forget to unplug the window switch...
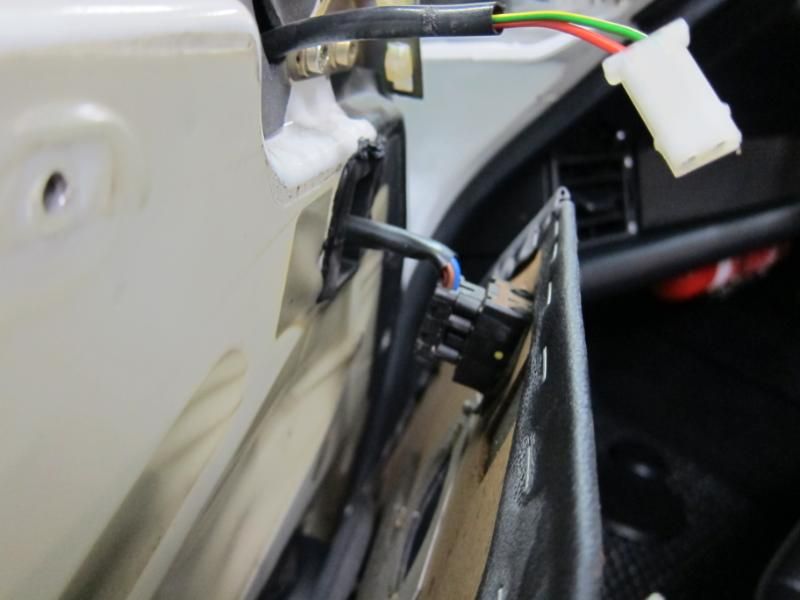
And the door panel can be lifted free!

The first step in fitting the RS-look panel, is to remove the rod that used to hook to the stock door handle. It pops out of its plastic cup quite easily, then I removed the plastic cup with needle nose pliers.

And now the door will (hopefully!) look like this. At this point, if the plastic barrier is a bit raggedy and holed, then it's a good idea to replace it, but mine's in good shape so I'll try not to disturb it too much.

The kit comes with this hardware, and I'll start by fitting the red opener straps.

It's pretty easy to work out where it goes, basically it bolts to the same spot that the rod we removed went in. This bit's a bit fiddly if you're not removing the plastic barrier, but if you take you're time it's quite simple.

As you can see, what you get with the DIY kit is a backing board made of compressed cardboard, and you upholster it yourself.
I use a classic car trimmer in Sydney (T Wall & Sons), which is one of those places where the same family has run the place for 3 generations. Craig Wall did a great job upholstering the cards in nice black leather. Craig uses full-grain, natural leather, which is untreated and is silky to the touch and is wonderfully soft. It should also look better as it ages too. Most leathers nowadays are rolled with a pvc treatment to impart a uniform grain on it, and that is mainly why most modern leather things seem more plasticky than say a vintage leather chair. So full-grain leather is a nicer quality, but it comes at a price, naturally
The natural grain also means that if you look closely, one side has a different grain to the other, but then again I suppose it's no good sending a complaint to the cow at this stage
This is the underside of the door card, as you can see AppBiz sends it precut with all the holes for speakers etc, even if you choose not to use them.
So here we go...
First undo this plate at the front of the door, and it'll reveal a couple of screws underneath.
At the back of the door cap is a plastic mushroom, which you just prise out with your fingers and undo the screw under that, too.
Then the whole door capping lifts off, and you unplug the central locking wiring so that you can remove it.
Then remove the speakers...the cover for the bottom is prised out (yes, mine cracked during removal)
But the cover for the tweeter is just unscrewed by hand. It's also clear at this point that I'll be needing new speakers, too.
Then you unscrew the pocket...(there are three more screws on the bottom edge of the pocket)
...not forgetting that it attaches to the door handle at two spots (one here and one at the other end of the door bin lid)
...and then the door will look like this
Next step is to unhook the little rod that locates in the door handle. It just pops out by hand
Then undo the two allen screws behind...
...as well as at the top of the door grip
Then we prise the cap off the door lock with a blade (for god sake wear safety glasses during this step!). But the cap will prise off easily, it's not clicked in place that tightly.
That reveals a screw, which allows you to remove the ****, then you unscrew the bezel by hand.
Then the door panel should just be held in place by three pop studs (two in front, one at the back) which unpop by hand.
Don't forget to unplug the window switch...
And the door panel can be lifted free!
The first step in fitting the RS-look panel, is to remove the rod that used to hook to the stock door handle. It pops out of its plastic cup quite easily, then I removed the plastic cup with needle nose pliers.
And now the door will (hopefully!) look like this. At this point, if the plastic barrier is a bit raggedy and holed, then it's a good idea to replace it, but mine's in good shape so I'll try not to disturb it too much.
The kit comes with this hardware, and I'll start by fitting the red opener straps.
It's pretty easy to work out where it goes, basically it bolts to the same spot that the rod we removed went in. This bit's a bit fiddly if you're not removing the plastic barrier, but if you take you're time it's quite simple.
Last edited by Babalouie; 12-25-2011 at 07:49 AM.
12-19-2011, 10:45 AM
#105
Burning Brakes
Thread Starter
Next step is to fit these.

The window switch clips into the door panel, and the cardboard construction of the RS-look panels aren't strong enough to work with the springloaded clips.

So you carefully cut an X in the leather, and fold it back to fit the new steel bezel. I used pliers to push down on the prongs to lock them in tight

And then the window switch will just clip in satisfyingly

Then I cut the hole for the door lock bezel, and now we can fit the door card! The door card, like the stock one, is screwed in at 3 spots along the bottom. Measure three times, and poke once! To make the hole, I used a scribe tool.

The next step is to dummy-fit the panel, and the instructions say to drill through the leather to make the holes for the door grip. I'm sure this is fine, but I'm a bit gunshy about using big drillbits through fabric, since the bit can grab the material and tear it. So first I make little pilot holes.

Then I remove the panels and drill the 10mm holes for real. The instructions explicitly advise you to do all this with the windows up...presumably so that you don't drill through the window at this point

First we install what are sorta like drywall/plasterboard wall anchors. You use this metal device to hold the anchor in place, and use a supplied bolt to collapse the anchor.

This was maybe the only unsatisfying part of the kit, the metal tool is very flimsy, and so it isn't long before it resembles a pretzel. The trick seems to be to lay it as flat as possible, and wedge it against one of the other door bolts. Even so, it's a bit of a faff to do.

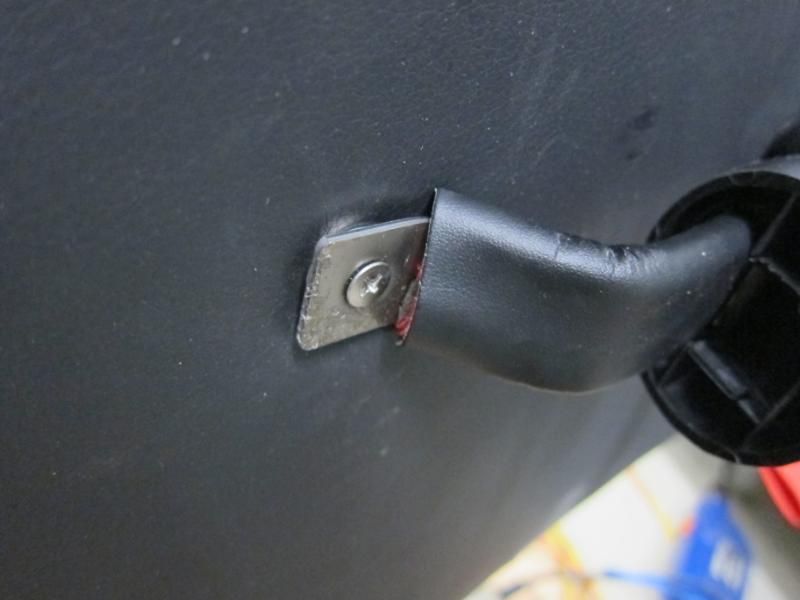
Then the handle can be fitted. As ThomasC2 helfully suggested in another thread, it's a good idea to fit a couple of extra washers between the handle and the door panel.
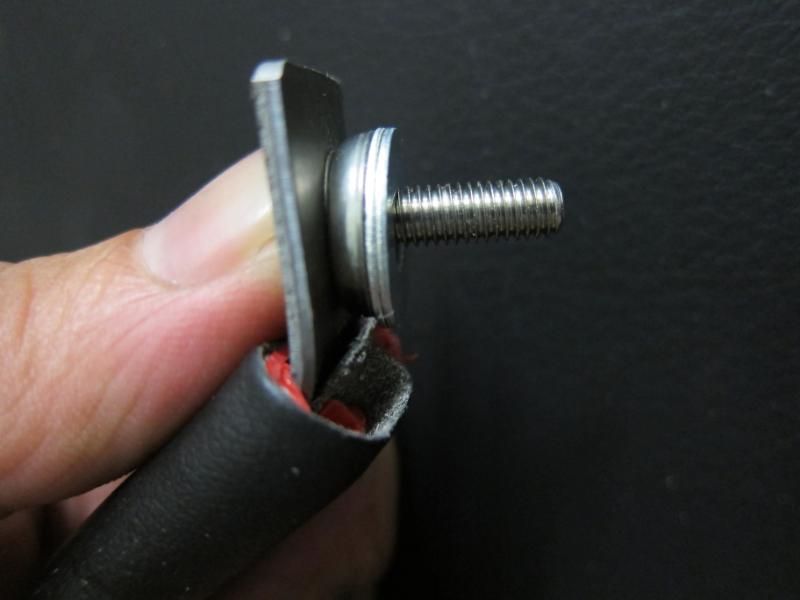
This allows the metal strap of the door grip to sit proud of the door panel, and the trip cup will clip into place more securely (since it clips to that metal part)
Other thoughts? Well the door lock bezel doesn't sit flush with the door card...

But if you look at the stock door card, it has some foam strips around the door lock bezel to sit the door card outwards a bit. I think if I replicate this on the RS door cards, it'll sort it out.

The other thing are the stainless cup washers that are supplied with the kit. I think maybe black ones would look nicer, so I'll go get some tomorrow.

But..overall I'm happy with it, it looks great!


And all of a sudden, you have all this room between yourself and the door I suppose the practical aspect of the RS door cards was to eliminate the stock pockets, which would make room for side intrusion bars for the optional RS/Cup rollcage.

And it does feel nifty opening the door with that red strap

All I gotta do now is...sigh...the other side

I'll also be going speaker shopping too, I think. But I am thinking I might not be getting the split speakers with the separate tweeter like the stock speakers, I might just get a plain coaxial speaker, to keep it looking simple and clean.
The window switch clips into the door panel, and the cardboard construction of the RS-look panels aren't strong enough to work with the springloaded clips.
So you carefully cut an X in the leather, and fold it back to fit the new steel bezel. I used pliers to push down on the prongs to lock them in tight
And then the window switch will just clip in satisfyingly
Then I cut the hole for the door lock bezel, and now we can fit the door card! The door card, like the stock one, is screwed in at 3 spots along the bottom. Measure three times, and poke once! To make the hole, I used a scribe tool.
The next step is to dummy-fit the panel, and the instructions say to drill through the leather to make the holes for the door grip. I'm sure this is fine, but I'm a bit gunshy about using big drillbits through fabric, since the bit can grab the material and tear it. So first I make little pilot holes.
Then I remove the panels and drill the 10mm holes for real. The instructions explicitly advise you to do all this with the windows up...presumably so that you don't drill through the window at this point
First we install what are sorta like drywall/plasterboard wall anchors. You use this metal device to hold the anchor in place, and use a supplied bolt to collapse the anchor.
This was maybe the only unsatisfying part of the kit, the metal tool is very flimsy, and so it isn't long before it resembles a pretzel. The trick seems to be to lay it as flat as possible, and wedge it against one of the other door bolts. Even so, it's a bit of a faff to do.
Then the handle can be fitted. As ThomasC2 helfully suggested in another thread, it's a good idea to fit a couple of extra washers between the handle and the door panel.
This allows the metal strap of the door grip to sit proud of the door panel, and the trip cup will clip into place more securely (since it clips to that metal part)
Other thoughts? Well the door lock bezel doesn't sit flush with the door card...
But if you look at the stock door card, it has some foam strips around the door lock bezel to sit the door card outwards a bit. I think if I replicate this on the RS door cards, it'll sort it out.
The other thing are the stainless cup washers that are supplied with the kit. I think maybe black ones would look nicer, so I'll go get some tomorrow.
But..overall I'm happy with it, it looks great!
And all of a sudden, you have all this room between yourself and the door
I suppose the practical aspect of the RS door cards was to eliminate the stock pockets, which would make room for side intrusion bars for the optional RS/Cup rollcage.And it does feel nifty opening the door with that red strap
All I gotta do now is...sigh...the other side
I'll also be going speaker shopping too, I think. But I am thinking I might not be getting the split speakers with the separate tweeter like the stock speakers, I might just get a plain coaxial speaker, to keep it looking simple and clean.
Last edited by Babalouie; 12-19-2011 at 11:14 AM.