
Build Thread - Project Swine 93 - My Barnfind Outlaw / RS Inspired 993
 08-29-2018, 01:09 AM
#1
Basic Sponsor
Rennlist
Site Sponsor
Rennlist
Site Sponsor
Thread Starter
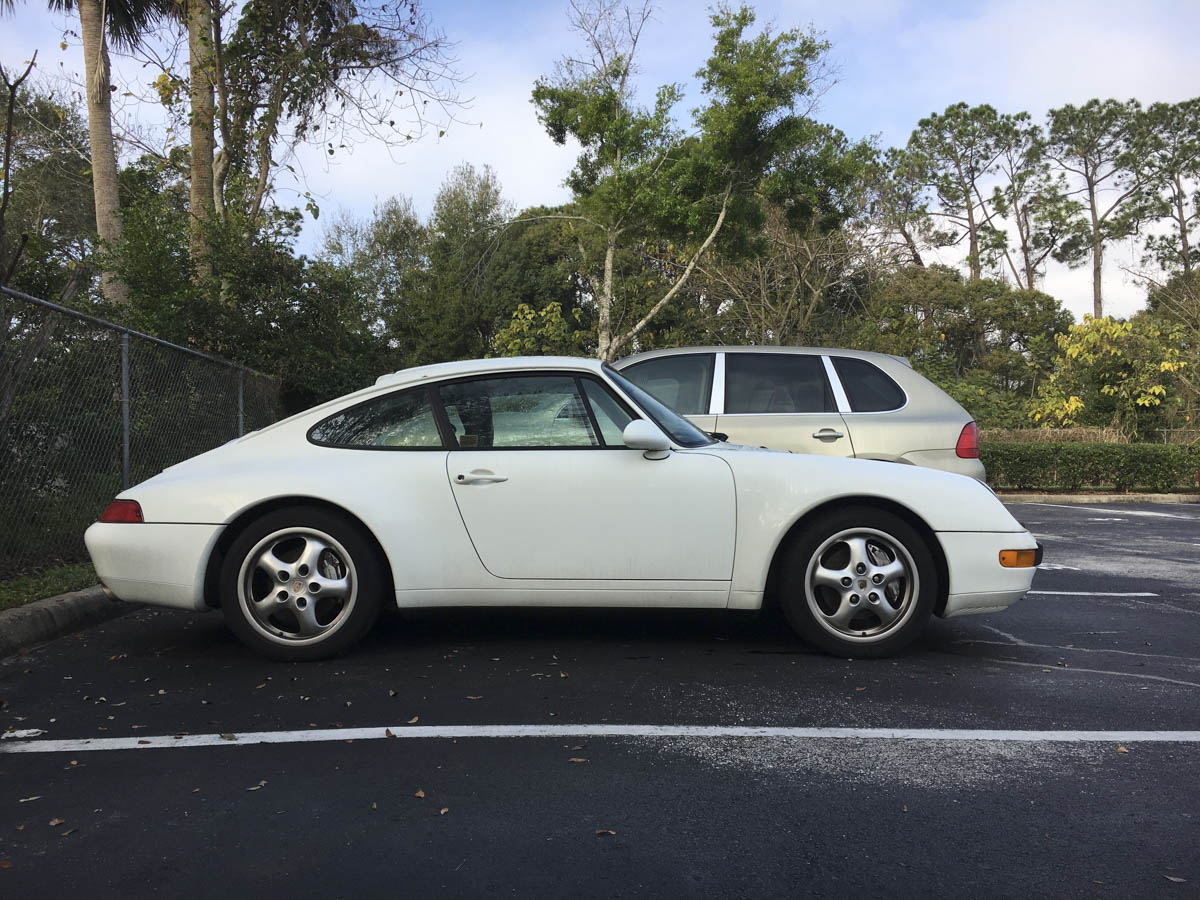
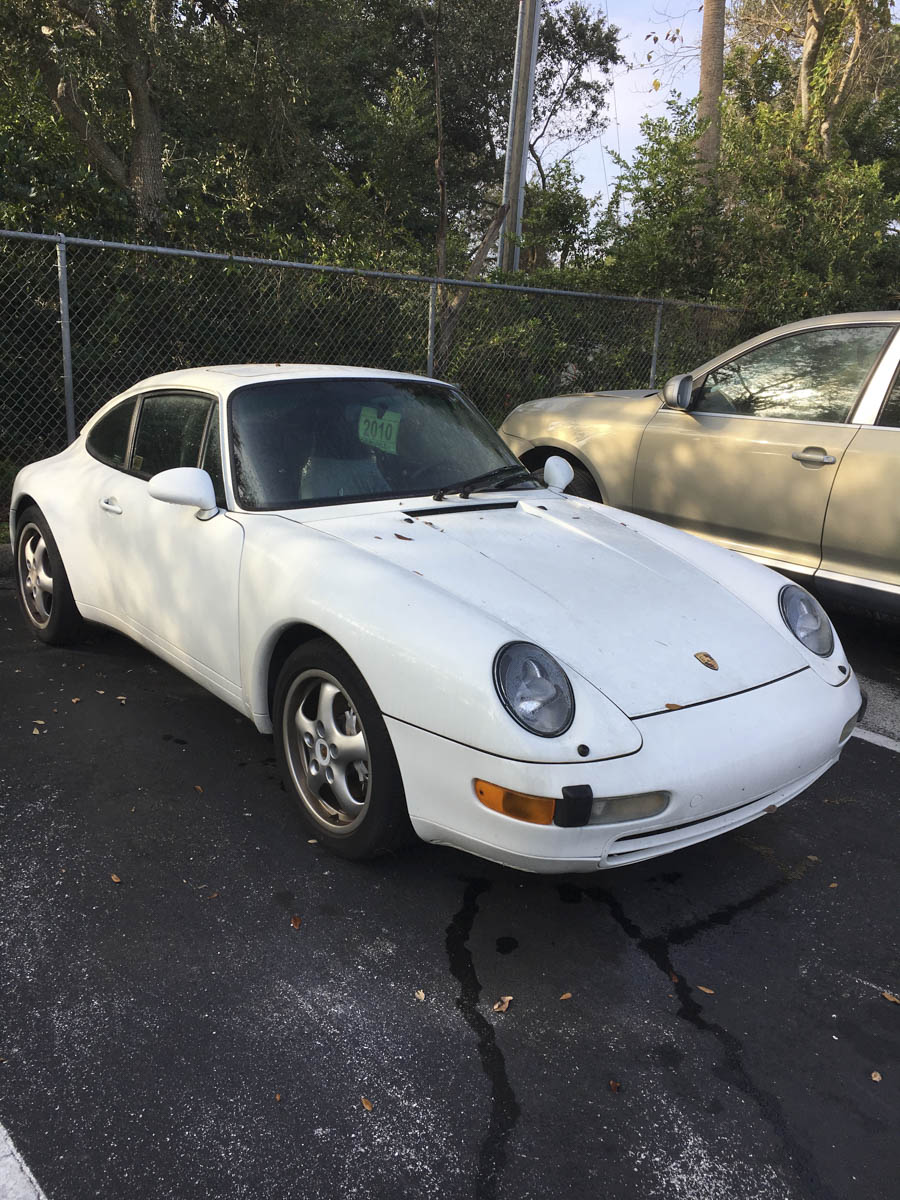
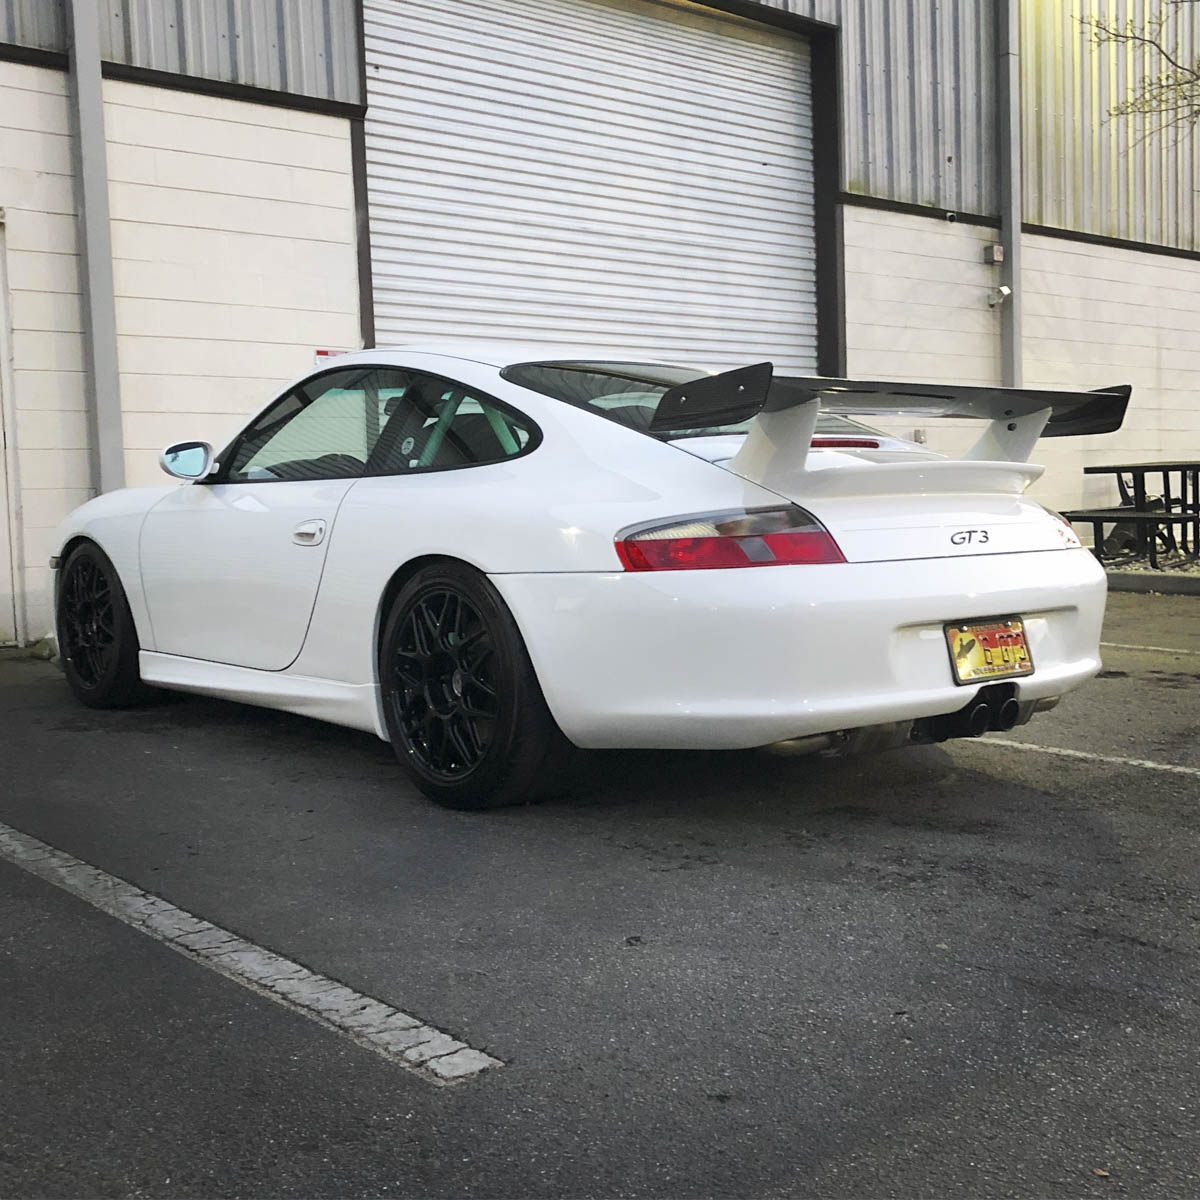
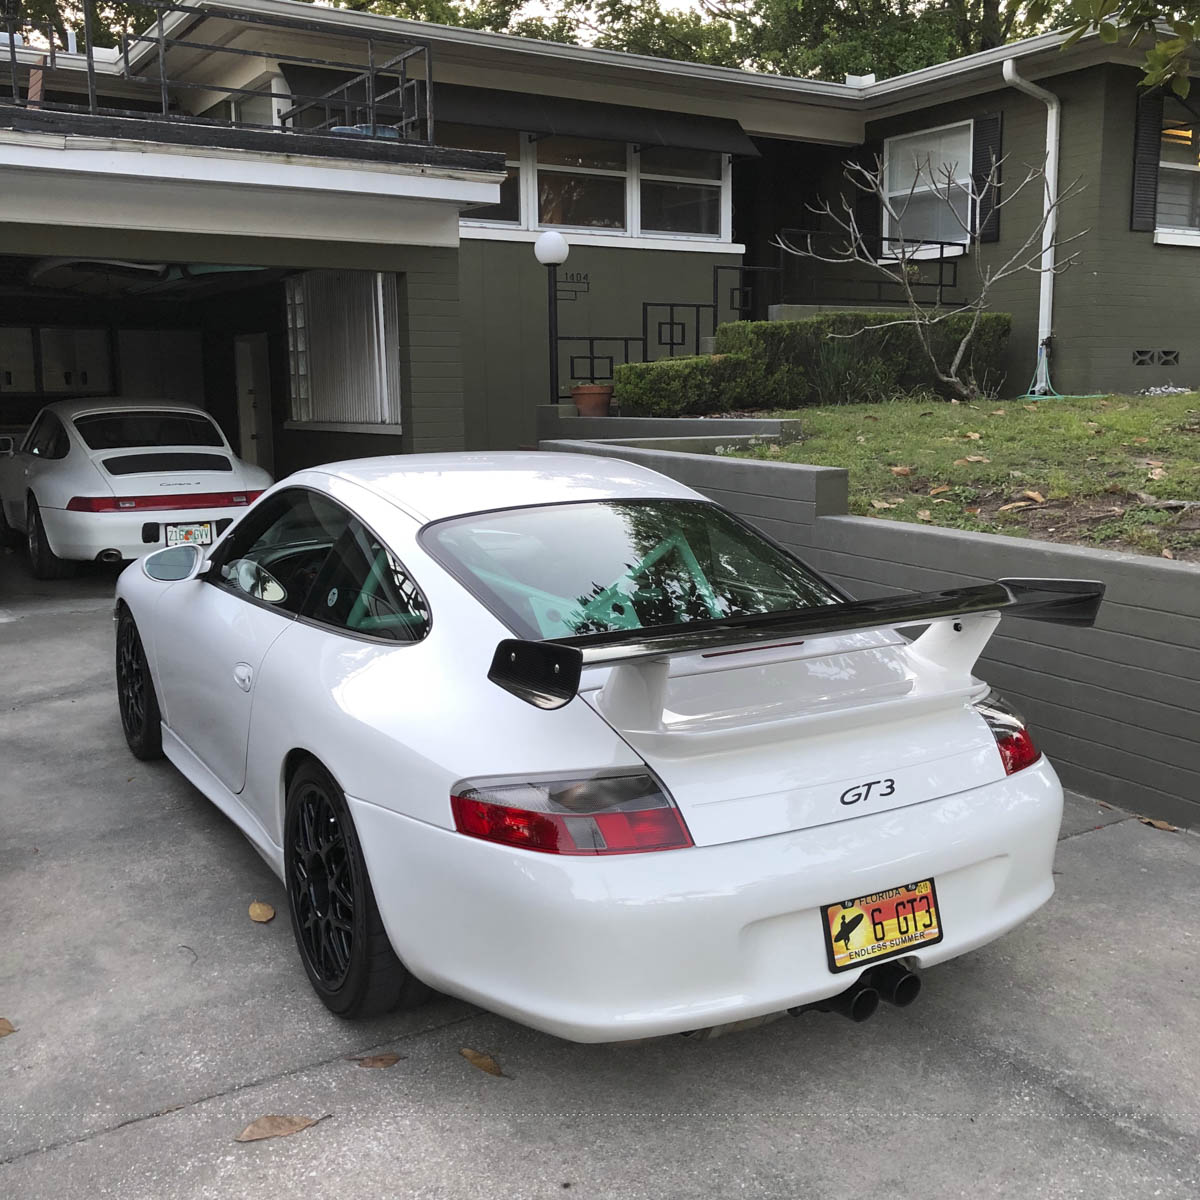
I've had the pleasure of owning my 996 GT3 for about 7 years now, throughout that time I've modified, tweaked, and updated the car to the point where the only thing left is an unnecessary (at this time) engine upgrade. I'd put the feelers out to some friends that I wouldn't mind getting an air cooled car but wanted a project and unfortunately was feeling like I might have missed the boat on being able to acquire one. Last February a buddy at the dealership called me and let me know that the perfect car had come into the dealerships for service with some oil leaks, the owner who had purchased the car new had failing health and was looking to possibly get rid of the car instead of repair it and that I could likely get the car as is. The car was a daily driven Grand Prix White, 6 Speed Carrera 4 with Black Interior, checking most of the boxes on my wish list. I rushed over to the dealership, took a look at the car and could see through its dirt and grime, after 122K miles it needed some love on the exterior and interior, but fortunately the mechanicals had been well taken care of and the car was serviced up until that day at the local dealer. We began working on a deal, being cautious to the situation since the woman had previously turned down every attempt to get her to sell the car previously had failed.
A few days went by and the car disappeared, my good friend let me know that an indy mechanic had convinced the woman that he could fix the car cheaper and it left the dealer before a deal could be made for me to purchase the car. Needless to say I was quite disappointed, however the next month as I was talking to a friend Steve at the local PCA meeting about the situation he filled me in on a few details I didn't know about. The car had been sold to the indy mechanic who convinced the woman he would restore the car, however he hadn't told his wife. The car was now sitting in Steve's barn where he was repairing the oil leaks and doing general maintenance while the situation played itself out. I told Steve if he ever needed space in his barn to let me know and I'd buy the car in a heartbeat, months passed and every PCA meeting or local Porsche gathering I'd remind him that I was still interested. Fast forward to January of this year when I brought my wife to our monthly gathering at Ace Cafe, I ran into Steve and he told me it was time and asked if I still wanted the car, without any discussion I told him I'd be there in the morning with a cashiers check. The look on my wife's face was quite puzzled but I told her I would explain the situation to her on the way home, after a delicate ride home and reminding her I had a GT3 and this would be a car she could drive, it was off the next day to get the car out of the barn it lived in for the past year.
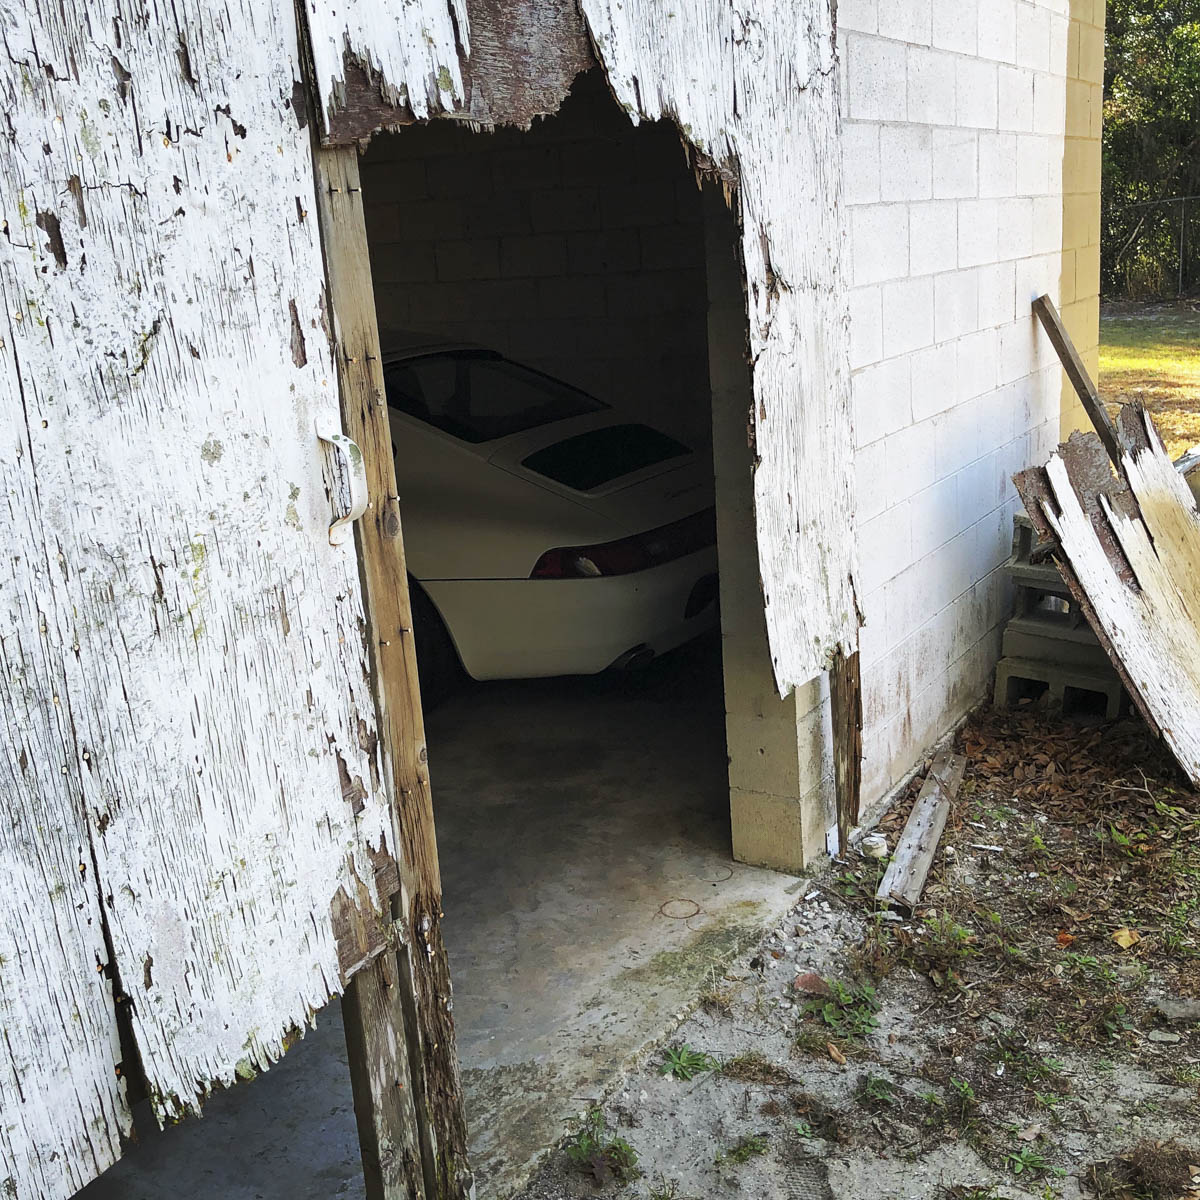
(I'm told this hole was the result of a bear..... fortunately he didn't seem to be a Porsche fan)
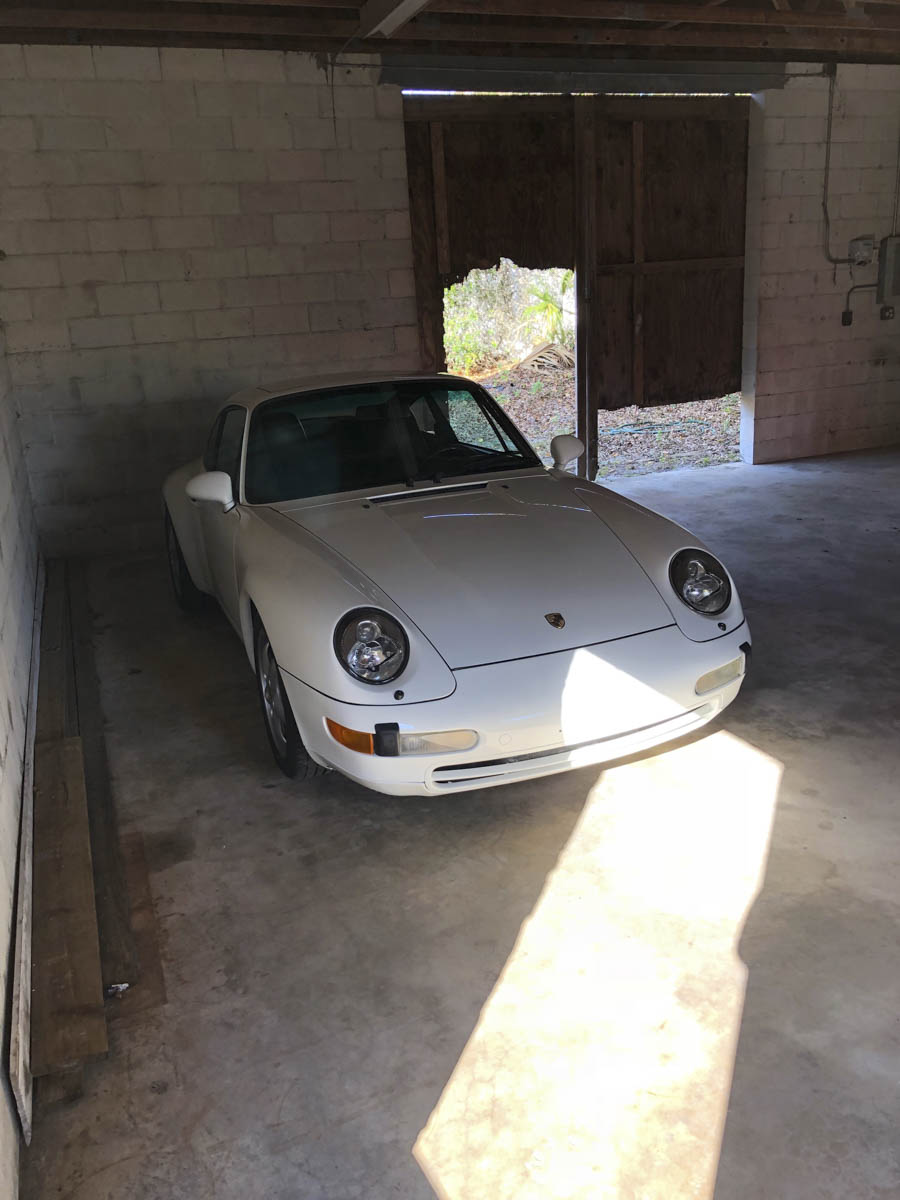
When we got to the barn the car of course wouldn't start and being a 96, as I've now learned the Immobilizer isn't quite as friendly, especially with new batteries. As it turns out the key I was given wasn't paired correctly however my good friends over at Drivers Choice were only a few minutes tow from the barn. I left them the car for a few days and they had the battery replaced and a new key coded for the car.
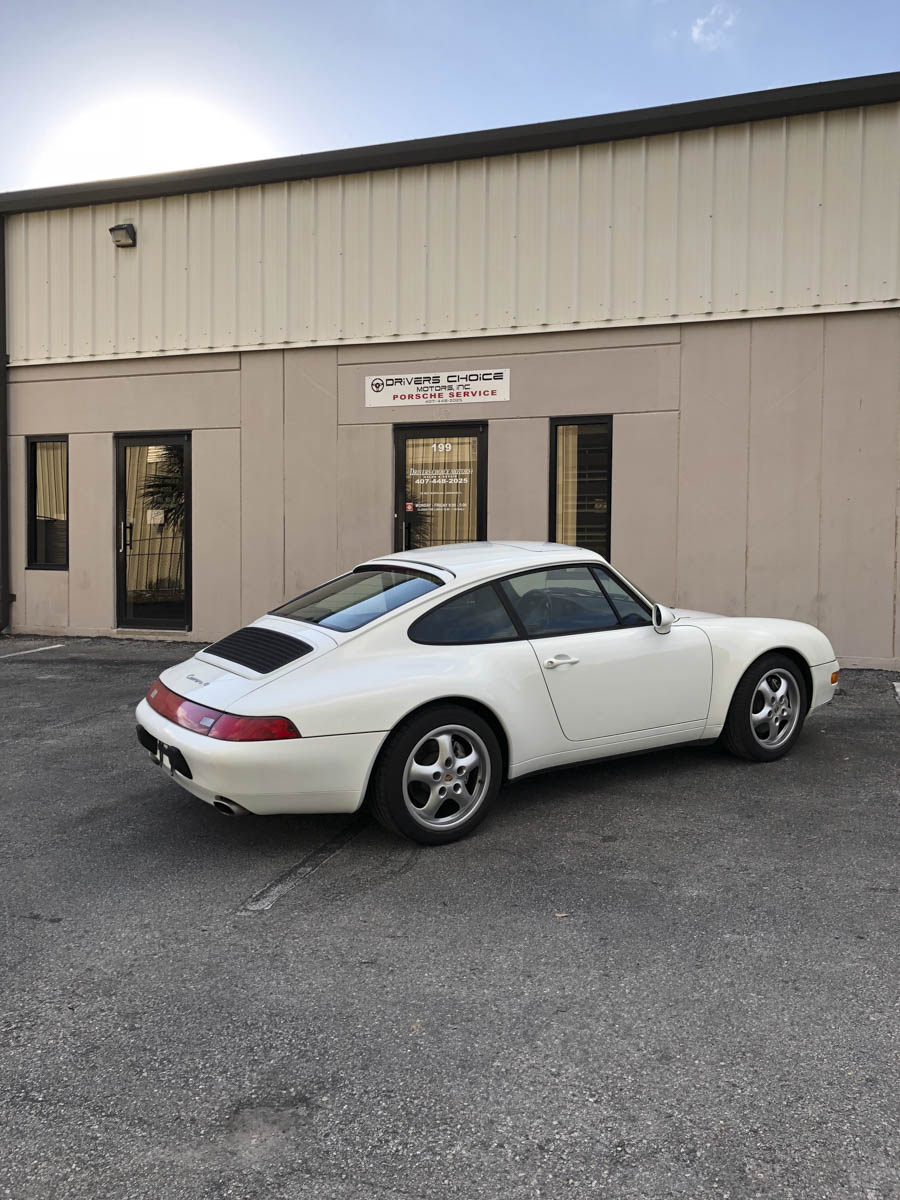
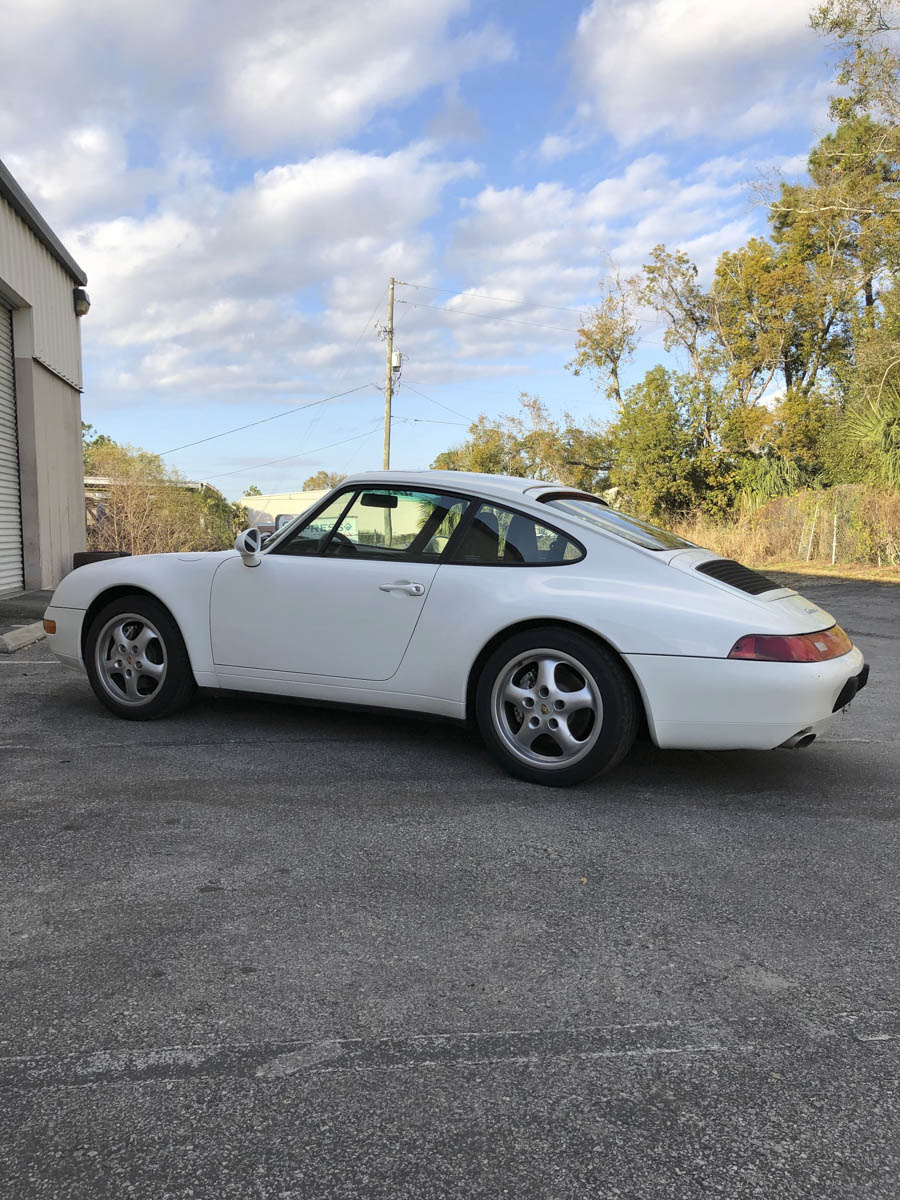
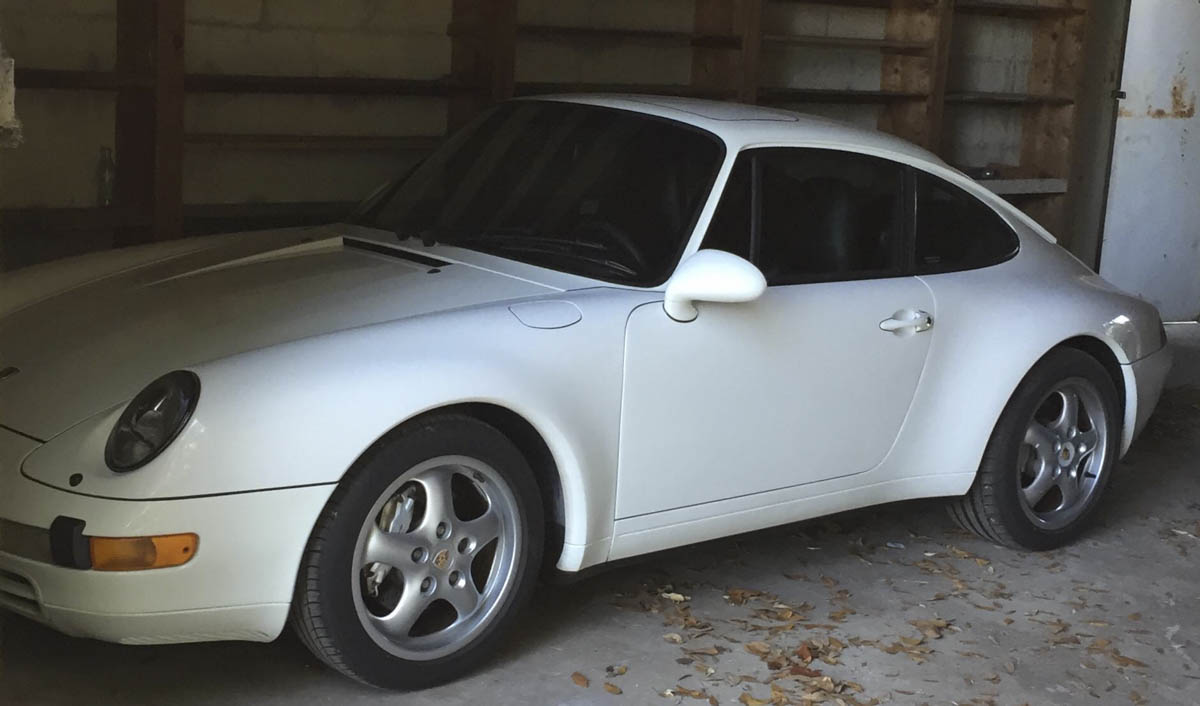
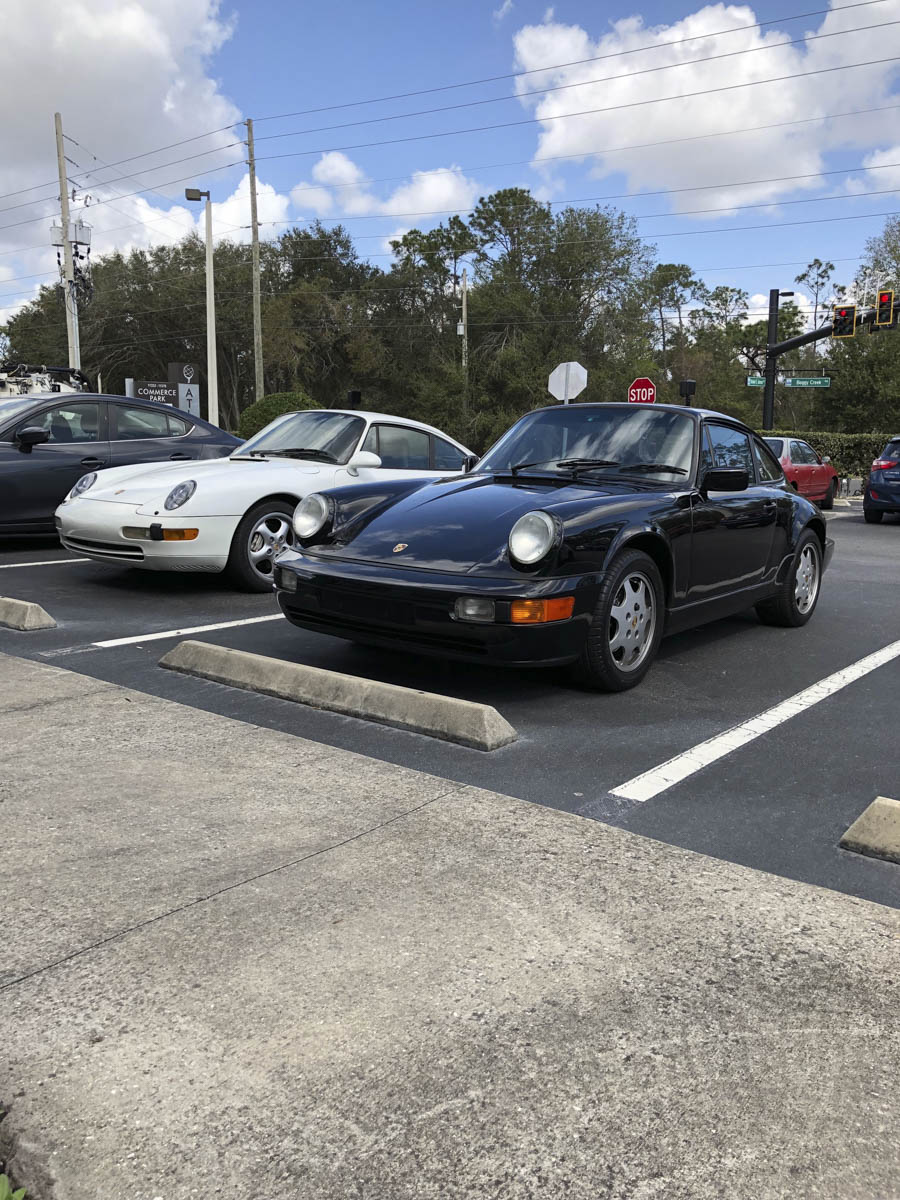
It was finally time to bring the 993 home to join the GT3, just by chance both Porsches as well as my daily driver an Audi Allroad all share the same white exterior, making for an interesting conversation with the neighbors.
As all this was happening, one of my old GT3 track buddies Nick "The Greek" dropped off his newly acquired 964 after also taking the air cooled plunge for us to do a complete suspension overhaul. We swapped his factory suspension for AST 5200 coilovers combined with every bushing, link and sway bar being replaced. Going back and forth between my Full Monoball and setup GT3, the tired 993 on aged out PS2s, and now Nicks dialed 964 set the ball in motion..... the 993 was due for some serious TLC, and so I've found myself down a slippery slope of "While you're in there". I've spent the majority of my time playing with Water Cooled Porsches, and this being my first air cooled there have been many late nights of research, and scouring the web and these forums for parts and an upgrade path. The goal will be to bring the car to better than new condition on the suspension and interior, while leaving a bit of the patina on the outside so that my OCD doesn't take over and keep me from driving it. My 996 GT3 is a serious machine and I find myself constantly reminding myself that this car will be a slightly tamed down version taking cues from the RS air cooled cars I've loved for so many years.
I'm a few weeks behind posting the progress, but looking forward to sharing the progress, failures, and lesson as I get time between wrenching. This car had an interesting life so far and I'm excited to continue its story and make sure it gets driven often in anger once complete.
A few days went by and the car disappeared, my good friend let me know that an indy mechanic had convinced the woman that he could fix the car cheaper and it left the dealer before a deal could be made for me to purchase the car. Needless to say I was quite disappointed, however the next month as I was talking to a friend Steve at the local PCA meeting about the situation he filled me in on a few details I didn't know about. The car had been sold to the indy mechanic who convinced the woman he would restore the car, however he hadn't told his wife. The car was now sitting in Steve's barn where he was repairing the oil leaks and doing general maintenance while the situation played itself out. I told Steve if he ever needed space in his barn to let me know and I'd buy the car in a heartbeat, months passed and every PCA meeting or local Porsche gathering I'd remind him that I was still interested. Fast forward to January of this year when I brought my wife to our monthly gathering at Ace Cafe, I ran into Steve and he told me it was time and asked if I still wanted the car, without any discussion I told him I'd be there in the morning with a cashiers check. The look on my wife's face was quite puzzled but I told her I would explain the situation to her on the way home, after a delicate ride home and reminding her I had a GT3 and this would be a car she could drive, it was off the next day to get the car out of the barn it lived in for the past year.
(I'm told this hole was the result of a bear..... fortunately he didn't seem to be a Porsche fan)
When we got to the barn the car of course wouldn't start and being a 96, as I've now learned the Immobilizer isn't quite as friendly, especially with new batteries. As it turns out the key I was given wasn't paired correctly however my good friends over at Drivers Choice were only a few minutes tow from the barn. I left them the car for a few days and they had the battery replaced and a new key coded for the car.
It was finally time to bring the 993 home to join the GT3, just by chance both Porsches as well as my daily driver an Audi Allroad all share the same white exterior, making for an interesting conversation with the neighbors.
As all this was happening, one of my old GT3 track buddies Nick "The Greek" dropped off his newly acquired 964 after also taking the air cooled plunge for us to do a complete suspension overhaul. We swapped his factory suspension for AST 5200 coilovers combined with every bushing, link and sway bar being replaced. Going back and forth between my Full Monoball and setup GT3, the tired 993 on aged out PS2s, and now Nicks dialed 964 set the ball in motion..... the 993 was due for some serious TLC, and so I've found myself down a slippery slope of "While you're in there". I've spent the majority of my time playing with Water Cooled Porsches, and this being my first air cooled there have been many late nights of research, and scouring the web and these forums for parts and an upgrade path. The goal will be to bring the car to better than new condition on the suspension and interior, while leaving a bit of the patina on the outside so that my OCD doesn't take over and keep me from driving it. My 996 GT3 is a serious machine and I find myself constantly reminding myself that this car will be a slightly tamed down version taking cues from the RS air cooled cars I've loved for so many years.
I'm a few weeks behind posting the progress, but looking forward to sharing the progress, failures, and lesson as I get time between wrenching. This car had an interesting life so far and I'm excited to continue its story and make sure it gets driven often in anger once complete.
__________________
Instagram :Swine11 | TitanMotorsports
Swine11 ReBoot - 964 / 993 Shift Boot Trim Panel
2004 996 GT3 | 1986 Carrera 3.2 (future Keen Project) | 2016 Cayenne Diesel
Instagram :Swine11 | TitanMotorsports
Swine11 ReBoot - 964 / 993 Shift Boot Trim Panel
2004 996 GT3 | 1986 Carrera 3.2 (future Keen Project) | 2016 Cayenne Diesel

The following users liked this post:
Vegas993 (06-26-2019)
08-29-2018, 01:21 AM
#2
Rennlist Member
Congratulations on the find. I was in a similar situation like you where the seller of mine sold it to someone else and the deal fell through and came back to me to take it off his hands! If you want some DIY tips my build blog below goes through a full suspension overhaul and then some below.
08-29-2018, 01:55 AM
#3
Basic Sponsor
Rennlist
Site Sponsor
Rennlist
Site Sponsor
Thread Starter
Congratulations on the find. I was in a similar situation like you where the seller of mine sold it to someone else and the deal fell through and came back to me to take it off his hands! If you want some DIY tips my build blog below goes through a full suspension overhaul and then some below.

 08-29-2018, 11:40 PM
#5
Basic Sponsor
Rennlist
Site Sponsor
Rennlist
Site Sponsor
Thread Starter
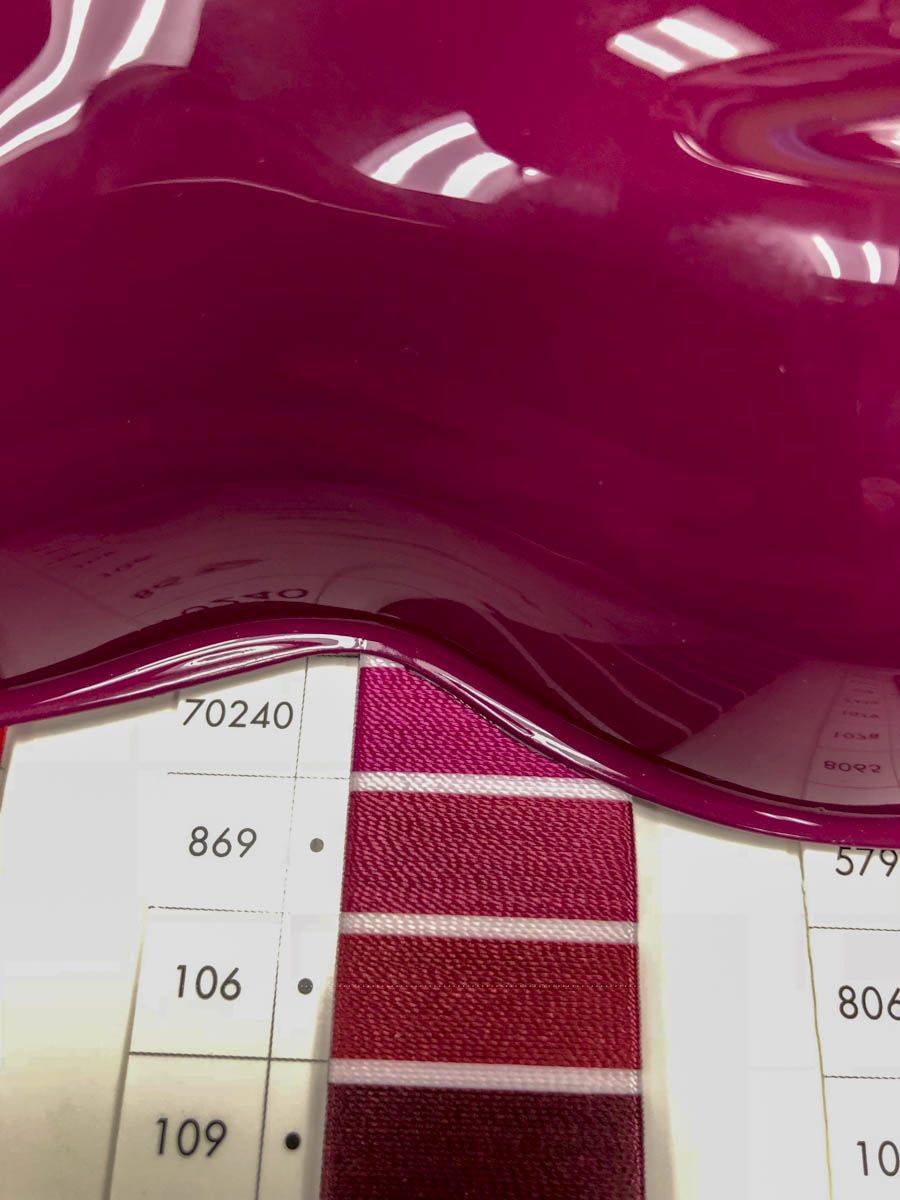
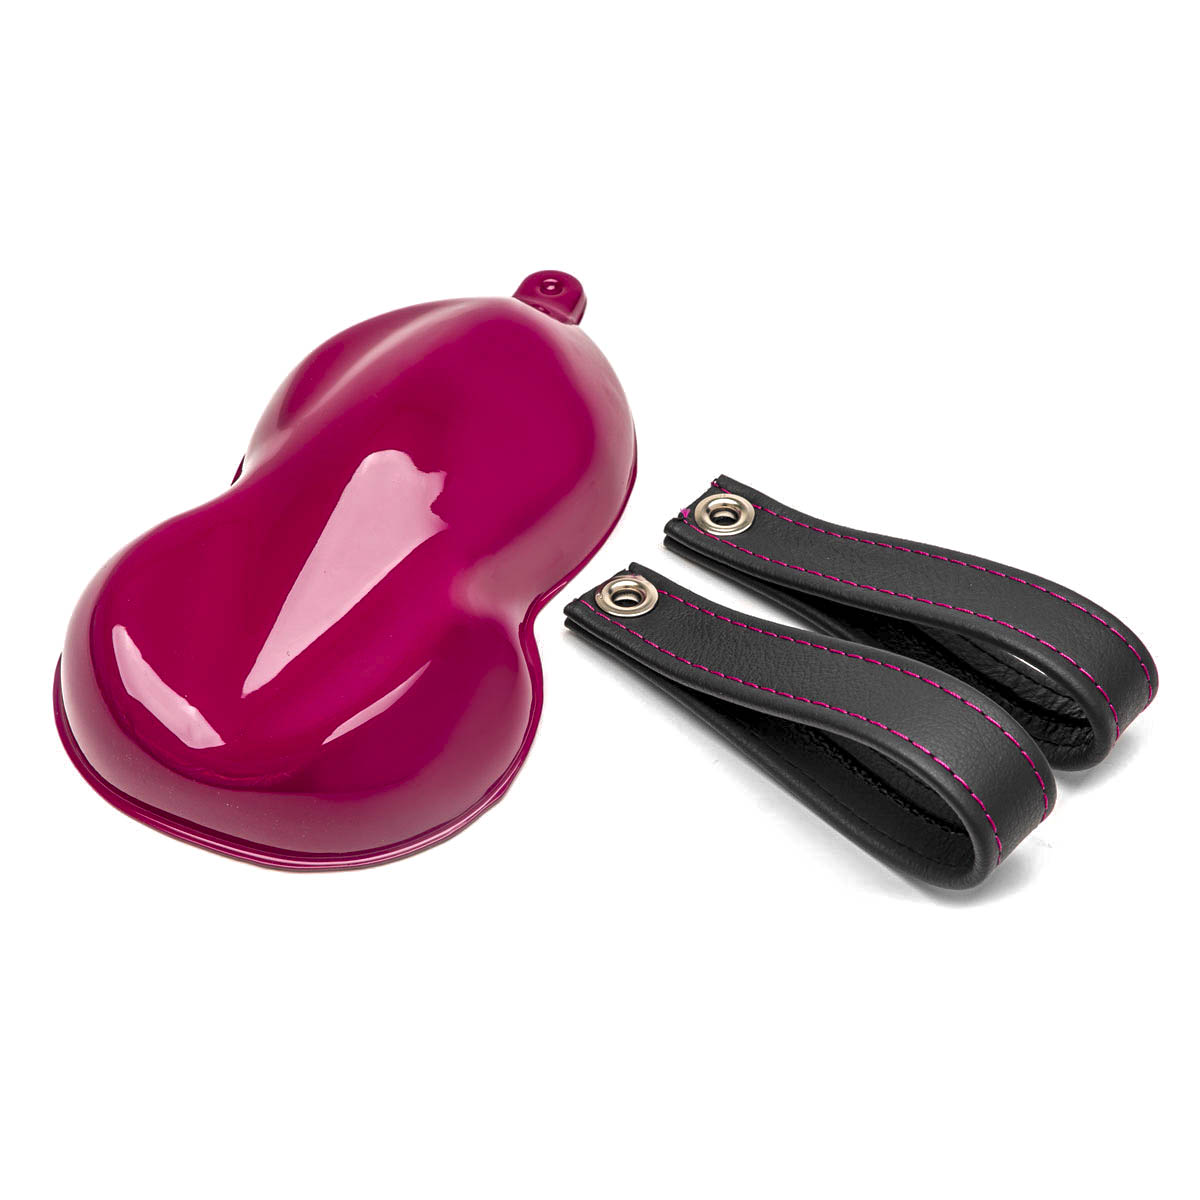
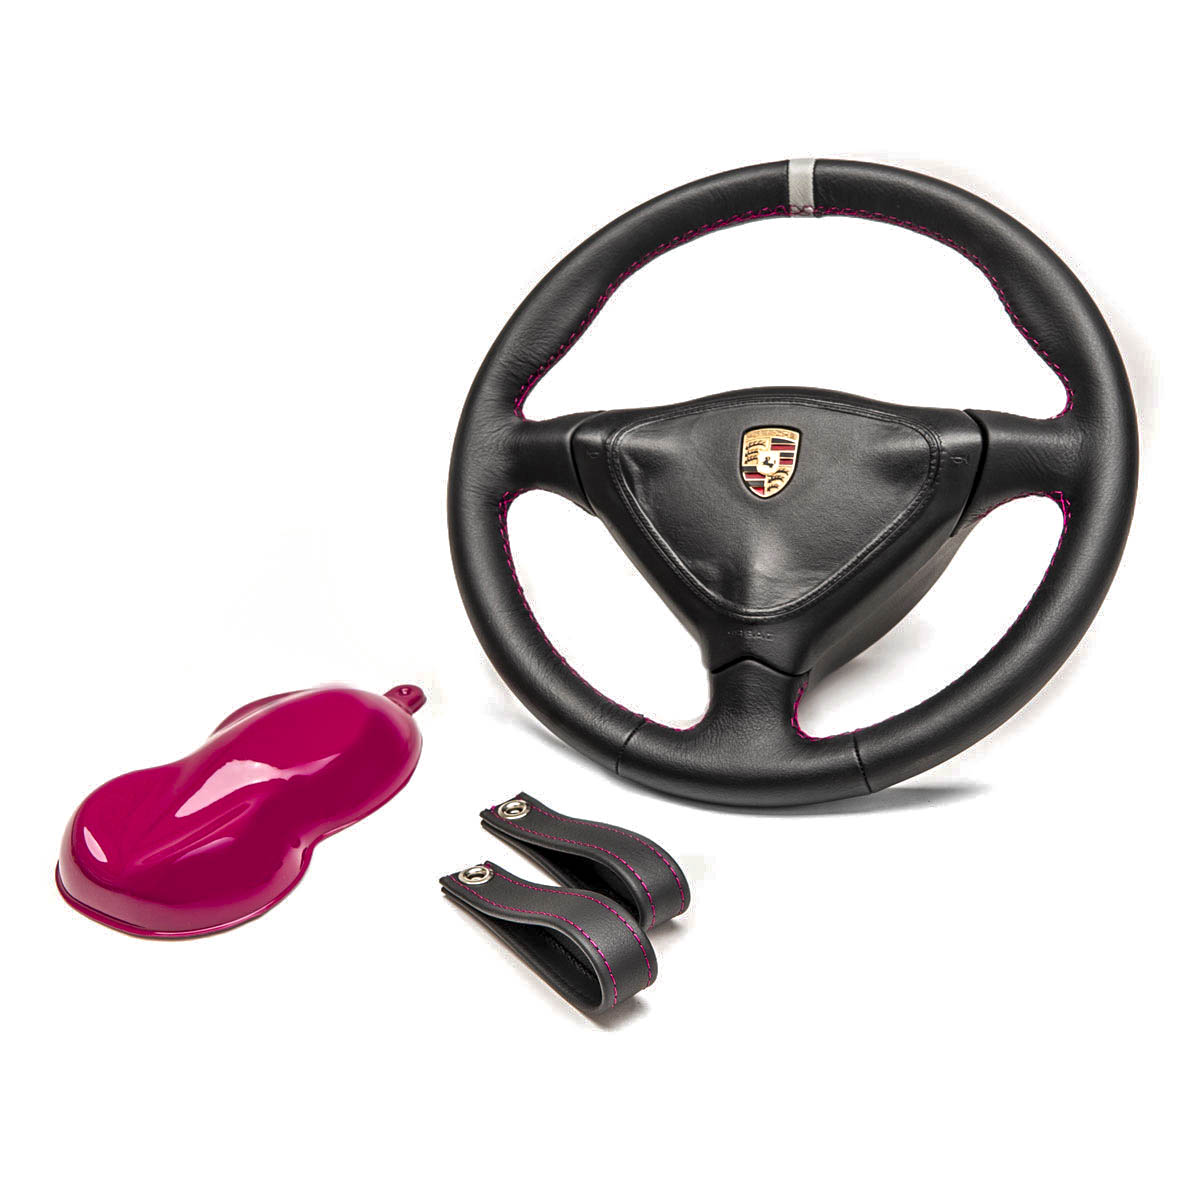
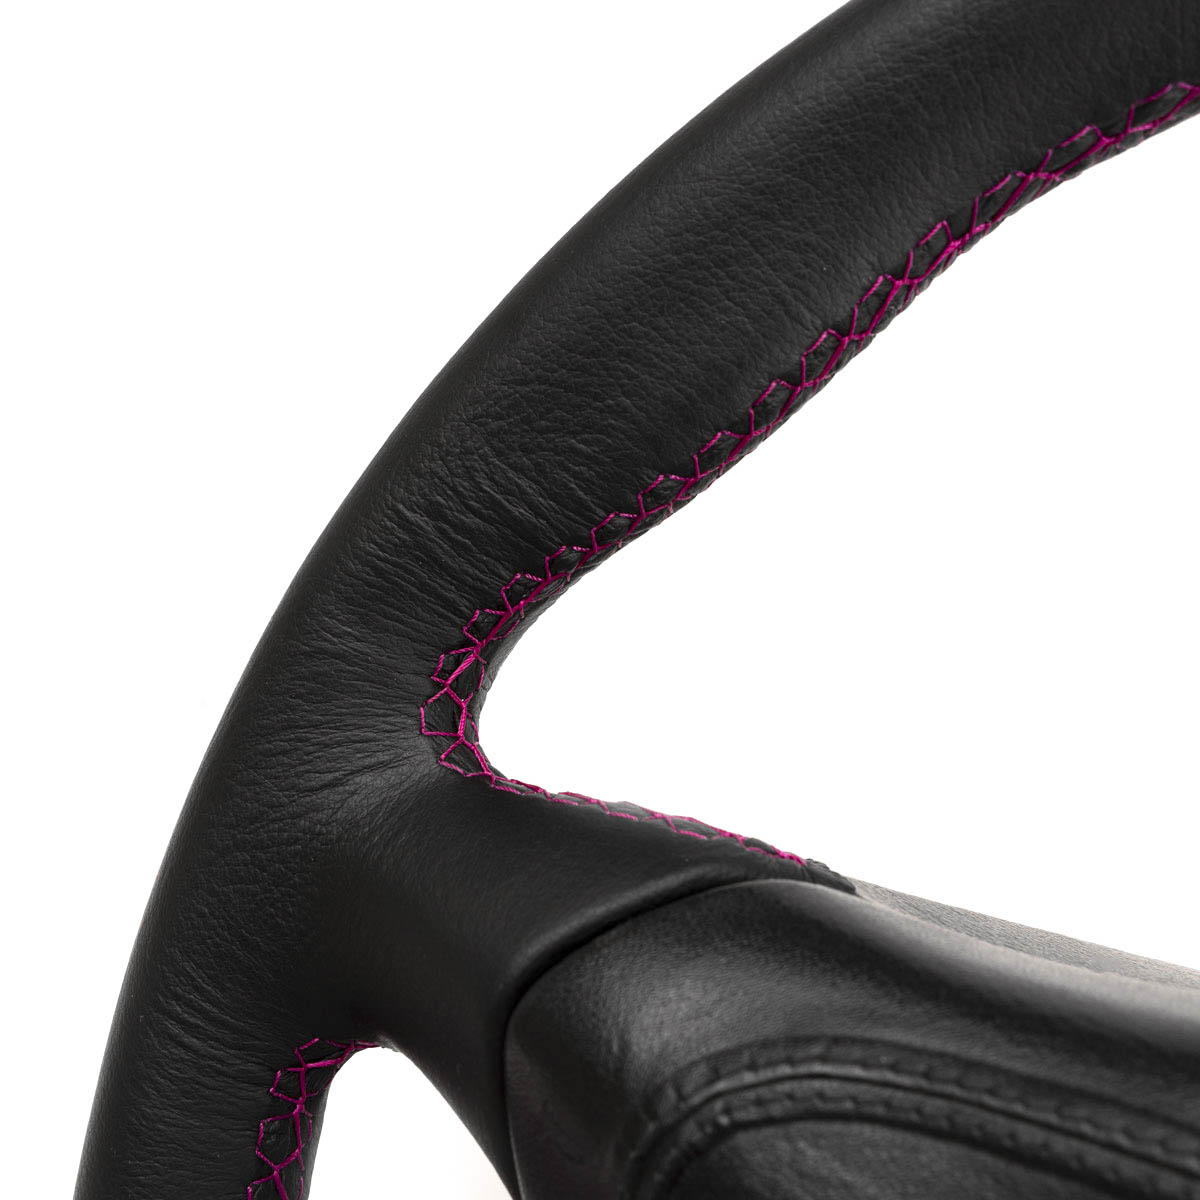
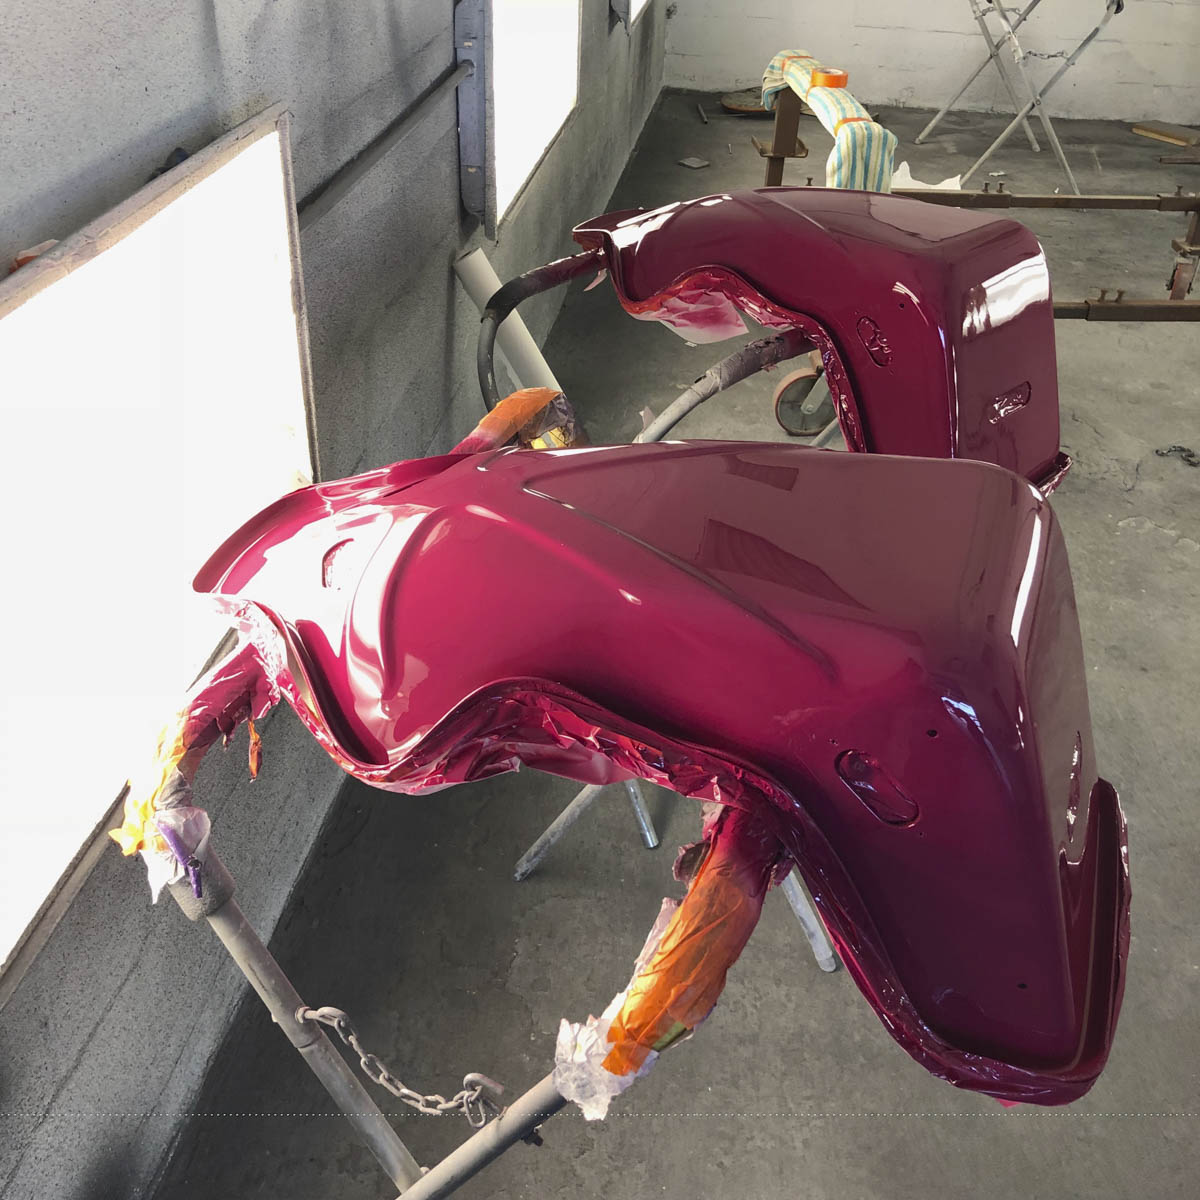
My background is in marketing / design, so I always like to put a personal touch on my projects but try to do so tastefully. On my 996 GT3 I accented the white with 22R Mint Green from the 964s. Since I can't drive 2 cars at once, my plan for this car was to match my GT3 but use Rubystone as an accent and let my wife and daughter enjoy this car at events where I take the GT3. I had my painter mix up some Code 82N rubystone paint and spray me a sample card. I used this sample to match up some thread from Serafil that I sourced from a site called Relicate to use on the interior accents since much of the original leather and vinyl was showing plenty of age. They offer a great sample card with various colors that they typically keep in stock, in this case it was thread 70240, a special order color (which I now have a few extra spools of if anyone is in need) .
With the thread in hand I visited my very talented upholster Fernando to have some of the first items stitched. I upgraded to RS door cars from Appbiz, but wanted a bit more elegant strap so one was reproduced from leather with the stitching to match. I also have the top portion of the door panels being re-wrapped in leather with a thin double stitch that will carry on to the dash and throughout the interior. I had just recently put a Cup steering wheel in my GT3 and realized the factory RS 3 spoke wheel would fit perfectly in the 993, and my wife prefers to have an airbag so this was a win win. The alcantara on the original wheel was quite tired so I had the wheel re-wrapped in leather with the ruby thread. Typically I would have opted for suede, but being that my wife will drive the car from time to time I chose leather to prevent the conversation of driving gloves with my quite supportive wife.
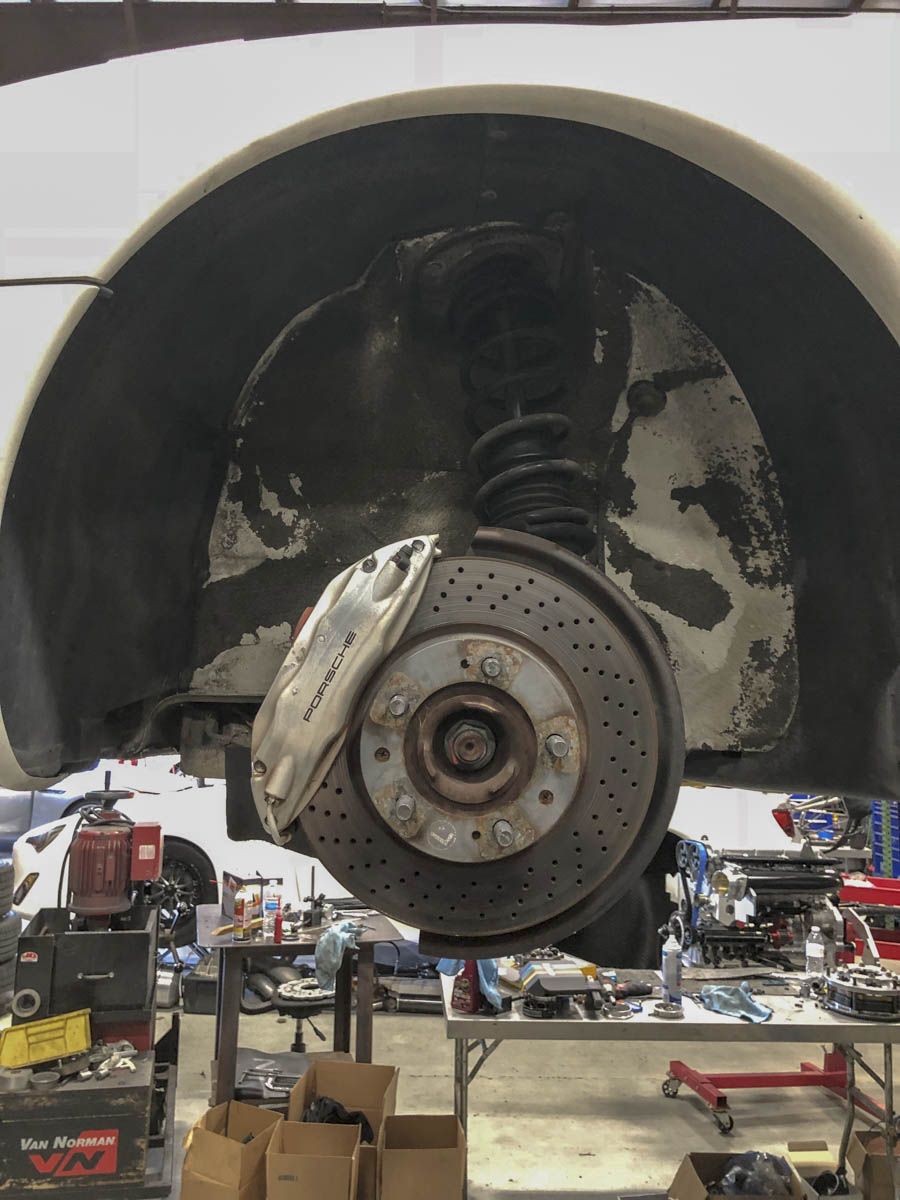
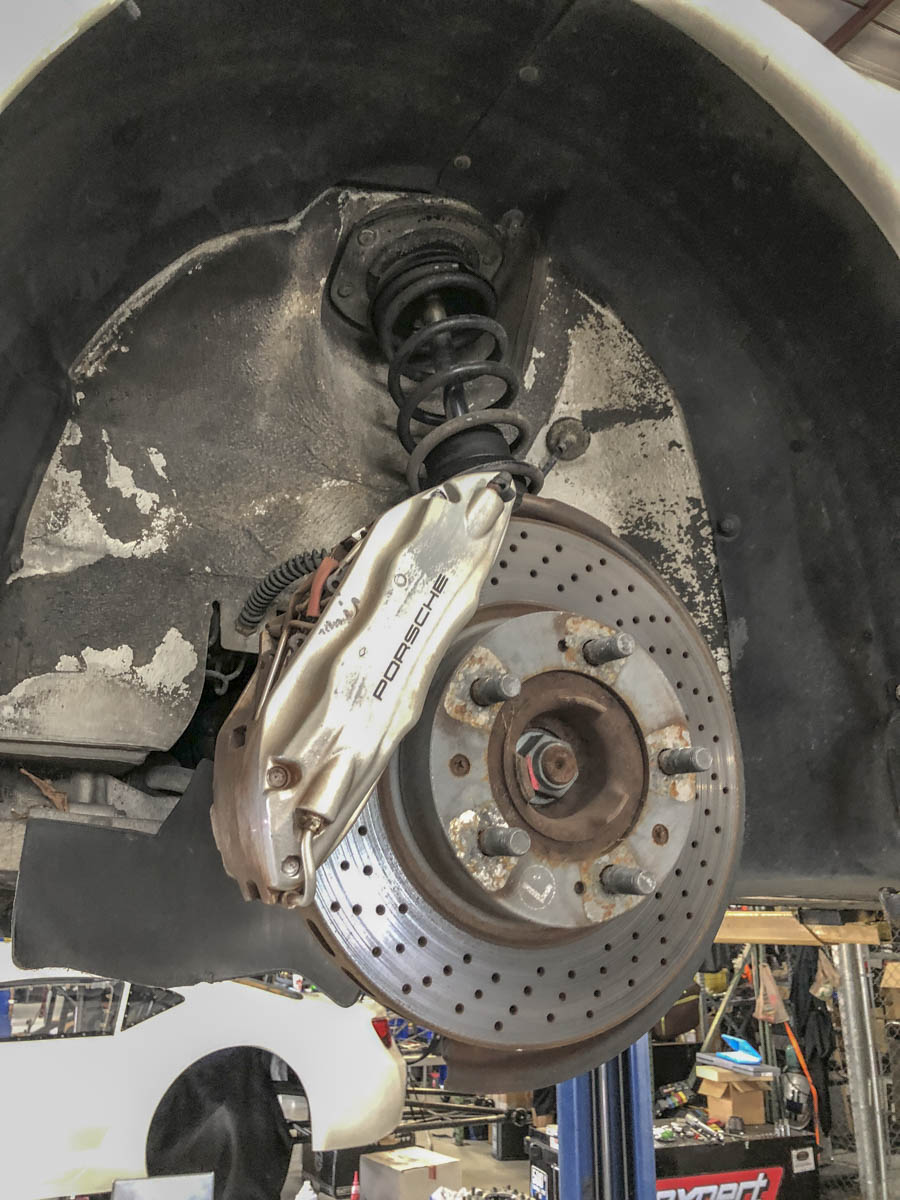
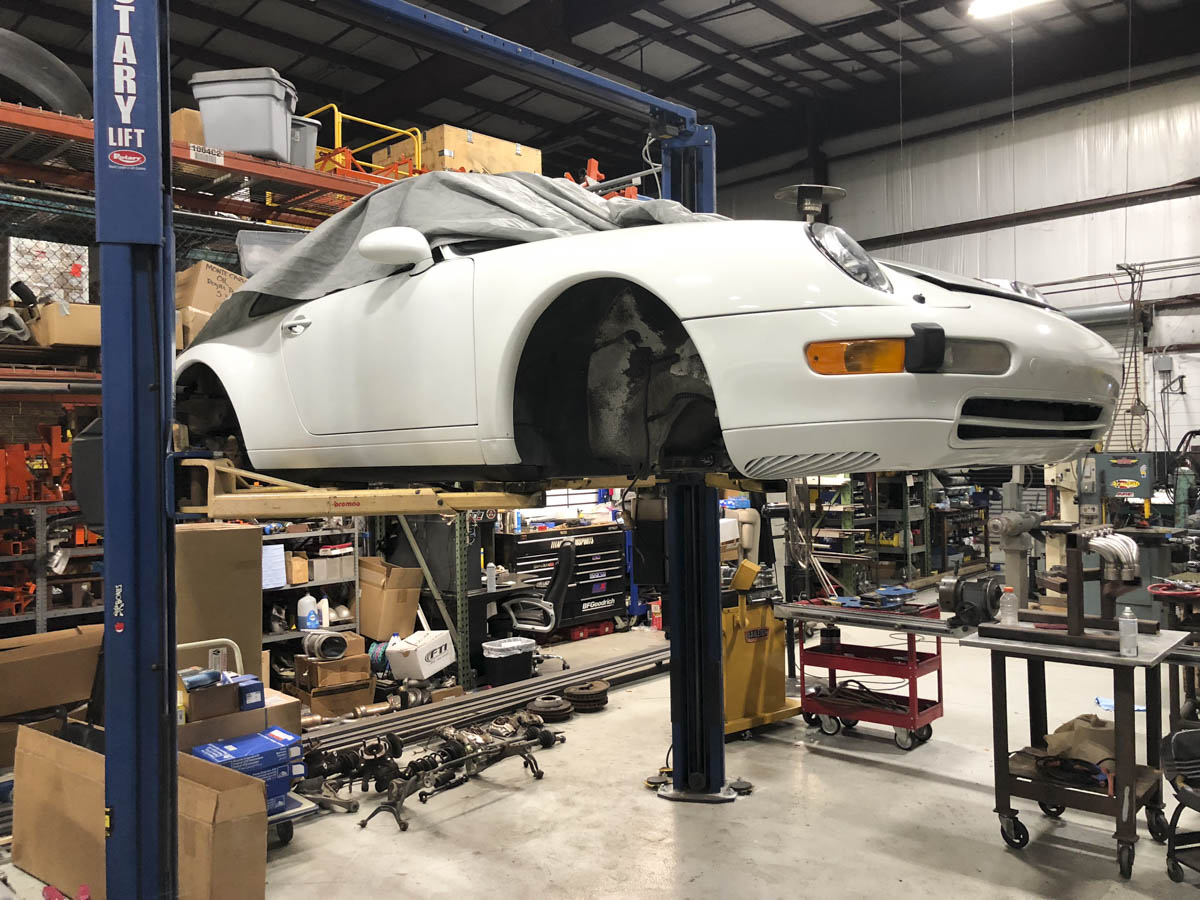
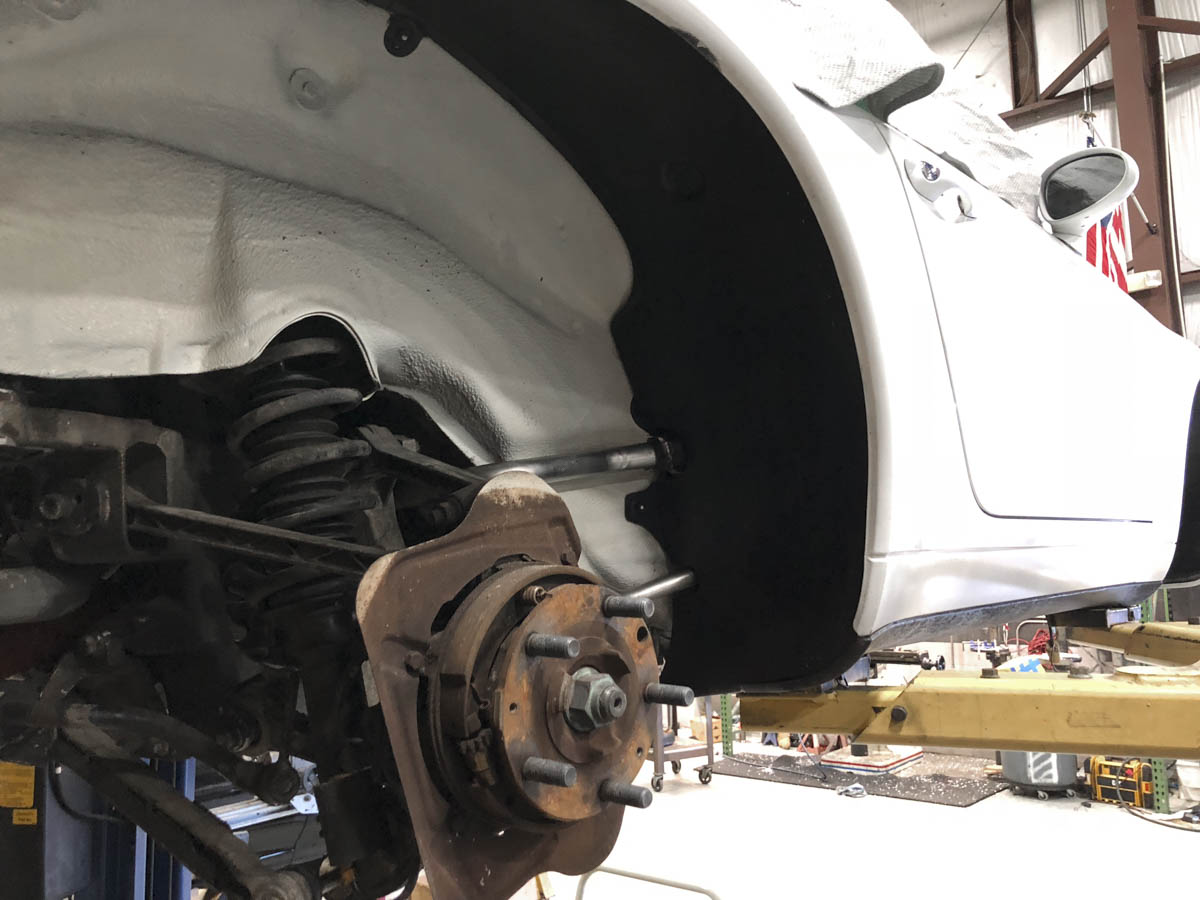
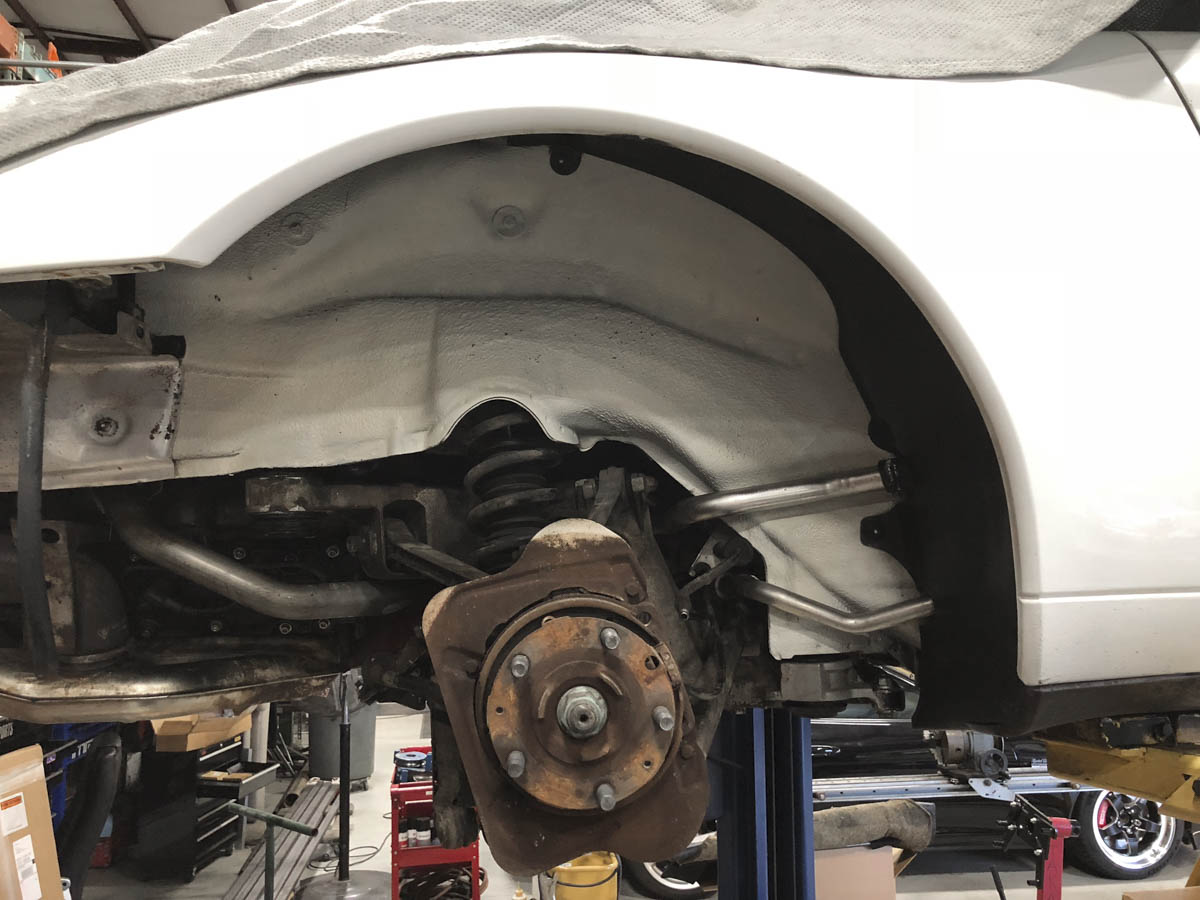
The more I drove the car and compared with others, I realize the suspension and tires were shot. I put the car on the lift and called my friends at AST to have a set of their 5100 coilovers built. As I began to look closer at the undercarriage and read others builds threads, my OCD kicked in and realized it was time to wage war on the undercarriage of the car and get rid of 100K+ miles of road grime and cosmoline.
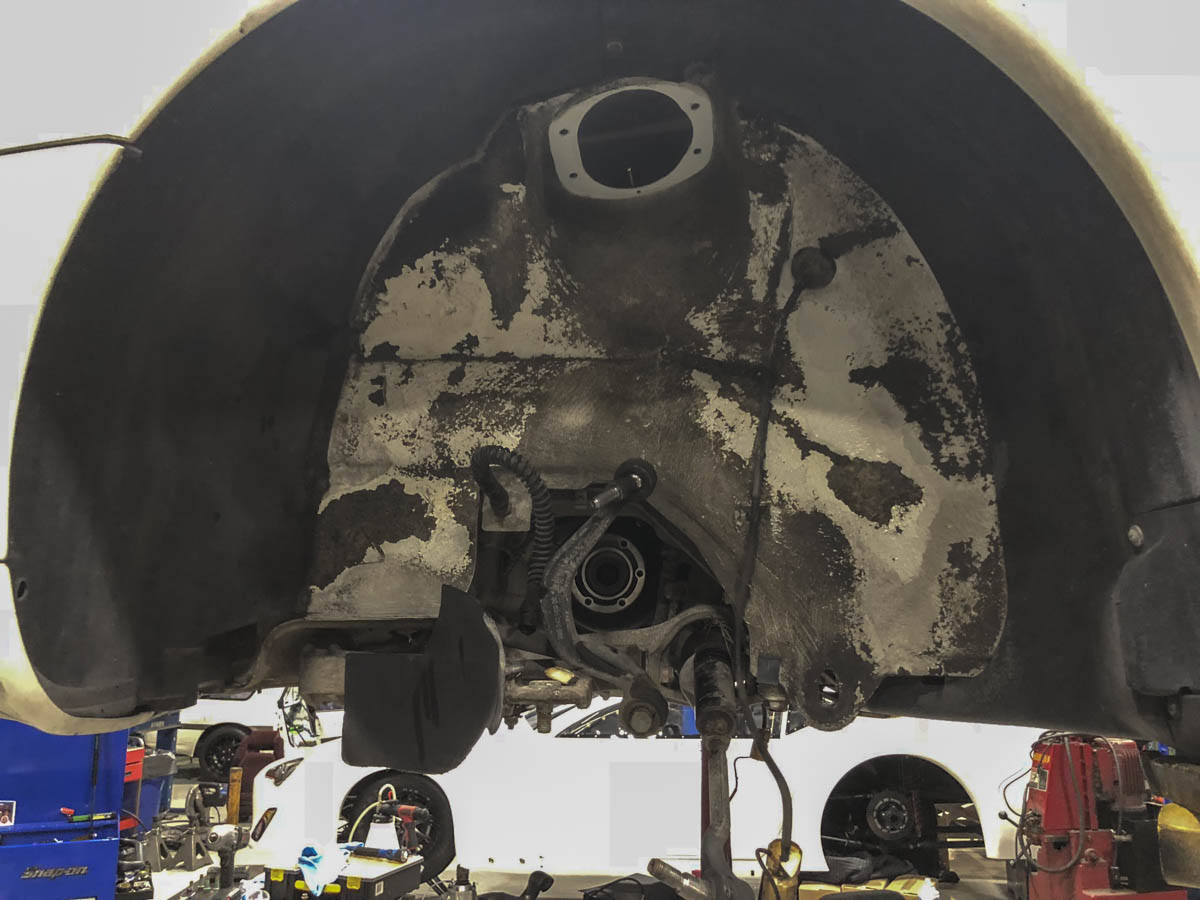
From here the "While we are in there" bug really began kicking in and I found things to be much easier to clean off the car, and more bushings and suspension pieces to replace and upgrade to make the car perform like I expected. From here I began researching and obtaining the various bushings, arms and suspension components needed. Quite frequently I had to remind myself that this was a companion car to the GT3 that would see more street time, more time in the mountains and twists and less time at the track, so a Street/Track setup was the preferred upgrade path over going all out with full monoball and triple adjustable shocks. Slowly the pile of parts needing to be inspected, cleaned and or replaced began to form.


With the thread in hand I visited my very talented upholster Fernando to have some of the first items stitched. I upgraded to RS door cars from Appbiz, but wanted a bit more elegant strap so one was reproduced from leather with the stitching to match. I also have the top portion of the door panels being re-wrapped in leather with a thin double stitch that will carry on to the dash and throughout the interior. I had just recently put a Cup steering wheel in my GT3 and realized the factory RS 3 spoke wheel would fit perfectly in the 993, and my wife prefers to have an airbag so this was a win win. The alcantara on the original wheel was quite tired so I had the wheel re-wrapped in leather with the ruby thread. Typically I would have opted for suede, but being that my wife will drive the car from time to time I chose leather to prevent the conversation of driving gloves with my quite supportive wife.
The more I drove the car and compared with others, I realize the suspension and tires were shot. I put the car on the lift and called my friends at AST to have a set of their 5100 coilovers built. As I began to look closer at the undercarriage and read others builds threads, my OCD kicked in and realized it was time to wage war on the undercarriage of the car and get rid of 100K+ miles of road grime and cosmoline.
From here the "While we are in there" bug really began kicking in and I found things to be much easier to clean off the car, and more bushings and suspension pieces to replace and upgrade to make the car perform like I expected. From here I began researching and obtaining the various bushings, arms and suspension components needed. Quite frequently I had to remind myself that this was a companion car to the GT3 that would see more street time, more time in the mountains and twists and less time at the track, so a Street/Track setup was the preferred upgrade path over going all out with full monoball and triple adjustable shocks. Slowly the pile of parts needing to be inspected, cleaned and or replaced began to form.
09-01-2018, 10:42 AM
#6
Basic Sponsor
Rennlist
Site Sponsor
Rennlist
Site Sponsor
Thread Starter
While the car was on the lift I started putting together some of the part and pieces that would get re-installed new. I did make one oversight that I now regret, having a lift the car can live on makes working after hours and in small bites much easier. However when you're detailing and cleaning the suspension / underside, cleaning / pressure washing the underside before I put it on the lift would have made my life much easier in removing the dirt and grime vs doing it by hand.
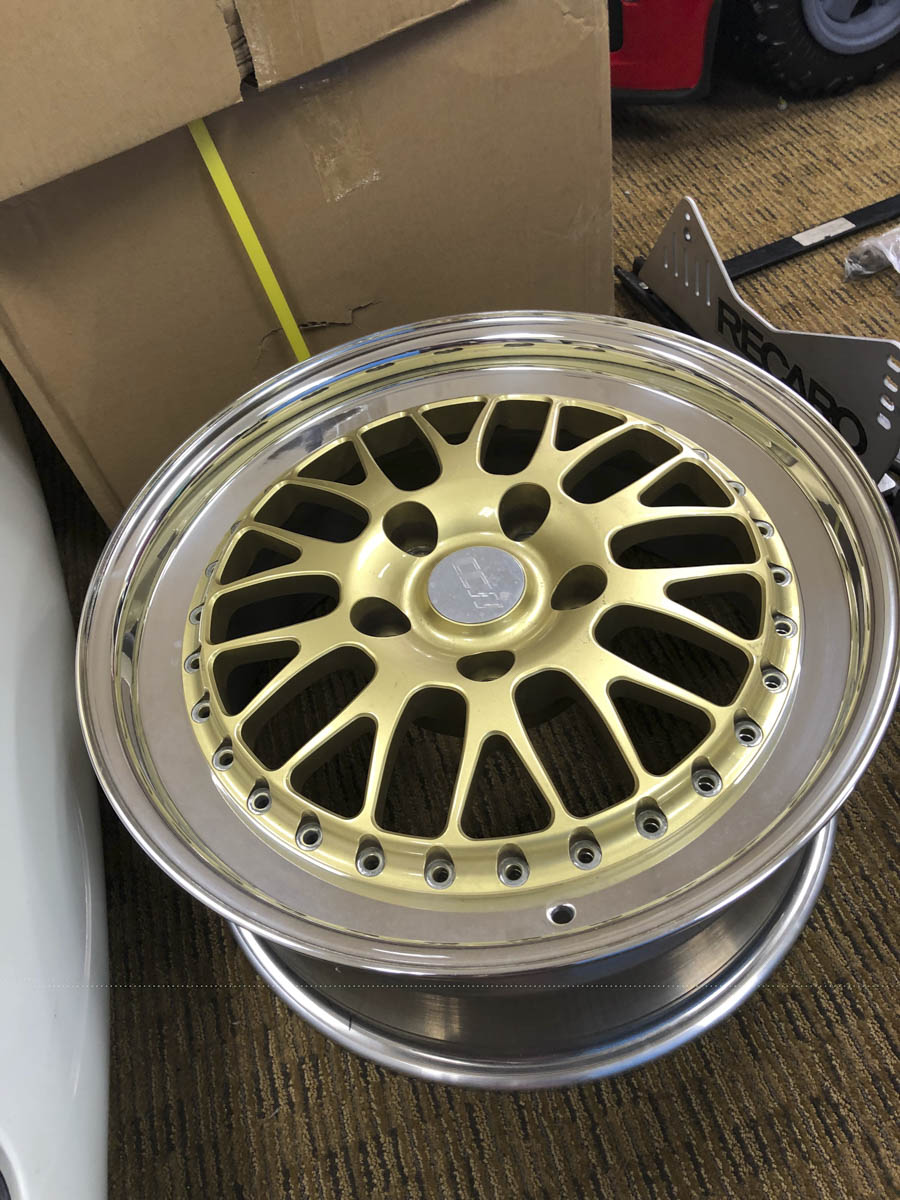
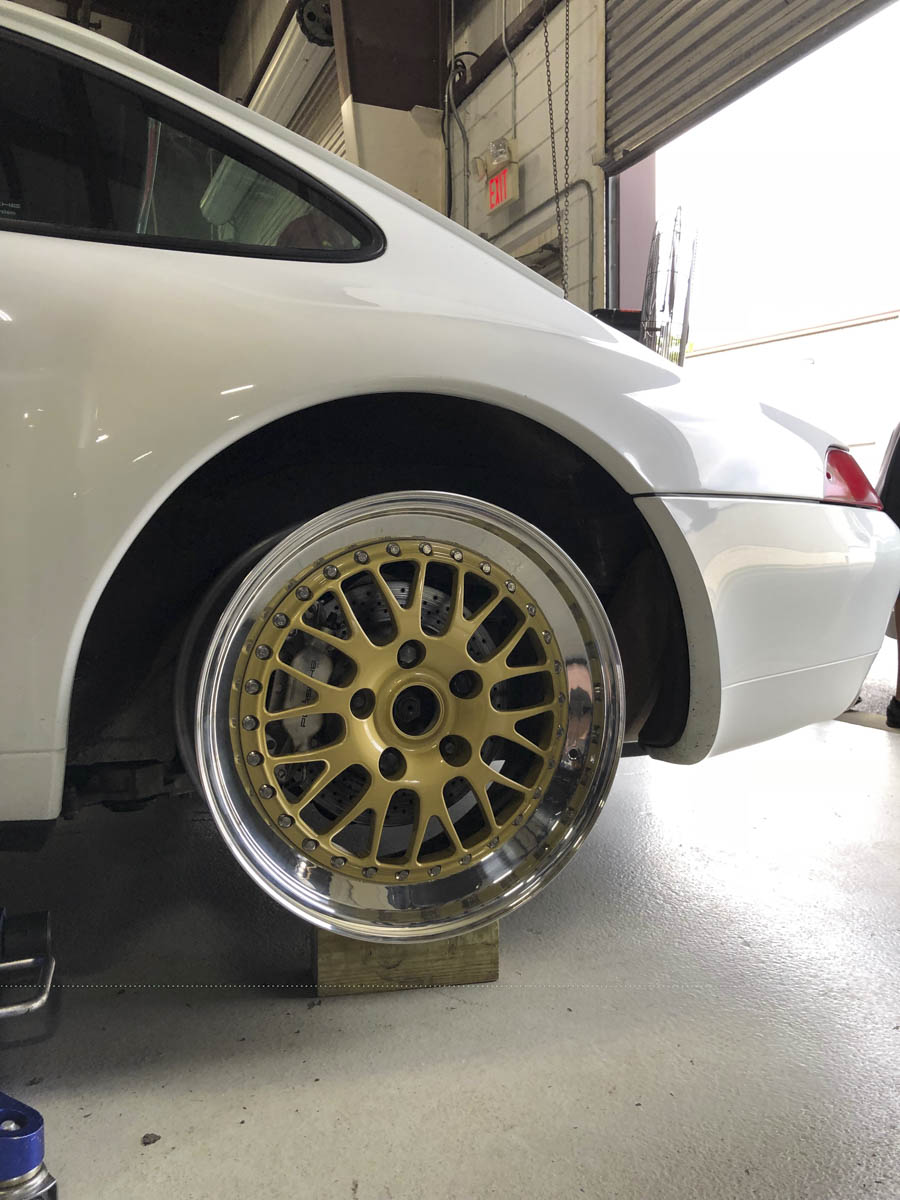
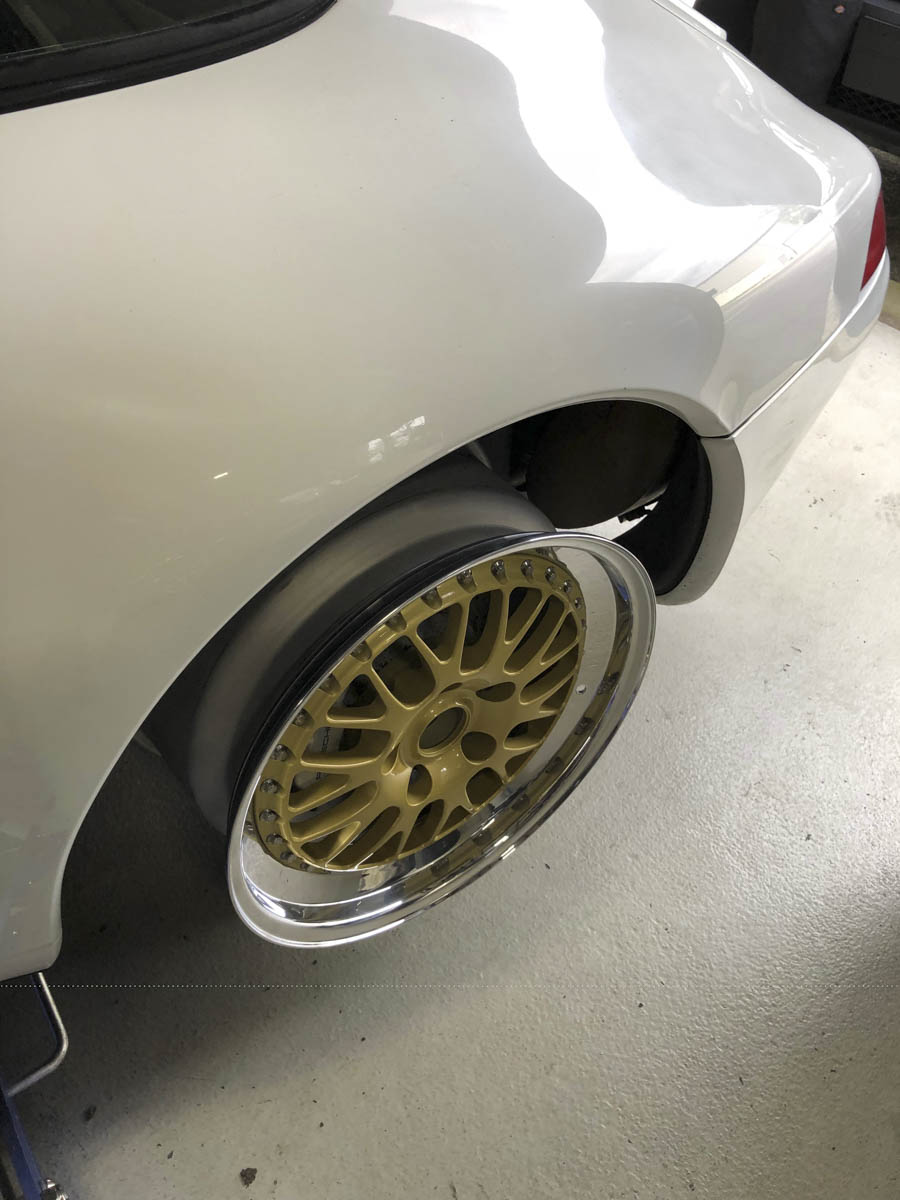
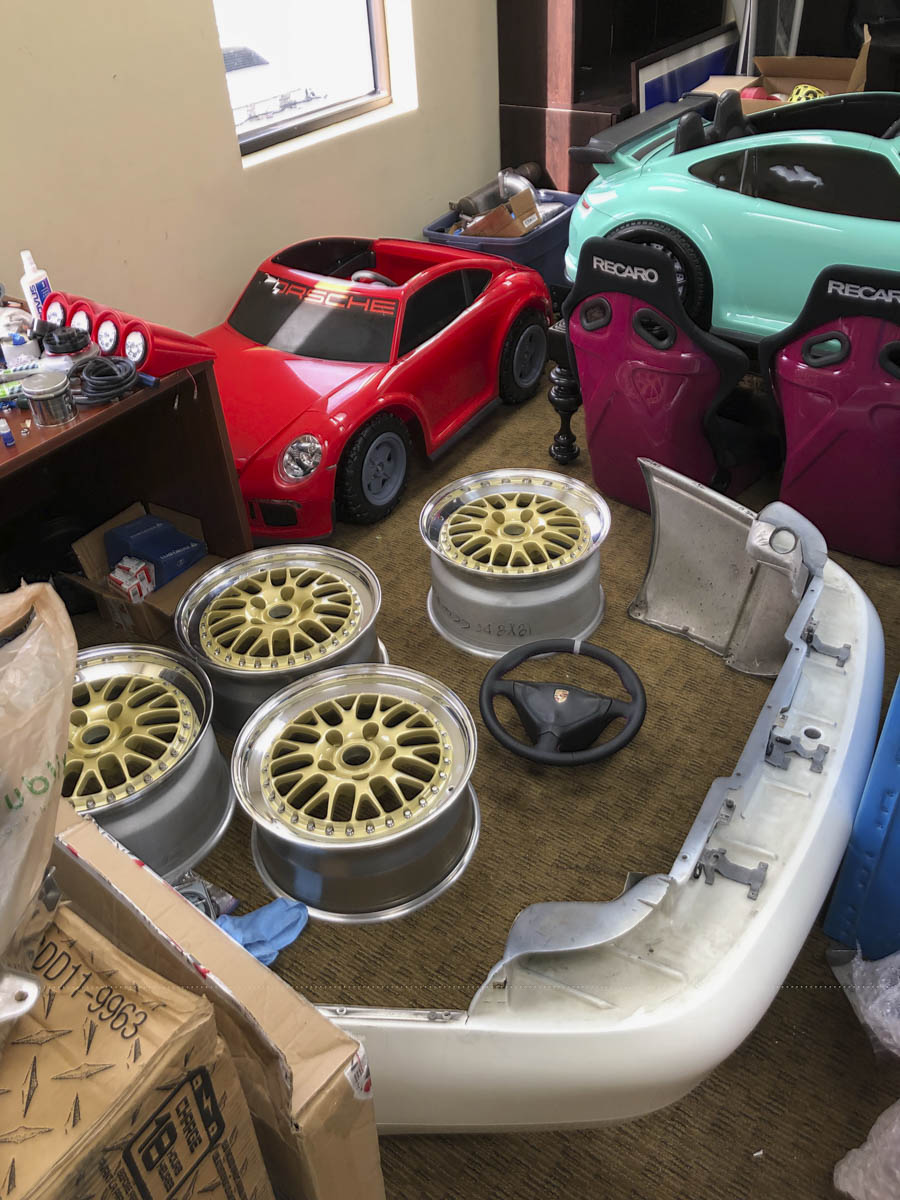
A good client had these CCWs in his barn after building an RWB, he graciously donated them to me after taking them apart and deciding that he didn't want to go through the trouble of rebuilding them. They were 17s and originally on a 964 so they weren't the 18" spec that I was looking for on the 993, but the price point was something I couldn't resist. I called a good friend who worked at CCW prior to their sale and he was able to look up the order and find the current wheel specs, and help me come up with a plan to use the wheels. He also took a few moments to tip me off that these particular wheels the LM20, used 17" centers for both the 17" fitments and 18" fitments, so by replacing the barrels, these centers could be used to produce a set of 18" wheels.
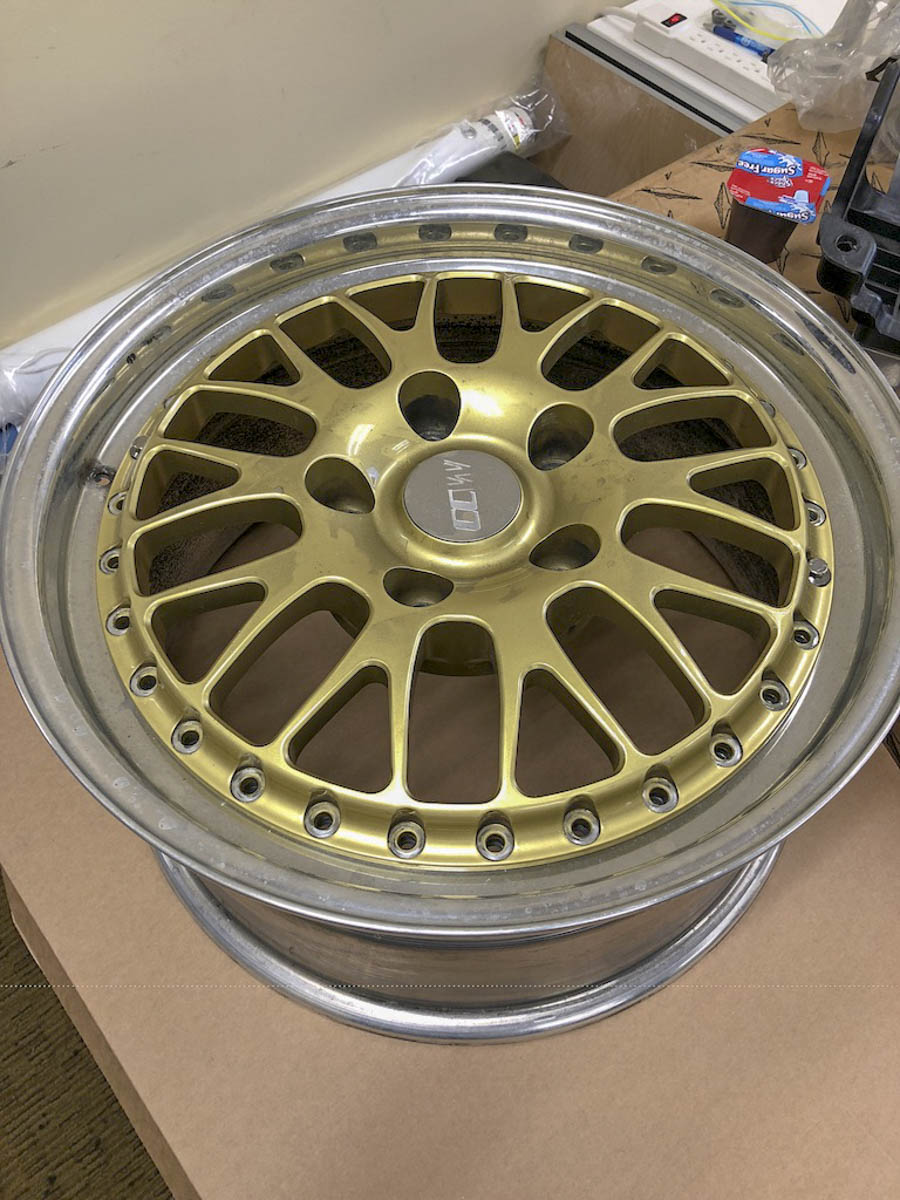
The centers had a small bit of blemish and some slight scratches that I thought could be polished out and fixed with some touch up paint. Since the wheels were already apart I decided it would probably just be best to respray the centers. Tracking down the original color proved to be a challenge since CCW has moved their production to Kansas City and a number of suppliers since closed up shop. After a number of phone calls and some sleuthing I found the original light metallic "Yokohama Gold" was a 1 stage paint that I was able to purchase at a local paint supply store.
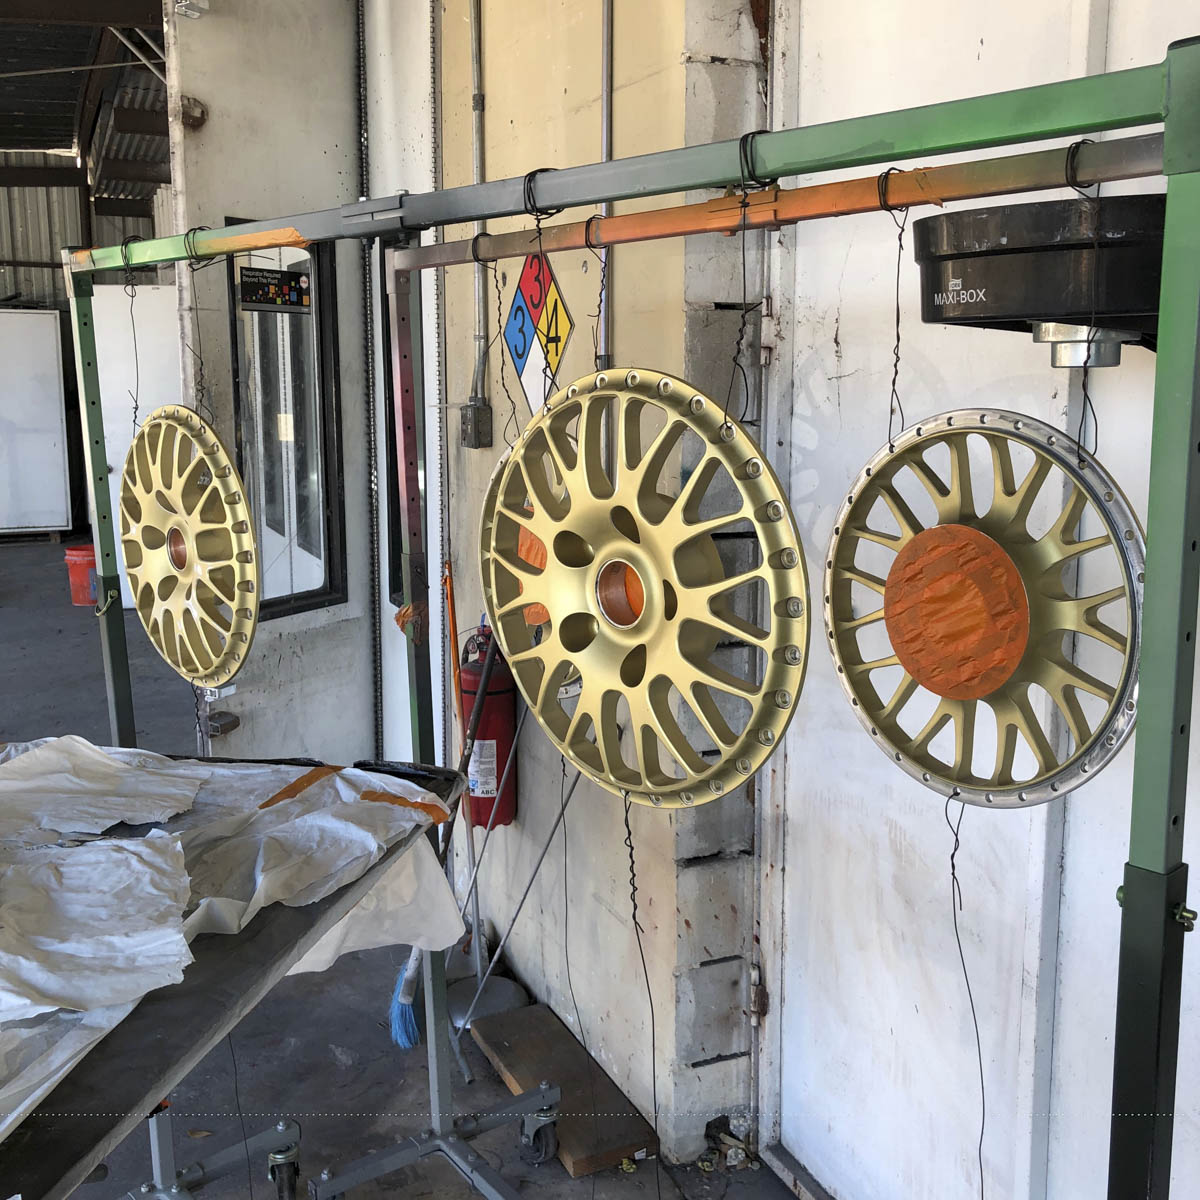
The "Who has the coolest wheels on their 993" and prior posts from Bill Verberg became instrumental in helping to get the wheel fitment right. I spent hours looking at cars with a fitment similar to what I was looking for, Bills wheel specs thread, and prior CCW setups. Since the centers were already cut for a specific offset I was limited to widths possible by pairing these centers with standard step barrel sizes. For the front I went with a 1.5 Outer /. 7.0 Inner to provide an 18x8.5 front with +51 offset and the rear a 2.0” Outer / 8.0” Inner gave me a 18x10 +57. I wanted to air on the side of conservative since I didn’t need an excessive large tire to keep things slippery, but also don’t mind giving the fenders a bit of a roll. The wheels got re-bolted together, sealed and dry fitted to the car and the fitment looked spot on for what I was going for. Another positive I learned there is quite the market for use barrels and “stance kids” looking to change their wheel fitment, so I was able to offset a good portion of the wheel costs by selling the old 30H barrels.


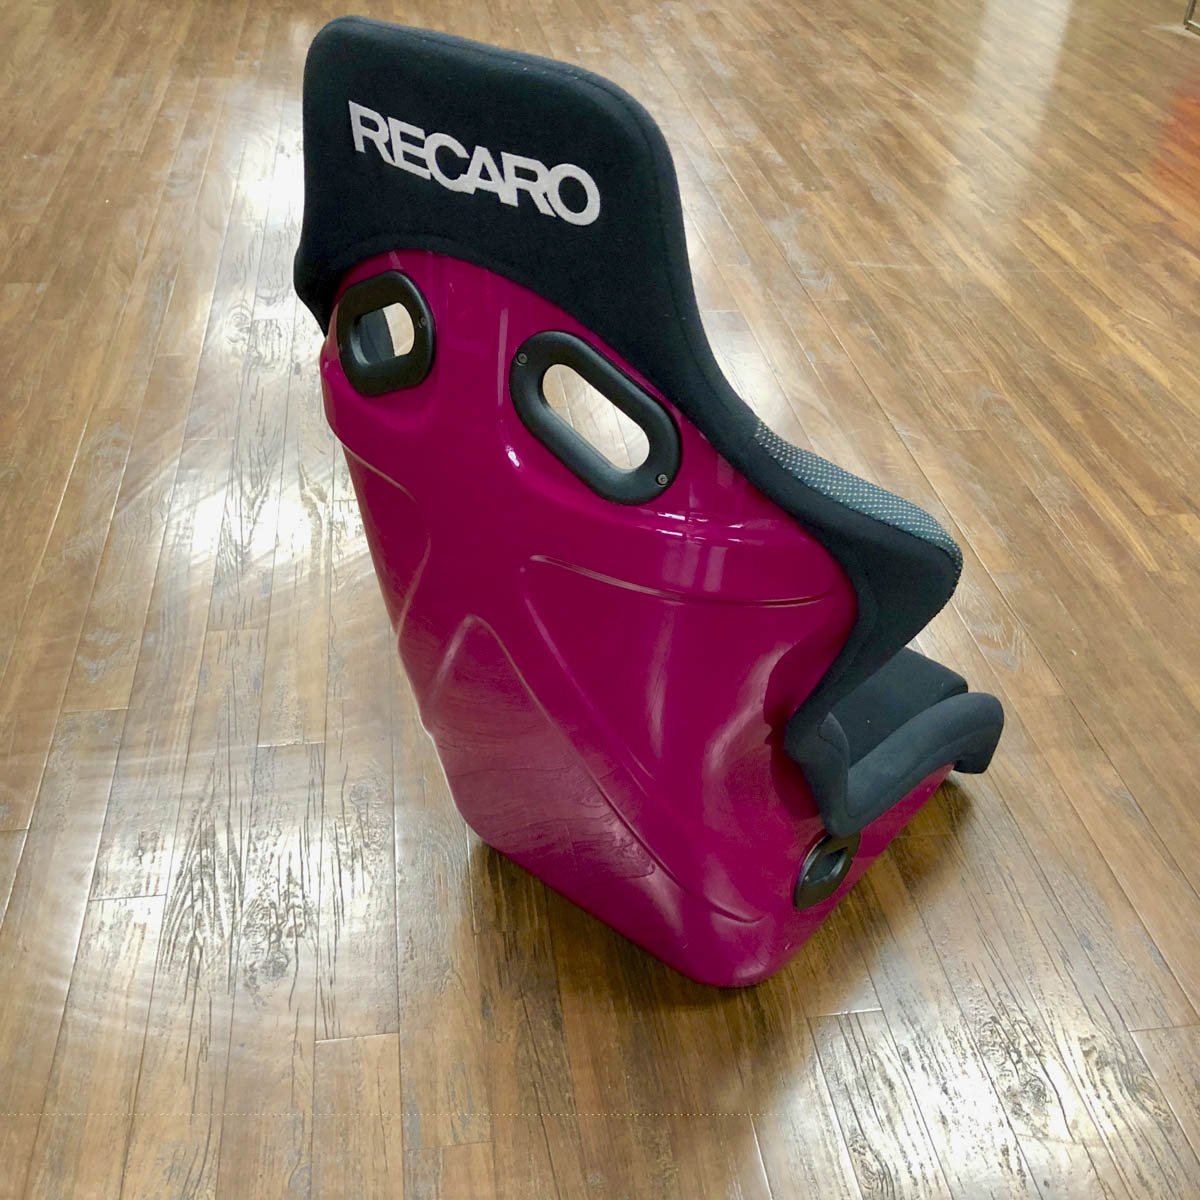
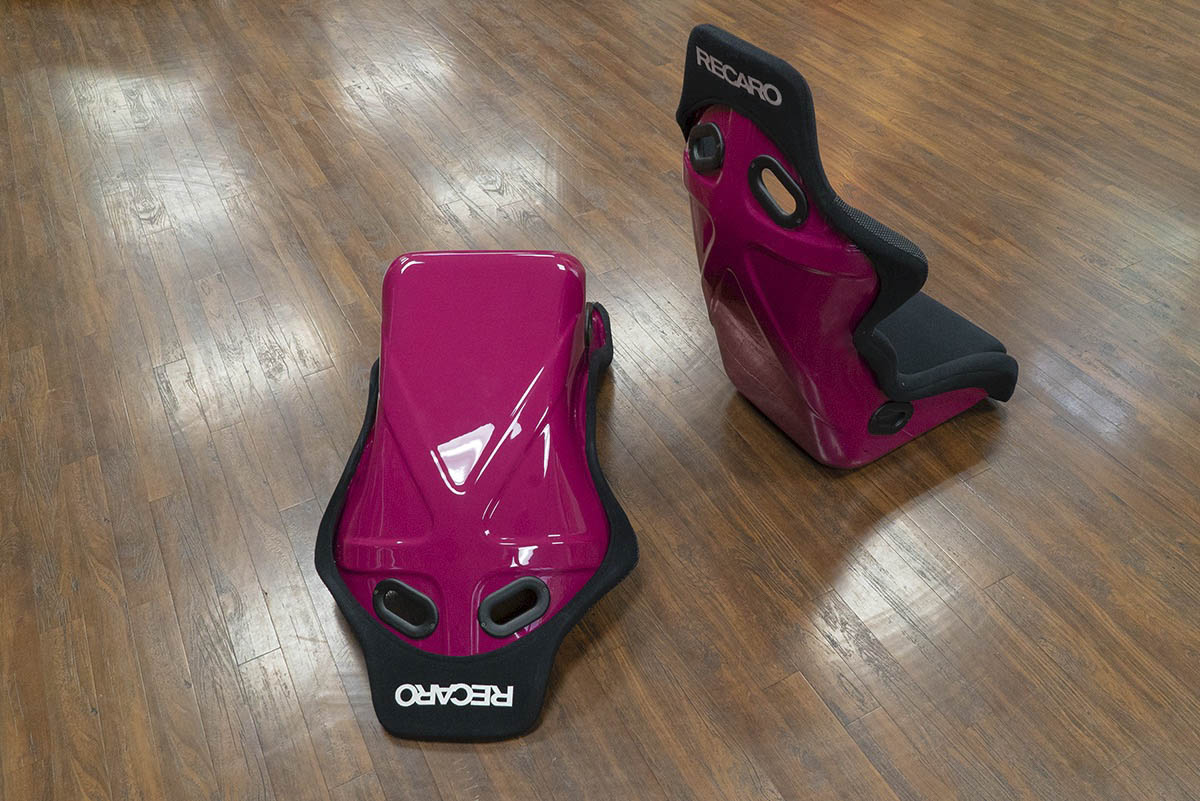
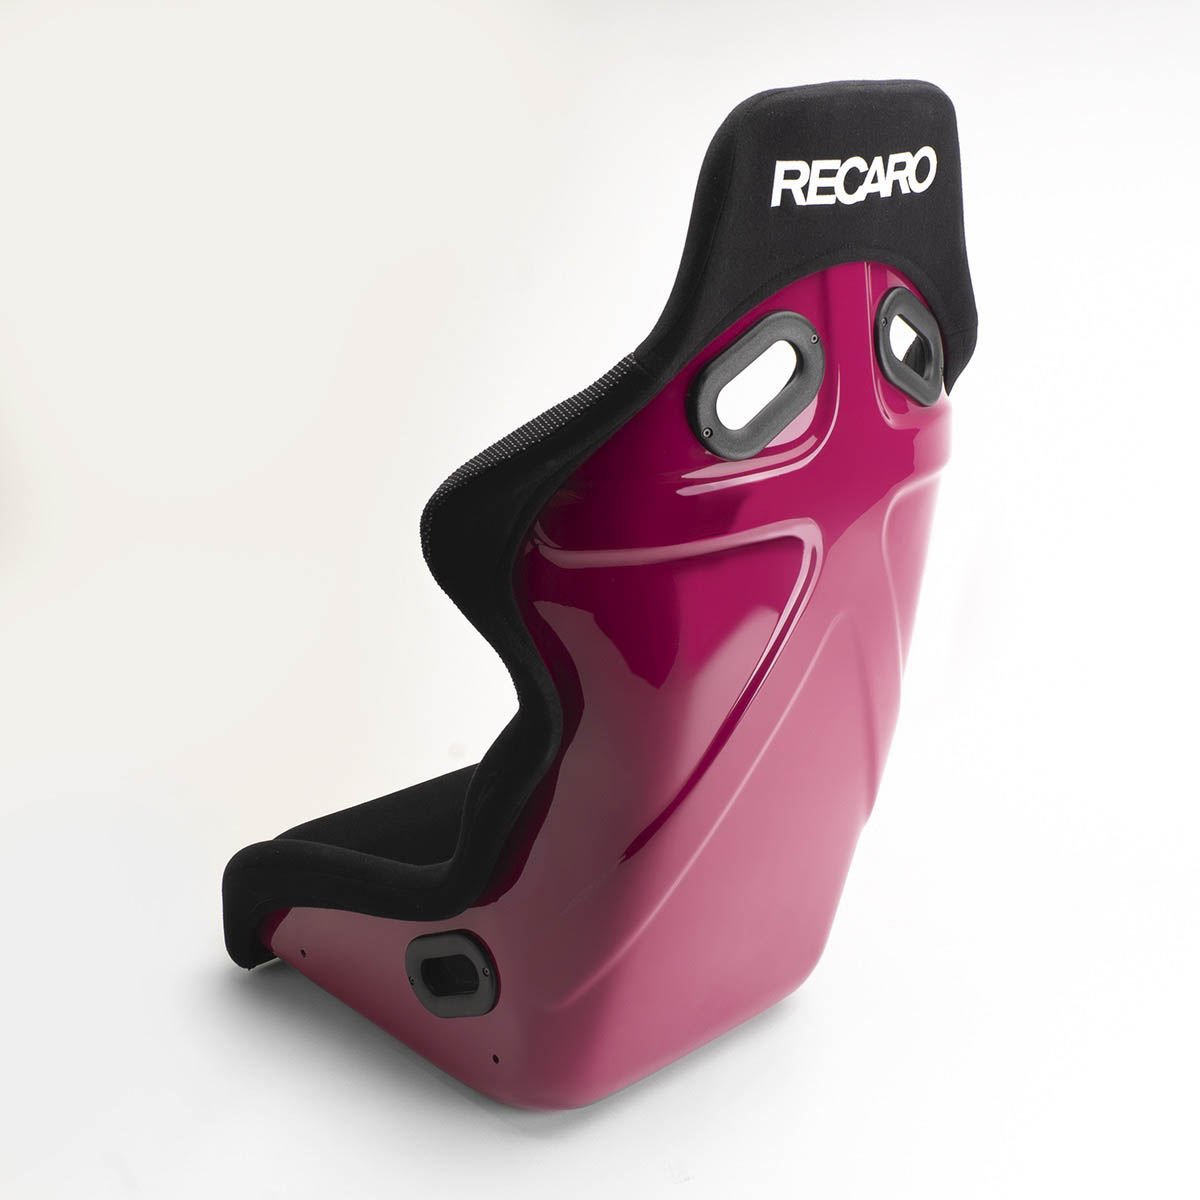
With the wheels done I located a set of Recaro SPG seats and began to give them a make-over. The covers were removed, cleaned and washed thoroughly and I dropped the seat backs off at the body shop to get a new lease on life. I've always loved the look of color matched Recaro in the 964 RS but as we all know the price on originals has gotten out of mosts range of sanity. The SPGs will require me to stay in shape to fit in them but also provided a ribbed back panel similar to that of the original RS seats. With a fresh coat of Rubystone paint the covers were re-installed and all trim re-attached with new adhesive strips I cut from a sheet of 3M 300SEL that I made using the originals as templates. At some point I'll remake the center cushions but still looking for the right wild fabric to tie everything together.
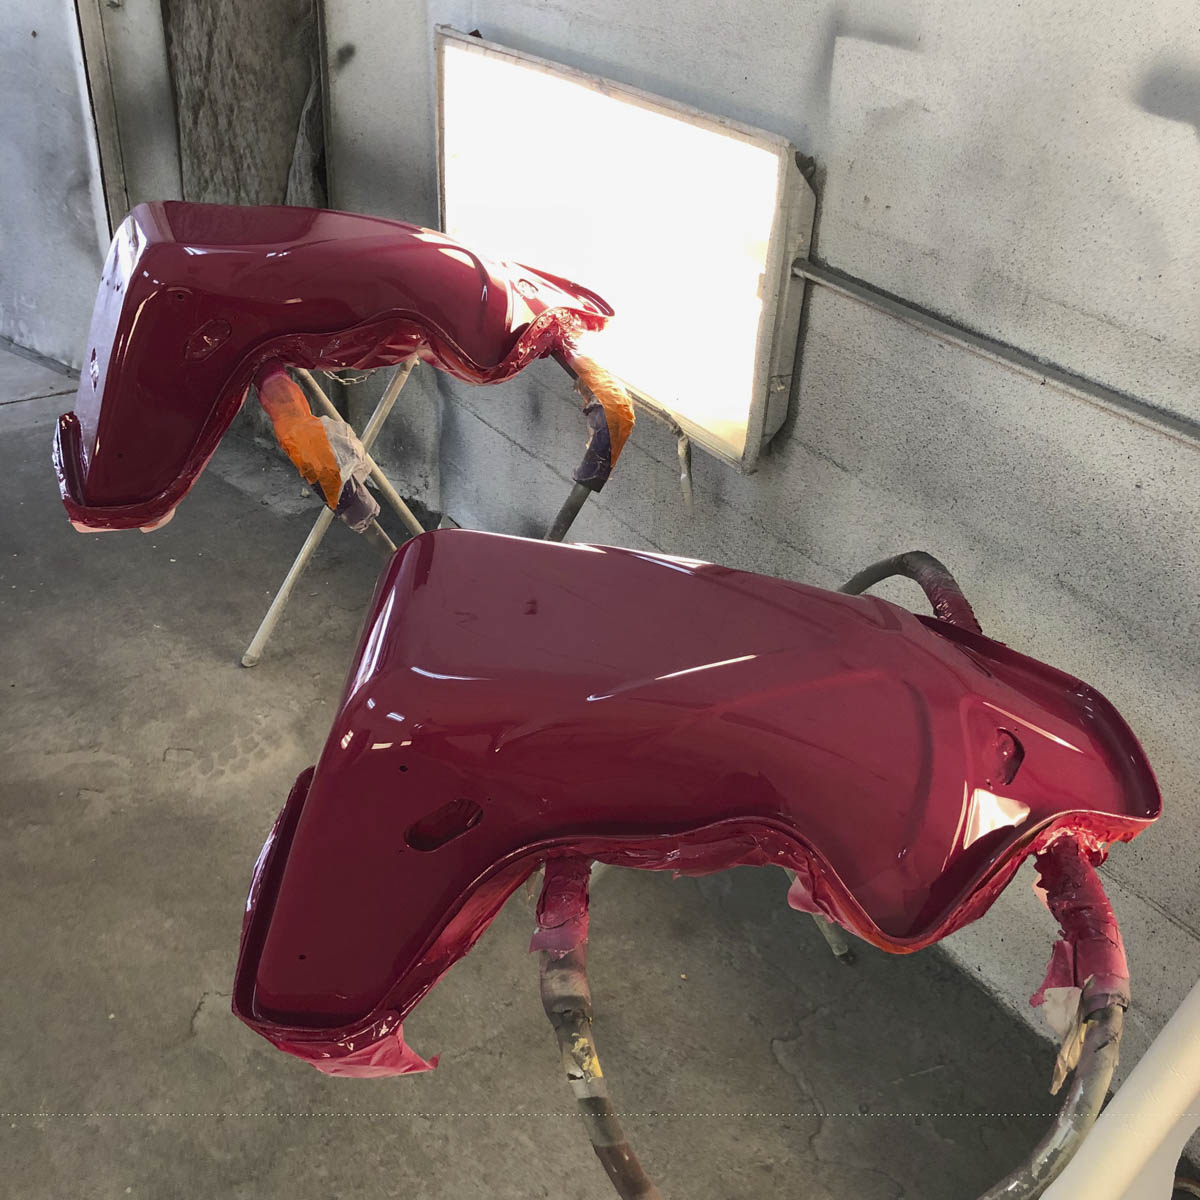
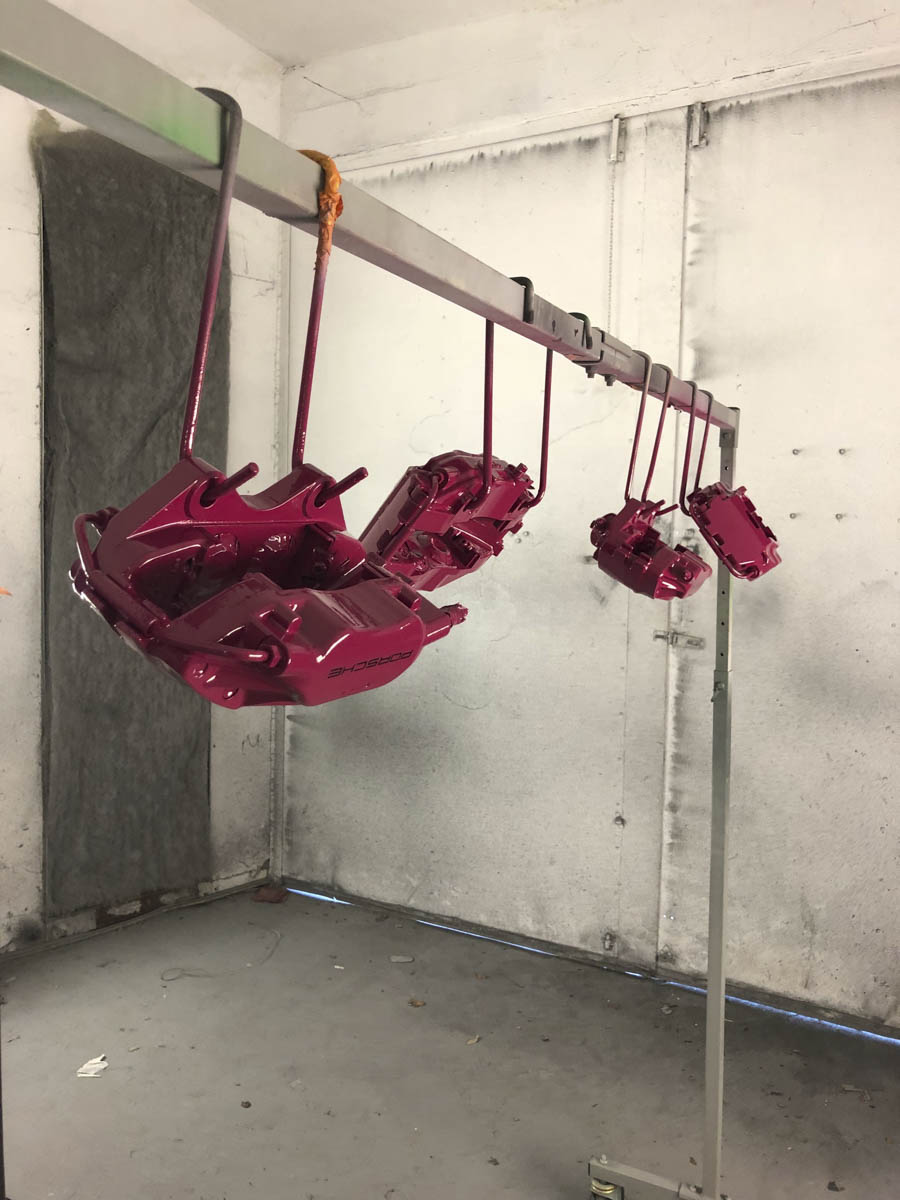
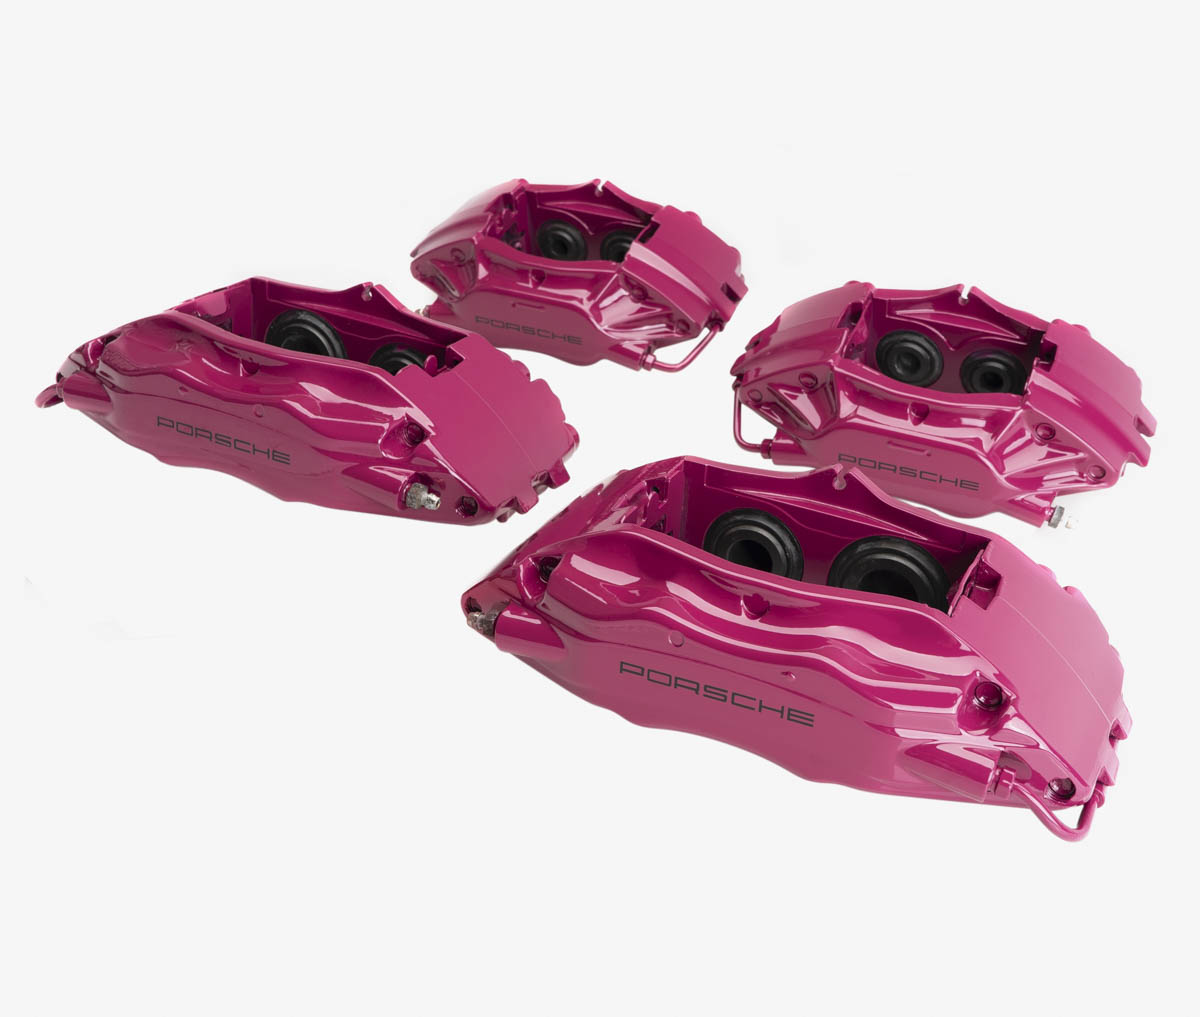
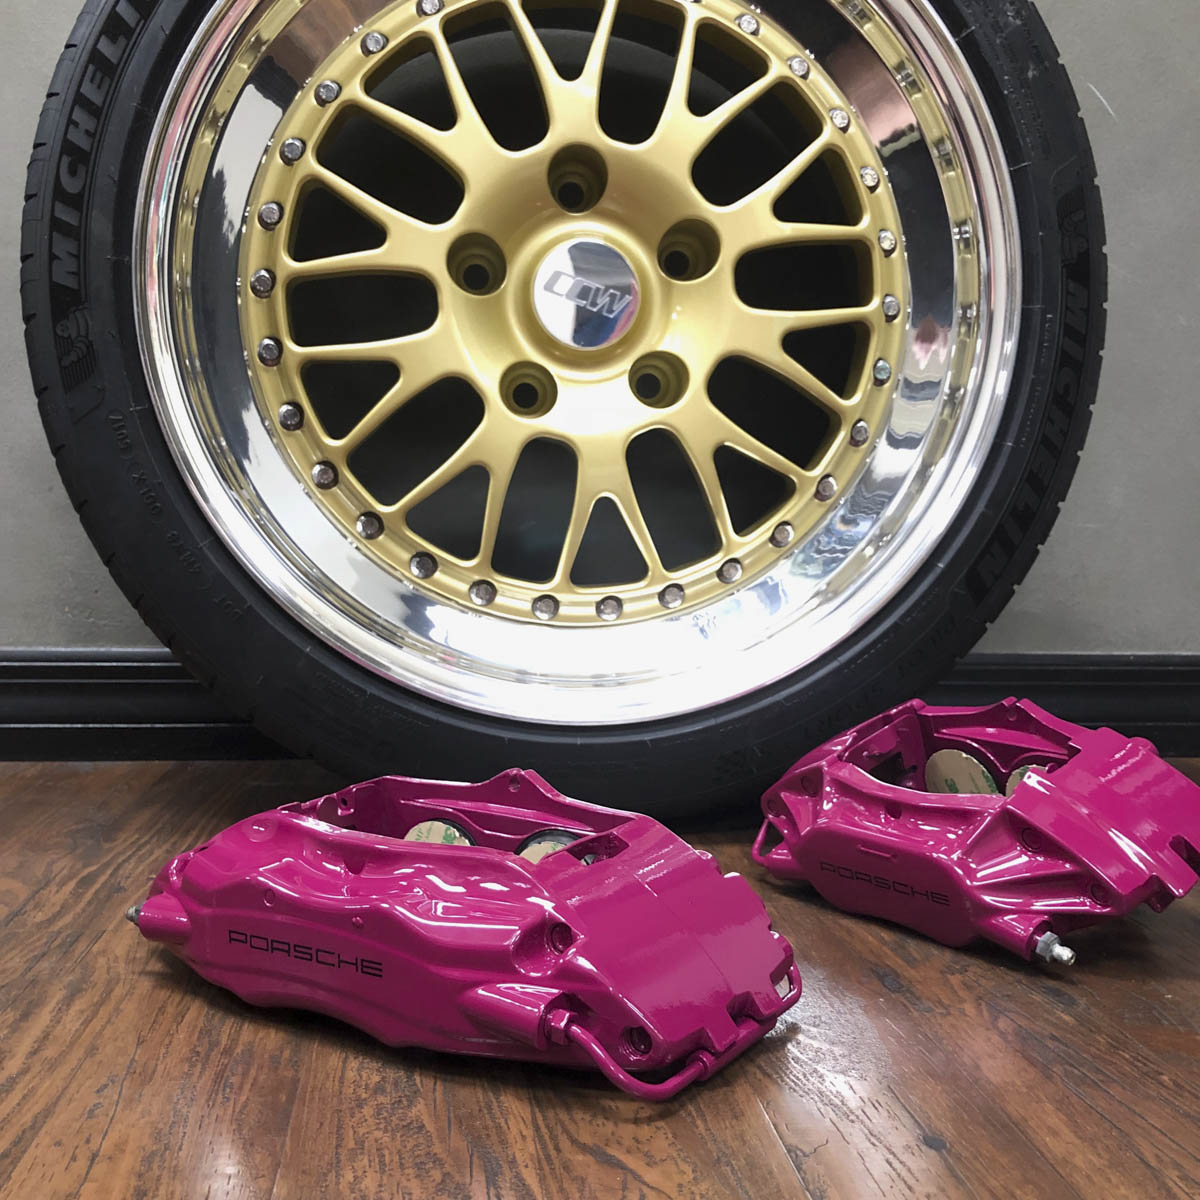
The factory calipers also were inspected, cleaned and treated to a coat of Rubystone paint as well. I cut a set of stencils with the Porsche logo and opted to have these painted on in black with a clearcoat over them as a more durable alternative to stickers.
With the wheel fitment confirmed, I re-sealed the wheels and wrapped them in Michelin Pilot Sport 4S in 245/35/18 and 265/35/18 sizing.
My cleaned parts storage / project room at the office is already bursting at the seems. Plenty more bits and pieces to handle and cleaning to commence before most of these bits can find their way back onto the car.
A good client had these CCWs in his barn after building an RWB, he graciously donated them to me after taking them apart and deciding that he didn't want to go through the trouble of rebuilding them. They were 17s and originally on a 964 so they weren't the 18" spec that I was looking for on the 993, but the price point was something I couldn't resist. I called a good friend who worked at CCW prior to their sale and he was able to look up the order and find the current wheel specs, and help me come up with a plan to use the wheels. He also took a few moments to tip me off that these particular wheels the LM20, used 17" centers for both the 17" fitments and 18" fitments, so by replacing the barrels, these centers could be used to produce a set of 18" wheels.
The centers had a small bit of blemish and some slight scratches that I thought could be polished out and fixed with some touch up paint. Since the wheels were already apart I decided it would probably just be best to respray the centers. Tracking down the original color proved to be a challenge since CCW has moved their production to Kansas City and a number of suppliers since closed up shop. After a number of phone calls and some sleuthing I found the original light metallic "Yokohama Gold" was a 1 stage paint that I was able to purchase at a local paint supply store.
The "Who has the coolest wheels on their 993" and prior posts from Bill Verberg became instrumental in helping to get the wheel fitment right. I spent hours looking at cars with a fitment similar to what I was looking for, Bills wheel specs thread, and prior CCW setups. Since the centers were already cut for a specific offset I was limited to widths possible by pairing these centers with standard step barrel sizes. For the front I went with a 1.5 Outer /. 7.0 Inner to provide an 18x8.5 front with +51 offset and the rear a 2.0” Outer / 8.0” Inner gave me a 18x10 +57. I wanted to air on the side of conservative since I didn’t need an excessive large tire to keep things slippery, but also don’t mind giving the fenders a bit of a roll. The wheels got re-bolted together, sealed and dry fitted to the car and the fitment looked spot on for what I was going for. Another positive I learned there is quite the market for use barrels and “stance kids” looking to change their wheel fitment, so I was able to offset a good portion of the wheel costs by selling the old 30H barrels.
With the wheels done I located a set of Recaro SPG seats and began to give them a make-over. The covers were removed, cleaned and washed thoroughly and I dropped the seat backs off at the body shop to get a new lease on life. I've always loved the look of color matched Recaro in the 964 RS but as we all know the price on originals has gotten out of mosts range of sanity. The SPGs will require me to stay in shape to fit in them but also provided a ribbed back panel similar to that of the original RS seats. With a fresh coat of Rubystone paint the covers were re-installed and all trim re-attached with new adhesive strips I cut from a sheet of 3M 300SEL that I made using the originals as templates. At some point I'll remake the center cushions but still looking for the right wild fabric to tie everything together.
The factory calipers also were inspected, cleaned and treated to a coat of Rubystone paint as well. I cut a set of stencils with the Porsche logo and opted to have these painted on in black with a clearcoat over them as a more durable alternative to stickers.
With the wheel fitment confirmed, I re-sealed the wheels and wrapped them in Michelin Pilot Sport 4S in 245/35/18 and 265/35/18 sizing.
My cleaned parts storage / project room at the office is already bursting at the seems. Plenty more bits and pieces to handle and cleaning to commence before most of these bits can find their way back onto the car.
Trending Topics
09-02-2018, 11:35 AM
#11
Rennlist Member
Subscribed!! Awesome!
09-02-2018, 12:31 PM
#12
Basic Sponsor
Rennlist
Site Sponsor
Rennlist
Site Sponsor
Thread Starter
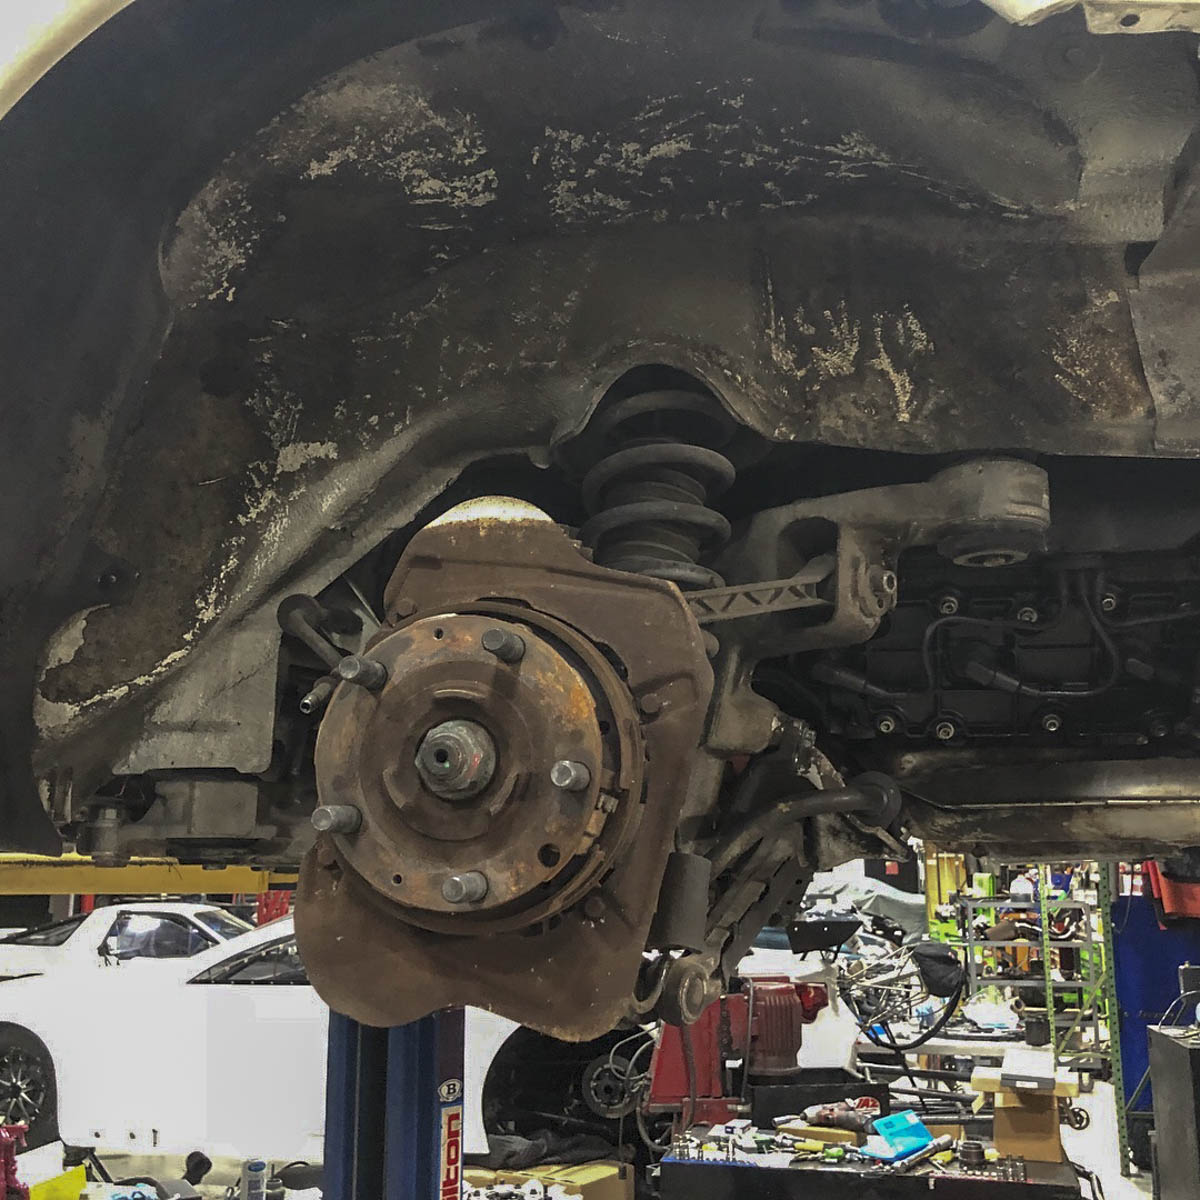
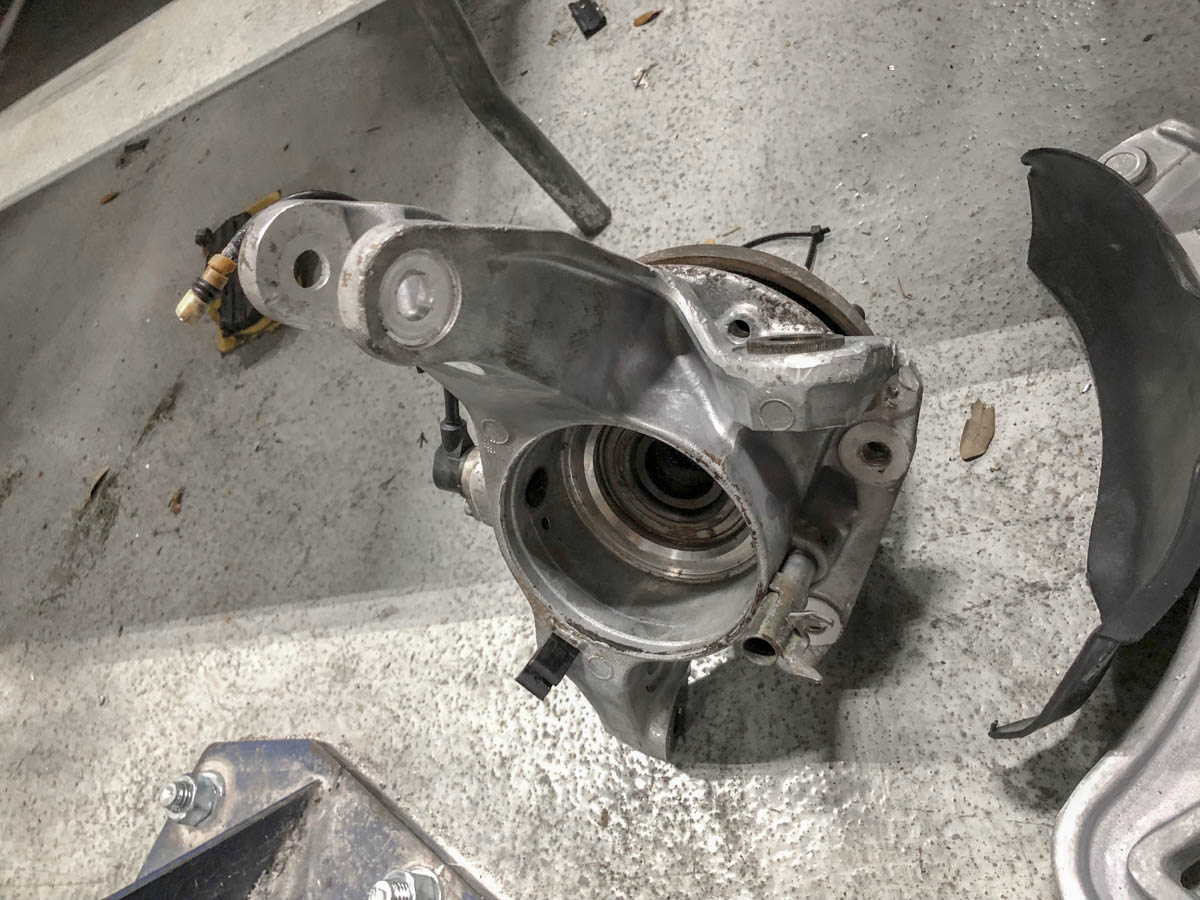
We stripped down the front suspension as the wheel bearings had some play in them, meaning the hubs would be coming off. When I first put the car on the lift I figured we'd just be doing a coilover install and minor suspension refresh.... it turned into quite the opposite as "While we are in there" took over. Since I'm doing this after hours, I decided to try and knock out one corner an evening. This would help make sure the task didn't remain too monotonous and keep the wife a bit happier with the project.

My cleaning method involved quite a bit of ZEP Heavy Duty Citrus Degreaser, a number of Nylon brushes, Plastic scrapers, Non-Scatch dish pads, and a neat 3 piece soft brush set from amazon that used a drill. I would coat everything with 1-2 coats of the Degreaser at full strength, and agitate it using the brushes, scraper and spinning brushes. From there I would wash things off with normal car wash at a heavier concentrate than I would use to wash the car using brushes rather than a mitt. I would then use compressed air to help dry things off and help rinse away some of the dirt and grime hiding in edge. Since I was doing this inside I found by placing a number of flattened cardboard boxes on the ground did a great job of soaking up the drips of dirt and degreaser and helping to contain the mess a bit. Once I got a corner clean I would apply a few coats of spray ways and then coat the plastics in Aerospace 303.
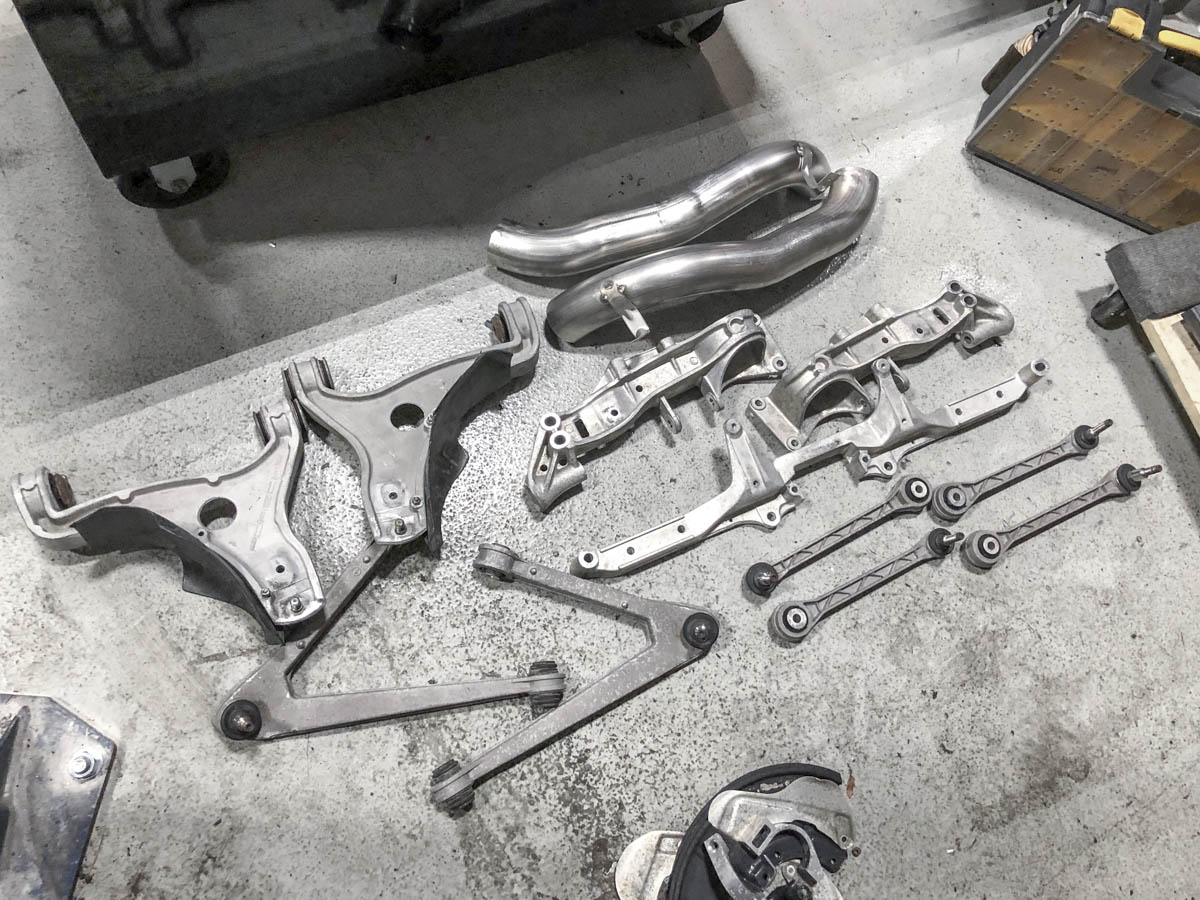
After cleaning one side of the rear, I figured it would be much easier to clean the suspension and subframe with them out of the car.... So the rear subframes were removed as well for a deeper clean, and a set of Rennline solid rear subframe bushings.
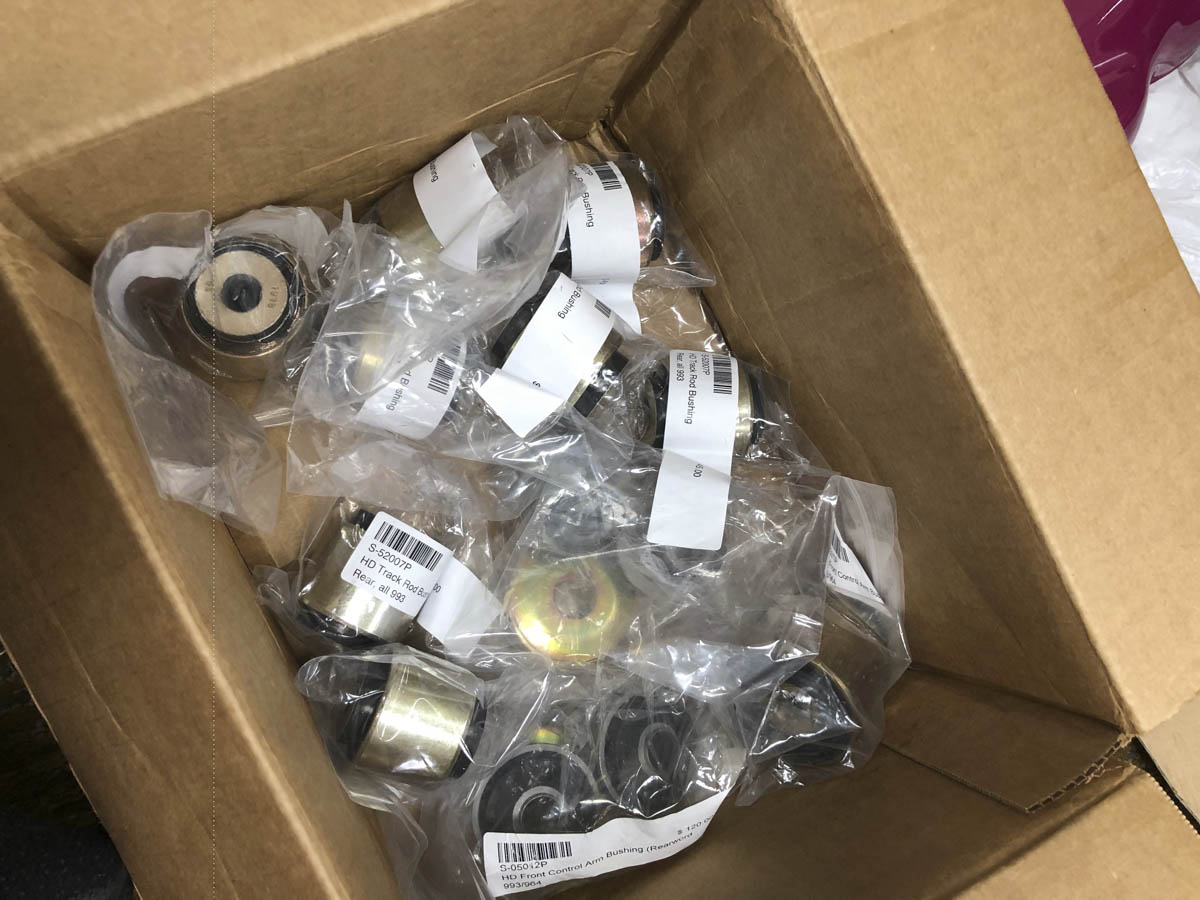
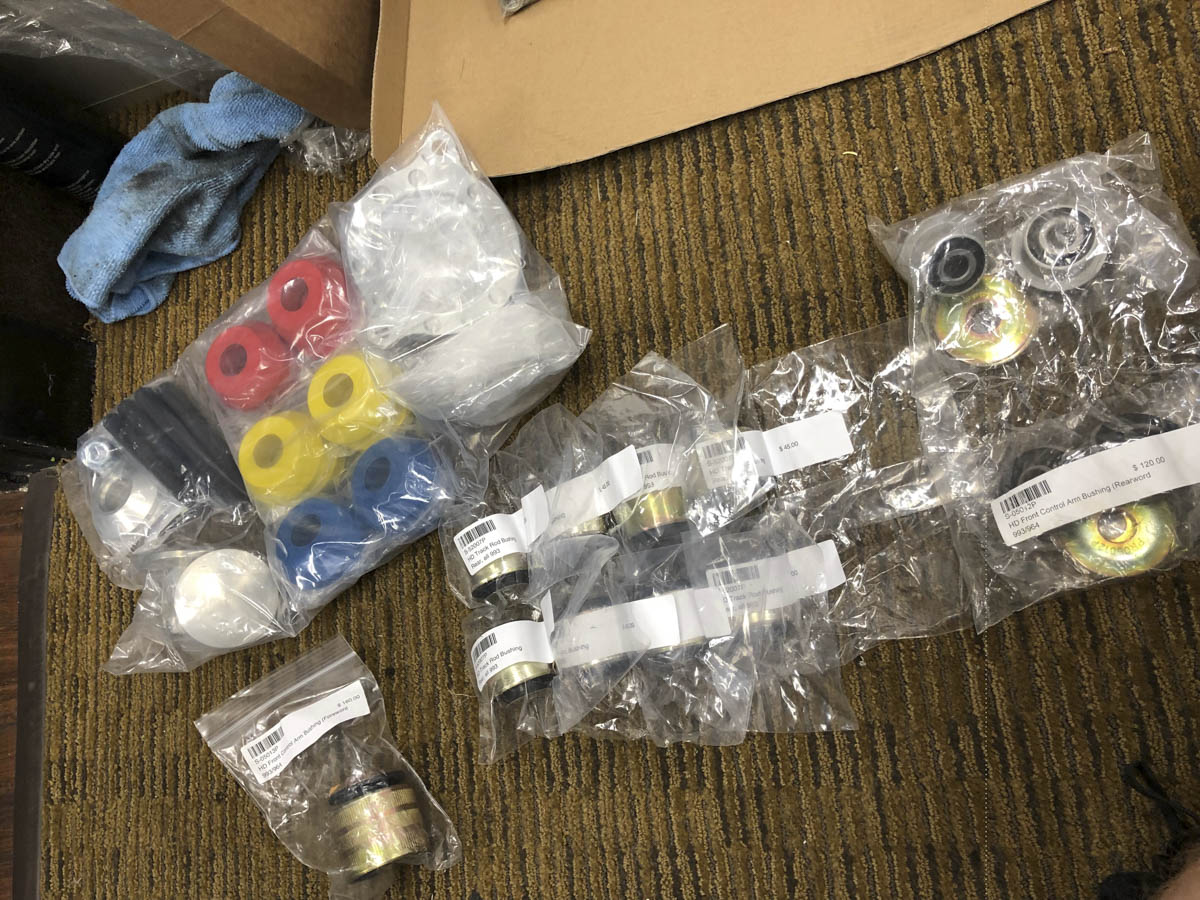
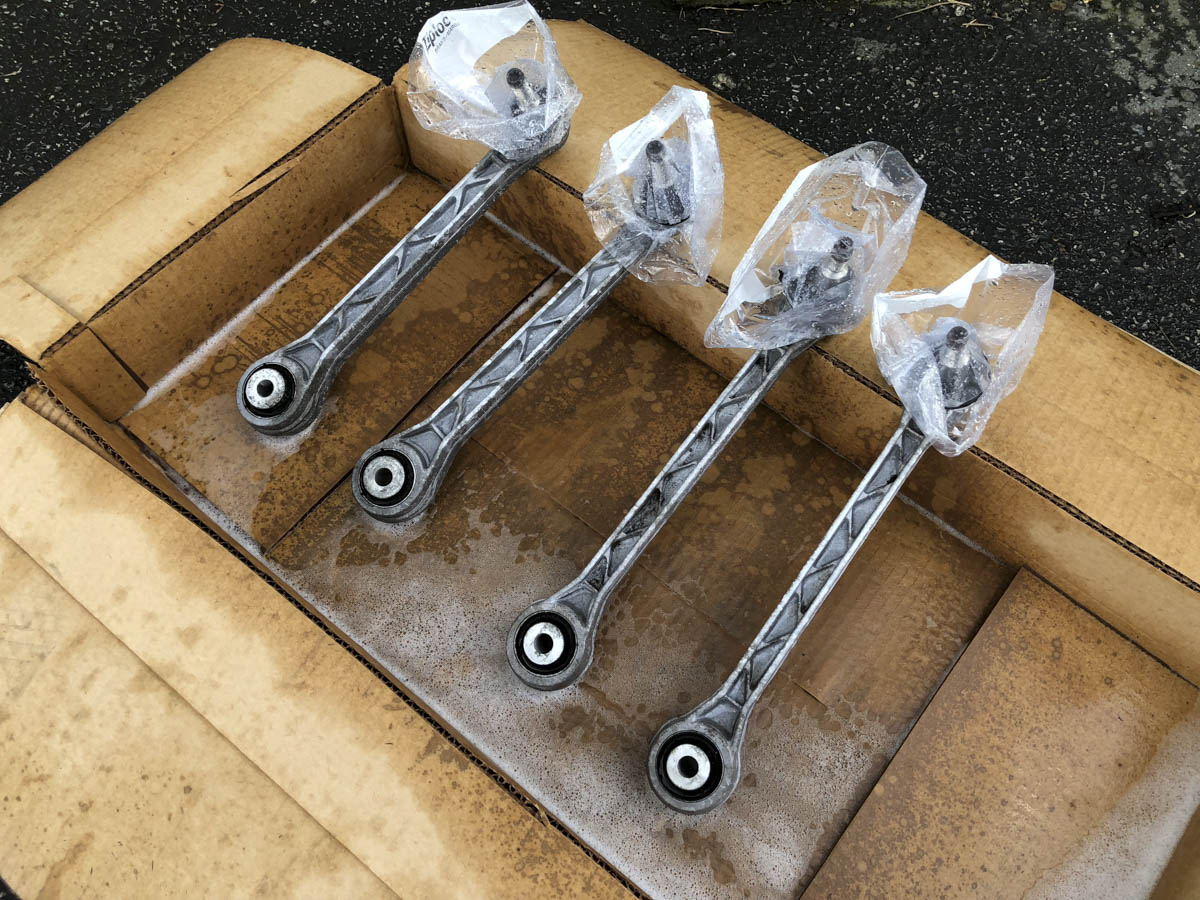
I've had a great working relationship with the guys at Rennline thanks to the RWB projects, so I reached out to them for a number of parts for this project. HD front control arm bushings, HD Track Rod Bushings, Adjustable Tow Links and their tunable engine mounts will replace the aging factory suspension bushings and parts. On numerous occasions I had to remind myself that while this car may occasionally get tracked, this is a compliment to my harsher setup GT3 and needed to remain a bit more steerable.
The trash pile and parts needing to be cleaned pile continues to grow. With the wheel-wells clean dealing with the cosmoline coated suspension arms, subframes, and hubs will be my next battle.
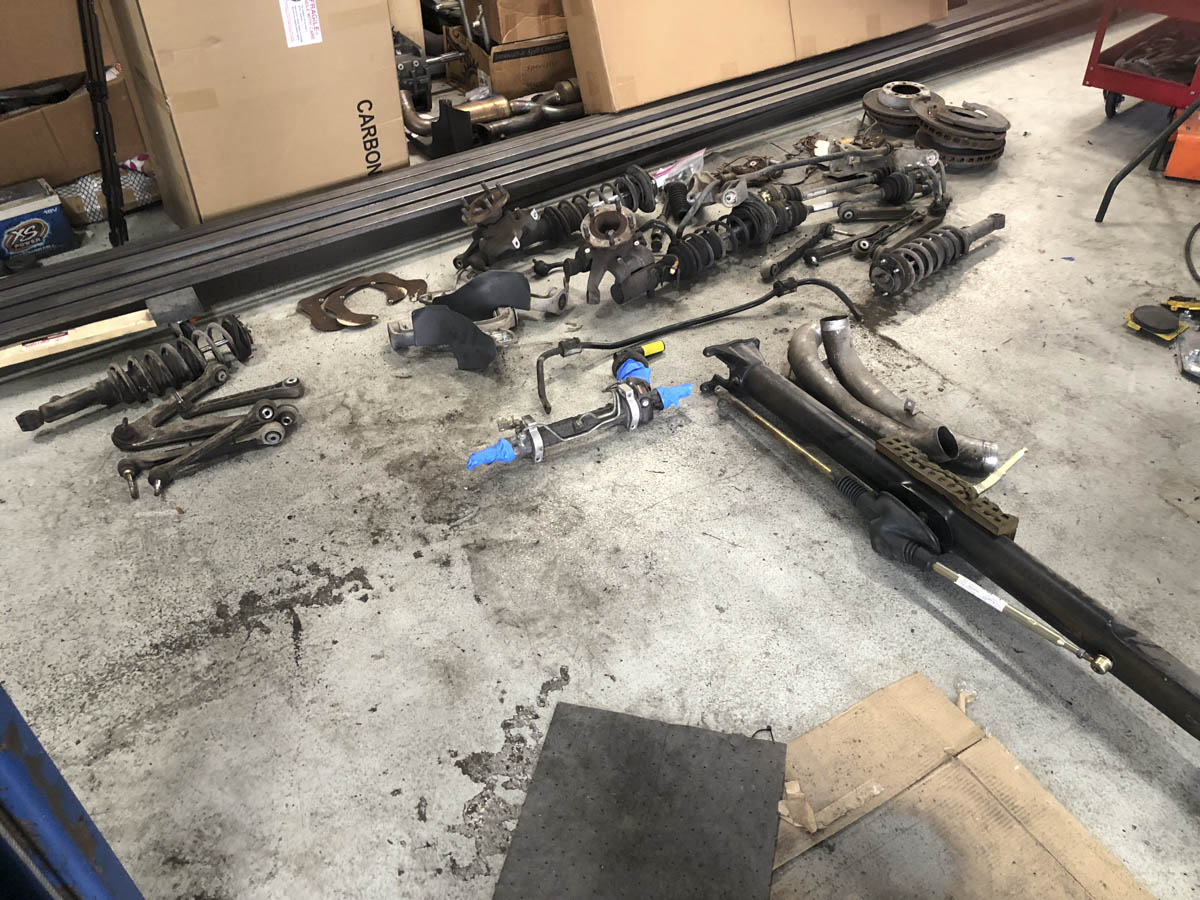
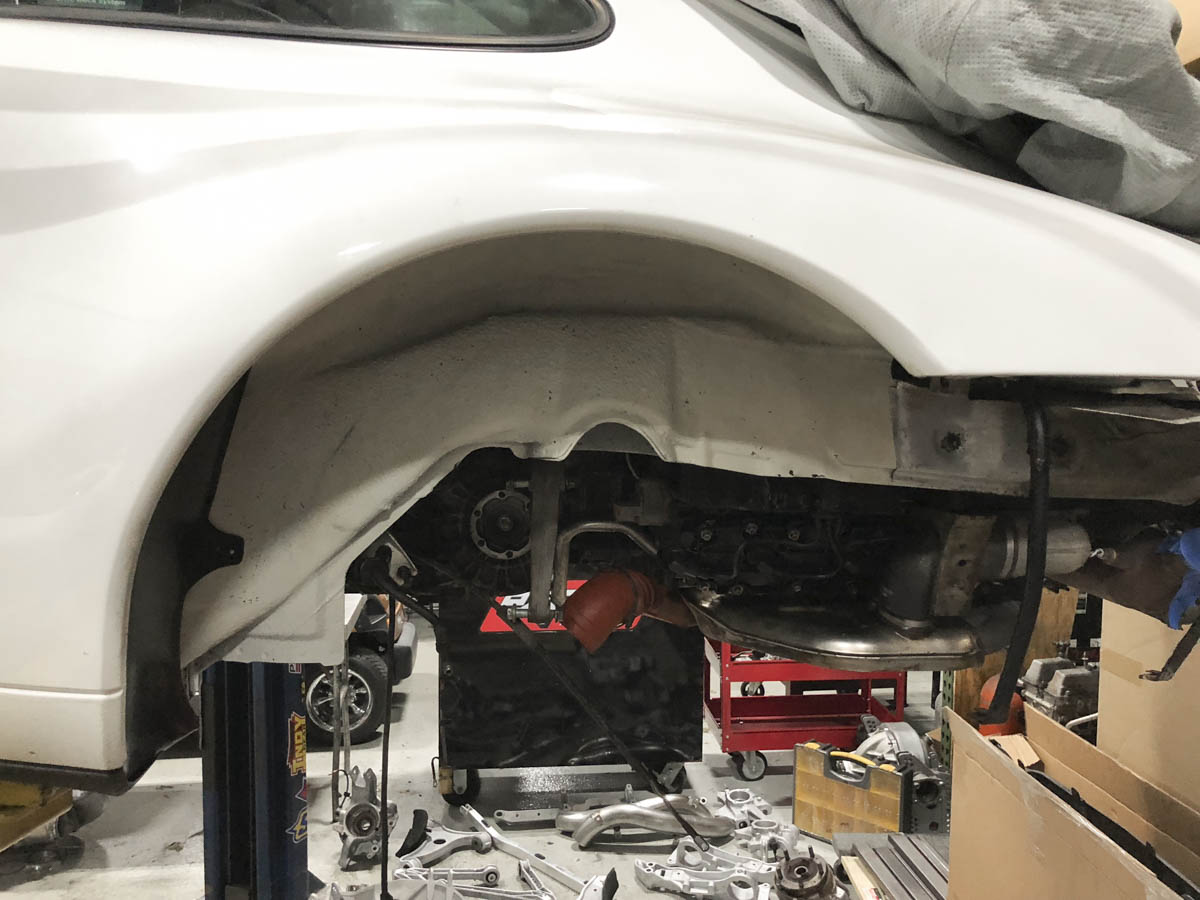
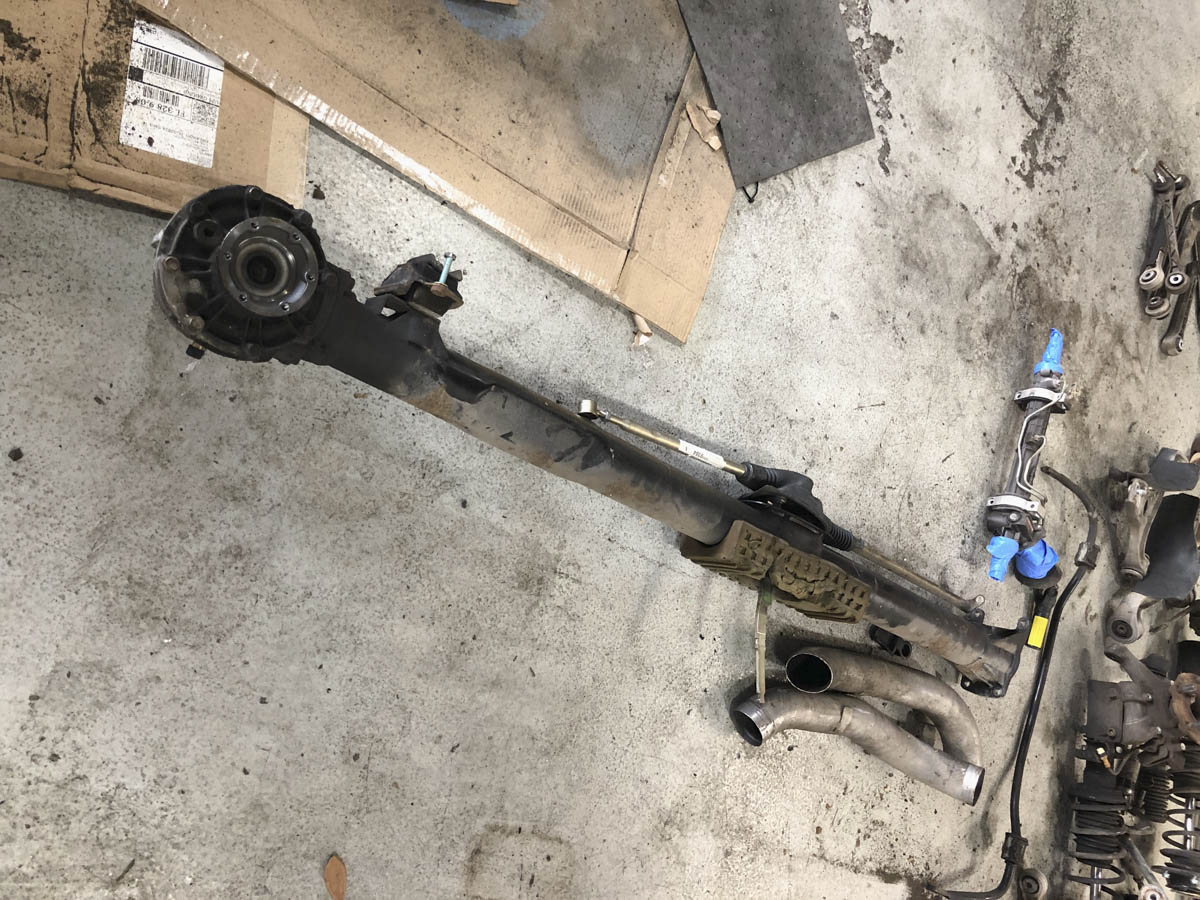
I'm more of a C2 guy than a C4 guy, and since our snow is limited here in Florida I'd prefer to get the car lighter and more crisp on turn in, so this torque tube and front differential are going to remain permanently removed. I've done this to a few 996tt cars I've had over the years but this conversion is going to be a bit more difficult but fun task to tackle.
My cleaning method involved quite a bit of ZEP Heavy Duty Citrus Degreaser, a number of Nylon brushes, Plastic scrapers, Non-Scatch dish pads, and a neat 3 piece soft brush set from amazon that used a drill. I would coat everything with 1-2 coats of the Degreaser at full strength, and agitate it using the brushes, scraper and spinning brushes. From there I would wash things off with normal car wash at a heavier concentrate than I would use to wash the car using brushes rather than a mitt. I would then use compressed air to help dry things off and help rinse away some of the dirt and grime hiding in edge. Since I was doing this inside I found by placing a number of flattened cardboard boxes on the ground did a great job of soaking up the drips of dirt and degreaser and helping to contain the mess a bit. Once I got a corner clean I would apply a few coats of spray ways and then coat the plastics in Aerospace 303.
After cleaning one side of the rear, I figured it would be much easier to clean the suspension and subframe with them out of the car.... So the rear subframes were removed as well for a deeper clean, and a set of Rennline solid rear subframe bushings.
I've had a great working relationship with the guys at Rennline thanks to the RWB projects, so I reached out to them for a number of parts for this project. HD front control arm bushings, HD Track Rod Bushings, Adjustable Tow Links and their tunable engine mounts will replace the aging factory suspension bushings and parts. On numerous occasions I had to remind myself that while this car may occasionally get tracked, this is a compliment to my harsher setup GT3 and needed to remain a bit more steerable.
The trash pile and parts needing to be cleaned pile continues to grow. With the wheel-wells clean dealing with the cosmoline coated suspension arms, subframes, and hubs will be my next battle.
I'm more of a C2 guy than a C4 guy, and since our snow is limited here in Florida I'd prefer to get the car lighter and more crisp on turn in, so this torque tube and front differential are going to remain permanently removed. I've done this to a few 996tt cars I've had over the years but this conversion is going to be a bit more difficult but fun task to tackle.
09-02-2018, 03:25 PM
#13
Rennlist Member
Great intro, and attention to detail. Looking forward to seeing the progress.
Solid subframe bushings were not ideal for a dual purpose street/DE car here in New England, but in Florida they may prove more friendly for DD. Will you be going with BBI wheel carriers?
Solid subframe bushings were not ideal for a dual purpose street/DE car here in New England, but in Florida they may prove more friendly for DD. Will you be going with BBI wheel carriers?
09-04-2018, 11:29 AM
#14
Basic Sponsor
Rennlist
Site Sponsor
Rennlist
Site Sponsor
Thread Starter
I saw the BBi Carriers when I was out west for Luft5, absolutely stunning pieces that I'm sure will find their home in this car in the future, but for now they blow the budget a bit further than I would like. Defiantly an upgrade I look forward to doing down the road for sure, especially if my ride height ends up resulting in excessive bump steer (It is getting the Elephant "Bump Steer kit" in the short term).
09-04-2018, 11:36 PM
#15
Basic Sponsor
Rennlist
Site Sponsor
Rennlist
Site Sponsor
Thread Starter
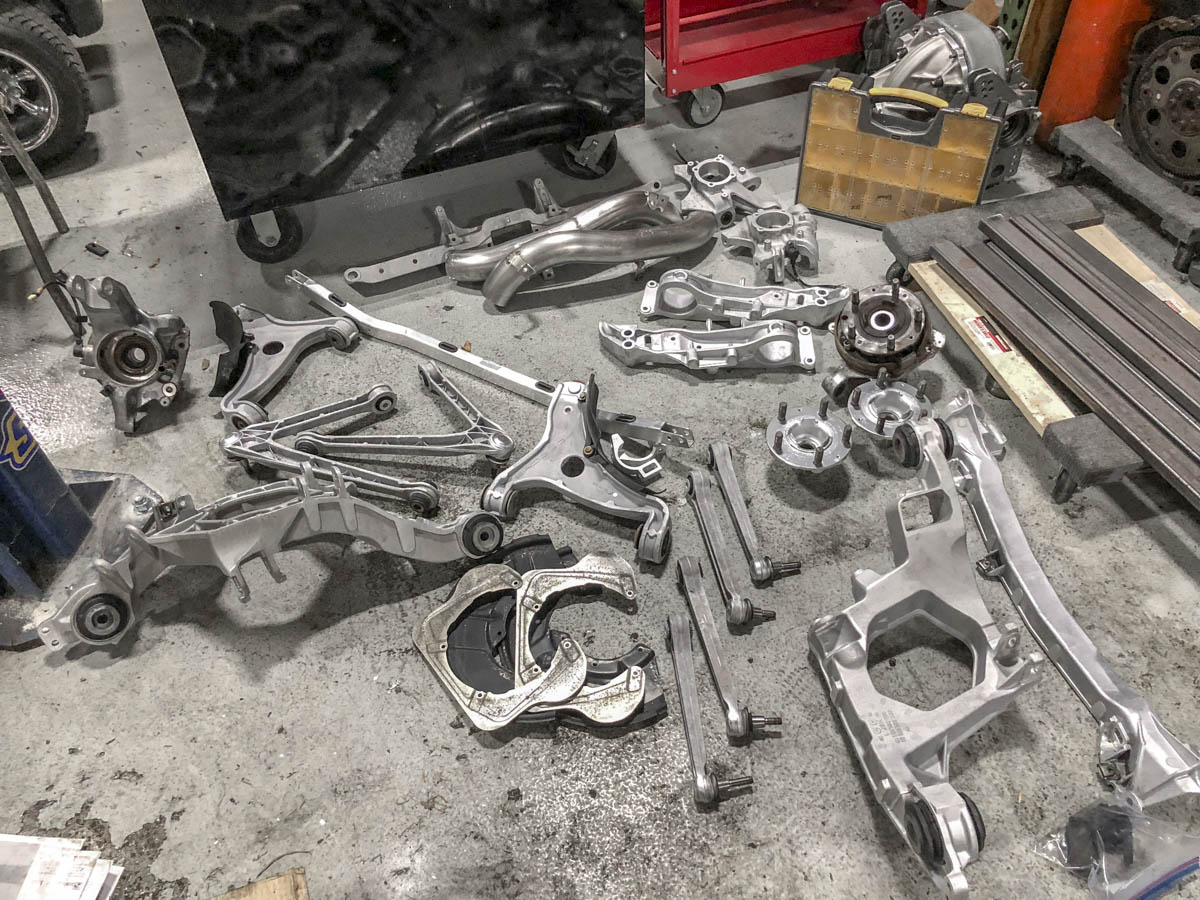
Started with the smaller parts, I followed my under-carriage method of getting the heavy grease and grime off with a few coats of Zep Orange and some elbow grease, repeated a few times per part. I broke the parts up again into small groups to help knock them out 1-2 hours at a time until the dirty pile became teetered over to the clean pile.
The front hubs were dissembled since they'd be getting new wheel bearings, which made it much easier to tackle these as individual units. Clean parts always seem to be much easier to re-assemble so I'm hoping that rings true when it comes time to build these.
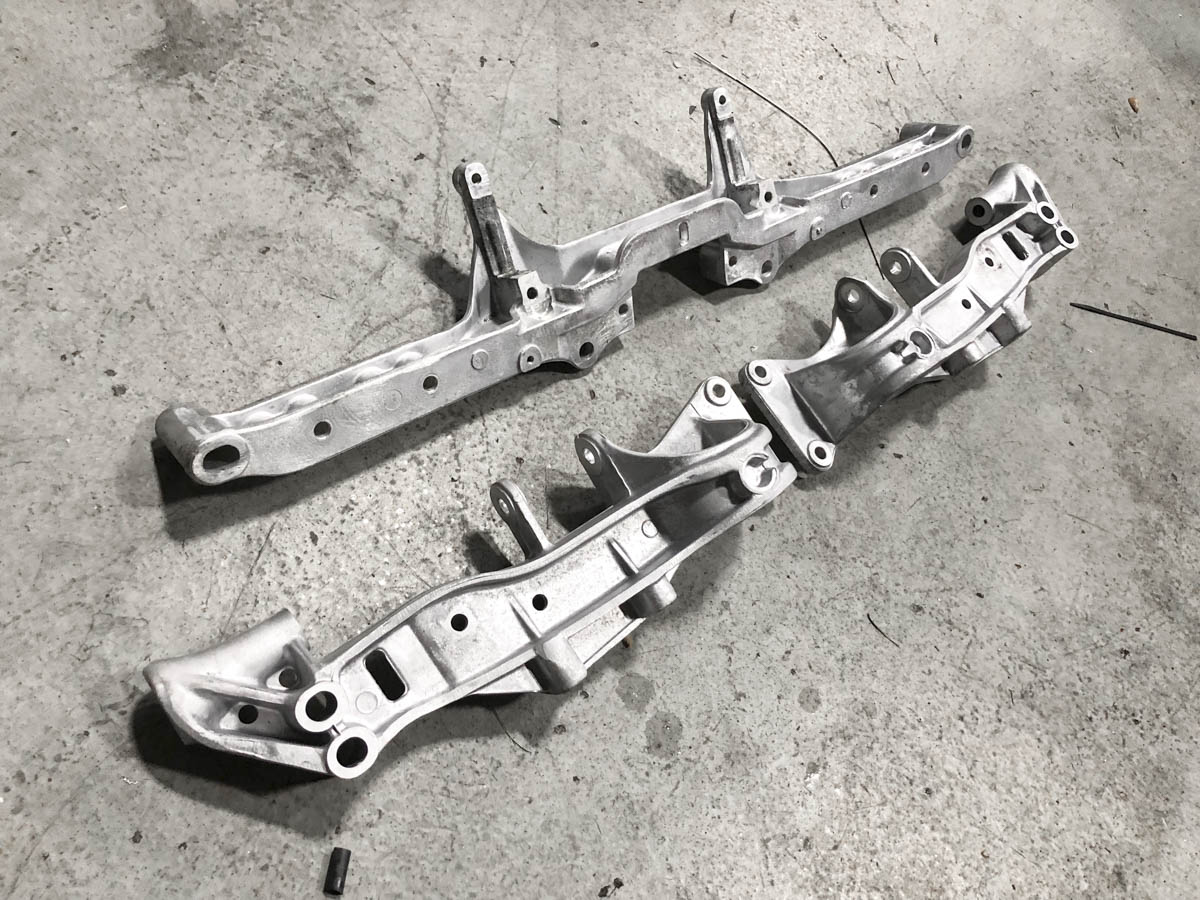
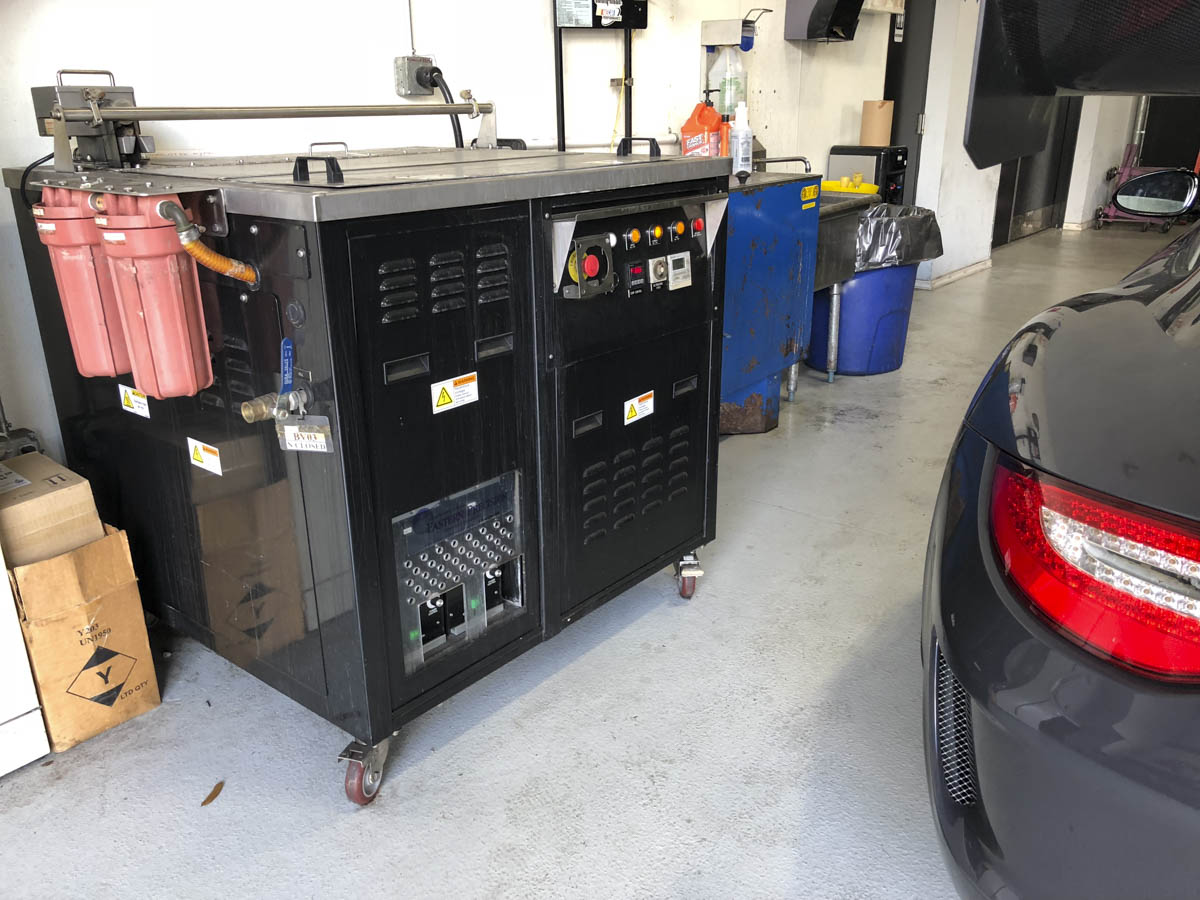
This is where I cheated..... we recently got a 24"x36" Ultrasonic hot tank at the office..... this was a huge motivation to strip the car down further and further as it cut my scrub time down to nearly nothing. 20 minutes flip, 20 minutes, flip again and then hit any remaining areas with some brake clean and rinse and dry with compressed air. I was quite lucky and the rear subframes just barely fit in the tank on their sides, but they fit and came out looking like new. This is by far one of the best pieces of equipment we've bought in our shop and I don't know what we did before this, it makes getting parts clean so much quicker and easier, almost too easy!
Before long most of the parts made their way over to the clean side, I've still got to remove the bushings to prepare for the HD versions, but will make a tool and deconstruction area to help do those in one large batch.
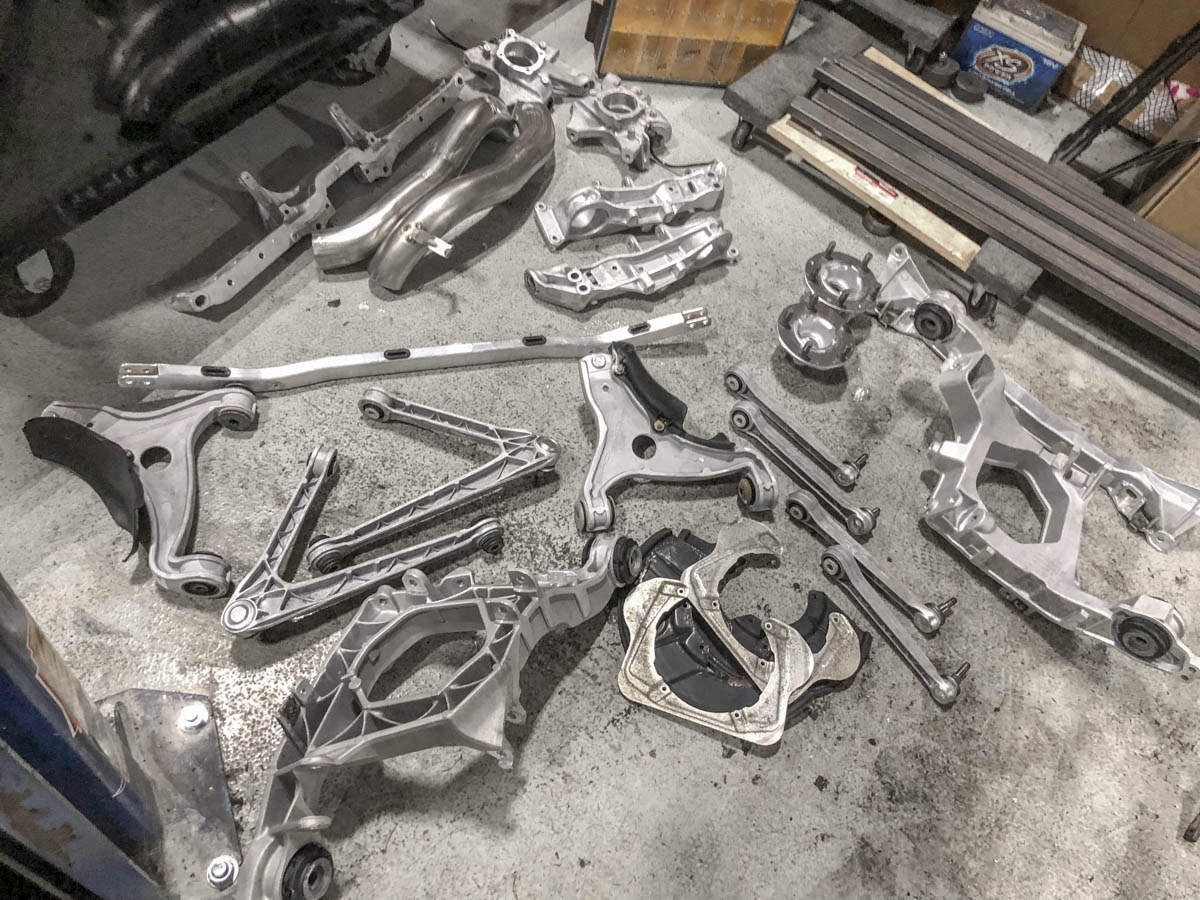
The last step on the cast aluminum pieces was a light coat of Alumabrite, this chemical is primarily an acid that strips away the outer layer and takes out the last remaining surface impurities with it. It does remove the outer layer but here in Florida we don't have salted roads but this car spent a small portion of its life at a beach house. It's a temporary "fix" but the aluminum will oxidate on its own soon enough but at least look a bit more uniform finish over the blotchy corrosion from before. The zinc plated rear covers on the ball joints were showing their age, however I found a nice aluminum engine paint that I scuffed and gave them a quick once over and have been super happy with the results.
With everything so clean I kept looking at the nasty bolts and hardware sitting in a pile.....While we're in there took over again....
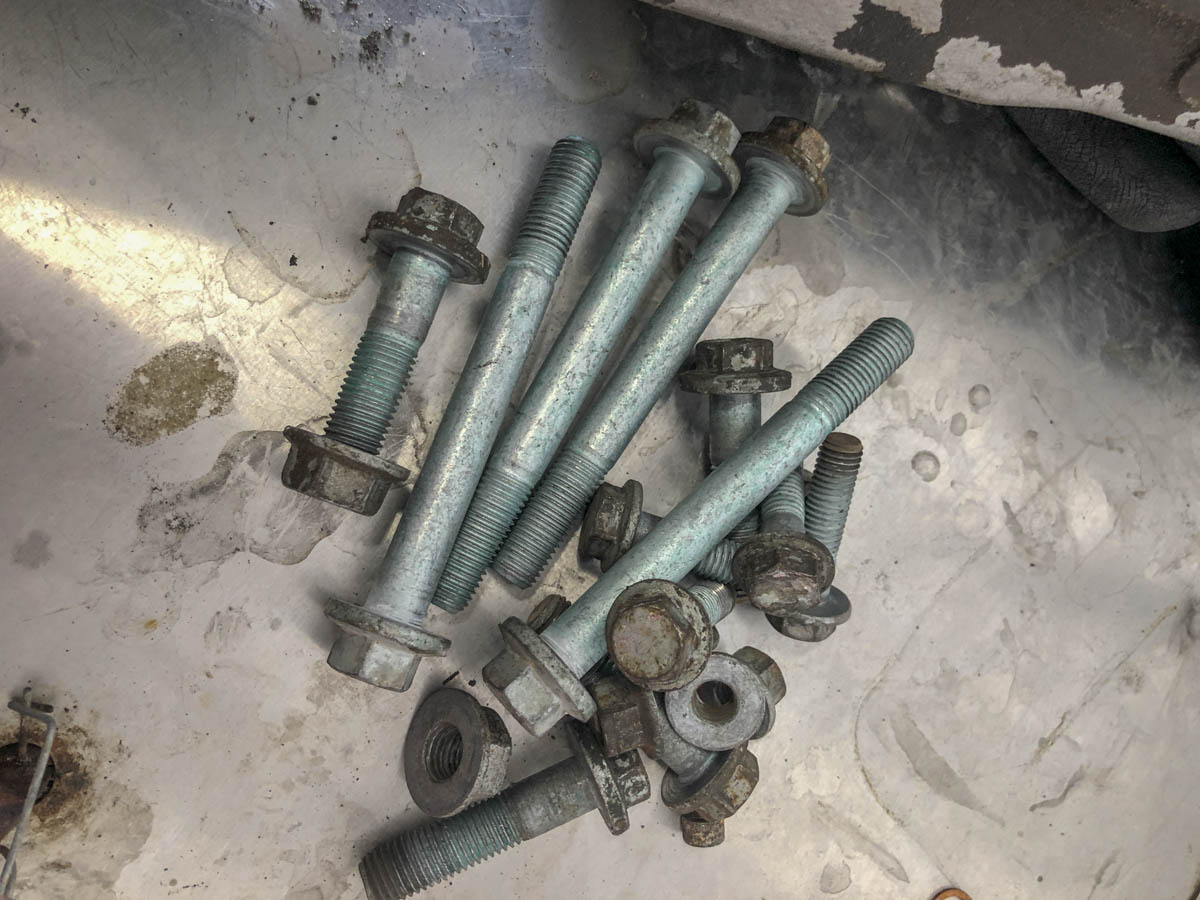
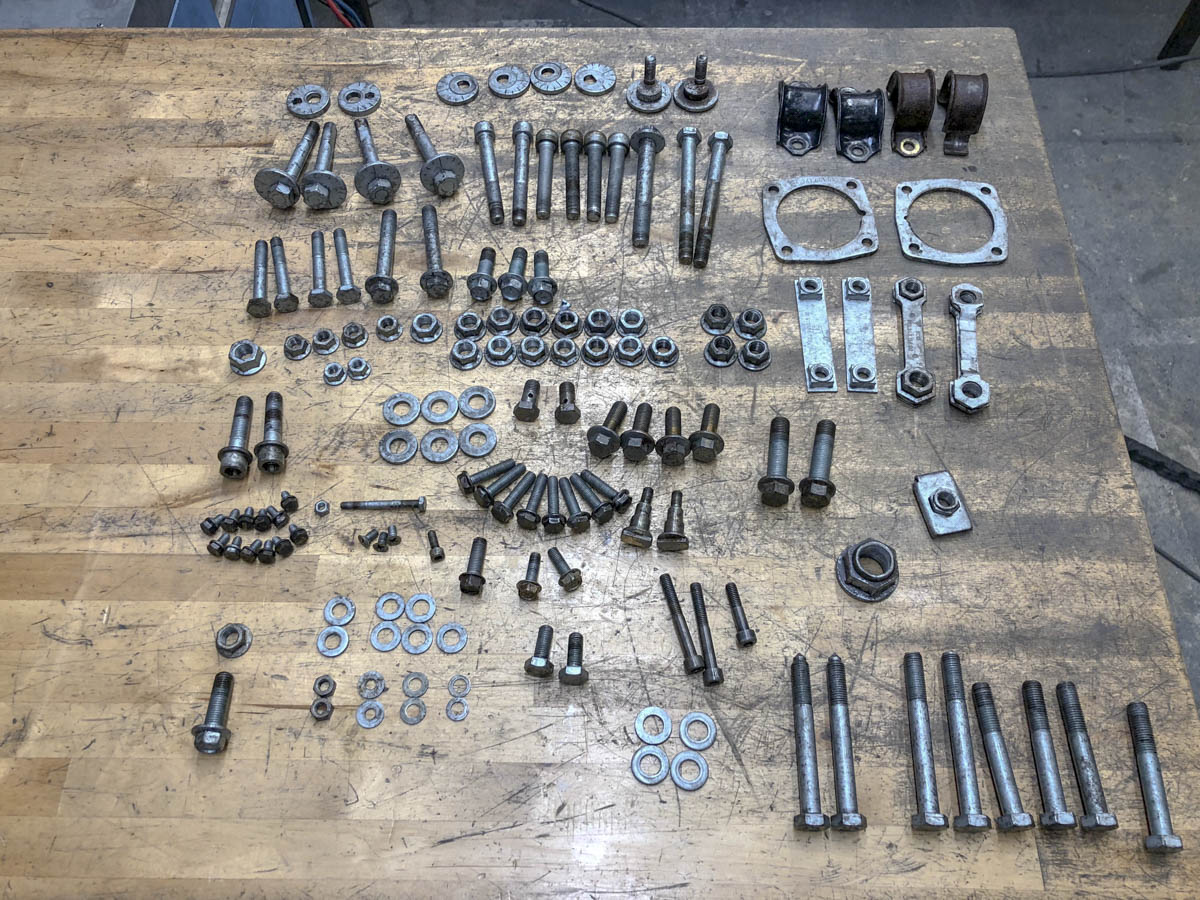
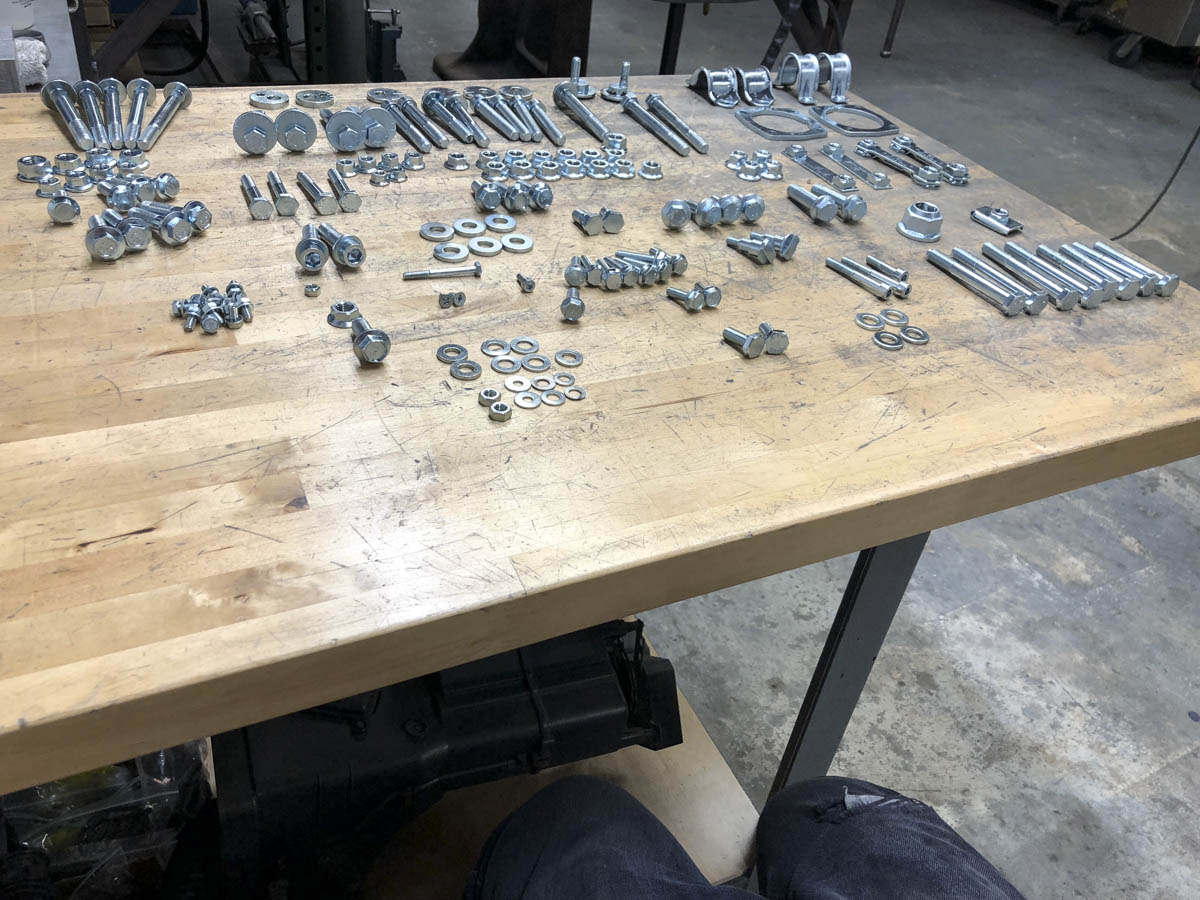
All of the removed hardware got a fresh stripping and replacing in a bright Zinc finish, I'm sure this won't be the last bath that gets done but it's going to make me feel so much better seeing the results are re-assembly. I even sent some bolts I won't be using (like the centrics which will get lockout plates instead) but wanted to make sure I met their drop off day for a quick turnaround. Better safe than sorry.
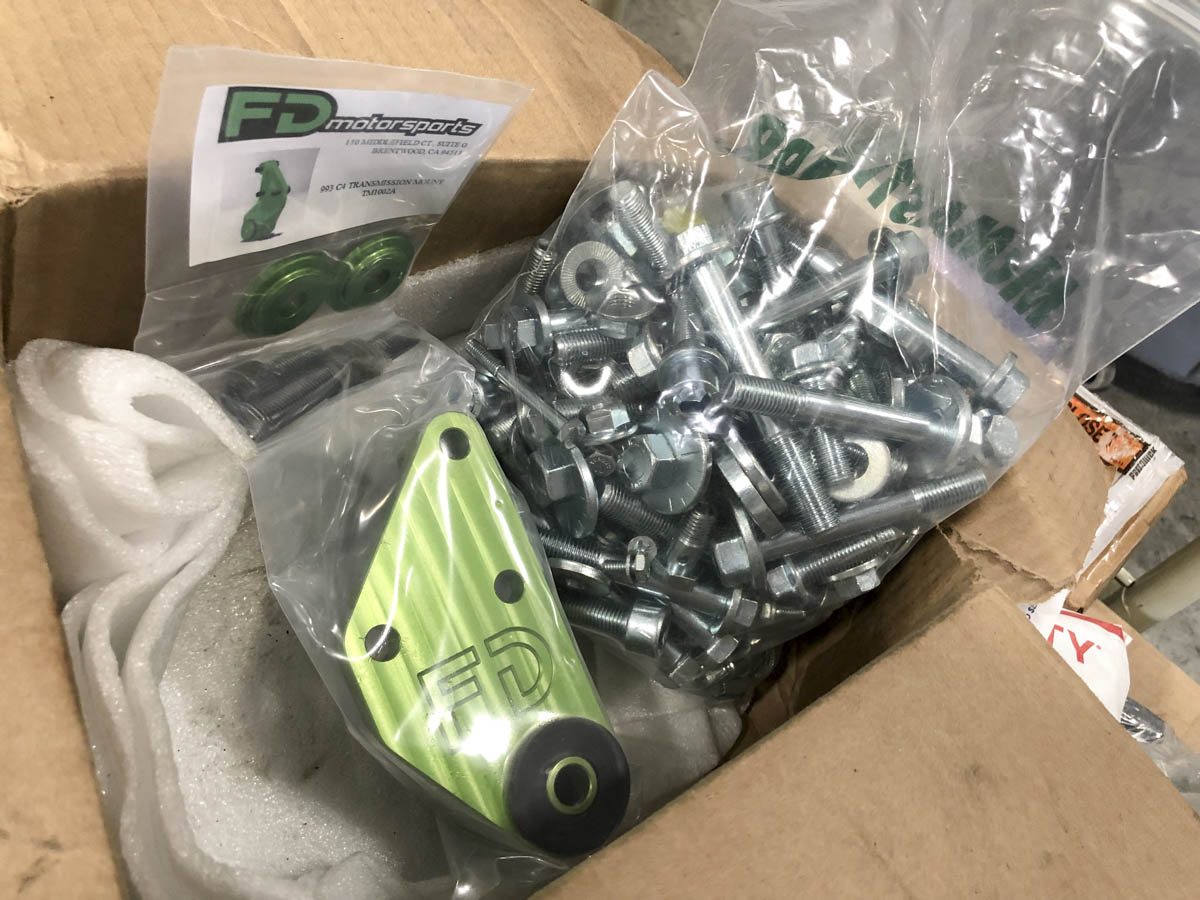
As the bolts were being dropped off the post man also delivered my FD AWD transmission mount, now that I'm all-in on the RWD conversion though I'm having second thoughts on the mounting solution. Keep the stiffer FD side mount and add a cover once the Coupler assembly is removed from the front, or convert the front housing to C2 specifications and replace the lower mount as well (at 4-5X the cost).?
The front hubs were dissembled since they'd be getting new wheel bearings, which made it much easier to tackle these as individual units. Clean parts always seem to be much easier to re-assemble so I'm hoping that rings true when it comes time to build these.
This is where I cheated..... we recently got a 24"x36" Ultrasonic hot tank at the office..... this was a huge motivation to strip the car down further and further as it cut my scrub time down to nearly nothing. 20 minutes flip, 20 minutes, flip again and then hit any remaining areas with some brake clean and rinse and dry with compressed air. I was quite lucky and the rear subframes just barely fit in the tank on their sides, but they fit and came out looking like new. This is by far one of the best pieces of equipment we've bought in our shop and I don't know what we did before this, it makes getting parts clean so much quicker and easier, almost too easy!
Before long most of the parts made their way over to the clean side, I've still got to remove the bushings to prepare for the HD versions, but will make a tool and deconstruction area to help do those in one large batch.
The last step on the cast aluminum pieces was a light coat of Alumabrite, this chemical is primarily an acid that strips away the outer layer and takes out the last remaining surface impurities with it. It does remove the outer layer but here in Florida we don't have salted roads but this car spent a small portion of its life at a beach house. It's a temporary "fix" but the aluminum will oxidate on its own soon enough but at least look a bit more uniform finish over the blotchy corrosion from before. The zinc plated rear covers on the ball joints were showing their age, however I found a nice aluminum engine paint that I scuffed and gave them a quick once over and have been super happy with the results.
With everything so clean I kept looking at the nasty bolts and hardware sitting in a pile.....While we're in there took over again....
All of the removed hardware got a fresh stripping and replacing in a bright Zinc finish, I'm sure this won't be the last bath that gets done but it's going to make me feel so much better seeing the results are re-assembly. I even sent some bolts I won't be using (like the centrics which will get lockout plates instead) but wanted to make sure I met their drop off day for a quick turnaround. Better safe than sorry.
As the bolts were being dropped off the post man also delivered my FD AWD transmission mount, now that I'm all-in on the RWD conversion though I'm having second thoughts on the mounting solution. Keep the stiffer FD side mount and add a cover once the Coupler assembly is removed from the front, or convert the front housing to C2 specifications and replace the lower mount as well (at 4-5X the cost).?