When you click on links to various merchants on this site and make a purchase, this can result in this site earning a commission. Affiliate programs and affiliations include, but are not limited to, the eBay Partner Network.
How hard are the lower valve cover gaskets to replace, really? I'm nervous about breaking off a bunch of bolts in the process.
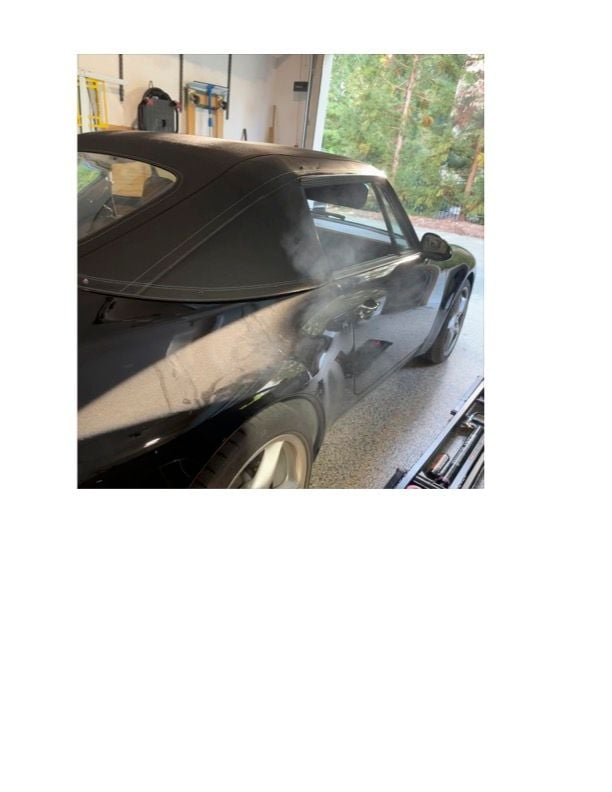
My '95, 70K mile 993 is to the point that after a 20+ minute drive, when I pull it into the garage, there is a good haze of smoke coming from both sides of the car (as well as some dripping off the timing cover - but I'm going to ignore that for now given it's more involved I guess. I *think* the upper valve cover gaskets are okay - but there may be some seepage.
My car has been in North Carolina it's entire life and does not show any/excessive rust other than what I presume is surface rust on the exhaust bolts.
I've read most of the threads on changing the lower valve cover gaskets which seem to range from an easy hour job to a lot of drilling out broken bolts. But after purchasing the gaskets (and, unnecessarily, a full set of bolts) - I'm now getting cold feet that I'll end up breaking off several bot heads and don't trust my non-existent skills on removing bolts. (Note that I've replaced the engine mounts, redid the pedal cluster/kinematic lever, changed all shifter bushings... as well as working all over a 968, so I'm reasonably competent in following instructions at least).
Or should I just take it to someone and have them drop the engine and have them charge me to seal up everything?
You can do it. I went to attack the lowers and ended up doing uppers as well. While yer there may as well do plugs and wires
you guys are ballooning my project already, I presume you have to either drop the engine or remove a quite a bit more to get to the uppers? Is there a procedure somewhere for the uppers?
First, make sure you have a good quality allen socket that fits tight. Make sure each bolt head recess is clean, so the socket gets a good bite. When you go to loosen them, make sure your socket is fully seated into the bolt head and is on square, not at an angle. And when you break them loose, you need to just have feel for it. They should crack loose with X amount pressure. If one isn't breaking loose with the normal amount of pressure, stop, and proceed with caution. Don't just gorilla it or you will snap the bolt head off.
The lower 3.6 covers are best torqued using a small-sized or short-length torque wrench appropriately scaled. Tight spaces..
The lower cover seal-replacement process is pretty much cake.... Think critical paths 1, 2, 3 .. .. Many lower valve cover leaks begin with oil drainage on the exhaust. . Mine did. . Yikes!
Originally Posted by NC TRACKRAT
A quote from the preface page in my old college calculus book seems appropriate here: "What one fool can do, so can another."
Hi MFerris,
The hardest part is gaining access to fit the tool over the cap screws.
From what I read the capscrew tightening sequences is from the covers'center to the ends alternating site to the side and most covers are found to leak after installation from using feel to gauge tightening torque resulting in an under-torqued condition. If done in the proper sequence and at a measured torque of 9.7Nm the covers apparently rarely leak. Only replace the covers found to be leaking.
First, make sure you have a good quality allen socket that fits tight. Make sure each bolt head recess is clean, so the socket gets a good bite. When you go to loosen them, make sure your socket is fully seated into the bolt head and is on square, not at an angle. And when you break them loose, you need to just have feel for it. They should crack loose with X amount pressure. If one isn't breaking loose with the normal amount of pressure, stop, and proceed with caution. Don't just gorilla it or you will snap the bolt head off.
This. Use a 6pt socket and not a 12pt. Should come out easily. Good luck. Where are you located? This board used to have wrench-a-thons....
The only grinding I had to do was the rusted fasteners for the mufflers and muffler straps. I replaced these with stainless steel fasteners.
I discovered one of my muffler straps still had a stainless bolt stud, while the other was a mild steel replacement.
I also replaced my exhaust system shrouds, they were corroded and only like, $100 bucks from the dealer. The mounting nuts for the shrouds were stainless and cleaned up well.
You can use this opportunity to take your mufflers somewhere to have them polished, and the muffler tips too. I did that when I replaced my lower valve cover gaskets, and they still look new 7 years later.
You can also remove and refinish/repaint your fender brackets if they are flaking or peeling.
Remember, when tightening the valve cover bolts, the aluminum bolt flanges on the inside of each cover meet the surfaces of the heads, so you only tighten the covers enough to snug these up.
Tightening too much will either stretch or break the bolts or you could damage the covers (if yours are the original Zytel).
Good luck!
@Blacktop That does help in giving me the confidence that I can cut the straps as needed. Still not quite sure how much and what I'll have to remove to get to the upper valve covers (if I go that far) - but I'll attempt to tackle it this weekend.
How hard are the lower valve cover gaskets to replace, really?
Might as well do all four of the covers and then you are good for many years to come. And replacing them or working on your car is mental therapy. There is no rush to get it all done lickety-split.
Originally Posted by mferris
Or should I just take it to someone and have them drop the engine and have them charge me to seal up everything?
You are kidding, right? This is an easy motor-in-place job. Clean everything first around the valve covers. The last thing you need is dirt and grime falling into the engine. Treat it like an operating room, an independent shop won't do any cleaning.
Valve Cover Seals. Not a DIY but some pics and info. And get quality tools as listed.
To clarify, you shouldn't have to cut the muffler straps, the hangers for the mufflers. You only need to cut the bolts, or just zip the flats of the nuts enough to break them off, and the cans will fall out. Hopefully not on your head!
I had to cut the bolts holding the exhaust tips on, because I wanted them polished too.
Don't lose the cage nuts for the exhaust heat shields, Stoddard wanted like, $20 PER PIECE for those. So, I carefully cleaned and reused my old ones, they're stainless so they can clean up fine.
I used a Rotozip power tool and metal cutting wheel. Great tool and made quick work of the nuts/bolts.
When putting it back together, I used copper nuts, copper anti-seize paste and Metric stainless bolts for the exhaust system in case it ever has to come apart again.
Cheers and good luck!

 11-06-2023, 02:24 PM