ERP Sport Bushings for Rear Suspension
 05-23-2011, 11:38 PM
#1
Addict
Rennlist Member
Rennlist Member
Thread Starter
I've been chasing a rear suspension "mushiness" for a few years. Replaced the shocks/springs/swaybars many years ago, didn't fix it. Replaced my toe links with Tarret's two years ago, no help. Did the pinned fwd tie rods ( thanks Garth! ) a year ago or so since I thought maybe I was imagining things at the back. No help.
Finally replaced the rear link-arm bushings with the ERP sport bushings over the weekend. I used the post by bobesser for DIY guidance, plenty of good instructions and pictures there. I ordered 8 of them, but only needed 6 since the Tarret toe links negated the need for the last two. At $50 apiece, the two remaining are just sitting on my work bench. Make an offer, lol.
Test drove it today... WOW... it's gone. Not just better, it's gone. I can't wait to get the car back on the track for a full assessment.
An interesting observation... the new bushings weighed twice as much as the old. The rubber in them is that much more dense. The result, no sway, no sponginess, I'm a very happy believer.
Took me two days to get all 6 replaced, mainly because I had to custom make a couple of tools to use for the press out/in process. Basically I faced off one socket that was the exact same size as the bushing (had to go to two stores before I finally found a brand with the exact OD as the bushing). I can post pics of the process and tools if anyone is interested. You can do it all with a 6" vise. Of course all the crafted tools are available to other interested Rennlisters. It's a very worthwhile upgrade, at least for me. I'm much more happy with the car.
Last edited by Jeff96-993; 05-24-2011 at 11:08 PM.
 05-27-2011, 05:31 PM
#2
Addict
Rennlist Member
Rennlist Member
Thread Starter
Tools and process:
The nose on the bushings make it more difficult.
I ground down a socket which is the exact OD as the bushing.
A large vise and a mandrel vise were just big enough to push the bushing out and put the new one in.
For the install I used another socket as a female for the nose of the bushing. The second socket provided support around the entire periphery of the link. Aligning everything in the vise was key before you could begin cranking down. I used two hands to align, and my knee to tighten the vise until everything wedged down snuggly. Once aligned, then I could crank down on the vise.
Before reassembly I cleaned up the ID of the link, and used a high temp grease as an assembly aid. Took me about 15 minutes a link max, mainly because I was totally **** about the alignment.
Pics below go with the words above.
12-25-2014, 07:07 AM
#3
Rennlist Member
Well done! It sure looks like a lot less swearing than the "press inner sleeve/burn rubber/cut outer sleeve method!
I doubt my 12 ton press can handle these. Has anyone been able to press them out with a 20 ton?
I doubt my 12 ton press can handle these. Has anyone been able to press them out with a 20 ton?
12-25-2014, 01:57 PM
#4
Burning Brakes
If Jeff could press the sleeves in/out with a bench vise, your 12 ton press should make easy work of this job.
Jeff,
Are all the bushings identical?
If the tie rods are in bad shape, is there a way to replace them or do you have to replace the whole arm?
Thanks for the inspirational post!
Jeff,
Are all the bushings identical?
If the tie rods are in bad shape, is there a way to replace them or do you have to replace the whole arm?
Thanks for the inspirational post!
12-25-2014, 02:37 PM
#6
Rennlist Member
Join Date: Nov 2010
Location: Central California
Posts: 3,484
Likes: 0
Received 12 Likes
on
11 Posts
QUOTE=CaptainGSR;11903126]You'd be surprised how powerful a simple vise can be...
Does anyone know the diameter of these bushings? Are they less than 34mm?[/QUOTE]
Just went out and measured my Rennline sport bushing that I haven't put in yet. It's 40.36mm O.D. on the sleeve.
An 1-1/8" socket looks good enough to use to press out old and new one in.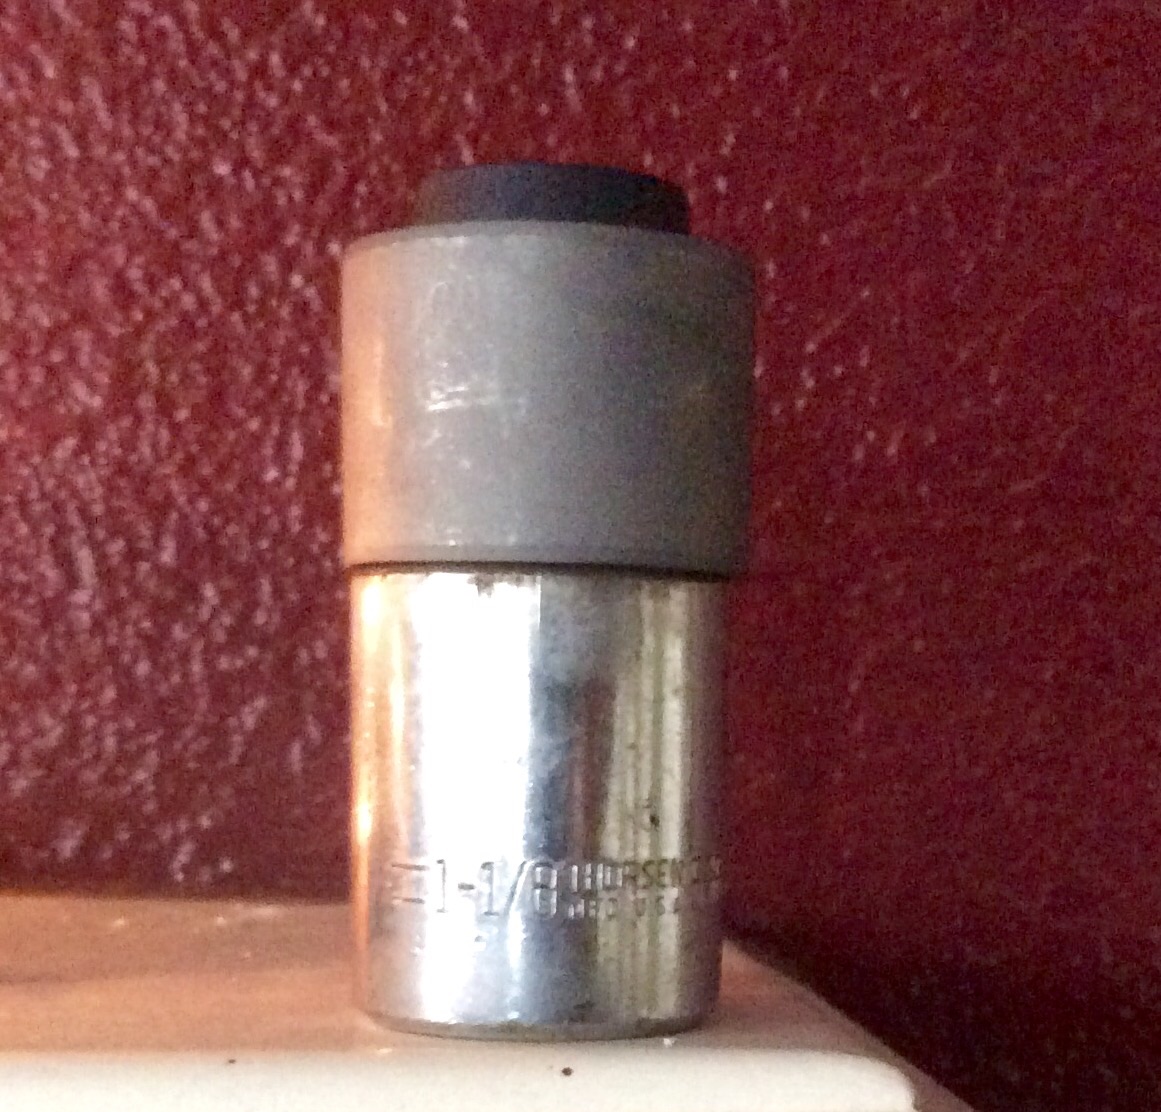
Does anyone know the diameter of these bushings? Are they less than 34mm?[/QUOTE]
Just went out and measured my Rennline sport bushing that I haven't put in yet. It's 40.36mm O.D. on the sleeve.
An 1-1/8" socket looks good enough to use to press out old and new one in.
Trending Topics
 12-26-2014, 01:01 AM
#9
Rennlist Member
Join Date: Nov 2010
Location: Central California
Posts: 3,484
Likes: 0
Received 12 Likes
on
11 Posts
It's very simple. Just pull links, replace and align. If you want to rebush existing links, just follow the above instructions. If you put adj links, make sure you get the locking plates.