When you click on links to various merchants on this site and make a purchase, this can result in this site earning a commission. Affiliate programs and affiliations include, but are not limited to, the eBay Partner Network.
I think you could since your transmission is out.
plugging the atmospheric ports would be the tough part. That plastic is slippery and RTV sealant has a hard time sticking.
The job is a lot easier from above the engine.
lower the engine and remove the TB, plenums and intake runner.
Just my experience, which isn't extensive.
I can overnight you one that is already sealed !!! , wait this is saturday, UPS just closed about an hour ago. Well I can overnight you one on Monday if you want..
Smart move, I think I'm gonna start insisting a new "lifetime" re-worked Factory style AOS be purchased from me with the UAOS kit. The simple sealing of the Atmospheric Port is just causing to many issues.
Joe, you want me to put you an "already re-worked AOS" in the box with Perry's kit ?
Thanks for the response! We have other issues so no need to overnight but I'll PM you with the address and payment info.
i think reaching the port to seal it from underneath for someone that has not pulled a motor from a car and knows how it is oriented is a no go. If u pull the tb and plenums the port area is very clear and easy to access. The process of sealing the port is also very easy once u can see it. I would enclose one good color print or have a dedicated web site with pics of this operation so people dont need to search for it. This would cut down on the difficulties and issues.
Good suggestions. None of this is much of a problem for a seasoned professional, but can be a daunting task for a novice. That's why I suggest professional installation.
I can R&R an AOS from a 996.1 6MT in about an hour from underneath, and install the UAOS kit in about 30 min.
On a 996.2 the left intake needs to be removed to R&R the AOS, but the port and be sealed by just removing the center plenums and reaching in and sealing, then the UAOS kit can be installed in 30 min.
Jake had mentioned to me that he wanted to do a installation video on the UAOS a month or so ago to promote his video channel, that would be a good service.
Originally Posted by JTT
Is it possible to install the UAOS without removing the plenums? I doesn�t seem so, but thought I�d ask. I originally thought you could, but now having doubts.
I can install the complete UAOS kit, with the pre-sealed "lifetime" AOS, on a 996.1 6MT without removing the plenums or intake.
On a 996.2 the left (bank 1) intake must be removed to get access to the AOS bolts (they bolt down to the head vertically).
There's more than than one way to skin a cat, but if you don't have the skillz to skin a cat, that means there is more than one way NOT to be able to skin a cat. Professional cat skinning is suggested.
Originally Posted by wkf94025
Do we have a sense yet for hours to install UAOS by a non-expert wrench? Mine is a '99 C2 with manual transmission.
No, not enough feedback from non-professionals. All DIY'ers make a project out of the install and are doing many "while you're in there" procedures.
Originally Posted by jumpy chunky
I think you could since your transmission is out.
plugging the atmospheric ports would be the tough part. That plastic is slippery and RTV sealant has a hard time sticking.
The job is a lot easier from above the engine.
lower the engine and remove the TB, plenums and intake runner.
Just my experience, which isn't extensive.
Permatex Ultra RTV will stick to even lightly oily surfaces.
I used it once in an emergency to stop an active leak on an oil pan that oil coming out in a small stream, it stopped the leak and sealed it while it was active/wet !! I actually ran it for a year before replacing the oil pan.
On a 996.2 the left intake needs to be removed to R&R the AOS, but the port and be sealed by just removing the center plenums and reaching in and sealing, then the UAOS kit can be installed in 30 min.
That�s what I was hoping for! I�ve had the throttle body and plenum out before (due to knocking off a vacuum line replacing alternator ), so comfortable with that.
There's more than than one way to skin a cat, but if you don't have the skillz to skin a cat, that means there is more than one way NOT to be able to skin a cat. Professional cat skinning is suggested.
Ok, I have come to the conclusion that I need a professional cat skinner on this.I just can not get to those back bolts on my .2 Tip.
I do see a hose on the lower part of that side of the engine that has oil on it, so may need to have the engine dropped anyway to fix some other stuff as well. Lots of black soot in the front plenum makes me think the intake manifolds need to be removed for cleaning.
I have been doing some "while I'm in there" stuff so haven't been tracking the hours specific to this but getting to the point of having both plenums out and the back mounting bolt on the AOS removed hasn't taken much time at all, not counting time to order tools i needed and didn't have.....
Skip, i have an original UAOS, Are there any updates/mods that i need to make to my kit before i take the car in for installation?
Yea, never underestimate the value of a good cat skinner...
The early UAOS is not much different from the one I am shipping now. Same principal, same design, only differences are ::::
1, The early ones had the Accumulator and the breather hose to AOS was made together, hose was all Polyamide 12 that was heated and stretched/bonded to the Accumulator.
The newer ones have a hose that can be disconnected from the Accumulator and is half Polyamide 12, half aluminum. Being able to disconnect the breather hose makes installation easier and puts less stress on the nipples than having an 18" hose leveraging on it..
2, The ones now include an aluminum re-location bracket, the earlyier ones had to flip the existing steel bracket and on 99 C2 bend it.
3, The ones now have a strain relief on the Infra-red sensor. The earlier ones didn't have this and received a few unwarranted negative comments. I tested the sensor wiring by tieing it to a cast iron
6" bench vice clamp and lifted it..but I did the update anyway..lol
4, I increased the wall thickness on the nipples to 3mm, overkill but doesn't hurt.
I'll continue to make small improvements as I see the need..
Showing the strength of the Infra-red Sensor wiring, that is a Cast Iron 6" bench vice !! Custom Aluminum change-over valve re-positioning bracket Detectable Accumulator breather hoses, half Plyamide 12 , half aluminum Stress relief on the Infra-red Sensor, although not needed, looks beefier..
3mm thick nipples on the Accumulators, overkill I know but doesn't hurt..
Originally Posted by TexSquirrel
I FINALLY got to drive my new 54 mile commute today. NOproblems with the newly installed UAOS!
I have REALLY missed driving my 996!
WhooHoooo !!
Last edited by Porschetech3; 05-11-2020 at 10:09 PM.
Drove mine over 120 miles this Sunday. No issues. Well no issues due to the UAOS. Had a little coolant leak from not securing one of the overflow tank hose clamps correctly.
Skip, when you say your can R&R the AOS on a 99 C2 in a half hour, is that with the trans in? I assume you are not on your back like I am, but I don't think I would be able to do it.
Yes, with the trans in. There is only 2 10mm bolts, 1 spring clamp, and 2 "quick - connect" hoses and 2 small spring clamps that must be undone !!
If you are used to "cat skinning" and working with "long reach 30" tools" it can be done.
The first one I had done, there was/is no "book time" or "Factory procedure " and I didn't know it was supposed to take everyone half a day or more to do this job, so I did it in an hour.
You can't do that on your back, must have it on a lift where you can stand up and use very long tools, and a variety of "special/unique tools"..
After having done a 996.2 manual now, I think I could do it in 4 hours now.
996.1 manual does look a LOT easier.
But I definitely couldn’t do it in 1 hour!
Maybe 3...
I would consider doing it for others in the Houston area...on my schedule.
These look like nice improvements. Wonder if I should make any to my kit before I have it installed by my professional cat skinner? I have tentatively schedule for next week but could push that out.
I'm thinking specifically of these two:
1, The early ones had the Accumulator and the breather hose to AOS was made together, hose was all Polyamide 12 that was heated and stretched/bonded to the Accumulator.
The newer ones have a hose that can be disconnected from the Accumulator and is half Polyamide 12, half aluminum. Being able to disconnect the breather hose makes installation easier and puts less stress on the nipples than having an 18" hose leveraging on it..
I could see where being able to remove the Accumulator would be helpful if work ever needed to be done behind it. Maybe use the new hose? On my kit one end of the accumulator hose has a quick disconnect at the AOS, so that end would be easy. Is the end attached to the Accumulator reasonable to remove or is it glued as well as stretched? Or maybe I should get a new accumulator as well if the hose is not removable? Or maybe just cut the existing accumulator hose and put a sleeve over the section ends so the accumulator could be separated from the hose?
2, The ones now include an aluminum re-location bracket, the earlier ones had to flip the existing steel bracket and on 99 C2 bend it.
Would there be an advantage to having this bracket vs flipping the existing bracket? Does this new bracket just attach to the existing bracket?.
Thanks for all the work you are doing, this will be a big improvement. Hopefully, the last of the "big issues" will be solved on my car. (Nickies and IMMS already done).
After it's installed, there is no real disadvantage to having the full Polyamide 12 hose that is heated/stretched/bonded to the Accumulator. Polyamide 12 actually cost more than aluminum.
The half Polyamide 12, half Aluminum hose that is detachable , actually costs less, is easier to manufacture, and easier to install. A Win, Win ,Win......two Wins for me, one Win for the installer.
The custom Aluminum re-location bracket is a nice piece, it looks better, is easy to bend (on a 99 C2), and is lighter, and fits better. The factory steel bracket, is heavier, harder to bend for 99 c2, and doesn't fit as nice, or look as good (but is does the job !!)
I have pics of the original bracked modified in the uaos tips and tricks thread. I also would have been fine with original set up but i have a tendency to break things. A little care and it will install just fine.
I have pics of the original bracked modified in the uaos tips and tricks thread. I also would have been fine with original set up but i have a tendency to break things. A little care and it will install just fine.
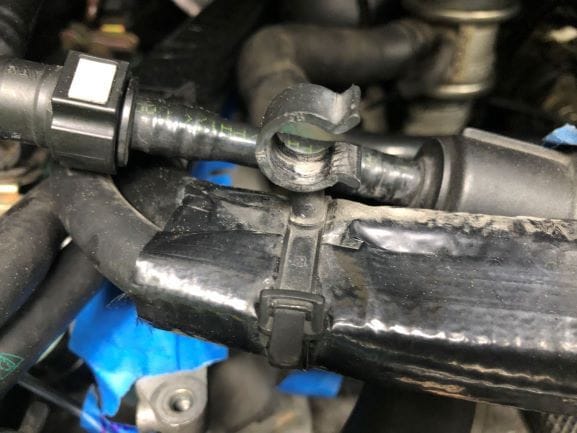
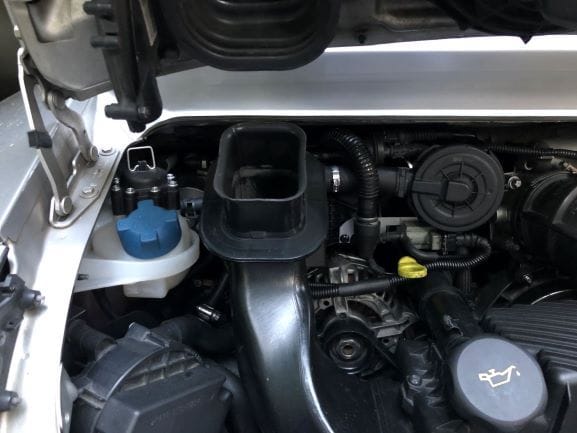
Hey Skip - I was hoping to have posted this closer to the time I actually completed the work (April 26) but at this point, I can add that everything is operating as it should! I have about 700 miles on the installation at this point. Along with the UAOS I installed new fuel injectors and replaced my drive belt tension roller...found the valuable post noting application of heat is needed to release the thread locker. This is the complete kit unboxed....I got extra parts! zip ties and wire management casing - those I understand - the poly stoppers, not so much AOS in place - also replaced my fuel injectors which you can see in the lower left. Hardest part of the install for me...attaching the quick connect hoses to the AOS. Took me hours. I just couldn't get them to click into place forever. I had to cut this hose management clip off of my hose bundle to complete the install. PT3, that is the only item I would add to your nicely complete UAOS kit.
The completed installation - I have since re-routed the vacuum wiring behind the alternator.
Thank you Skip! I also very much appreciate others' posts of their experiences.
 05-10-2020, 01:18 PM

 ), so comfortable with that.