996 --> 997 Front End Conversion Process and Pictures
 01-07-2013, 01:21 PM
#1
Intermediate
Thread Starter
**NOTE: Pictures are in no particular order. Finished pictures are on PAGE 3
A few members have asked me questions about my 996 --> 997 front end conversion, so I thought I'd post some pictures and info for anyone on here who might search for it.
I'm not going to go into the prices etc, nor my reasons for doing the conversion, as it's a matter of personal choice etc. and most people are more concerned with the technical aspects of the project.
The car is a 2002 C2 6MT. I grew quite attached to it over time. Bought the car in my 20's, now in my 30's and still love it. Did the clutch, IMS bearing, AOS, plugs, belt, motor mounts, all fluids, replaced all the worn interior parts, installed coilovers, 19" wheels, headers, cat bypasses, stainless exhaust, etc. This is fun for me. This is my entertainment. I like projects, and I like to work on things piece by piece, over time.
My car was originally sold in Japan. It was brought here (legally I hope) and sold on the grey market. It still has all of the Japanese stickers and paperwork. The original color was white, but the original owner bought a full AERO II kit (OEM!) and had it sprayed by a low quality paint shop, the result being that it didn't match the original paint, and began to chip prematurely. When I bought the car, I knew that I'd have to get it re-sprayed at some point. It had scratches here and there, and the low quality paint on the front/sides/rear started to bother me more over time.
Anyhow, knowing that a full re-spray was going to happen, and had in fact been budgeted in when I bought the car, I decided to take a chance with a 997 conversion on the front, because personally I've always liked the more round style headlights.
When you see 997 conversion kits for sale on the internet, the price is often misleading. There are a variety of other parts that you'll need to buy, and it's up to you to decide if you're going to save money by searching for all of the parts individually, or if you want to just simplify everything and buy it all from one supplier. The conversion kit that I got is more thorough than most, and included:
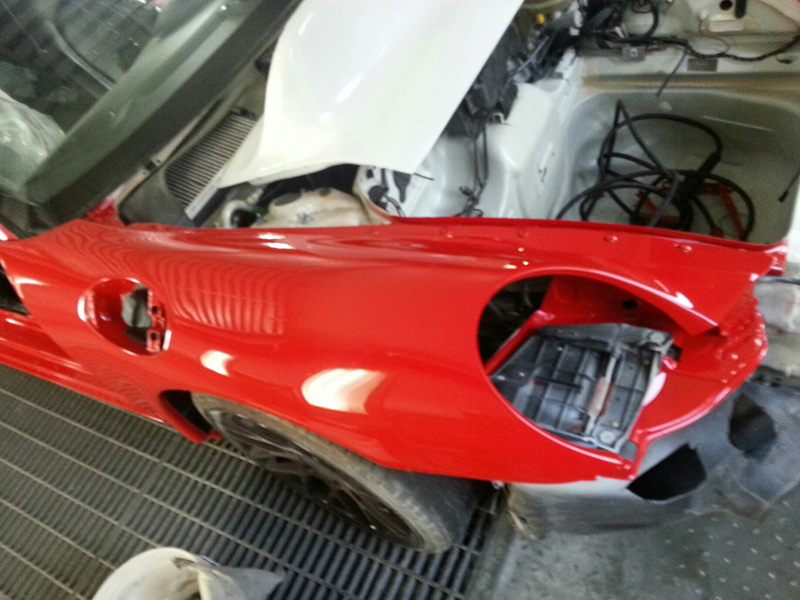
-Front Bumper (GT3 997 MKI Style) Fiberglass
-Front Lip (ABS Plastic)
-Front top vent (ABS)
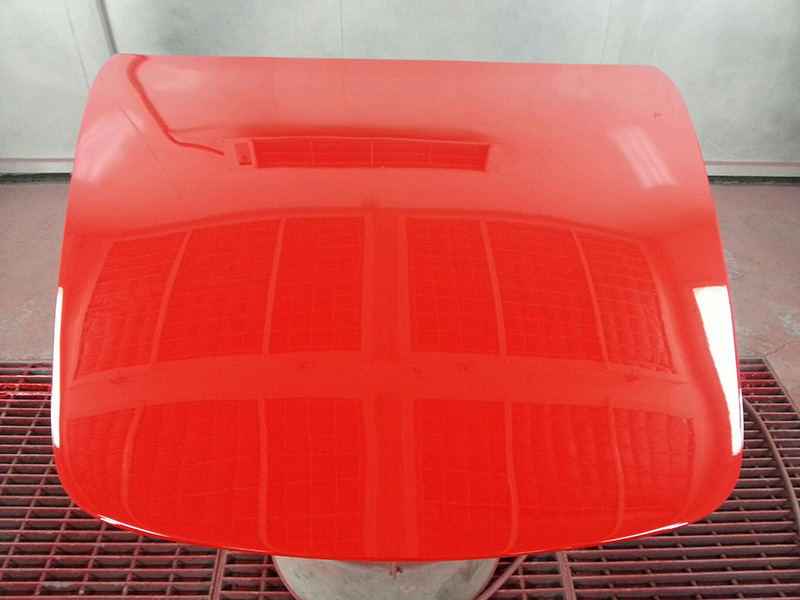
-997 OEM style Hood (Fiberglass)
-997 OEM hood hinges
-Conversion Fenders (100% Fiberglass)
-OEM 997 fuel door
-Fiberglass fuel door mounting bar
-OEM Fuel door bump stop and hinge parts
-Fiberglass rocker panel extension pieces
Parts that were NOT included, but I ended up getting from the same supplier to save both time and money:
-OEM 997 projector lights (I'm using a Philips HID kit)
-OEM 997 MK1 Turn signals
-OEM 997 headlight mounting trays
-997 style mirror conversion kit (I'd broken one of my 996 mirrors just prior to this, so figured what the heck)
Installation:
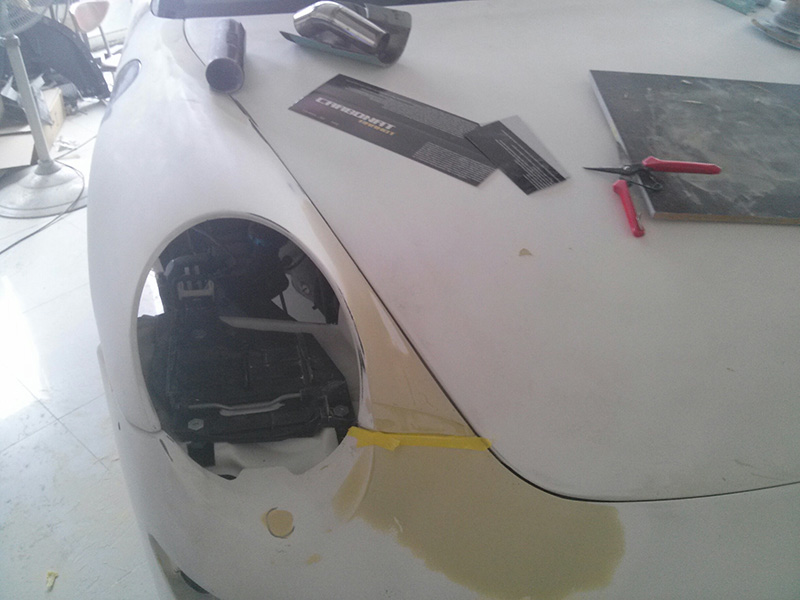
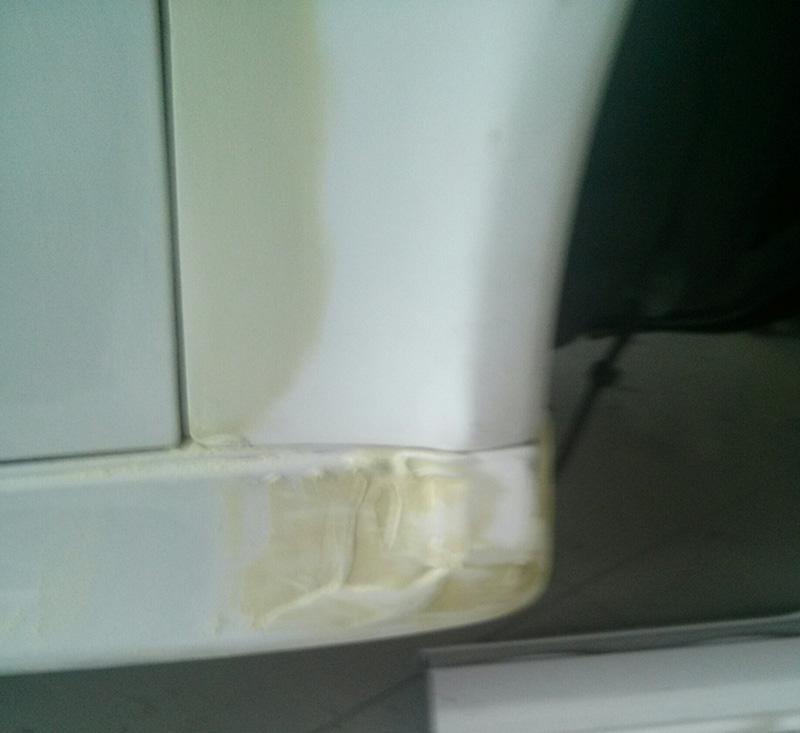
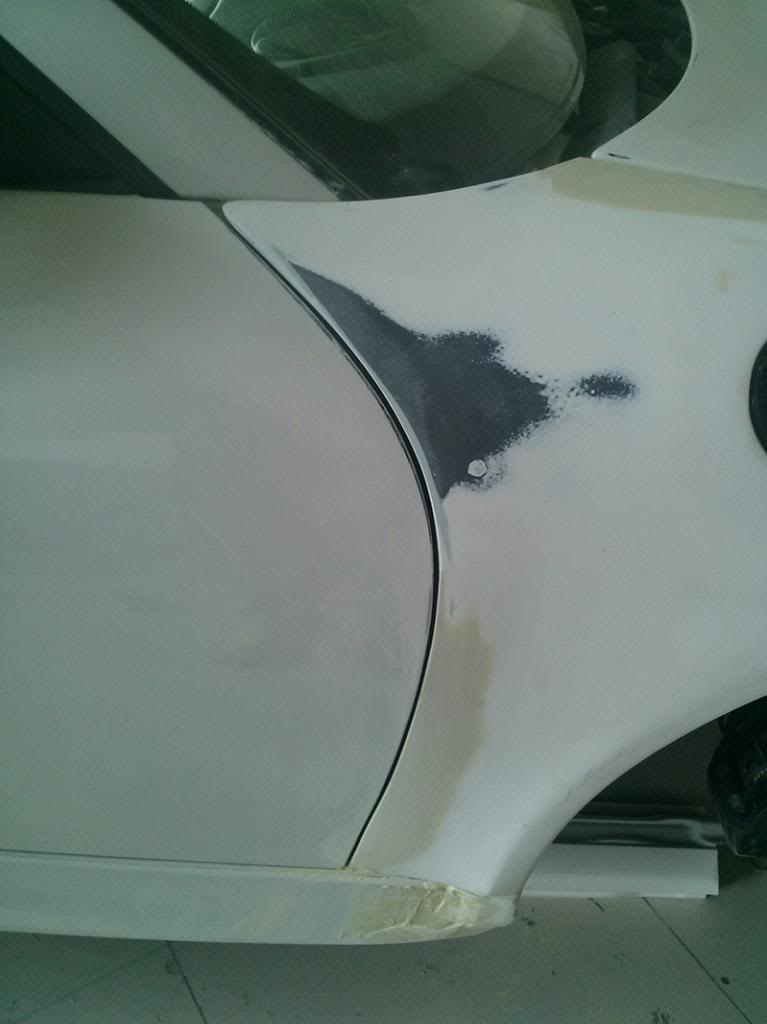
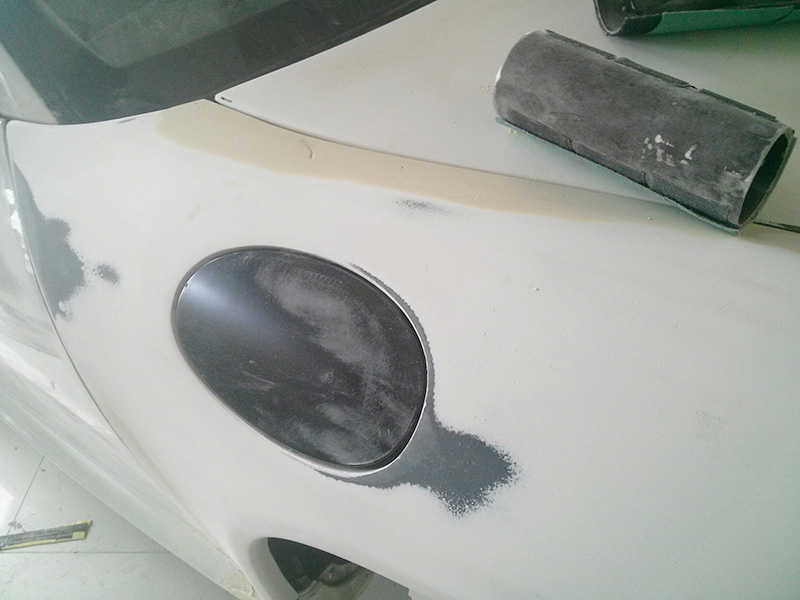
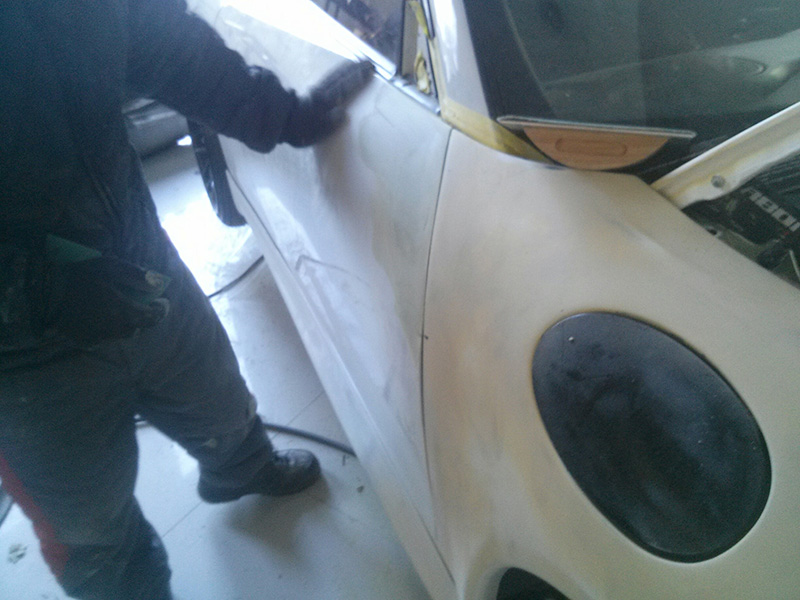
The particular kit that I got is made of fiberglass. Fiberglass WILL NEVER FIT PERFECTLY. Some parts COME CLOSE to fitting perfectly (like the ducktail I got), but most WON'T. This should be assumed before buying a fiberglass conversion kit. Even if the producer pulls it from the mold and it is flawless, a whole variety of factors can cause the parts to warp/bend. For example, if the producer stores them in a hot warehouse, the parts may warp slightly. If the producer stacks a bunch of fiberglass parts on top of each other, the parts may eventually warp. If the mold is perfect but the resin is mixed too hot, the parts may warp. If one part of the piece has more resin/cloth than another part, it may warp, etc. You'll have to work on it to make it fit nicely. Just look at my photos to see how many areas of the kit required attention to get them even with the body. The finish of the fiberglass parts I got was not very nice. I'll admit to being slightly disappointed with this fact. The front bumper also didn't have pre-drilled holes. It was rough around the edges, the corners of the fenders were chipped or rounded off, and there were tiny nicks, air bubbles, etc here and there. I expected this, and they were an easy fix for the most part.
When you receive parts like this, you have two options; you can stomp your feet on the ground like a little princess, call the producer and demand a replacement/refund -or- you can simply accept things as they are, get your hands dirty, and fix it yourself. I strongly believe that men shouldn't whine, and should instead use the two hands you were born with to take ugly things and make them pretty again. I mean, this is one of the reasons that people have project cars, right? The whole spirit of modifying cars and hot-rodding revolves around the idea of taking something that doesn't fit, and making it work. Not to sound critical, but if you are going to whine about fiberglass parts not fitting flawlessly out of the box, I'd highly recommend finding another hobby. As you can see from the final paint photos at the bottom, the fender tips were fixed, as were the edges and gaps. The strong point of this particular kit is that the parts are THICK. Very thick. I could set the bumper on the ground, and then sit on top of it without breaking it. I opted for this material because for a highly skilled body shop, fiberglass is very easy to work with. You can add to it, remove from it, build it up, re-enforce it, etc. However, for a shop that isn't well versed in the use of fiberglass, it could be a veritable nightmare, and they'll probably call you up complaining and whining about how they can't work with it. My only advice with regards to this is to take the entire kit to a shop that has built fiberglass parts from scratch before. Lots of hotrod parts, racecar parts, speedboat parts etc are made of the same type of fiberglass. Find a shop that has worked on these types of projects before. While you can reasonably expect something like a fiberglass hood or wing to fit REASONABLY well out of the box, it's an entirely different story when you have an entire front end composed of several different pieces of fiberglass, which all have to fit together.
My biggest fitment worry was the fenders. They come from a 2 or 3 piece mold, and depending on how they dry or how they are left to sit in a shop, could fit very well, or could require major work. Mine required some work. They needed to be bulked up in the area around the headlights where they meet the hood (see pics), and needed some attention where they meet the door area as well. Again, for an experienced body shop, this is no problem. They do things like this every day. The inexperienced or discount body shop is probably going to call you whining about how it doesn't line up 100%. The quality of a fiberglass project depends more on the shop than on the material. A good shop can make anything fit. They'll cut it, extend it, re-glass it, build it up or sand it down until everything lines up perfectly. Fiberglass is an excellent material to work with. Trust me, I used to fix fiberglass speedboats that were filled with bullet holes
The pictures below show VERY VERY rough, early stages of fitment. All of the gaps and jagged edges seen below were later smoothed out and measured with a gauge so that the clearance between door and fender was uniform from top to bottom.
Here are some of the same areas after a bit more attention:
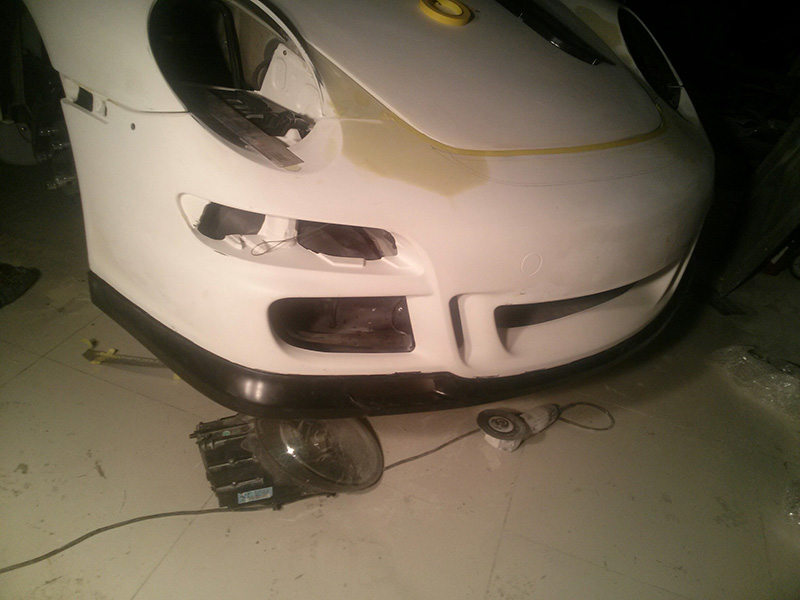
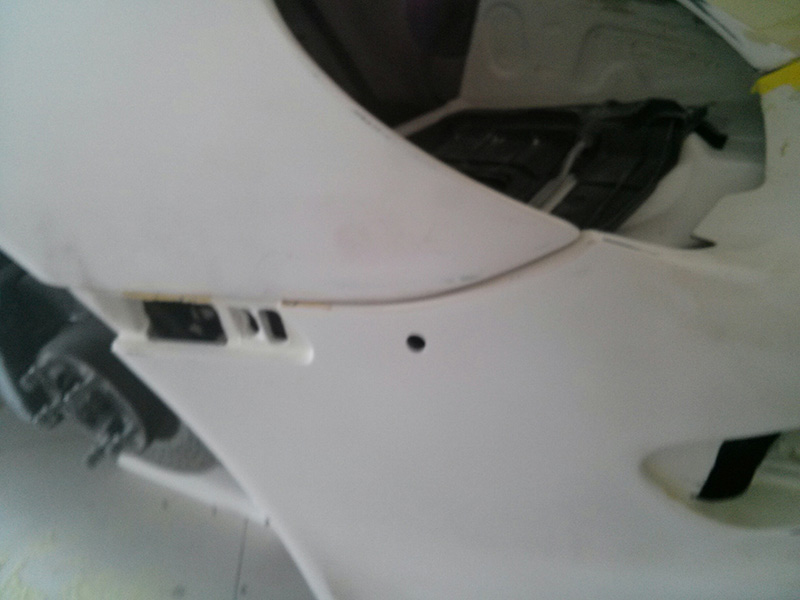
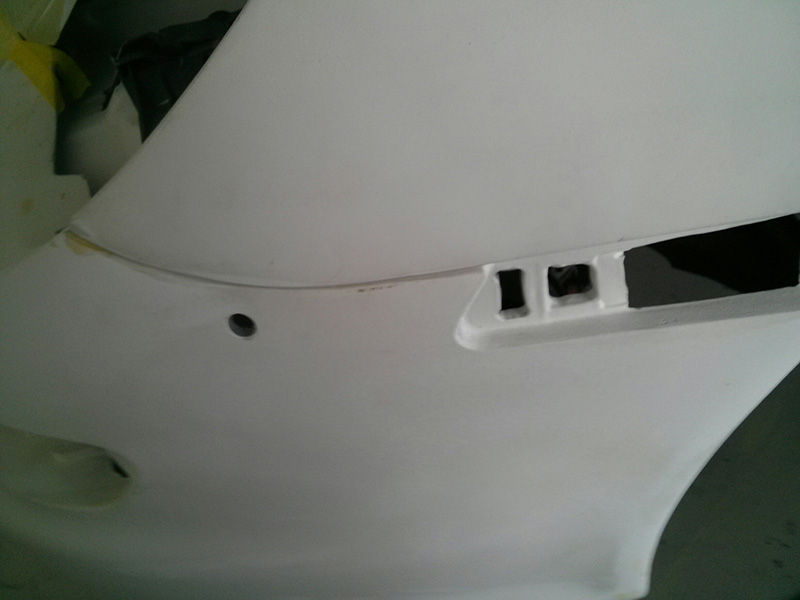
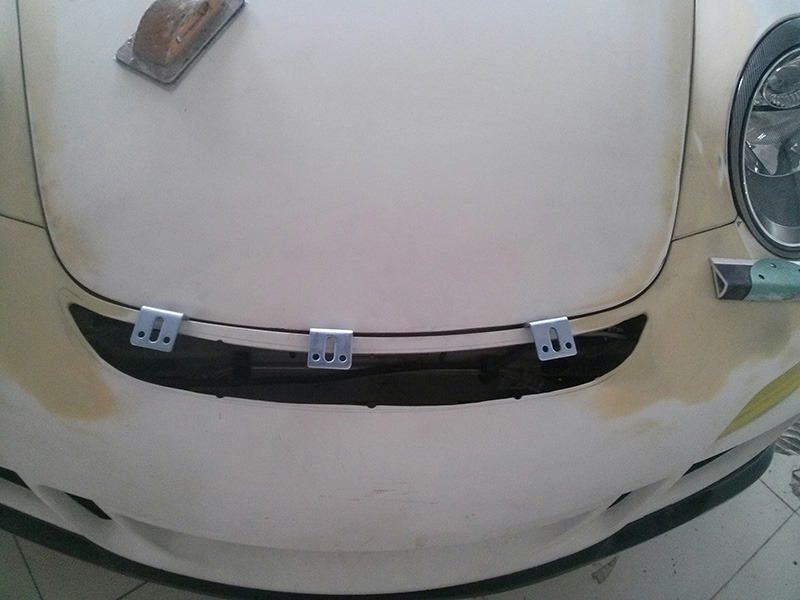
The front bumper itself fit very well, no cutting or extra work required aside from drilling the holes and cutting bits out of the areas where the turn signals mounted. The filler you see was applied to smooth out some scratches and fill a few air bubbles while bringing the lines of the front bumper flush with where they meet the fenders. Most of it was later sanded away. The bottom parts where the front lip attaches also needed some work, but 10 minutes with a dye grinder would be enough to sort it. The hood was another concern. Being something that opens and closes fairly often, I didn't want much body filler used on the hood for fear of it cracking. Luckily the hood was a 100% bolt on affair with no re-glassing or body filler needed, just used some polyester putty in certain areas to smooth out scratches and make sure everything was flush. Just a bit of sanding and it was ok. New holes had to be drilled for the 997 hinges, and they mount to the body of the car a little further back than the 996 hinges did. I used the original 996 latch for the front.
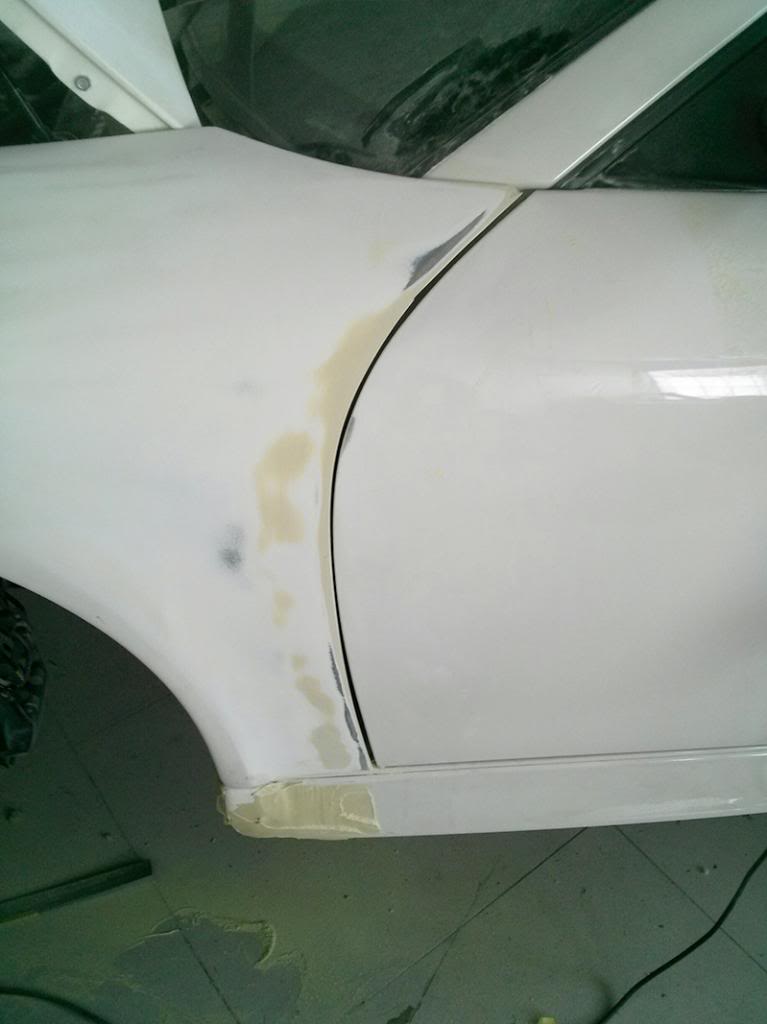
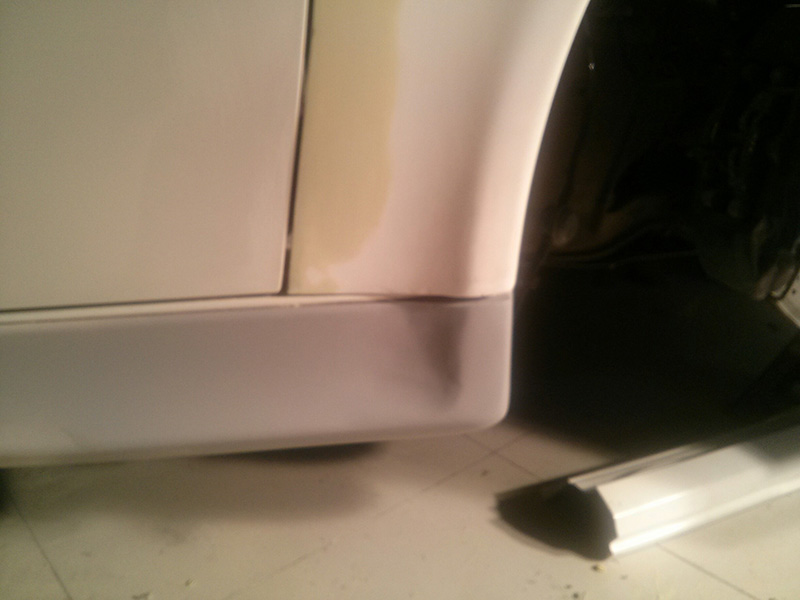
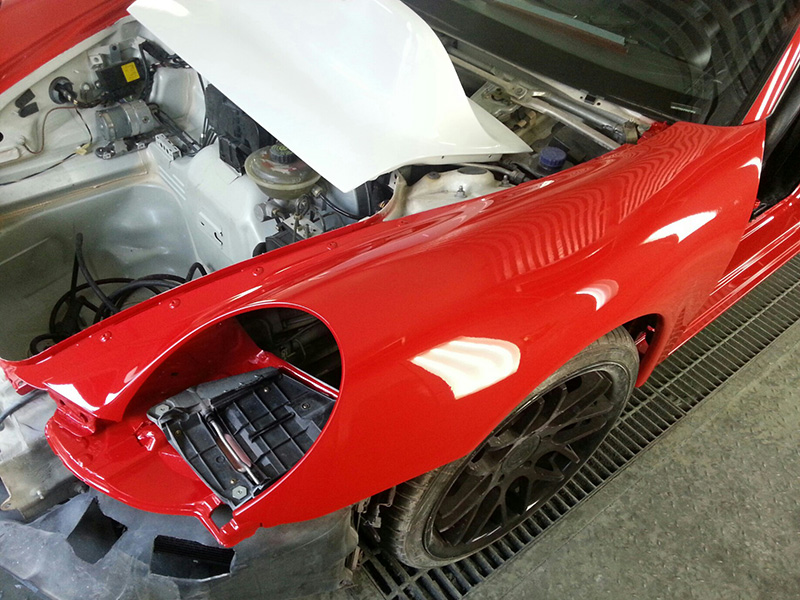
My fenders bolt on to the 996 frame, but for the most part, have the shape of 997 fenders. The fenders on my particular kit came with a slight flare, just like the OEM 997 fenders do. In my opinion, this is one of the reasons that other 997 conversion kits don't "look right". The overall front end of the 997 is more rounded, and follows a certain line. I opted for a kit with the slight flare built in because it blends well with the overall 997 front end. The downside however, is that at the bottom of the fender, where it meets the rocker panel, you're going to have the fender sticking out about 1.5 inches because you're obviously still using a 996 frame and rocker panels, which are not flared out to meet with the newer 997 fenders. In my case, we simply cut a piece from the rocker extension parts included with the kit, and molded them onto the fronts of my AERO Kit II side skirts, so that they'd match up perfectly with the front fenders (hard to imagine, but see pictures for details of how this was done. It wasn't hard at all).
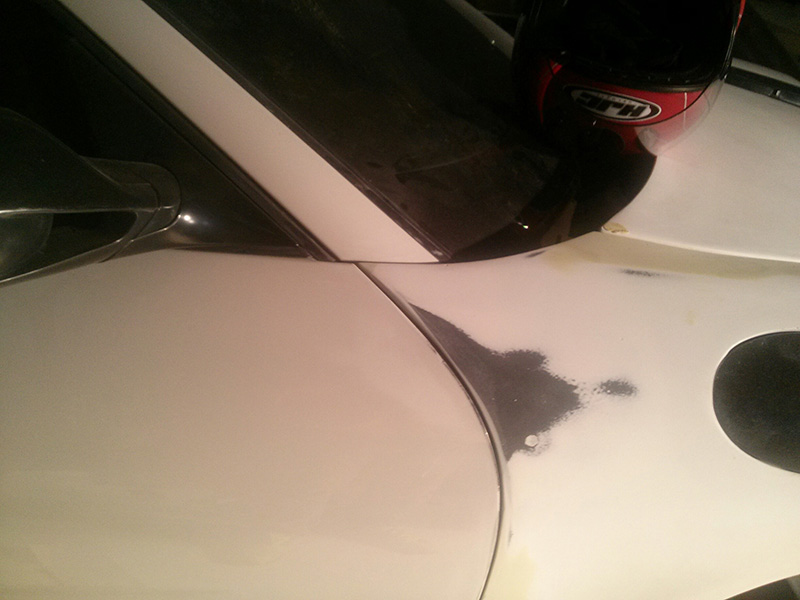
The biggest fitment areas are at the front where the fenders intersect with the hood and front bumper. This area required some building up to make it perfectly even. Another area where some might have issues is where the fenders align with the fronts of the doors. In some cases, the fenders may stick out farther than the doors. There are a multitude of ways you can address this type of problem, and in the end, it's not difficult for an experienced body shop.
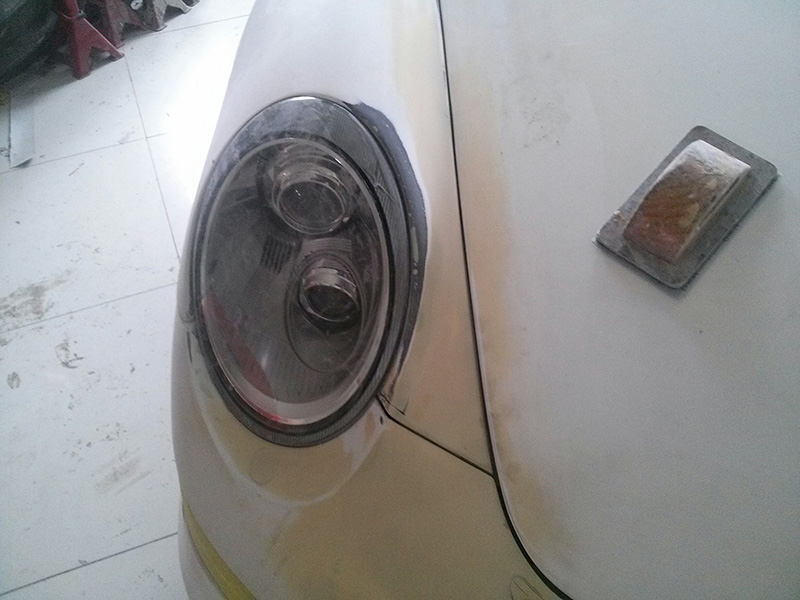
I should also note that my particular fenders came in two pieces; the main fender, and the flat trays that are used to hold the lights. I assume that the producer did this both to make the production process easier, and because it allows you to make fine adjustments to the position of the lights etc prior to install. I'm guessing it was more of a time-saving measure on their part. My kit also came with an OEM fuel door, and a piece of fiberglass bar material on which you are supposed to mount the hinge. The "cup" area of the fuel door (area surrounding the fuel cap and tube) also needs to be fiberglassed into place on the inside of the fender. I recommend doing this after test fitting the fender and lining it up perfectly from the outside.
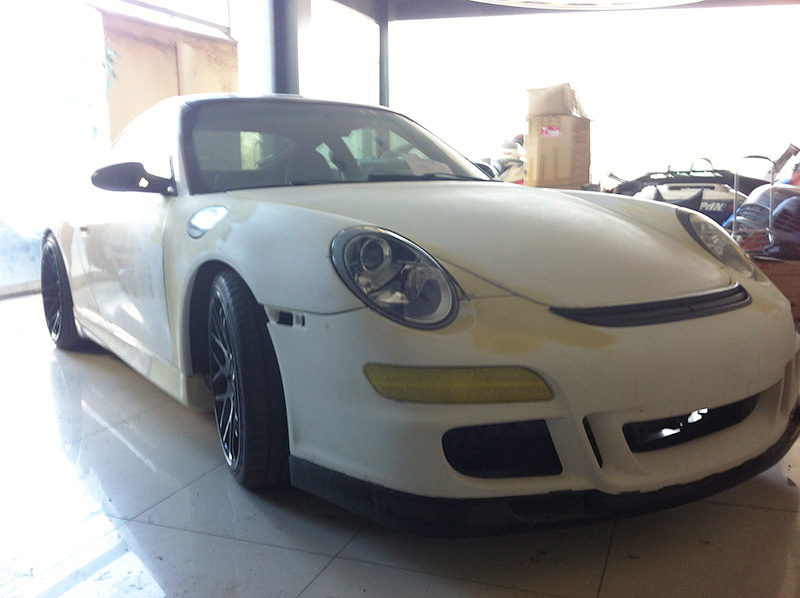
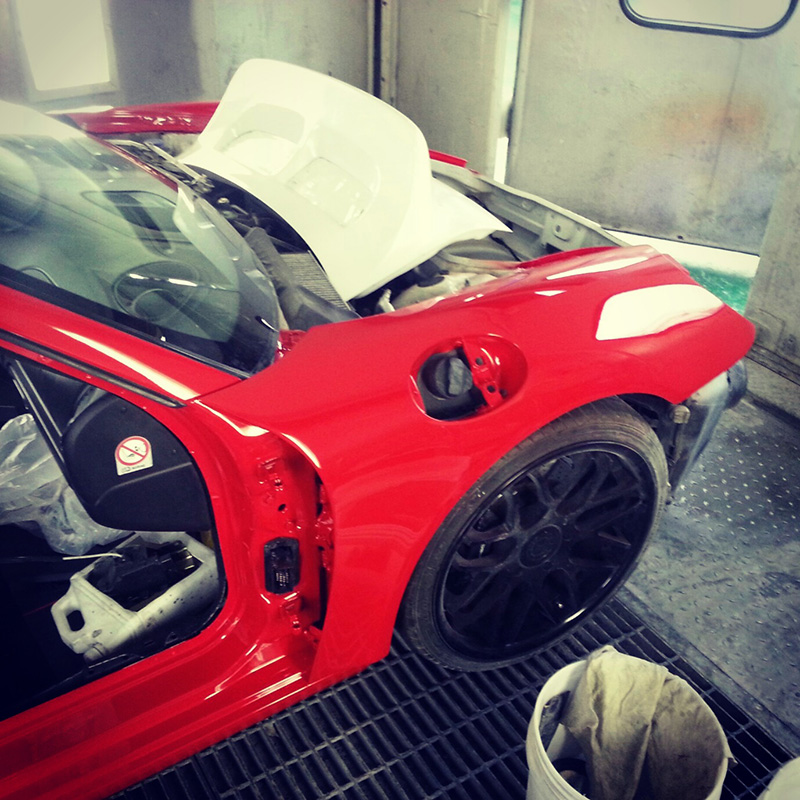
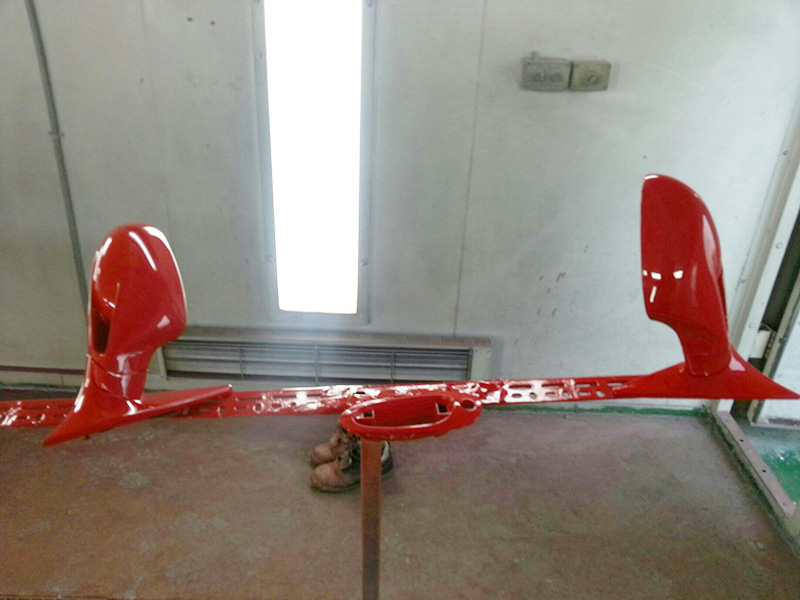
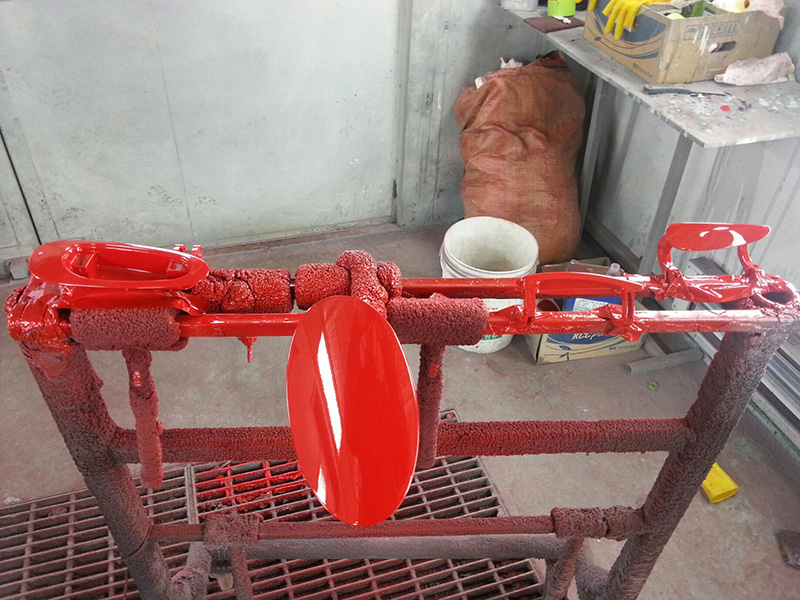
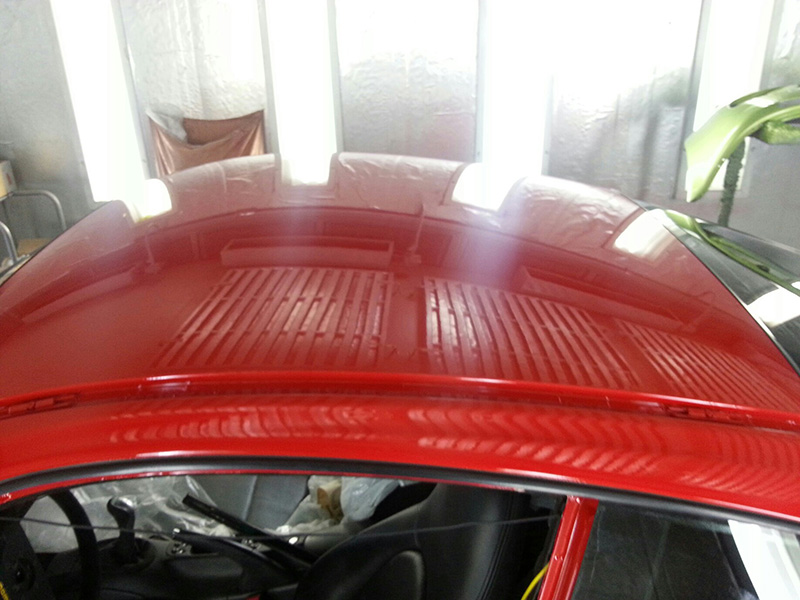
I also opted for a ducktail to replace the OEM AERO II wing that was on the car. In case anyone was curious, I got about $3840 for my used headlights, wing, and front bumper. That did in fact help lessen the blow on the cost of the conversion kit. I chose Guards Red for the color, because it was going to cost me the same to get it re-sprayed in white, and of all the cars I've owned, I've never had a red one. I wanted to stick with an OEM Porsche color. White primer was used in order to make the color more vibrant. Using a darker color primer can make bright colors like red, seem more dull. Using a white primer really makes the final color brighter. As you can see from the pictures, the car wasn't stripped to the frame for the paint work. It's not a classic, and I'm not restoring it as an investment (obviously), so piece by piece, they're removing the parts and spraying as much as they can so that when fully re-assembled, none of the old color will be visible, unless of course you lift up the carpeting under the bonnet, or check under the engine lid. This doesn't bother me, because as I said before, it's not a tear-down-to-the-frame restoration.
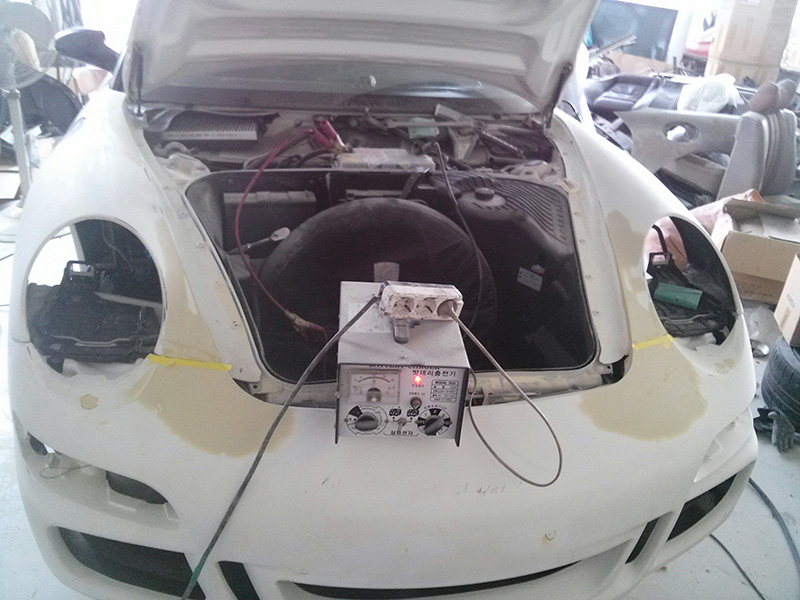
Wiring the headlights and turn signals is a challenge, but since people have done it before, you can google it and find the wiring instructions for the conversion. I opted for an aftermarket HID kit because it saved me money over buying the OEM Xenon 997 headlights. If anyone has questions about the kit or install in general, that haven't already been answered here, feel free to ask. For those curious about how I dealt with the rear brake light (the ducktail comes with one, and the height of the ducktail essentially blocks the light in the OEM location), we simply filled in the place where the OEM brake light was, smoothing it over as if it never existed. As you can see below, I left the water-sock thing over my K&N filter, as I knew the car would probably sit outside in the rain/snow, possibly without an engine lid, not to mention the filter getting covered in all sorts of dust/over-spray.
A few members have asked me questions about my 996 --> 997 front end conversion, so I thought I'd post some pictures and info for anyone on here who might search for it.
I'm not going to go into the prices etc, nor my reasons for doing the conversion, as it's a matter of personal choice etc. and most people are more concerned with the technical aspects of the project.
The car is a 2002 C2 6MT. I grew quite attached to it over time. Bought the car in my 20's, now in my 30's and still love it. Did the clutch, IMS bearing, AOS, plugs, belt, motor mounts, all fluids, replaced all the worn interior parts, installed coilovers, 19" wheels, headers, cat bypasses, stainless exhaust, etc. This is fun for me. This is my entertainment. I like projects, and I like to work on things piece by piece, over time.
My car was originally sold in Japan. It was brought here (legally I hope) and sold on the grey market. It still has all of the Japanese stickers and paperwork. The original color was white, but the original owner bought a full AERO II kit (OEM!) and had it sprayed by a low quality paint shop, the result being that it didn't match the original paint, and began to chip prematurely. When I bought the car, I knew that I'd have to get it re-sprayed at some point. It had scratches here and there, and the low quality paint on the front/sides/rear started to bother me more over time.
Anyhow, knowing that a full re-spray was going to happen, and had in fact been budgeted in when I bought the car, I decided to take a chance with a 997 conversion on the front, because personally I've always liked the more round style headlights.
When you see 997 conversion kits for sale on the internet, the price is often misleading. There are a variety of other parts that you'll need to buy, and it's up to you to decide if you're going to save money by searching for all of the parts individually, or if you want to just simplify everything and buy it all from one supplier. The conversion kit that I got is more thorough than most, and included:
-Front Bumper (GT3 997 MKI Style) Fiberglass
-Front Lip (ABS Plastic)
-Front top vent (ABS)
-997 OEM style Hood (Fiberglass)
-997 OEM hood hinges
-Conversion Fenders (100% Fiberglass)
-OEM 997 fuel door
-Fiberglass fuel door mounting bar
-OEM Fuel door bump stop and hinge parts
-Fiberglass rocker panel extension pieces
Parts that were NOT included, but I ended up getting from the same supplier to save both time and money:
-OEM 997 projector lights (I'm using a Philips HID kit)
-OEM 997 MK1 Turn signals
-OEM 997 headlight mounting trays
-997 style mirror conversion kit (I'd broken one of my 996 mirrors just prior to this, so figured what the heck)
Installation:
The particular kit that I got is made of fiberglass. Fiberglass WILL NEVER FIT PERFECTLY. Some parts COME CLOSE to fitting perfectly (like the ducktail I got), but most WON'T. This should be assumed before buying a fiberglass conversion kit. Even if the producer pulls it from the mold and it is flawless, a whole variety of factors can cause the parts to warp/bend. For example, if the producer stores them in a hot warehouse, the parts may warp slightly. If the producer stacks a bunch of fiberglass parts on top of each other, the parts may eventually warp. If the mold is perfect but the resin is mixed too hot, the parts may warp. If one part of the piece has more resin/cloth than another part, it may warp, etc. You'll have to work on it to make it fit nicely. Just look at my photos to see how many areas of the kit required attention to get them even with the body. The finish of the fiberglass parts I got was not very nice. I'll admit to being slightly disappointed with this fact. The front bumper also didn't have pre-drilled holes. It was rough around the edges, the corners of the fenders were chipped or rounded off, and there were tiny nicks, air bubbles, etc here and there. I expected this, and they were an easy fix for the most part.
When you receive parts like this, you have two options; you can stomp your feet on the ground like a little princess, call the producer and demand a replacement/refund -or- you can simply accept things as they are, get your hands dirty, and fix it yourself. I strongly believe that men shouldn't whine, and should instead use the two hands you were born with to take ugly things and make them pretty again. I mean, this is one of the reasons that people have project cars, right? The whole spirit of modifying cars and hot-rodding revolves around the idea of taking something that doesn't fit, and making it work. Not to sound critical, but if you are going to whine about fiberglass parts not fitting flawlessly out of the box, I'd highly recommend finding another hobby. As you can see from the final paint photos at the bottom, the fender tips were fixed, as were the edges and gaps. The strong point of this particular kit is that the parts are THICK. Very thick. I could set the bumper on the ground, and then sit on top of it without breaking it. I opted for this material because for a highly skilled body shop, fiberglass is very easy to work with. You can add to it, remove from it, build it up, re-enforce it, etc. However, for a shop that isn't well versed in the use of fiberglass, it could be a veritable nightmare, and they'll probably call you up complaining and whining about how they can't work with it. My only advice with regards to this is to take the entire kit to a shop that has built fiberglass parts from scratch before. Lots of hotrod parts, racecar parts, speedboat parts etc are made of the same type of fiberglass. Find a shop that has worked on these types of projects before. While you can reasonably expect something like a fiberglass hood or wing to fit REASONABLY well out of the box, it's an entirely different story when you have an entire front end composed of several different pieces of fiberglass, which all have to fit together.
My biggest fitment worry was the fenders. They come from a 2 or 3 piece mold, and depending on how they dry or how they are left to sit in a shop, could fit very well, or could require major work. Mine required some work. They needed to be bulked up in the area around the headlights where they meet the hood (see pics), and needed some attention where they meet the door area as well. Again, for an experienced body shop, this is no problem. They do things like this every day. The inexperienced or discount body shop is probably going to call you whining about how it doesn't line up 100%. The quality of a fiberglass project depends more on the shop than on the material. A good shop can make anything fit. They'll cut it, extend it, re-glass it, build it up or sand it down until everything lines up perfectly. Fiberglass is an excellent material to work with. Trust me, I used to fix fiberglass speedboats that were filled with bullet holes
The pictures below show VERY VERY rough, early stages of fitment. All of the gaps and jagged edges seen below were later smoothed out and measured with a gauge so that the clearance between door and fender was uniform from top to bottom.
Here are some of the same areas after a bit more attention:
The front bumper itself fit very well, no cutting or extra work required aside from drilling the holes and cutting bits out of the areas where the turn signals mounted. The filler you see was applied to smooth out some scratches and fill a few air bubbles while bringing the lines of the front bumper flush with where they meet the fenders. Most of it was later sanded away. The bottom parts where the front lip attaches also needed some work, but 10 minutes with a dye grinder would be enough to sort it. The hood was another concern. Being something that opens and closes fairly often, I didn't want much body filler used on the hood for fear of it cracking. Luckily the hood was a 100% bolt on affair with no re-glassing or body filler needed, just used some polyester putty in certain areas to smooth out scratches and make sure everything was flush. Just a bit of sanding and it was ok. New holes had to be drilled for the 997 hinges, and they mount to the body of the car a little further back than the 996 hinges did. I used the original 996 latch for the front.
My fenders bolt on to the 996 frame, but for the most part, have the shape of 997 fenders. The fenders on my particular kit came with a slight flare, just like the OEM 997 fenders do. In my opinion, this is one of the reasons that other 997 conversion kits don't "look right". The overall front end of the 997 is more rounded, and follows a certain line. I opted for a kit with the slight flare built in because it blends well with the overall 997 front end. The downside however, is that at the bottom of the fender, where it meets the rocker panel, you're going to have the fender sticking out about 1.5 inches because you're obviously still using a 996 frame and rocker panels, which are not flared out to meet with the newer 997 fenders. In my case, we simply cut a piece from the rocker extension parts included with the kit, and molded them onto the fronts of my AERO Kit II side skirts, so that they'd match up perfectly with the front fenders (hard to imagine, but see pictures for details of how this was done. It wasn't hard at all).
The biggest fitment areas are at the front where the fenders intersect with the hood and front bumper. This area required some building up to make it perfectly even. Another area where some might have issues is where the fenders align with the fronts of the doors. In some cases, the fenders may stick out farther than the doors. There are a multitude of ways you can address this type of problem, and in the end, it's not difficult for an experienced body shop.
I should also note that my particular fenders came in two pieces; the main fender, and the flat trays that are used to hold the lights. I assume that the producer did this both to make the production process easier, and because it allows you to make fine adjustments to the position of the lights etc prior to install. I'm guessing it was more of a time-saving measure on their part. My kit also came with an OEM fuel door, and a piece of fiberglass bar material on which you are supposed to mount the hinge. The "cup" area of the fuel door (area surrounding the fuel cap and tube) also needs to be fiberglassed into place on the inside of the fender. I recommend doing this after test fitting the fender and lining it up perfectly from the outside.
I also opted for a ducktail to replace the OEM AERO II wing that was on the car. In case anyone was curious, I got about $3840 for my used headlights, wing, and front bumper. That did in fact help lessen the blow on the cost of the conversion kit. I chose Guards Red for the color, because it was going to cost me the same to get it re-sprayed in white, and of all the cars I've owned, I've never had a red one. I wanted to stick with an OEM Porsche color. White primer was used in order to make the color more vibrant. Using a darker color primer can make bright colors like red, seem more dull. Using a white primer really makes the final color brighter. As you can see from the pictures, the car wasn't stripped to the frame for the paint work. It's not a classic, and I'm not restoring it as an investment (obviously), so piece by piece, they're removing the parts and spraying as much as they can so that when fully re-assembled, none of the old color will be visible, unless of course you lift up the carpeting under the bonnet, or check under the engine lid. This doesn't bother me, because as I said before, it's not a tear-down-to-the-frame restoration.
Wiring the headlights and turn signals is a challenge, but since people have done it before, you can google it and find the wiring instructions for the conversion. I opted for an aftermarket HID kit because it saved me money over buying the OEM Xenon 997 headlights. If anyone has questions about the kit or install in general, that haven't already been answered here, feel free to ask. For those curious about how I dealt with the rear brake light (the ducktail comes with one, and the height of the ducktail essentially blocks the light in the OEM location), we simply filled in the place where the OEM brake light was, smoothing it over as if it never existed. As you can see below, I left the water-sock thing over my K&N filter, as I knew the car would probably sit outside in the rain/snow, possibly without an engine lid, not to mention the filter getting covered in all sorts of dust/over-spray.
Last edited by offshoreMM; 01-27-2013 at 03:45 AM.
 01-07-2013, 02:15 PM
#2
Looks great, I had no idea of the work involved with fiberglass add-ons. If the producers put the same explanations and disclaimers on their products like your explanations, they'd probably have less people complaining. But probably sell less kits too I guess.
Thanks for sharing!
Thanks for sharing!
01-07-2013, 02:27 PM
#3
Looks great, I had no idea of the work involved with fiberglass add-ons. If the producers put the same explanations and disclaimers on their products like your explanations, they'd probably have less people complaining. But probably sell less kits too I guess.
Thanks for sharing!
Thanks for sharing!
I would expect the parts to fit. It is not impossible for companies to sell fiberglass parts that fit well. Just my opinion of course.
 01-07-2013, 03:58 PM
#5
Intermediate
How many times when watching a classic car auction on TV, a car comes through with a high end restoration and the door is a different color than the body! Obviously painted a different day or time with a slightly different paint mix...glad to see yours in the booth at the same time!
01-07-2013, 04:17 PM
#6

I could understand if the parts were cheap to begin with, you sort of expect more prep and fabrication time. However at over $1500 for just the fenders, I would be concerned at any additional costs in labor(beyond basic prep) to fix any issues.
Thanks for the detailed post. It is definitely an eye opener for some people looking to take this on in the future.
Trending Topics
01-08-2013, 01:10 AM
#9
Intermediate
Thread Starter
I would expect the parts to fit. It is not impossible for companies to sell fiberglass parts that fit well. Just my opinion of course.
For example, a small, rigid thing like an engine lid SHOULD fit pretty well. It's solid, with no room to flex as it dries. Furthermore, being small, you can construct a jig for it, and pre-drill the holes for customers and even test fit it before selling it to a customer. I have no doubt that my ducktail wing was constructed in this fashion, and tested on a jig prior to being sold.
For large parts like bumpers and fenders, the construction of a jig is going to be more difficult, especially since it needs to be more three dimensional. When you have an entire front end of very heavy fiberglass parts, and you imagine trying to build a jig that will hold all of the parts simultaneously, it's a nightmare.
Therefor, for a kit that HASN'T been test fit, I think it's reasonable to pay the current market price (what you see on ebay etc). But for a kit that has been tested for fitment, with all holes pre-drilled, I'd personally expect to pay several thousand dollars more for it. Remember, you're paying for the time, effort, as well as a little of the material, all mixed in with the subjective value of the goods placed by the seller. If the seller has to go through all the trouble of building jigs and test fitting all of these large and heavy parts, then the prices are going to soar to much higher than what you see now.
For example, if you look at authentic Gemballa parts, or really high quality parts that are made in Japan, these are ALL test fit on a jig prior to sale, and are mostly free of scratches and pinholes, etc. The downside is that for a single fiberglass 996 front bumper for example, you're going to pay about $4400-$5000 USD, which is more than my entire kit cost, even after shipping. You have to pay for quality. Look at the price of an all metal front end conversion with an OEM Porsche front bumper. Guaranteed to fit perfectly, at double, triple the cost of a fiberglass front end.
Last edited by offshoreMM; 01-27-2013 at 04:28 AM.
01-08-2013, 03:04 AM
#10
Fair enough, I guess it all comes down to cost. Your car is looking good we need more pics!
Having worked with, produced, and constructed molds for fiberglass parts, Id' have to say that it's relative to the price, as well as the size of the part.
For example, a small, rigid thing like an engine lid SHOULD fit pretty well. It's solid, with no room to flex as it dries. Furthermore, being small, you can construct a jig for it, and pre-drill the holes for customers and even test fit it before selling it to a customer. I have no doubt that my duckbill wing was constructed in this fashion, and tested on a jig prior to being sold.
For large parts like bumpers and fenders, the construction of a jig is going to be more difficult, especially since it needs to be more three dimensional. When you have an entire front end of very heavy fiberglass parts, and you imagine trying to build a jig that will hold all of the parts simultaneously, it's a nightmare.
Therefor, for a kit that HASN'T been test fit, I think it's reasonable to pay the current market price (what you see on ebay etc). But for a kit that has been tested for fitment, with all holes pre-drilled, I'd personally expect to pay several thousand dollars more for it. Remember, you're paying for the time, effort, as well as a little of the material, all mixed in with the subjective value of the goods placed by the seller. If the seller has to go through all the trouble of building jigs and test fitting all of these large and heavy parts, then the prices are going to soar to much higher than what you see now.
For example, if you look at authentic Gemballa parts, or really high quality parts that are made in Japan, these are ALL test fit on a jig prior to sale, and are mostly free of scratches and pinholes, etc. The downside is that for a single fiberglass 996 front bumper for example, you're going to pay about $4400-$5000 USD, which is more than my entire kit cost, even after shipping. You have to pay for quality. Look at the price of an all metal front end conversion with an OEM Porsche front bumper. Guaranteed to fit perfectly, at double, triple the cost of a fiberglass front end.
01-08-2013, 10:35 AM
#14
This. I don't see a front end conversion cost justified in the eyes of most 996 owners as the cost could rival that of 997 territory. Btw, good to great fitting frp parts don't always have to be expensive, it's just that the cheaper ones are sort of like playing Russian Roulette.
