When you click on links to various merchants on this site and make a purchase, this can result in this site earning a commission. Affiliate programs and affiliations include, but are not limited to, the eBay Partner Network.
If you think you can get the access you need by removing the underside plastic, that's really easy to do - just a few torx head screws - maybe 8-10. Just keep straight which ones go where as some are flush on the underside of the head and others have a shoulder. The ones with the shoulder go into the larger holes and allow the screws to be tightened while not pinching the plastic tight so it can move a little.
Front bumper removal is a lot more work - headlights come out, turn signals come out, inner fender liners come out, then you have to slide the pinch-clips sideways to free the front of it - as you can tell I've done this a few times.
I would first just remove the belly pan and see if you need to go any further after that.
I put the loose trim back in and tried to manually re-attach it. The issue: How in the world do I get my hands behind the trim piece?
Seems like I can't come above from the trunk. Everything below is protected with underbody panels. So I can't push the piece into place.
Also I think I will attempt to fix the tabs first with some plastic and Q-bond. And then attempt to re-attach trim. Not the most glamorous project ever, but will bug me until suitably fixed.
Would really appreciate ideas on how to get leverage on the trim piece in this location... I must be missing something?!
I'm lazy, so I tried to think of ways to avoid jacking the car up, taking the bumper off, and so on, just to install this trim piece. All of this is done from the the front of the car, with all panels intact and the trunk lid closed.
I used two or three pairs of long nylon "zip-ties", tied to each other, creating strong flexible loops which I looped behind the center trim piece and pulled through the center opening. The nylon is flexible and thin, so it lays flat through the joint overlap between the bumper and the trim piece.
Once the trim piece is positioned to engage the bumper's edge tabs, and kneeling down in front of the car, firmly pull the looped zip-ties and the trim piece with them up tight to the opening frame and "snap" the piece into place.
Afterwards, cut the zip-ties close to the joint, push the loose "ends" through the joint into the cavity, and either fish them out by hand through the gaps between underbody panels, or them slide out on their own through that same gap.
Ok I think I have a DIY plan of attack for fixing the loose center trim in front bumper (997.1).
But first: What is up with Porsche?! Sometimes their design decisions are perplexing. The tabs securing this trim piece are weak, poorly conceived. Checked my wife's 1-series. No issues, rock solid. Same even with my other P-car... the Prius. Seems like small rash with curb flexes the plastic and breaks the tabs.
Some stats:
There are 10 tabs in all holding the mysterious trim in place (on main bumper cover). 4 on top. 6 along bottom. On mine, only 3 are still intact. 2 are broken and still have "chad" hanging (ha). The remaining 5 are completely broken. The trim piece itself is perfect condition (though needs good cleaning).
So my plan is to first fix the tabs so the trim has something to snap into.
Per Petza914, I'm going to try some Q-bond to bond the plastic. I may use plastic bids found in a model set (the ones that hold all the pieces in place) to cut some custom tabs and bond those with the Q-bond.
When that's done, I'm going the 06_Black_C4S trick: Zip-ties!
Going to then follow his great idea and pull the trim piece into the tabs to, hopefully, fasten once and for all.
Removing the bumper would be best, no doubt. But I'm not up for that much challenge quite yet. And I want to avoid costly repair just for a simple piece of trim.
As all us old 997 drivers know, the front ends are vulnerable to poorly built road intersections with serious dips in them. The front end really takes a hit over time from all of those encounters. I elected to buy a special APS skid-plate from Performance Products many years ago.
I also added several additional mounting bolts than came in the kit. It helps to dampen the damage. It's my sacrificial skid plate. It helps to keep that central piece from having tabs torn out of it, ultimately failing.
I have no idea whether Performance Products still makes that thing but it was worth it's weight in Platinum to me!
Skid plate. Never heard of that. Thanks for the tip. Great idea.
In my 997 I'm oh-so-aware, as I'm sure others are too, of every little irregularity in the road, speed bumps, driveways, etc. I've learned to approach low-speed entries/exits with a paranoid 20-30 degree angle.
One other thing to consider before executing "the plan" is replacing the so-called "spoiler" on the underside of the 997.1's front bumper, if it's missing.
Mine was missing. I decided to replace it because I figure that Porsche put it there to serve some intelligent aerodynamic purpose, although clearly, it's the first thing to get torn off when you scrape the car's nose hard enough.
This OEM part is a flexible linear rubber spoiler or lip which mounts to the underside of the bumper about 6" - 8" back from the bumper's lower leading edge by means of a series of tabs which lock into matching holes.
You can see this part in Edgy01's cross-referenced post's photos of the skid plate. You can find it in the Porsche official 997.1 Katalog.
The part number is 997 505 557 01C. I ordered mine from Suncoast.
This part really cannot be installed properly unless you have full access to the center cavity. That's because the part's rubber tabs need to be pulled into their "locked" positions by hand. You cannot push the tabs into locked position from underneath by hand.
This means that, in terms of work sequence, the spoiler's installation needs to happen before the center trim piece is installed.
After installing the part conventionally, I siliconed-caulked the tab tops to the bumper from inside the cavity, as well as the exposed joint between the two parts (bumper and spoiler). The idea is to flexibly bond the parts, in addition to the factory's mechanical fastening method.
So far, that spoiler piece is still in place after a year of use, but it takes much care to prevent it from getting ripped off.
For example, whenever I go over a dip in a driveway apron, or whatever, I roll down the window. I can hear the spoiler rubbing pavement. After every drive, I check to make sure it's still there.
(BTW, Performance Automotion no longer sells the skid plate).
Last edited by 06_Black_C4S; 10-23-2014 at 01:39 PM.
Reason: display error
Hi shoot2score67:
One other thing to consider before executing "the plan" is replacing the so-called "spoiler" on the underside of the 997.1's front bumper, if it's missing.
Done. Hat tip! Big time. Just ordered the spoiler. Will install it first, as you recommend. So thankful you let me know about that, otherwise I would have had to undo the center trim frame bit (a project we were on the verge of tackling this weekend after ordering the Q Bond) to access the tabs.
Sure enough. I looked underneath the front bumper, and the (tiny) spoiler was not there. Part only cost about $80. And, yes, I'm like you - if it's good enough for Porsche, then it's most definitely good enough for me. I want my car spec, it must be ... said with TopGear Brit (or should that be German?) accent... "sorted". So I want that spoiler in there, even if no one can see it except for curbs and driveway aprons!
I plan to also use some caulk as you did. Any tips on what kind?
I'll update this thread with photos & updates on this most exciting endeavor.
You are going through almost as much trouble to do that DIY band-aid fix as adding the center radiator. Did you know the parts for the center radiator are only $211? It takes a shop an hour to install. It took me about 2 hours.
My .02...
Since my car is black, I used "black" GE Silicone II, purchased from Home Depot. "Clear" would work, of course, for any other car color. This is an area no one sees anyway.
Make sure by inspecting the silicone caulk tube's fine print that its "use by date" hasn't expired.
Expired silicone caulk won't cure and cleaning it up after you've carefully applied it is a time-consuming mess. Don't ask how I know that.
As for installing a center radiator, my car is located in the Great Lakes region, so for me, it's a solution to a problem that doesn't exist.
Last edited by 06_Black_C4S; 10-24-2014 at 12:08 PM.
Reason: punctuation
Just get the trim for the third radiator kit. It's a hollow border so you can grab it. Glue that thing to the opening, so at leaf will look finished piece. Paint the inside with a black spray can, so you can minimize the contrast of the AC tubes to flat black. Done.
No need to remove the bumper.
The other solution is to glue the edge, place some tiny screws on the trim and use pliers to pull the piece to the front.
Front bumper underside spoiler arrived from Pelican.
Have all parts + Q-bond.
Interesting advice regarding 3rd rad, investigating possibility - still leaning though towards stock.
Thanks all!
Since my car is black, I used "black" GE Silicone II, purchased from Home Depot. "Clear" would work, of course, for any other car color. This is an area no one sees anyway.
Make sure by inspecting the silicone caulk tube's fine print that its "use by date" hasn't expired.
Expired silicone caulk won't cure and cleaning it up after you've carefully applied it is a time-consuming mess. Don't ask how I know that.
As for installing a center radiator, my car is located in the Great Lakes region, so for me, it's a solution to a problem that doesn't exist.
Perfect thanks, I'll go with clear.
Yep, unfortunately know first hand the pain of dealing with bad caulk -- either expired or tube punctured. Created havoc with a DIY project. Required many Stellas to keep my mindset in order.
Just get the trim for the third radiator kit. It's a hollow border so you can grab it. Glue that thing to the opening, so at leaf will look finished piece. Paint the inside with a black spray can, so you can minimize the contrast of the AC tubes to flat black. Done.
No need to remove the bumper.
The other solution is to glue the edge, place some tiny screws on the trim and use pliers to pull the piece to the front.
Thanks for tip! Curious if your 997 avatar has the 3rd rad/trim you're describing? Would love to see some photos.
Clint
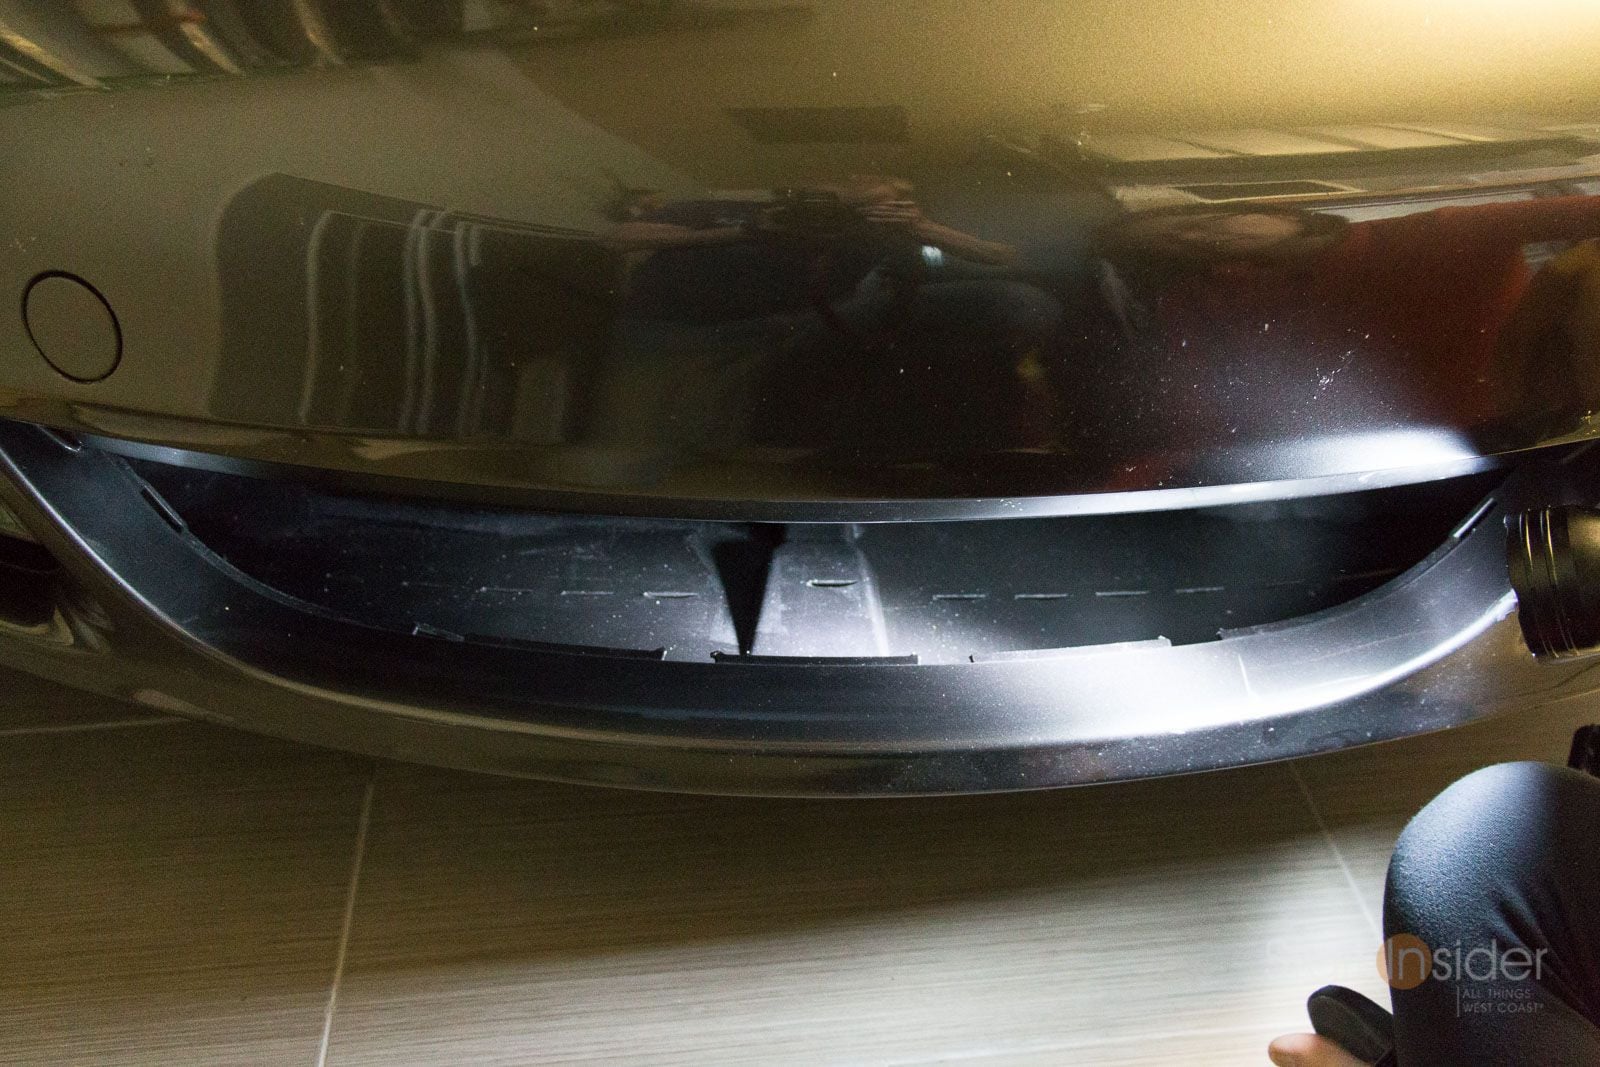
Another weekend, another step forward on refurbing front bumper trim and spoiler.
My 997.1 was missing small spoiler underneath front bumper. Ordered part. And had my Loni do the honors of installing.
It definitely wasn't plug and play as I was anticipating. But I suspect it was slightly easier than dropping the engine.
The tabs need to be cajoled into the slots. You need to wiggle them, pull and bend them (slightly). Sweet talking might work. ymmv.
Finally we did get the piece into place. The slots in the bumper are wider than the tabs themselves. We started on LEFT side. Got all of the tabs in place. Then slid the entire spoiler to the RIGHT (towards the driver's side). That seemed to lock it in place - as best as can be "locked".
Now per 06_Black_C4S will caulk. Don't have any clear stuff at home so need to make Lowes run.
Once this piece is finished, we will then tackle getting that center trim piece back in place.
Photos...
PS - those who get queasy at the sight of curb rash may want to look away (note: that was previous owners... but I know it's near impossible not to get some)

 10-22-2014, 12:01 AM