When you click on links to various merchants on this site and make a purchase, this can result in this site earning a commission. Affiliate programs and affiliations include, but are not limited to, the eBay Partner Network.
Cayenne VR6 Transsyberia Look Alike Off Road Build
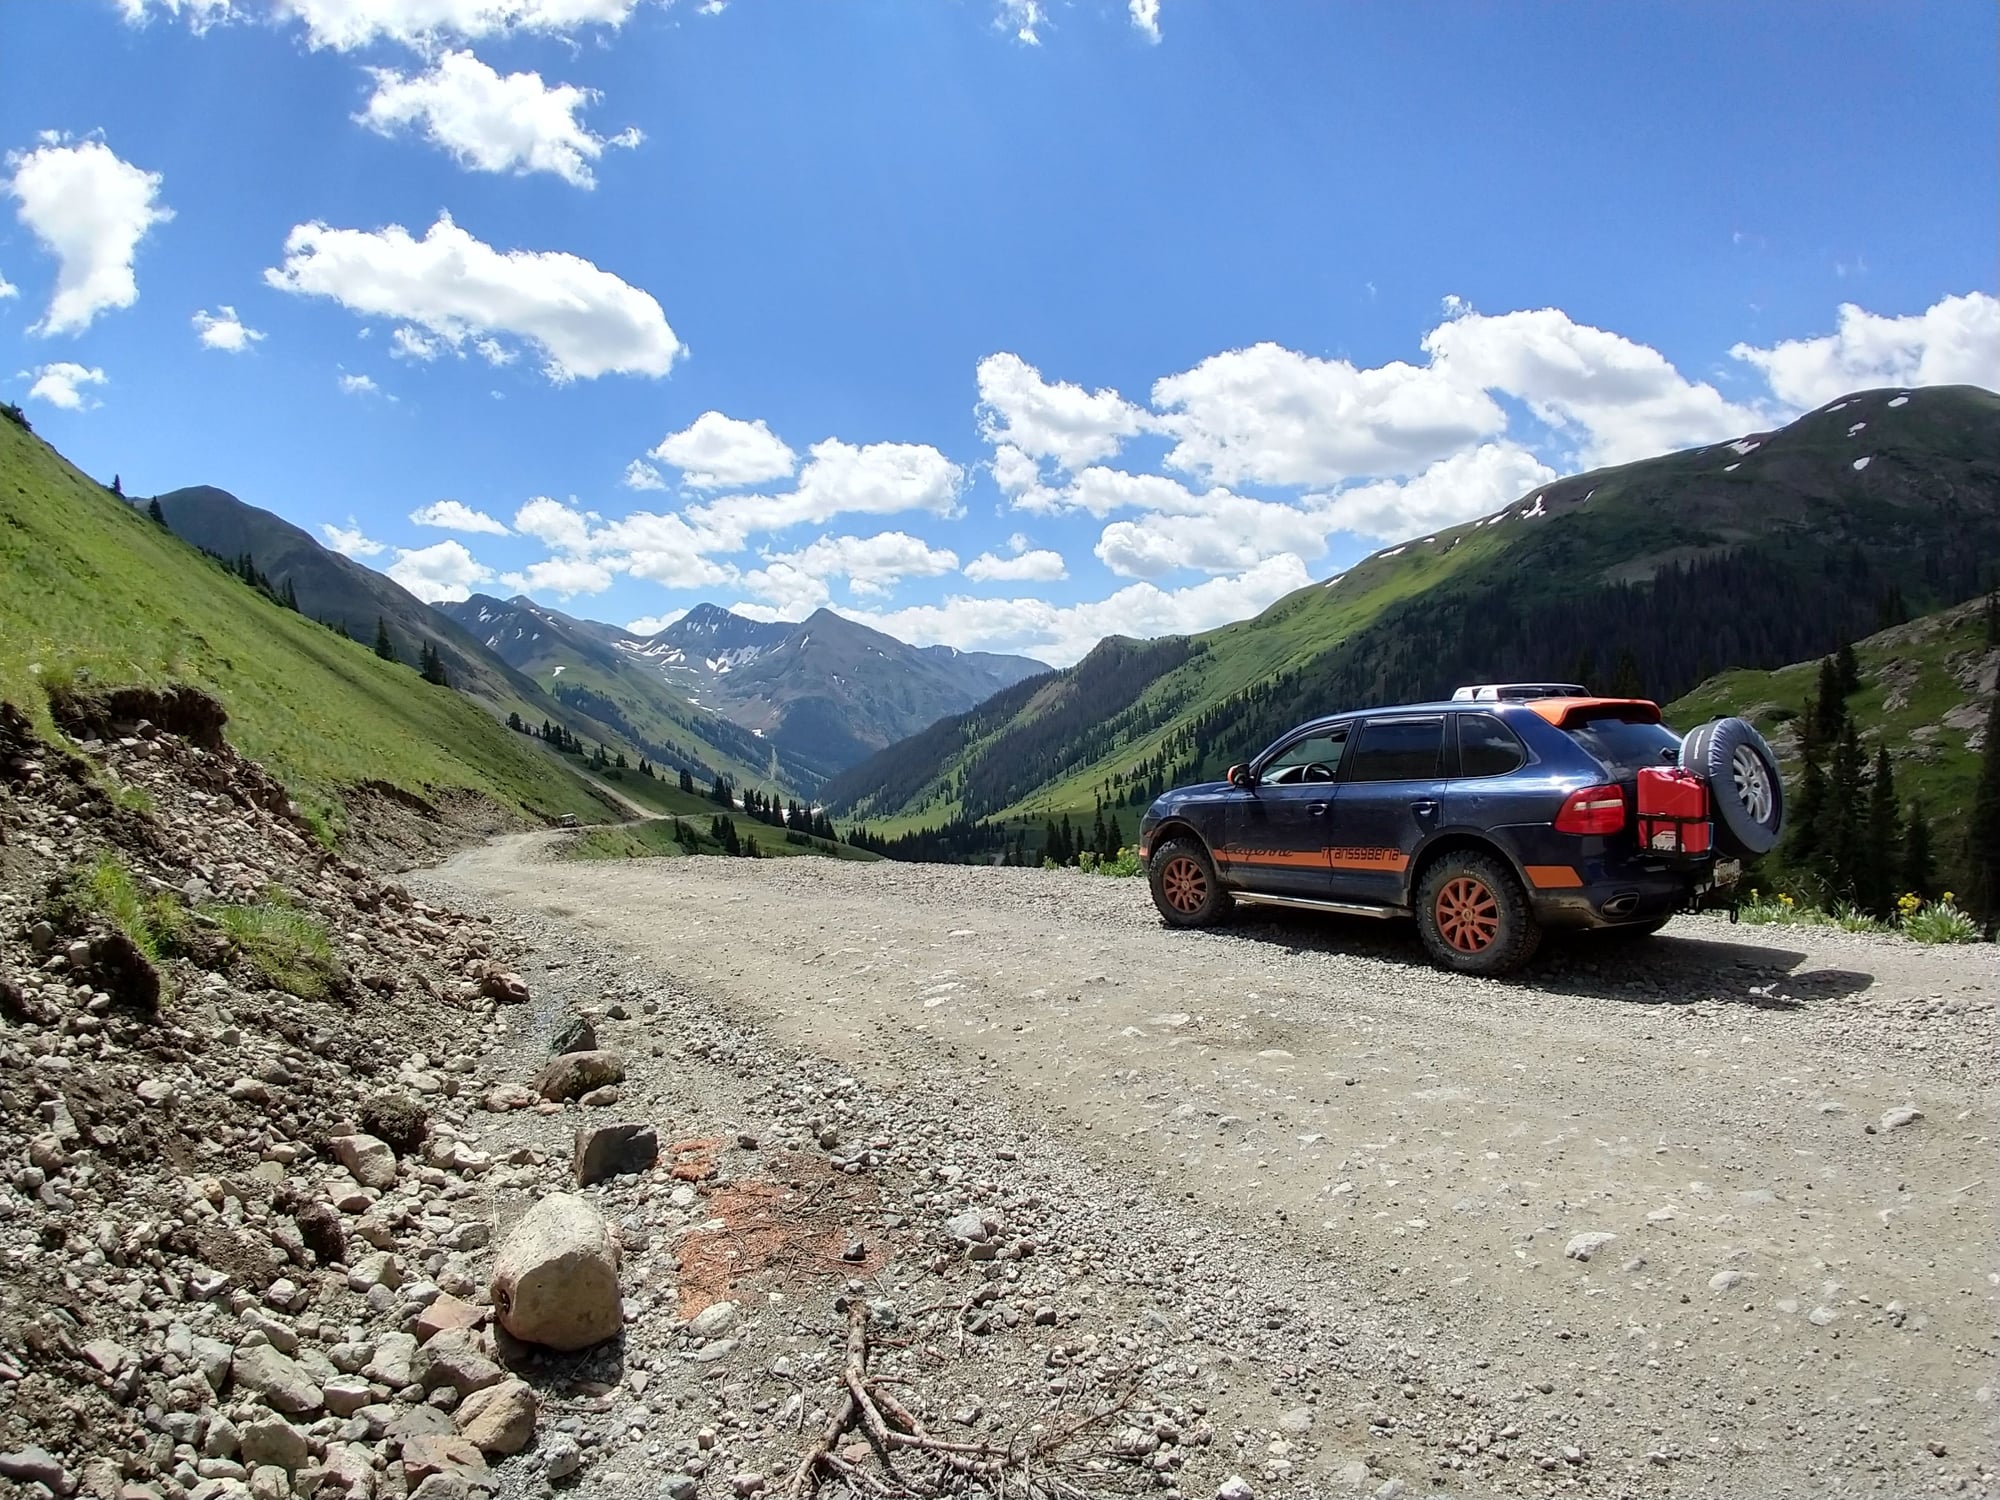
I just got back from 12 day cross country trip from east coast to Colorado and Utah. Did tons of off road trails and camping. This is just a teaser for now since I just got home tonight and need to take care of some things first. Will post details about the build and trip soon.
Anyway, when I got the car initially 8 months ago, this is how it looked. Then, after countless hours of labor and $$$, it looks like this now.
Used hitch mount spare tire carrier from CL. Added jerry can holder after creating custom brackets and custom wiring for license plate light and wireless backup camera
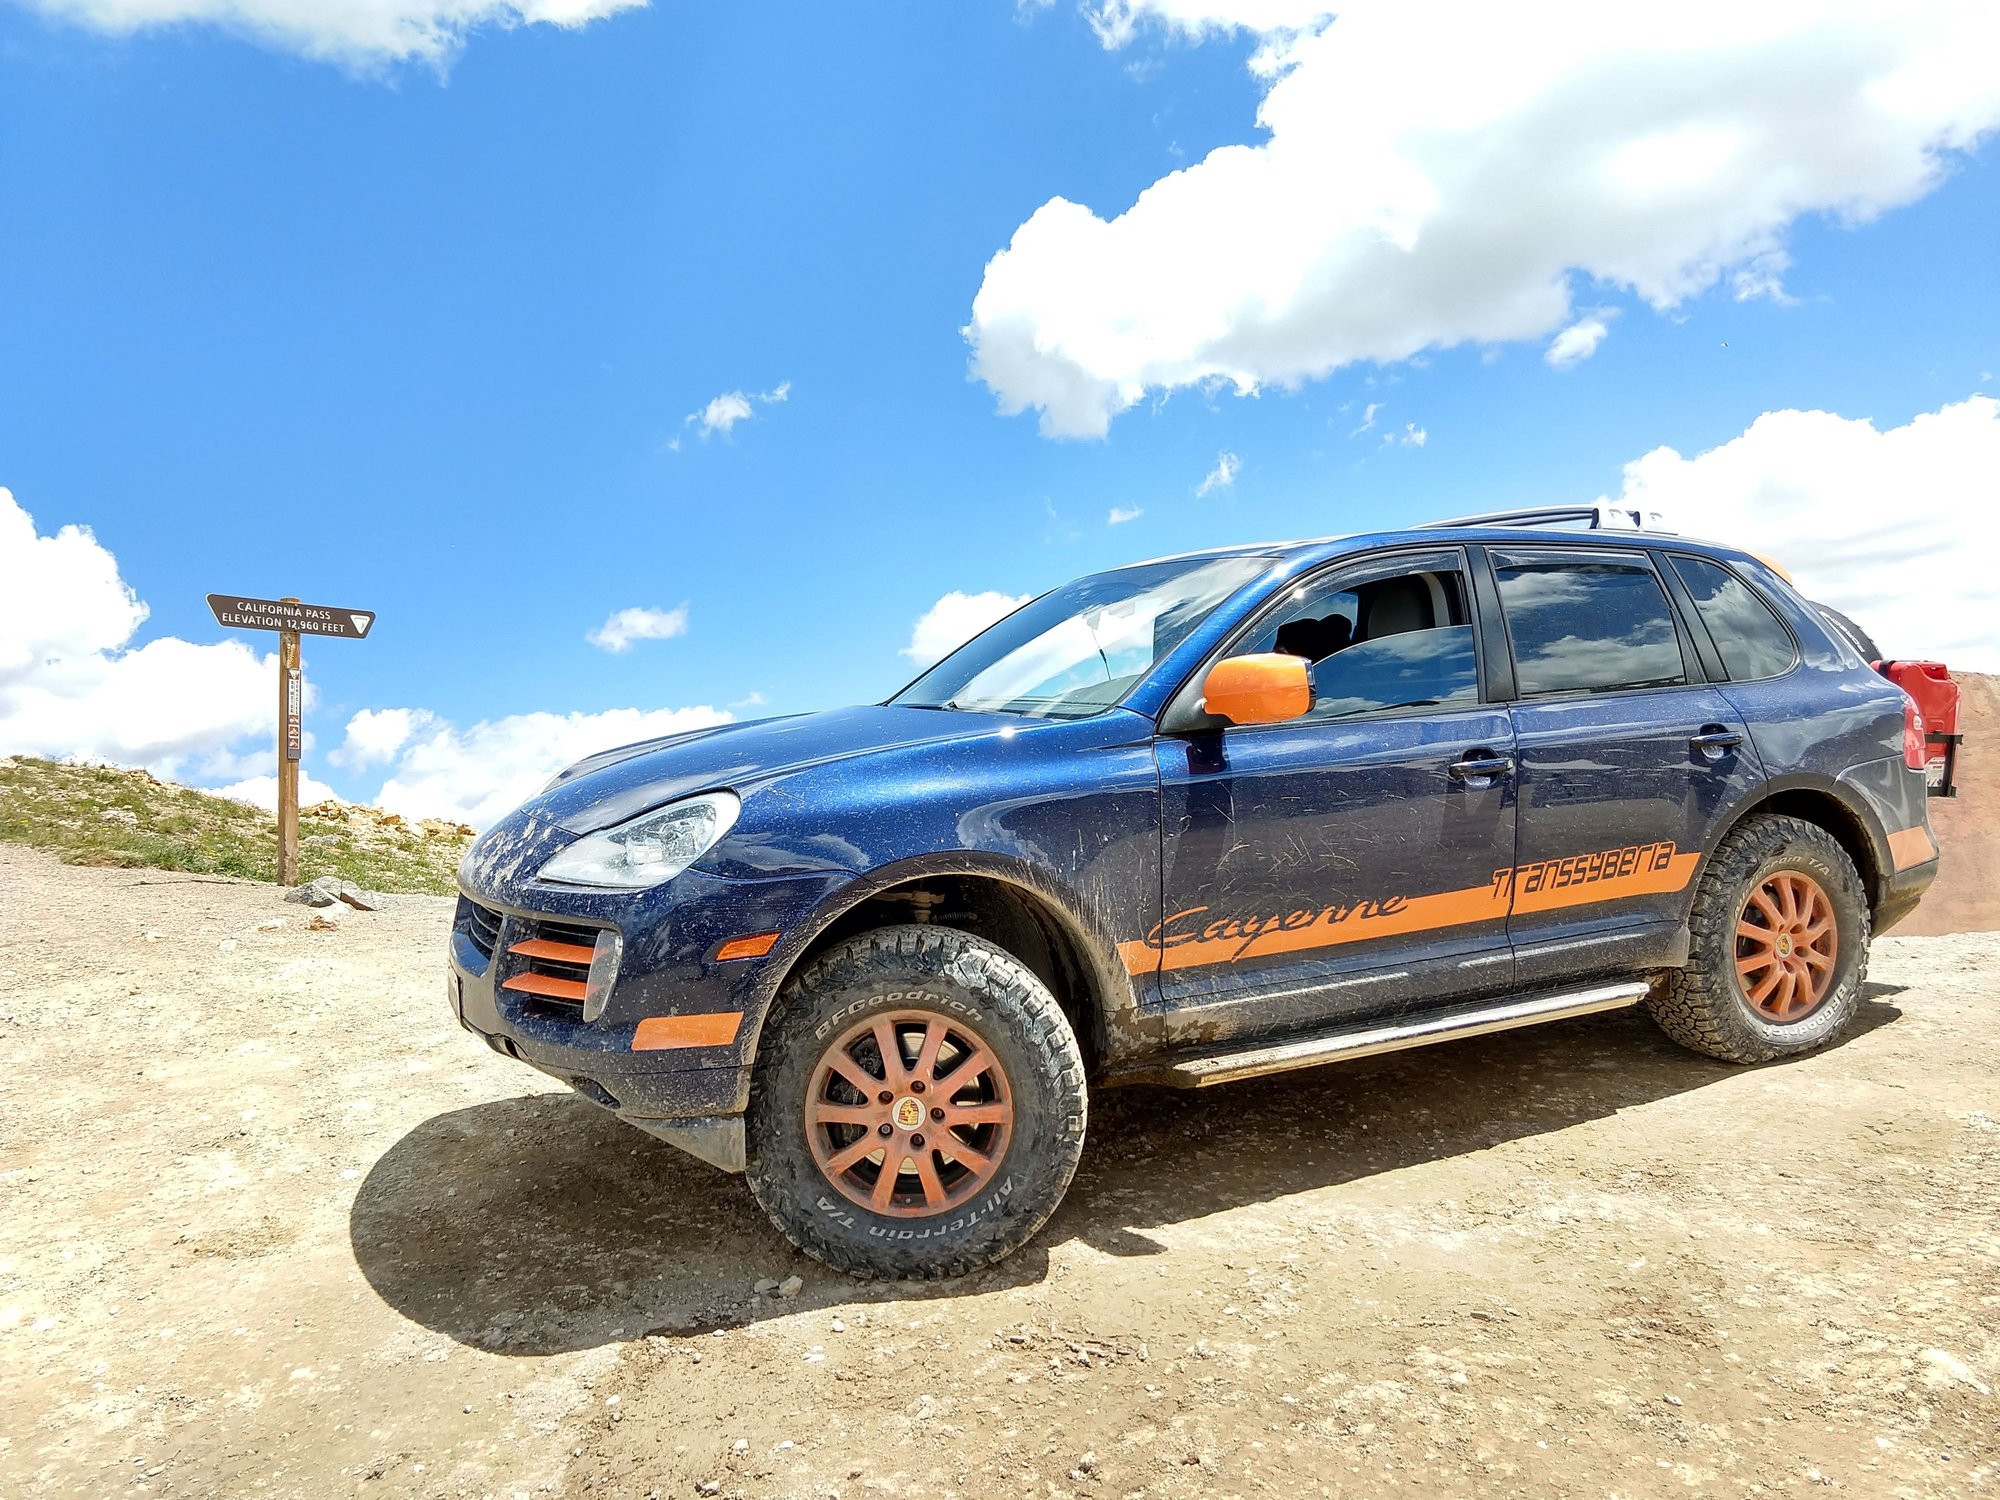
3M 1080 Gloss Burnt Orange on Front Grill slats and rear spoiler, Painted wheels and Mirror Covers using paint from https://www.automotivetouchup.com/. Paint color code: 8C6.
I've just realized I really want a Cayenne Diesel modded like a Trans Siberia. A fuel efficient awesome adventure vehicle! I really want to know how you did the carrier in the back.
It was a trip I had planned over several months in advance, to give enough time to prep the car and plan the route.
Not affiliated or sponsored by any links listed below.
Car specs: 2009 Cayenne V6 with Manual Transmission, Marine Blue Metallic with Grey sport seats.
Car Prep:
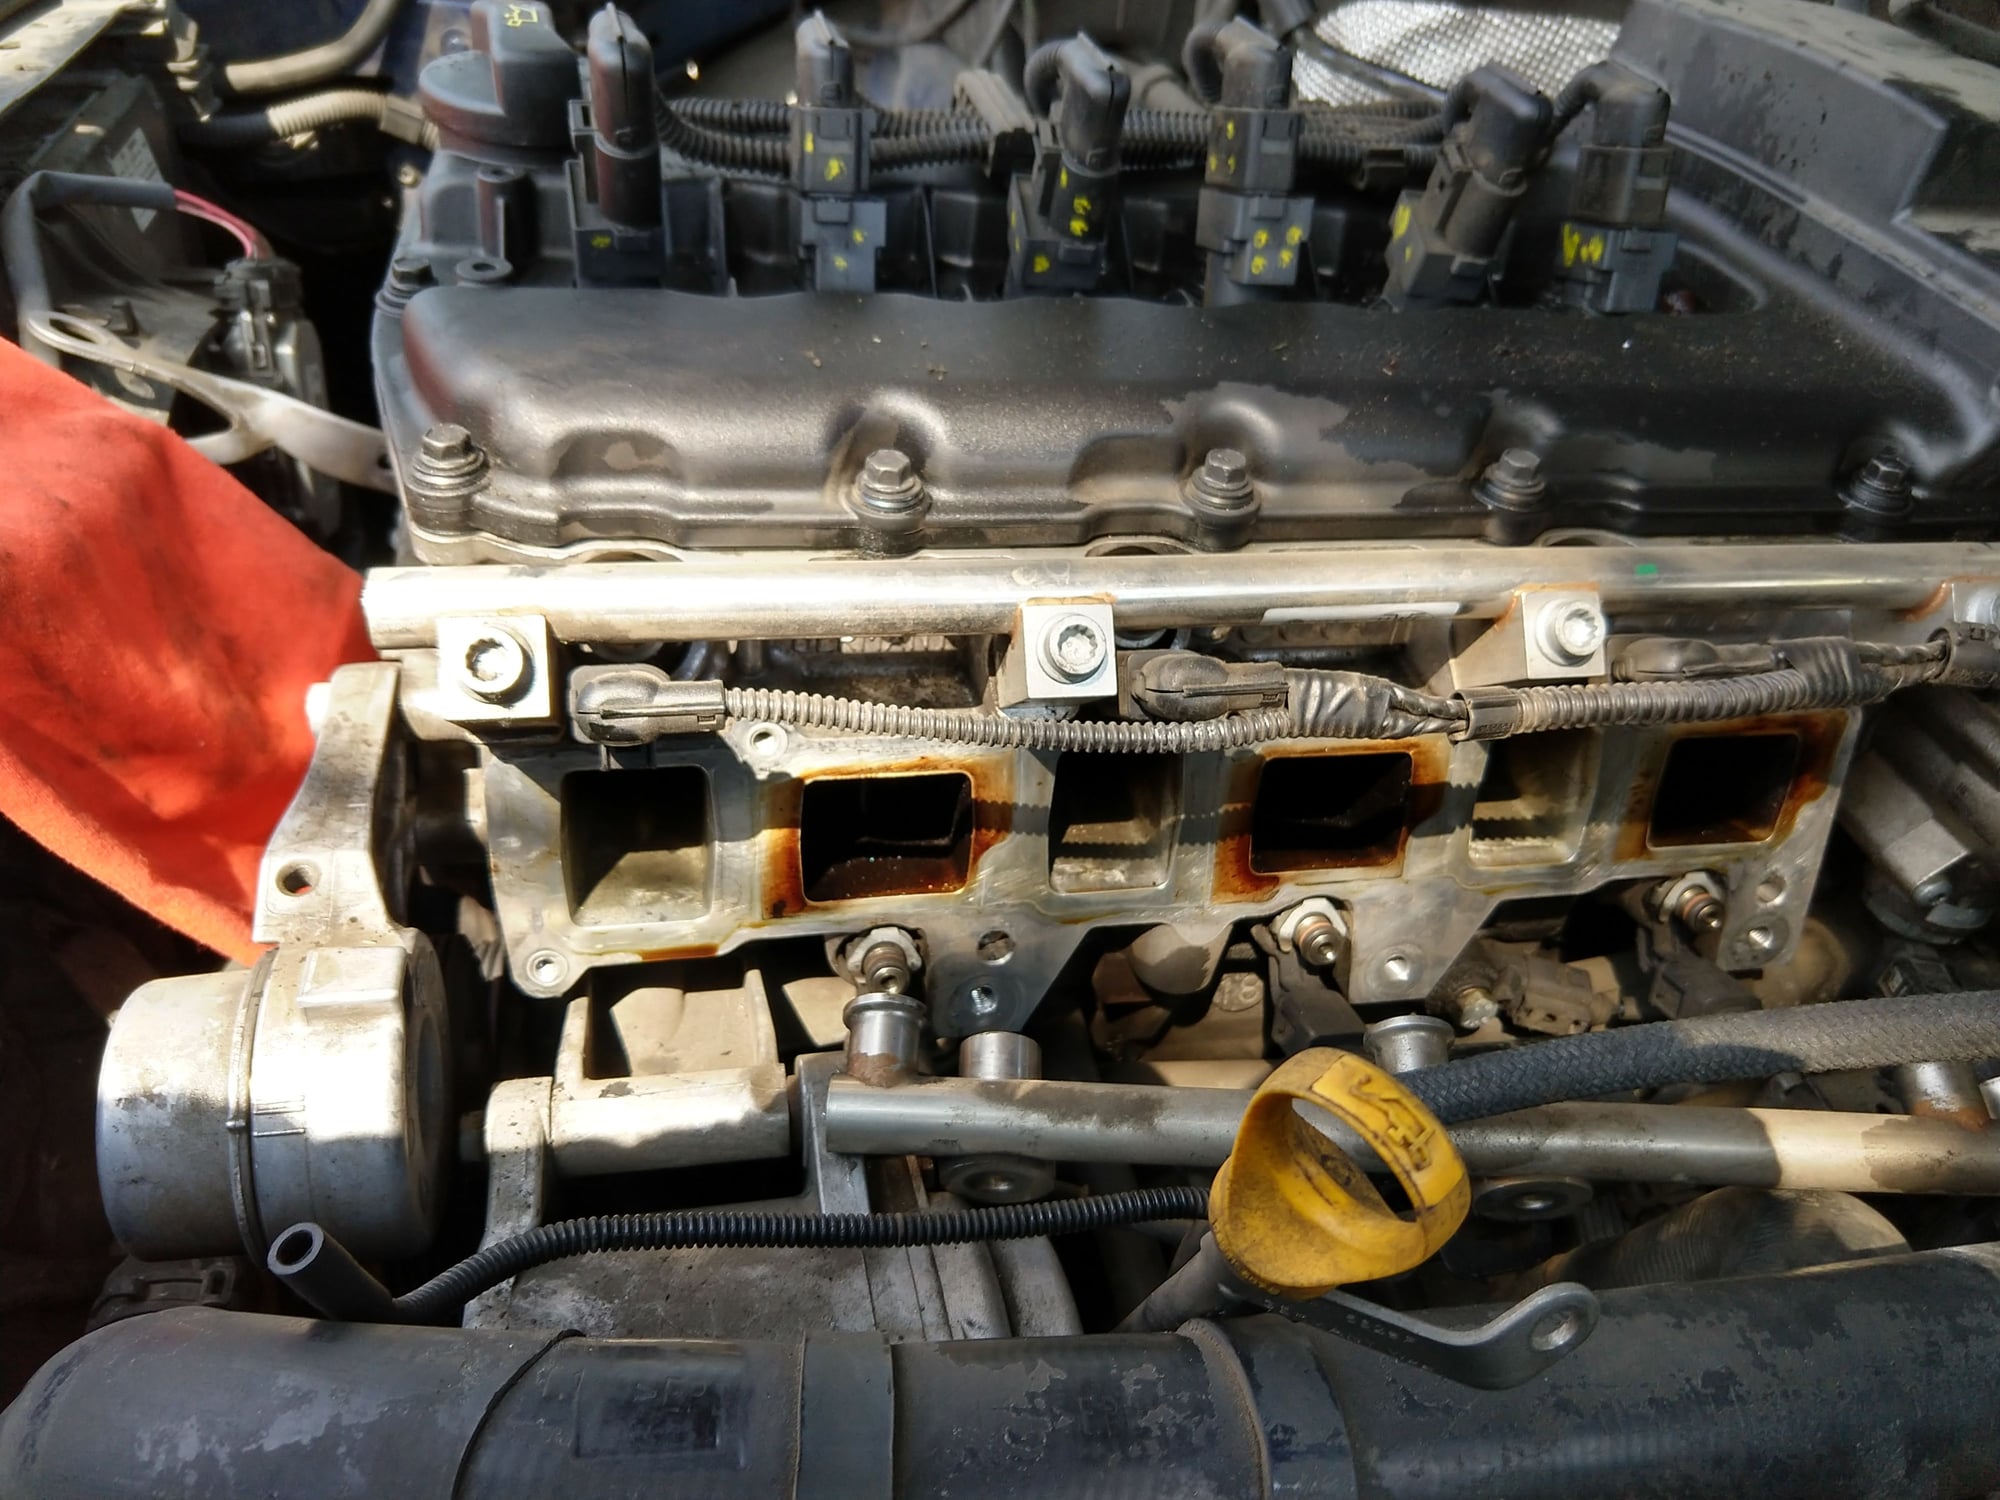
Took care of all the maintenance and repairs first. (All the fluids and filters, brake pads, horn speakers, spark plugs, pcv membrane, intake gaskets, valve cover gasket, t-stat, hatch struts, and whatnot)
Removing/reinstalling intake manifold was probably one of the most frustrating DIY jobs I've ever done. All because of that fuel rail. Took me like 2 full days.
Horn low speaker was kaput, so I found a bargain priced direct fit horn speakers:
They've been on the car for 6+ months and work fine. Only $20 for a pair and they sound slightly better than stock.
Headlights were dim, so I replaced the bulbs with these D1S Philips 85415XV2 XtremeVision (4800K) https://www.xenondepot.com/D1S-phili...85415xv2c1.htm
This made driving at night a lot better since my old bulbs were probably at the end of their usable life.
Led bulbs in certain areas to modernize the look (rear cargo area, mirror bulbs, door lights, front parking lights). Interior dome and footwell lights stayed the same as I disliked bright white light.
Car came with roof rails but since Cayenne Rally cars had the cross bars with lights, I bought and installed roof transport system cross bars. Eventually I'll install some lights if I can find some that looks like the ones in rally car.
Bought OEM running boards for few hundred bucks on CL. I was surprised the amount of protection it provides and how beefy they were. Installed them with new hardware.
If your Xenon Bulb is dim and looks like it's burnt in the middle, it's probably a time to replace them
Got the vinyl decals from http://www.acromann.com/ 3M 1080 Gloss Burnt Orange on Front Grill slats and rear spoiler, wrapped them myself. Painted wheels and Mirror Covers using paint from https://www.automotivetouchup.com/. Paint color code: 8C6. Thank you @garrett376 for your help with paint and vinyl color.
Installed Suntek PPF film before installing vinyl stickers. Film is installed only on sides (door and fenders) to protect it from brushing against tree branches in tight trails. The first time I was off roading I scratched up sides and took me a whole weekend to do a paint correction. This is what prompted me to put paint protection film. Hood and Front bumper was already chipped enough so I skipped putting PPF on it. Don't like Suntek as much as I it started to peel in certain places after driving in hard rain. Going to ask if it is covered by warranty. Never had the same issue with Xpel film.
Anyway, just for comparison purposes, check out how current gen 4Runner looks next to my Cayenne
Last edited by Petrolhead_007; 08-20-2019 at 12:19 PM.
Is the spare tire on the original T painted orange to match the others or silver, like yours.
Spare wheel supposed to be orange as well but I ran out of paint. I'll eventually paint the spare wheel in the future, if I have time.
Originally Posted by NelaK
I've just realized I really want a Cayenne Diesel modded like a Trans Siberia. A fuel efficient awesome adventure vehicle! I really want to know how you did the carrier in the back.
Got a used hitch mount spare tire carrier from CL, and added jerry can holder after creating custom brackets. Didn't have a brand name but it was cheap. Will post detailed pics soon.
Spare tire carrier tilts down 45 degrees if I need to open the rear hatch but I can still open rear glass without an issue. Also, the license plate is now relocated to under spare tire and I used trailer wiring to illuminate the license plate and for powering wireless rear camera.
You are so lucky to find those running boards for a few hundred bucks. I spent more than that for shipping alone for the parts when I bought a set new.
You are so lucky to find those running boards for a few hundred bucks. I spent more than that for shipping alone for the parts when I bought a set new.
What is the lift kit you used?
Keep posting pics from your adventures!
Originally Posted by 95_993
Looks great. What did you do for a lift kit?
Well, the finding a lift kit was an adventure by itself.
I've spent weeks searching the net for a lift kit. Some options were Seikel full kit for treg was 3K and BUT it was no longer produced.
Individual named Alex from the land down under was making aluminum spring pads but that had it's own disadvantages which I didn't want to deal with.
I was ready to give up and started looking for GTS Cayennes so I can get air suspension, but somehow some guy from Russia starts selling kit I was looking for. It magically shows up in my ebay recommended list.
So I order it right away and even pay for express shipping. https://www.ebay.com/str/RisingTuning -ebay store for lift kit, they sell for both 955/957 and 958
actual listing: https://www.ebay.com/itm/Lift-Kit-fo...QAAOSwaNRcx2GF
In the meantime, I look thru parts diagrams and also order heavy duty springs 955-343-533-81-504, 955-333-531-11-504 in order to deal with extra weight that I will be adding for camping/ off road. These get to me in about 2 weeks, since they had to come from Germany.
Then there comes the wait for lift kit to arrive from Russia. It somehow gets held up somewhere along the route (probably in customs), and I wait 2 months but still no luck. Seller was nice enough to send me a second one so that in case if both arrive, I would reject one and it would just get sent back.
Anyway, somehow magically about a week later the package arrives with the lift kit. I was lucky that there is a DIY garage about 1.5 hour from me that lets you rent a lift and use their tools. I don't think I would've been able to do it outside in the parking lot by myself.
So I start with rear right, use this nice spring compressor and air tools to replace the spring and started replacing bolts on the upper plate with longer ones. Immediately I notice the new bolts doesn't fit, as the ones came in the kit were bigger. (the seller was notified and actually had the correct ones in the second package)
So I end up using the regular M8 bolts instead since I needed to finish install and didn't find specially ribbed head bolts in the size I needed anywhere on the web.
After strut assembly was ready I had to have the mechanic push the hub all the way down while I installed the lower bolt on the strut. This is necessary since spacer makes the whole assembly longer and you need to push the hub all the way down to be able to install.
Fronts spacer install is much easier if you're not changing the spring, since it doesn't require removing the coil spring. However, fronts are still time intensive as you still need to remove the strut assembly in order to do it. Having air tools and a mechanic nearby definitely helped.
My initial impression after the new heavy duty springs and spacer was like "wow holy f I might have ruined the ride" since the ride became too stiff for my liking. But it was too late to change it now and I needed to leave for my trip soon. Besides, new springs needed the time to settle in and actually became much more tolerable now. If I had to do it again I would probably not change the springs, I would just install spacers itself. At least the body roll is reduced which is a plus since it compensates somewhat for the handling deficiency created by higher ride height.
Even with stiffer springs I had a decent off road ride quality, since I was running 20 psi on trails.
Last edited by Petrolhead_007; 08-28-2019 at 09:00 PM.
Reason: added the pic for lift kit installed on a car
Fantastic build - love it. I think you are the first of many that will do this. Keep us posted with your exploits. Lots of us doing offroad in these cars now.
Fantastic build - love it. I think you are the first of many that will do this. Keep us posted with your exploits. Lots of us doing offroad in these cars now.
thank you!
You are an inspiration as well, since I follow your cayennegtsoffroad on fb and it is always nice to see your adventures.

 08-19-2019, 02:04 AM