When you click on links to various merchants on this site and make a purchase, this can result in this site earning a commission. Affiliate programs and affiliations include, but are not limited to, the eBay Partner Network.
How to tap into rearview mirror power for radar detector power?
Hi All,
I have a wiretap direct wiring harness from blendmount for my radar detector. I was able to dissasemble the rearview mirror housing assembly today without destroying anything, however, I was unable to figure out which pins to use for the wiring harness. Do any of you have any schematics or diagrams showing known pins and the ground? I'm sure some of you have done this. Thanks!
So I took the plunge and hard wired my V1 Gen 2 using a mirror tap this weekend overall it was fairly easy to do but I always get a little nervous as the force it take to remove some trim pieces in this car. The guides posted above in the thread didn't help that much except that tap black to brown wire and look for a blue wire. With that being said below are my observations and what worked for me:
1: You need a set of plastic trim removal tool
2: Get a mirror tap kit that has different tap sizes (I ended up using two different sizes). I used the Radar Mount brand from Amazon (PN#: 4005201V for the V1) There are a few of these for the V1, not all have different connection sizes. This was 1/2 the price of the other brand, thought I would give it a shot to save $20 and it worked.
3: You don't need to remove the dome light. Don't even try to do that via the video link in this thread, it won't come out of the clips, I felt too much force was being applied.
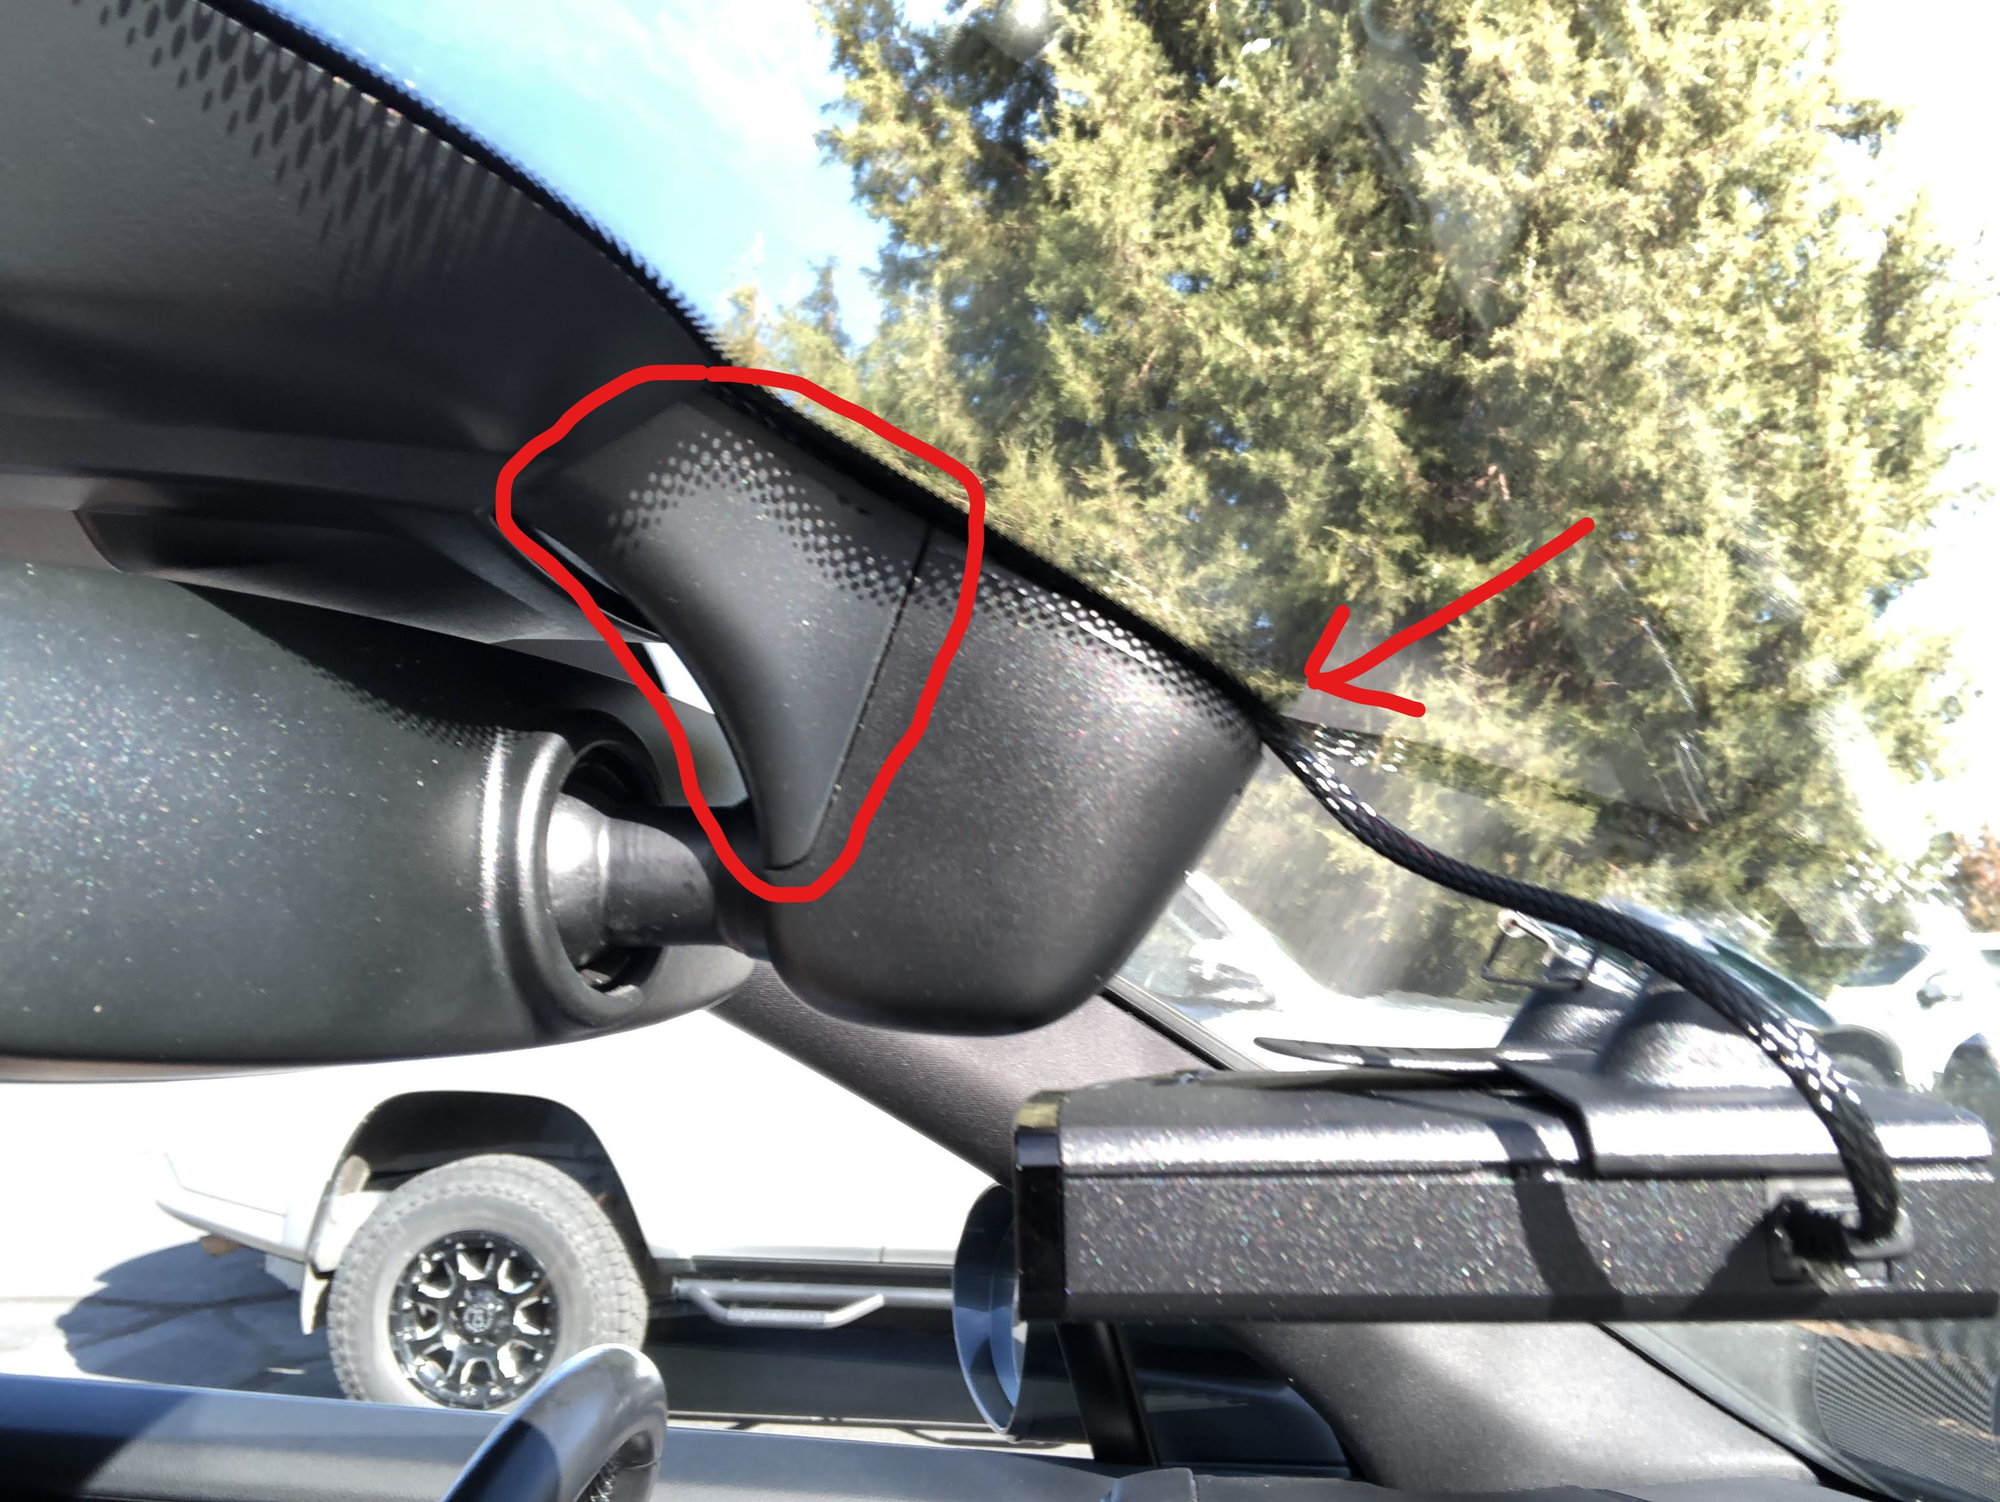
4: Start by removing the plastic trim right above the mirror, the one that houses the Passenger Airbag Light (see first pic below)
a: It took some force to remove. Just use a trim tool and work from the left side against the windshield over to the right. There are a lot of little bits that help keep it attached. You will have to slide it forward to the windshield to drop it down, at times I thought I broke it (maybe I actually did) and it hangs on by a red belt so it will just dangle once off.
b: You will need to unplug the Passenger Airbag Light connection to gain enough room. Just make sure you put that back in before you start the car otherwise it will through an airbag error that is easily rectified once you plug it back in and restart the car.
5: Remove the next piece of trim right behind the mirror (see second pic below).
a: This one is also a pain to remove. There is a rubber ring attachment that holds the right side onto the car inside the trim piece. I don't have a photo of it but it is attached a plastic piece and I couldn't pop the entire bit off so I had to stretch the rubber and just remove that.
b: I had a real hard time stretching this back on during reassembly, it started to tear so I stopped since the entire piece seemed very solid once it all snapped back together. I may order a new one but in 40 miles of driving it does not move or make a noise.
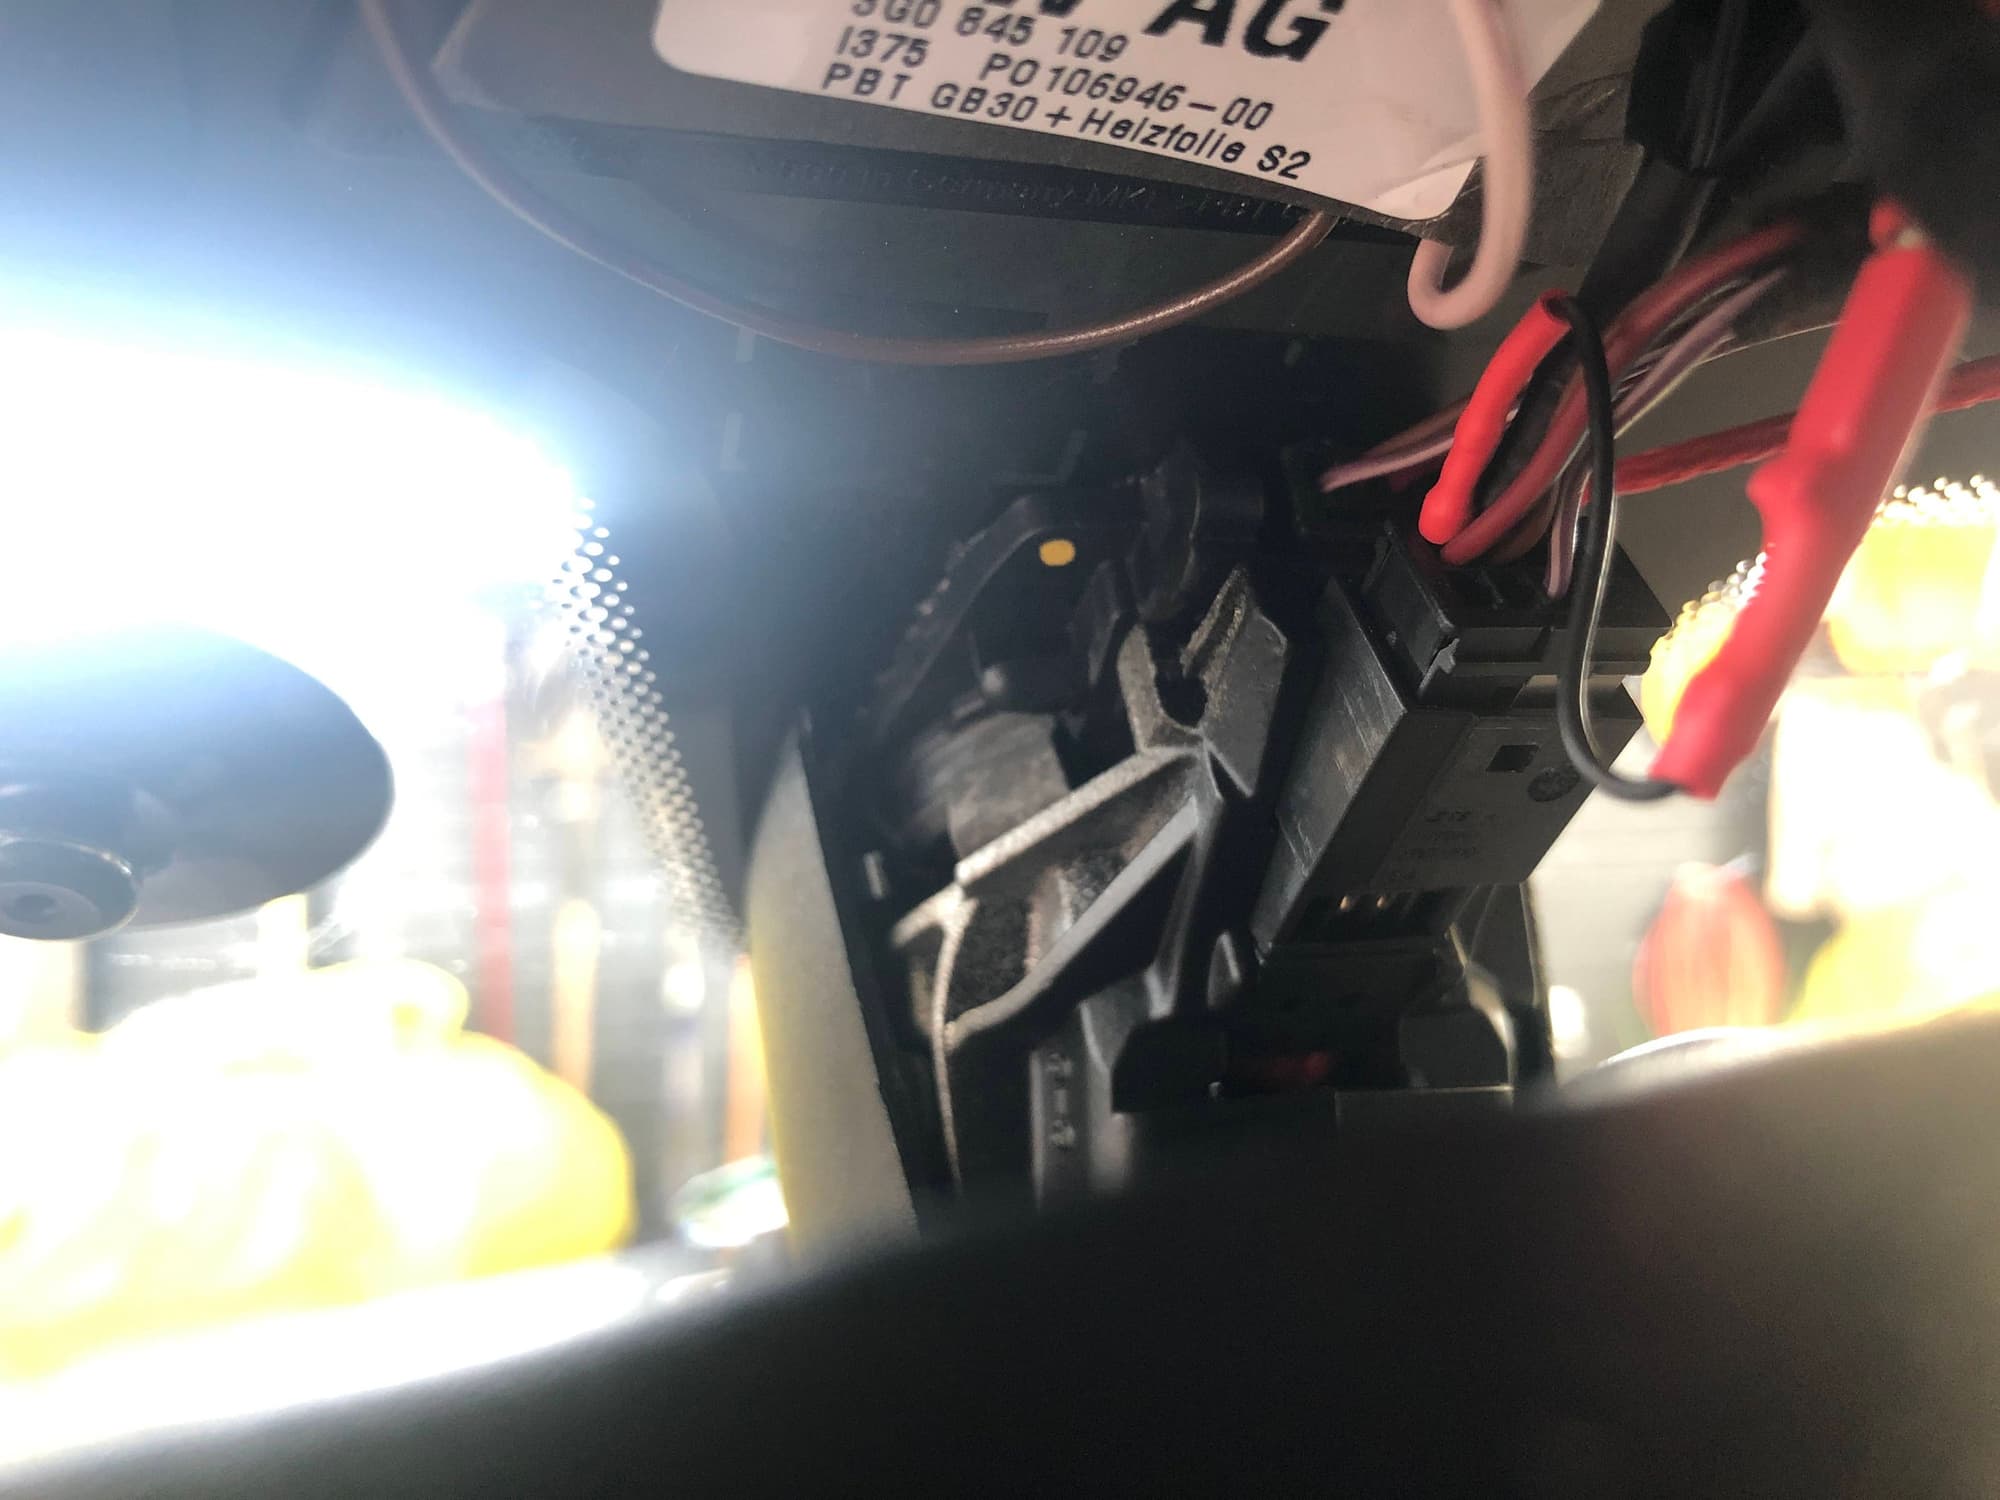
6: Once these pieces are off you will clearly see the connector smack dab in the middle with wires going up (see third pic)
a: I found it easiest to unplug the connector and work on it in front of the rearview mirror
b: There is a BROWN wire, tap this with the black connector (see fourth pic below), I tapped into it with the thicker of the tap connections as the thinner one kept falling out. I also tapped it on the windshield side of the wire. (see fifth pic below)
c: There is a RED with BLUE STRIPE wire right next to the brown wire that takes the red connector (see fourth pic below). I used the thinner tap here as it would not take the larger tap I had, again tapped it on the windshield side of the wire. (see fifth pic below)
7: Slip the RJ cable into the bottom mirror trim piece that was not removed, there is a rubber bit between the plastic and the windshield so the cable fits perfectly at the bottom (see second pic below)
8: Reassemble in reverse order and you are good to go.
I hope this makes sense and is helpful to someone!
Im not into radar detectors but would like to know if I could power a dash cam with the same mirror connectors that you might use for a dash cam. Thanks.
Watching. We have a 2019 e-Hybrid with heated windshield and a Uniden R7 radar detector. There's only a small area on either side of the upper console, immediately below the windshield header, where the detector works, so it does make sense to hard-wire it. Another option is to run the wire up the A-pillars and across the header, but it might be harder to hide nicely.
I'm also waiting for a V1 G2, which is a little more compact than the R7, and can be run dark at all times when using JBV1 on my phone. The power connector is the same for both detectors.
Last edited by David Mackintosh; 09-28-2020 at 06:57 PM.
I'm also waiting for a V1 G2, which is a little more compact than the R7, and can be run dark at all times when using JBV1 on my phone. The power connector is the same for both detectors.
As an update, I got my V1 G2, and it does fit better, allowing the sunvisor to be tilted forward more than the Uniden R7. I also really like the JBV1 integration, and anyone should be using an app like that or Highway Radar, to get the police heat maps, whether or not you're using a radar detector.
I have a wiretap direct wiring harness from blendmount for my radar detector. I was able to dissasemble the rearview mirror housing assembly today without destroying anything, however, I was unable to figure out which pins to use for the wiring harness. Do any of you have any schematics or diagrams showing known pins and the ground? I'm sure some of you have done this. Thanks!
So I took the plunge and hard wired my V1 Gen 2 using a mirror tap this weekend overall it was fairly easy to do but I always get a little nervous as the force it take to remove some trim pieces in this car. The guides posted above in the thread didn't help that much except that tap black to brown wire and look for a blue wire. With that being said below are my observations and what worked for me:
1: You need a set of plastic trim removal tool
2: Get a mirror tap kit that has different tap sizes (I ended up using two different sizes). I used the Radar Mount brand from Amazon (PN#: 4005201V for the V1) There are a few of these for the V1, not all have different connection sizes. This was 1/2 the price of the other brand, thought I would give it a shot to save $20 and it worked.
3: You don't need to remove the dome light. Don't even try to do that via the video link in this thread, it won't come out of the clips, I felt too much force was being applied.
4: Start by removing the plastic trim right above the mirror, the one that houses the Passenger Airbag Light (see first pic below)
a: It took some force to remove. Just use a trim tool and work from the left side against the windshield over to the right. There are a lot of little bits that help keep it attached. You will have to slide it forward to the windshield to drop it down, at times I thought I broke it (maybe I actually did) and it hangs on by a red belt so it will just dangle once off.
b: You will need to unplug the Passenger Airbag Light connection to gain enough room. Just make sure you put that back in before you start the car otherwise it will through an airbag error that is easily rectified once you plug it back in and restart the car.
5: Remove the next piece of trim right behind the mirror (see second pic below).
a: This one is also a pain to remove. There is a rubber ring attachment that holds the right side onto the car inside the trim piece. I don't have a photo of it but it is attached a plastic piece and I couldn't pop the entire bit off so I had to stretch the rubber and just remove that.
b: I had a real hard time stretching this back on during reassembly, it started to tear so I stopped since the entire piece seemed very solid once it all snapped back together. I may order a new one but in 40 miles of driving it does not move or make a noise.
6: Once these pieces are off you will clearly see the connector smack dab in the middle with wires going up (see third pic)
a: I found it easiest to unplug the connector and work on it in front of the rearview mirror
b: There is a BROWN wire, tap this with the black connector (see fourth pic below), I tapped into it with the thicker of the tap connections as the thinner one kept falling out. I also tapped it on the windshield side of the wire. (see fifth pic below)
c: There is a RED with BLUE STRIPE wire right next to the brown wire that takes the red connector (see fourth pic below). I used the thinner tap here as it would not take the larger tap I had, again tapped it on the windshield side of the wire. (see fifth pic below)
7: Slip the RJ cable into the bottom mirror trim piece that was not removed, there is a rubber bit between the plastic and the windshield so the cable fits perfectly at the bottom (see second pic below)
8: Reassemble in reverse order and you are good to go.
I hope this makes sense and is helpful to someone!
Last edited by A4EP; 10-19-2020 at 06:52 PM.
Reason: Space steps
So I took the plunge and hard wired my V1 Gen 2 using a mirror tap this weekend...
Very helpful, thank you! I've been using my V1 G2 with the coiled wire for a few days. I'm still not sure I want to dismantle the overhead console as you did, I'm considering just running a straight wire across the header, down the A-pillar, and to a switched 12V wire behind the dash,. I'm assuming the wire could all be tucked in, but I don't have one yet. Any thoughts?
Thanks for posting. Just to confirm the red with blue stripe is switched 12V?
Affirmative, it is switched and works so I assume it is 12v.
I don�t have a voltmeter so I just used my wife�s V1 Gen1 to test before plugging in mine. Figured if it was going to nuke a detector make it my wife�s since she never drives fast anyway ;-)
Very helpful, thank you! I've been using my V1 G2 with the coiled wire for a few days. I'm still not sure I want to dismantle the overhead console as you did, I'm considering just running a straight wire across the header, down the A-pillar, and to a switched 12V wire behind the dash,. I'm assuming the wire could all be tucked in, but I don't have one yet. Any thoughts?
You shouldn�t have a problem running a flat cable. I had been running mine with the Savvy run down the drivers A-pillar and plugged into the Savvy in the OBDII port but kept having my car alarm go off randomly while parked.
Dealer said they had seen that occur before with those Progressive Insurance driving monitors that plug into the port. Guess the Savvy was sending some signals to the car even when when the car was turned off making the car think someone was trying to steal it through the OBDII. I got tired of always unplugging the V1 when parked or forgetting
and the alarm going off in front of Costco or my office.

 09-21-2020, 08:42 PM