When you click on links to various merchants on this site and make a purchase, this can result in this site earning a commission. Affiliate programs and affiliations include, but are not limited to, the eBay Partner Network.
Joyeauto Apple CarPlay DIY install for CDR31 unit in my GT4
Hey all. Here is my JoyeAuto DIY install as promised:
I installed a Joyeauto Apple CarPlay device into my 2016 GT4. My head unit is VERY basic and there in NO Bose, NAV, or Siruis/XM. My car had a backup camera installed when I took delivery and was able to hook it up easily, and it works perfectly. During my install, I had a few roadblocks and headaches, but I was able to solve them. I hope this post will make life easier for those who will take on this task.
The unit works very well and connects automatically soon after starting the car. The resolution is not super great, but that is the limit of the screen, not the Joyeauto device. The touch screen works well.
The instructions that come with the product leave a lot to be desired. You can follow the instructions as to how to install the ribbon cable to the display circuit. It is the same as my install, but instead of routing the ribbon to be outside the head unit, I angled it to stay inside. See my photos below for more details.
The main roadblock I ran into was that there is VERY limited space in the compartment that holds the head unit. The kit for the CDR31 head unit requires a switch box in addition to the Joyeauto box. I will tell you that you CAN NOT fit the switch box in the dash space if you keep it outside the head unit. It WILL NOT FIT. Trust me, I ruined a ribbon cable and had to get a new one shipped from China....I ended up mounting the switch box INSIDE the head unit, and it works perfectly!
A couple of other tips:
The "LCD OUT" wire connector (smaller one) to the switch box can potentially be connected the wrong way. So, MAKE SURE the RED wire is facing the adjacent connector (for the touch screen cable), and NOT facing toward the outside edge, then put some tape over the whole thing to make sure it stays secure.
If yo have any questions, please let me know.
WIRING DIAGRAM: Use QR code to see install video Use QR code and PW to see instructions.
These panels just pop off. No screws.
Remove the 4 screws with T25 bit. Head unit will slide right out. Put towels over shifter and console to avoid scratches. Be careful for leather surrounds on the dash (I scratched mine a bit, ugh).
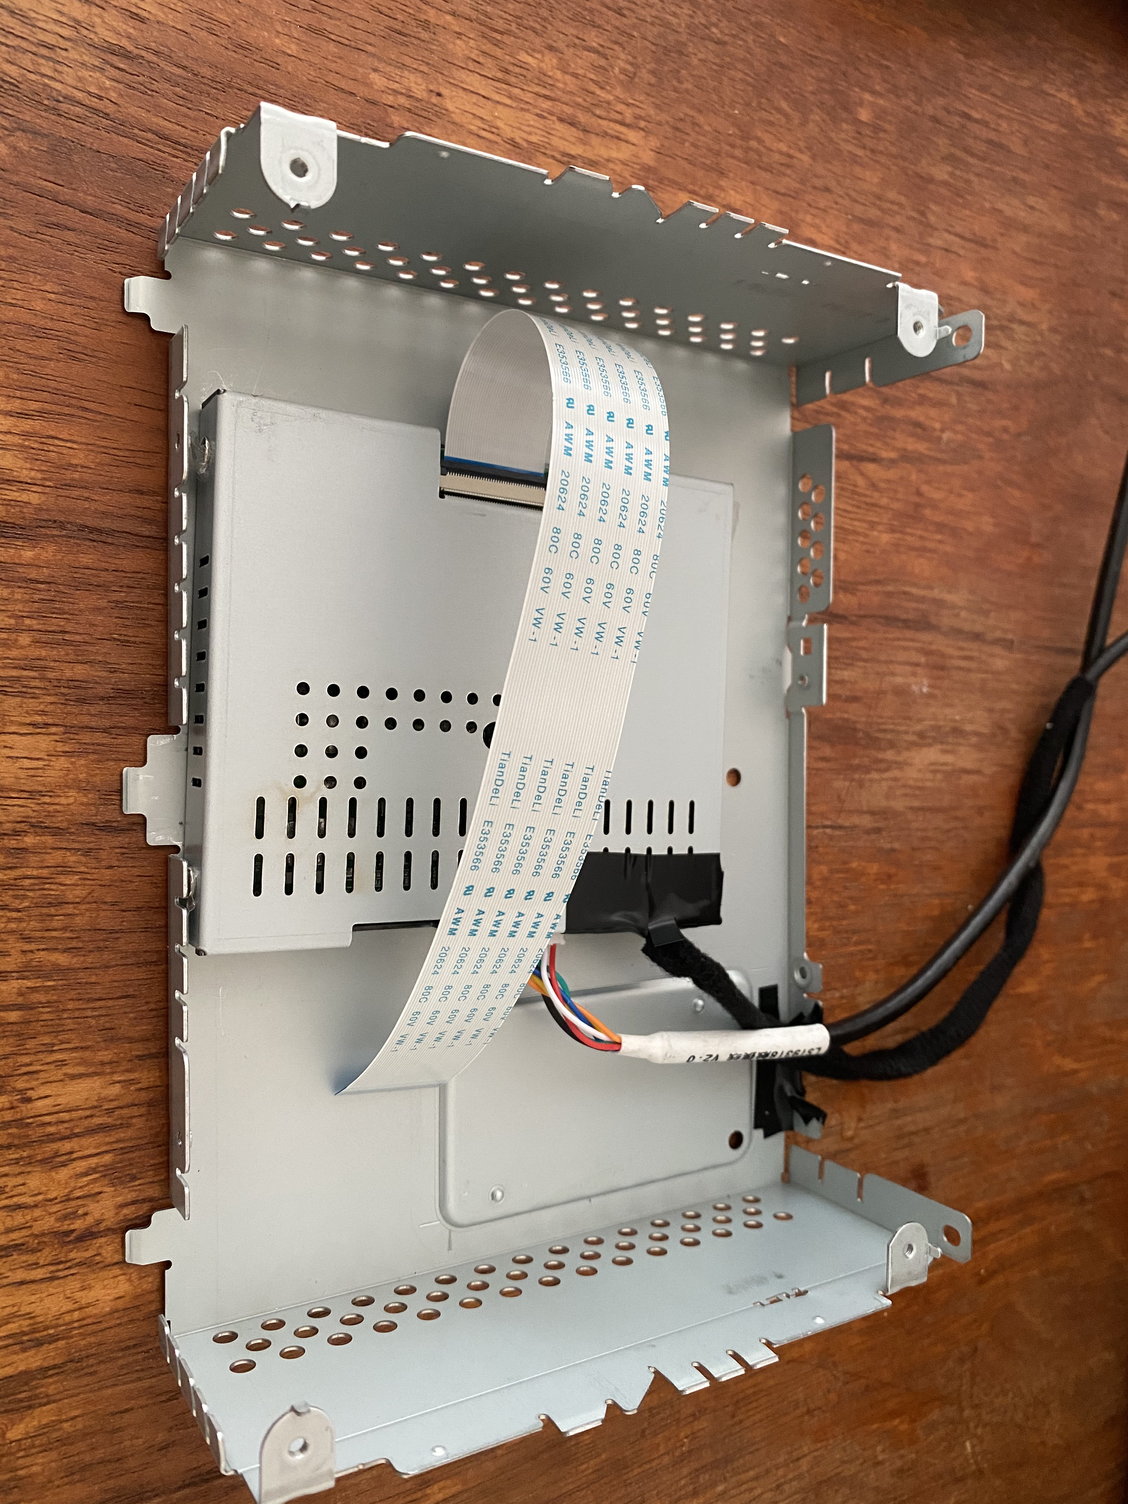
Disassemble the head unit: Remove the front and back panels. Beware, 2 of the screws are longer than the others, so pay attention to which ones. Also, the 2 black screws that hold the CD drive need to be removed. There is a ribbon cable for the CDR that needs to be removed. Then separate the top and bottom half of the head unit. Then remove the 4 screws for the circuit board and set it aside. The switch box mounts here. make sure to have the ribbon cable installed before you mount the switch box, otherwise it will be a lot harder to do after you mount it. Use strong 2 way tape. I used 6 Gorilla 24 pound mounting squares. It is a tight fit, so make sure to check that it clears the circuit board electronics before securing it.
This is how it looks installed with the circuit board back in place. Note that the switchbox is slightly angled, to make room for the frame screw. This is how it looks before re-installing the face plate. make sure you re-connect the CDR ribbon before closing it up!!
Run the switch box ribbon out from here, then you can secure the face plate back with all the screws. Don't forget to put the 2 black screws in to secure the CDR unit.
Connect the ribbon tape at the connector, then put some tape over it. As you close it up, slide the ribbon cable (including the connector) into the main body, then close it up and screw it back together.
All back together. This is how it looks. Read to install.
This is the switch. No need to mount it outside since it will remember last setting, so Apple CarPlay will start each time you get in your car. Don't need to push this each time you start the car..
No space behind the head unit for this box to sit, so I looped all the wired around and under to connect to the Joyeauto device so it would slide under this space. I put some cloth wiring tape around it to prevent rattling. Also, I did not connect the extra interface (USB) cable near the antenna. I don't plan on using external device on the CarPlay. It may not fit in this space if you connect the external USB wire. Also, put tape around the base of the antenna since the plastic cover will pop off.
Works great!
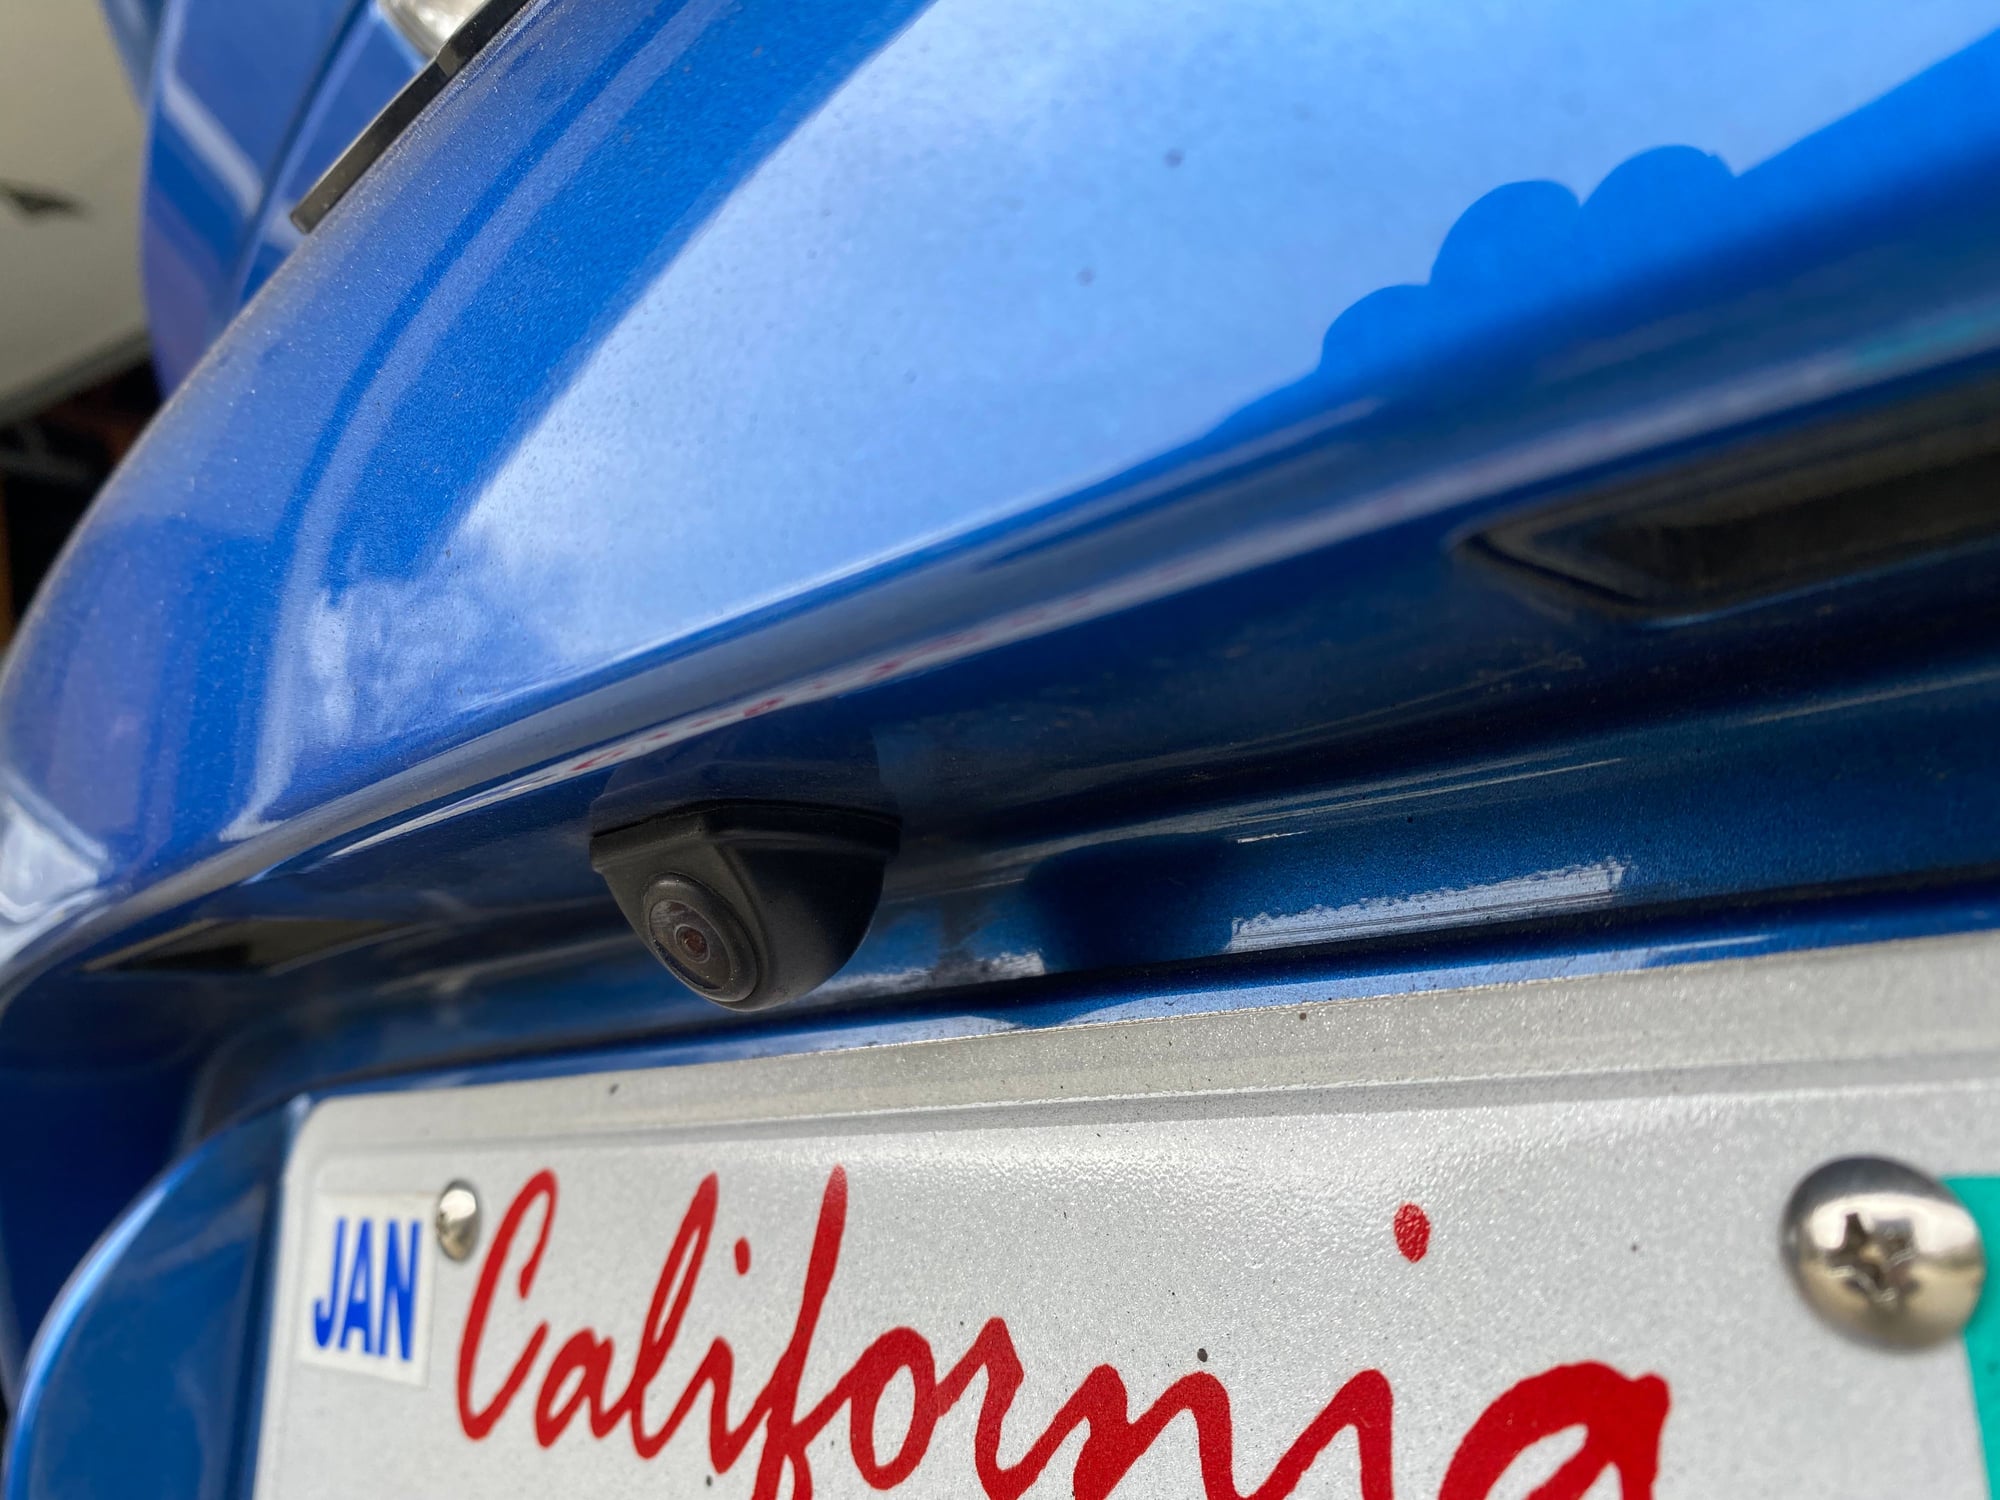
Backup camera that was installed prior to me buying car, so I have no idea what brand it is. Hooked it up to the Joyeauto and it works perfectly. Plug in RCA cable. Red wire is power, and purple wire hooks to reverse light to trigger camera to come on when car is in reverse.
This might be a better illustration as to how the box fits underneath where the head unit goes:
It is a tight fit. Again, I have to loop all of the wires behind and underneath to come up from under that space to connect to the CarPlay box. There�s plenty of wire and space to do so.
Also, make sure dip switches are set correctly. May want to plug it all in and make sure it works properly before putting it all back in place and closing it all up.
Thanks for doing the write up! I recently helped my friend install the Joyeauto unit in the base CDR. Does your right **** allow you to scroll between the apps and select the apps? My friend's didn't do anything. I have the same unit in my 991 GT3 and the right know allows you to flip between the apps (and between the screens). The Porsche touch screen is the base base in function. It's designed to be pressed on the screen to select a button but doesn't swipe very well to switch between the pages. I use the right **** to switch between the screens.
Thanks for doing the write up! I recently helped my friend install the Joyeauto unit in the base CDR. Does your right **** allow you to scroll between the apps and select the apps? My friend's didn't do anything. I have the same unit in my 991 GT3 and the right know allows you to flip between the apps (and between the screens). The Porsche touch screen is the base base in function. It's designed to be pressed on the screen to select a button but doesn't swipe very well to switch between the pages. I use the right **** to switch between the screens.
I just tried it on my set up and the right **** does not do anything on the CarPlay screen. No function to toggle thru apps or go to next page.
Awesome. I will have to hit you up when i go to do this. I have the base CDR as well with no camera. Is everything you have to buy just this kit or did you need other stuff as well?
Awesome. I will have to hit you up when i go to do this. I have the base CDR as well with no camera. Is everything you have to buy just this kit or did you need other stuff as well?
Everything is in the kit. If you want the back up camera, you have to buy that kit separately and wire it separately. You don�t have to have it though for the Apple CarPlay device to work. It�s just an accessory. You could even get a front camera if you really want as well. I do not have front facing camera. Good luck!
Everything is in the kit. If you want the back up camera, you have to buy that kit separately and wire it separately. You don�t have to have it though for the Apple CarPlay device to work. It�s just an accessory. You could even get a front camera if you really want as well. I do not have front facing camera. Good luck!
Installed a front and rear camera when I installed the JoyeAuto unit. It took some extra time to install the front camera (plus the cost of the second camera) but was well worth the effort, especially if you drive it on the street. I both my wife and I love having front and rear facing cameras and would highly recommend doing them both while you have everything apart. It makes life so much easier when pulling into parking spaces.
Last_935 - I have the same cameras on my white GT3. Looks just like your's. Totally worth it to install the front camera as well. On a 911 it's a pain to run the wires back through the engine firewall for the rear camera, especially if you have a roll bar back there. Only thing is to activate the front camera you have to put it in reverse first then "D" and it stays on for only a few seconds. But it's great for pulling right up to the parking curb without wondering whether you're going to hit the front lip spoiler.
Glitches - touch screen in the PCM 3.0 is meant to just push buttons. Carplay relies on swiping as well. Swiping on the PCM isn't consistent so I use the right radio dial to scroll through the apps and screen instead of swiping. The CDR31 in my friend's 981 the radio dial didn't work (maybe it's fixed now? he hasn't driven the 981 since putting it in storage for the winter last fall). Also you have to install this extra button to swap between Carplay and PCM radio with the CDR31. With the PCM you don't need to install this extra button.
Wifi Carplay works pretty well. I do notice sometimes it cuts out for a fraction of a second now and then. Wired Carplay works without a hitch.
Last_935 - I have the same cameras on my white GT3. Looks just like your's. Totally worth it to install the front camera as well. On a 911 it's a pain to run the wires back through the engine firewall for the rear camera, especially if you have a roll bar back there. Only thing is to activate the front camera you have to put it in reverse first then "D" and it stays on for only a few seconds. But it's great for pulling right up to the parking curb without wondering whether you're going to hit the front lip spoiler.
I totally agree with being a saver of front spoilers. On the GT4, running the front camera was a more involved process to do it correctly. I was able to run the wire through the large grommet under cabin filter. It required removing the battery and the filter box. The end result was that the wire is totally concealed.
 02-14-2021, 07:37 PM