When you click on links to various merchants on this site and make a purchase, this can result in this site earning a commission. Affiliate programs and affiliations include, but are not limited to, the eBay Partner Network.
This is something I posted on another site back in 2008. It was so old that it had disappeared from over there. I think it is good for Porsche rear engine cars from 1998-2012 (986, 987, 996, 997). I do not have access to 991 and later, so do not know if there is similar adjustability on the new models. I believe that the brake pedal is really high because that is safer for incompetent drivers. Lowering can make heel/toe much easier.
******************************************************
Pedal position is a compromise in all cars, unless the pedals are adjustable. Porsche did a fine job of setting up the pedals to accommodate as many drivers as possible, but there are still some (like me) who find the pedal position bad enough that it needs to be changed for the car (driver?) to realize its potential.
The brake pedal can be difficult to use in heel/toe shifting, especially if you are on the street (not the track), are tall, have long legs, reduced ankle flexibility, or big feet. If this is you, lowering the brake pedal between .5” and 1.5” can make a world of difference.
In particular, if you are trying to learn to heel/toe, it will allow you to practice on the street in everyday driving. And as I can attest, it makes it even easier on the track – no downside.
First, a note on safety. Even if your coach is saying “More Gas, Less Brake!”, you still need to have SOME brakes (except in Spec Box… even for Turn 7 at Sebring, a quick throttle lift is all you need…[<<JOKE. Please do not try T7 without braking...]). No brakes is BAD. This is a simple adjustment that a shade-tree mechanic can make, BUT if you have any doubts, have your professional mechanic do it instead.
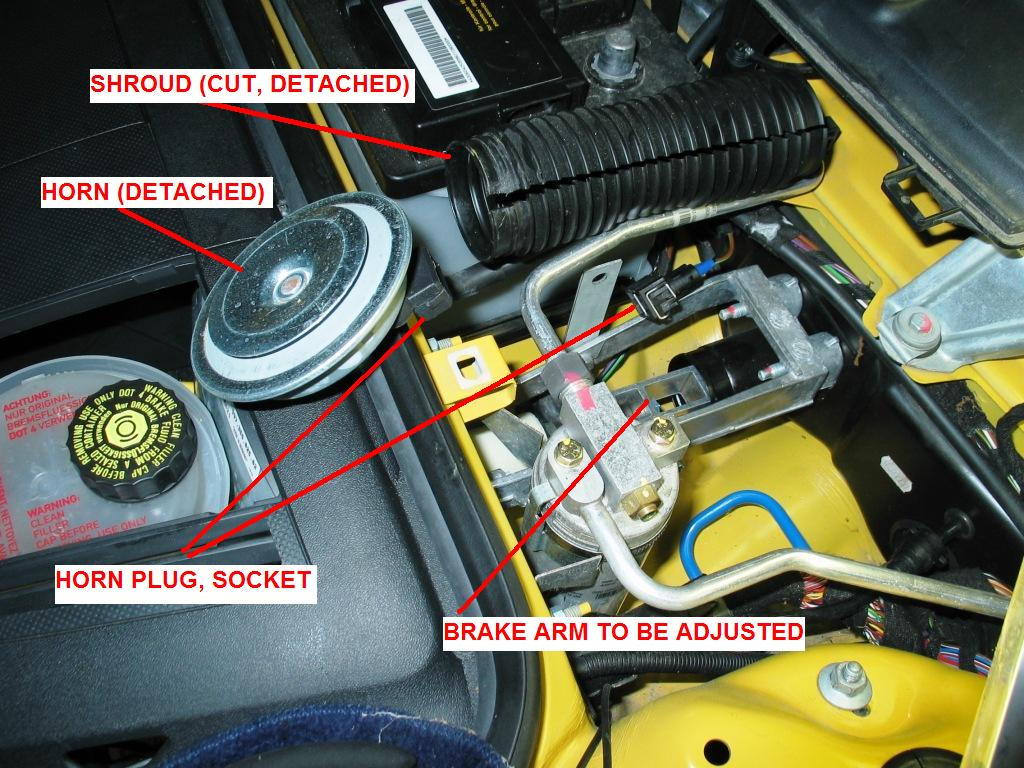
To begin, open the front trunk, remove the battery cover, disconnect the battery and remove the trim panel next to the battery on the driver’s side. Drape a towel over the hood latch, so that you do not absent-mindedly shut the hood when you get a phone call and then have to spend 30 minutes going through the “Opening the hood with a dead battery” procedure. (Do I sound bitter?)
This exposes the arm coming from the brake pedal, going to the braking system (booster, fluid reservoir, ABS system, etc). The arm is enclosed in a black plastic accordion sleeve, with clamps on both ends.
Remove the horn by unplugging it, then unfasten with a 13MM wrench, set it aside.
I cut the clamps at both ends of the sleeve with tin snips, then slit the sleeve with a razor knife and removed it.
This is what is inside:
The 19MM and 17MM nuts are jammed to fix the height of the pedal. They are marked at the factory with a paint stroke. You need to hold the 17MM nut, and loosen the 10MM nut on the cabin side. Continue to hold the 17MM nut, and loosen the 19MM nut on the trunk side. Back the 19MM nut off a few turns to give some room. Now you can rotate the 17MM nut toward the trunk. Because of where this arm attaches to the brake pedal, you get a mechanical advantage – one full turn of the 17MM nut lowers the brake pedal about 3/8”. I would suggest about two turns. I put it down as far as it would go, and everything works, but it feels bad to have the pedal so low, and brake lockup (ABS engage) happens when the pedal is almost at the bulkhead – feels scary. After trying several heights over a few days, I ended up at two turns, but your leg length, or where the assembler set it at the factory could change this. Once you have a trial height you like, hold the 17MM nut, tighten the 19MM nut, then tighten the 10MM nut.
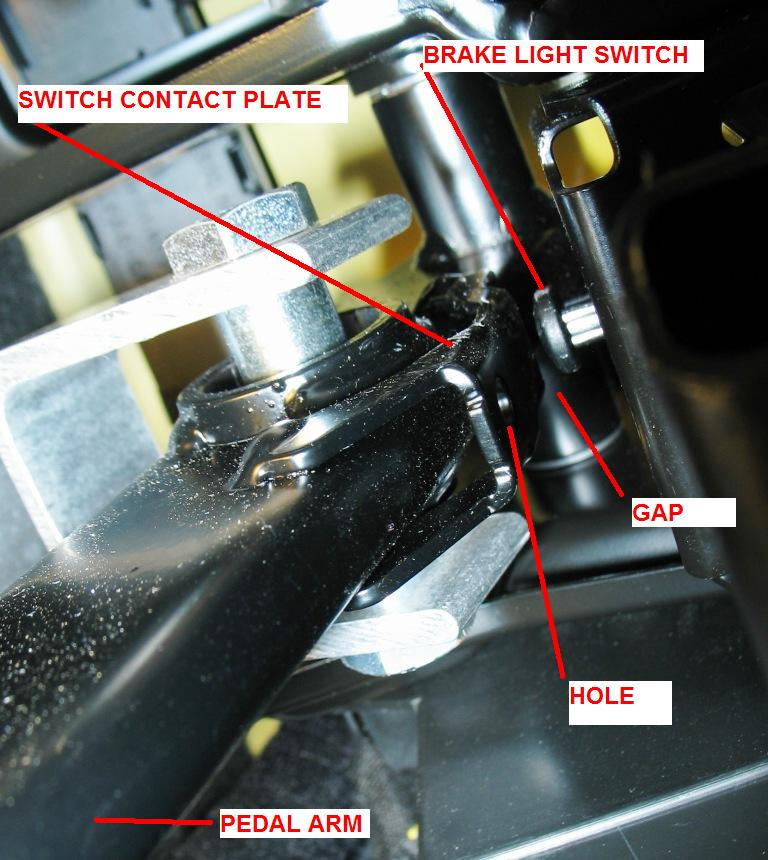
INSIDE THE CAR: This is looking up the brake pedal arm, with your cheek against the brake pedal. The rounded brake pedal arm has a flat plate (with a small hole in it) welded to it as a striker for the brake light switch. This brake light switch does much more than just light up the rear brake lights, though. The car’s brains use it to decide if you are trying to brake, and by comparing wheel speed, decide how effective braking is. When you move the brake arm and pedal back, it is important to still have this switch working. After moving the pedal back, I had a gap so that the switch was not engaged.
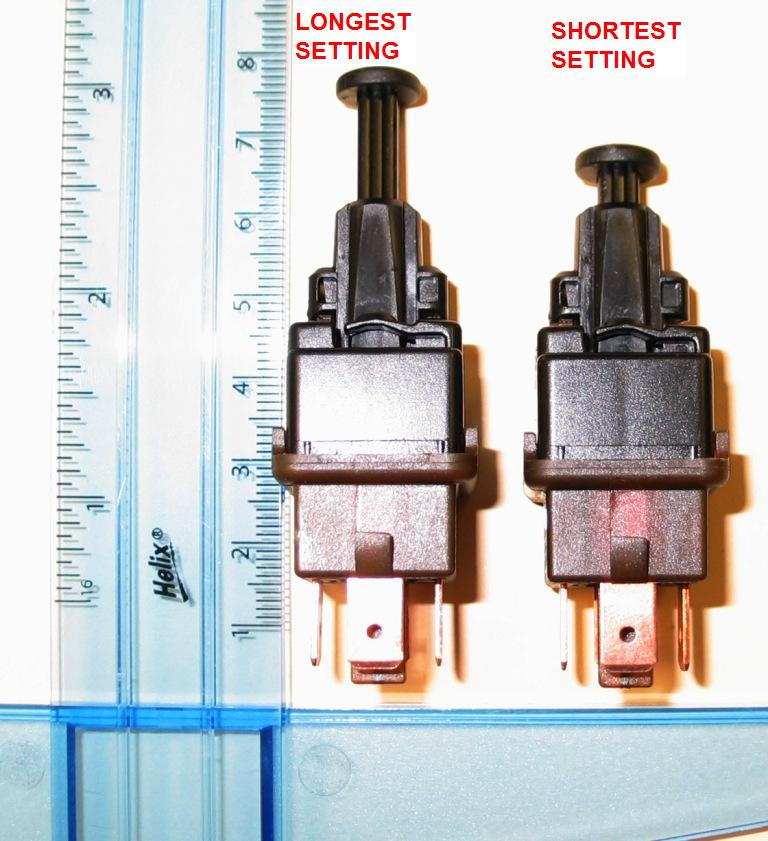
The brake pedal switch is adjustable:
If you push the brake pedal down and hold it, you can pull the adjustable striker out. When you then release the brake pedal, it pushes the striker back to the perfect height.
Once you are sure that you have the pedal height to your liking (and the switch is taken care of), you can close up in the front trunk. I put the cover back on, fastening the ends with zip ties, slit at the bottom facing down.
The cover is only a dust and dirt cover, so that is probably good enough. Replace the horn, plug it in, and re-attach the battery terminals. Put the covers back on, and you are done!
As an extra, I wanted to be sure everything stayed clean, so I made an additional cover to assure nothing got through the slit in the sleeve. You might want to try this if you have access to sewing skills. Because Porsche has the highest standards, I did the secondary cover in black leather to match the car’s interior:
I think the deviated stitching really accents the AC and brake tubing, don’t you?

 04-28-2023, 11:15 PM