Found an easy way to remove the bastard SAI valve
 03-17-2006, 11:53 PM
#1
Rennlist
Lifetime Member
Lifetime Member
Thread Starter
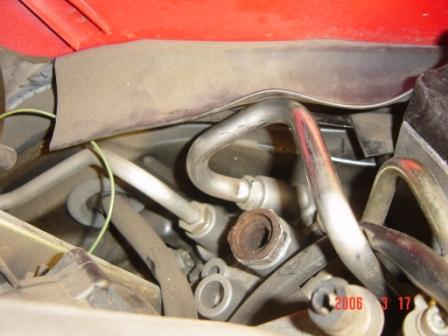
For the past 3 nights I have been struggling to remove the bastard SAI valve in my 993. Tried every known method....
Modified crawfoot
Dremel and a cold chisel
Vise grip with a socket inserted...
All without any luck
Finally while I had the socket inserted inside of the SAI and trying to turn the SAI with the vise grip the valve started to move left and right... The thin metal finally started to give way and the valve snaped off from the bolt. Then I realized, once the valve breaks off from the bolt then I am free and clear to stick a socket on top...
Here is a picture of after the SAI valve broke off
And then I stuck a 27mm socket on there, you will need to hammer the socket on as there are some minor left over SAI sheet metal that will prevent you from sticking the socket on.
Then the rest is piece of cake. Grab the intake manifold with your left hand for leverage, and push! Whoala!!!!!!
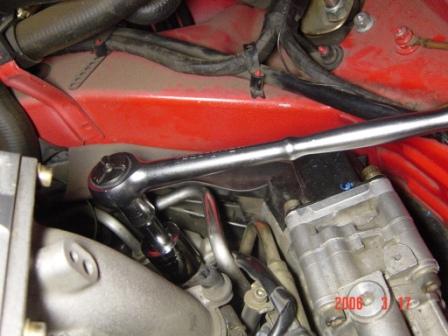
Notice through the process I managed to dent one of the air pipes... prior to the socket method... I think the discovery I made is a far safer and quicker way to remove the SAI valve. Just breake the darn thing off and use a socket!
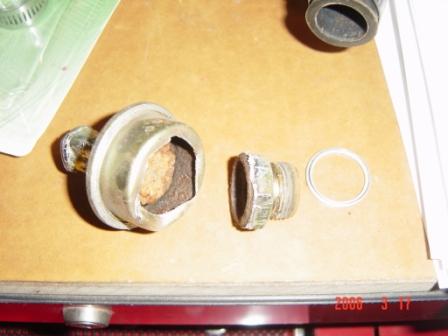
Here is the bastard all apart!!!! There should still be enought space left for you to use the left over piece with the thread for your SAI cleaning nozzle.
Modified crawfoot
Dremel and a cold chisel
Vise grip with a socket inserted...
All without any luck
Finally while I had the socket inserted inside of the SAI and trying to turn the SAI with the vise grip the valve started to move left and right... The thin metal finally started to give way and the valve snaped off from the bolt. Then I realized, once the valve breaks off from the bolt then I am free and clear to stick a socket on top...
Here is a picture of after the SAI valve broke off
And then I stuck a 27mm socket on there, you will need to hammer the socket on as there are some minor left over SAI sheet metal that will prevent you from sticking the socket on.
Then the rest is piece of cake. Grab the intake manifold with your left hand for leverage, and push! Whoala!!!!!!
Notice through the process I managed to dent one of the air pipes... prior to the socket method... I think the discovery I made is a far safer and quicker way to remove the SAI valve. Just breake the darn thing off and use a socket!
Here is the bastard all apart!!!! There should still be enought space left for you to use the left over piece with the thread for your SAI cleaning nozzle.
 03-18-2006, 12:08 AM
#2
Advanced
Join Date: Feb 2006
Location: Orange County, CA
Posts: 81
Likes: 0
Received 0 Likes
on
0 Posts
Good for you Robin!!!
I had a 1 1/16" socket all ready to go, but I just couldn't figure out a way to get the valve's main body out of the way so I could use it. Looks like you figured it out.
You'd think Porsche could place the hex nut portion of the valve ON TOP of the friggen' thing, but NOOOoooooo.
Let us know how the rest of this little exercise goes.
02-07-2015, 03:48 PM
#4
RL Community Team
Rennlist Member
Rennlist Member
Outstanding, added your procedure to my library!
Andy
Andy
02-07-2015, 04:08 PM
#5

You'd think Porsche could place the hex nut portion of the valve ON TOP of the friggen' thing, but NOOOoooooo.
Beautiful! I'm gonna chisel my valve body off with an air chisel and get down to business, post haste. Thanks for the post, Robin!
02-07-2015, 09:11 PM
#7
John, I guess I fail to see your point...
...Look at how many current members had not seen said post, and how many DIY's contain not even a peep about the simple method of removing the valve.
I would never consider grinding a 27mm crows foot to make the specialized tool, when I can air chisel the damn thing off in two minutes!
I happen to have a 3/4 drive 27mm socket, which fit one of the rear wheel nuts from my previous Ducati 996 superbike. So I am good to go.
Last edited by nine9six; 02-08-2015 at 12:42 AM.
Trending Topics
02-07-2015, 10:36 PM
#8
 02-07-2015, 11:42 PM
#9
Rennlist Member
I tried the slot and tried to tap it out with chisel and hammer. No luck.
Breaking it off was the trick. Was able to use a 1-1/8" socket and voila!
I wonder if there would be a market for a redesigned valve. Maybe a machined piece that could be rebuilt.
My car has about 25000 miles since the SAI was last replaced. The valve now longer was working as a check valve as I can blow through both directions.
02-08-2015, 12:33 AM
#10
I tried the slot and tried to tap it out with chisel and hammer. No luck.
Breaking it off was the trick. Was able to use a 1-1/8" socket and voila!
I wonder if there would be a market for a redesigned valve. Maybe a machined piece that could be rebuilt.
My car has about 25000 miles since the SAI was last replaced. The valve now longer was working as a check valve as I can blow through both directions.
Breaking it off was the trick. Was able to use a 1-1/8" socket and voila!
I wonder if there would be a market for a redesigned valve. Maybe a machined piece that could be rebuilt.
My car has about 25000 miles since the SAI was last replaced. The valve now longer was working as a check valve as I can blow through both directions.
The SAI sticky on Pelican recommends replacement every 30k mi., but your experience yields even less.
I wonder if this is indicative of excessive oil consumption, and premature pollution and death of the valve. Are you currently burning oil, and if so at what rate;
 if you don't mind me asking?
As far as a redesign goes, I'm sure ALL 993 owners would love the idea, but how does one find a cost effective replacement to the existing Porsche unit; while providing consistent operation in the somewhat harsh environment?
Last edited by nine9six; 02-08-2015 at 02:27 PM.
02-08-2015, 07:51 AM
#11
button queen
John, I guess I fail to see your point...
...Look at how many current members had not seen said post, and how many DIY's contain not even a peep about the simple method of removing the valve.
I would never consider grinding a 27mm crows foot to make the specialized tool, when I can air chisel the damn thing off in two minutes!
I happen to have a 3/4 drive 27mm socket, which fit one of the rear wheel nuts from my previous Ducati 996 superbike. So I am good to go.
...Look at how many current members had not seen said post, and how many DIY's contain not even a peep about the simple method of removing the valve.
I would never consider grinding a 27mm crows foot to make the specialized tool, when I can air chisel the damn thing off in two minutes!
I happen to have a 3/4 drive 27mm socket, which fit one of the rear wheel nuts from my previous Ducati 996 superbike. So I am good to go.
 02-08-2015, 11:25 AM
#12
Rennlist Member
Pretty how mine came off. The difference was that my valve had rotted off so I was left with the lower section. After attemtping the crowfoot and a handful of other failed attempts, ended up using my dremel to shave off a little bit of the leftover valve weld to properly sit the socket. Once this was done, applied a bit of antiseize and the little bastard came right out.
02-08-2015, 01:13 PM
#13
Rennlist Member
I miss Robin. He was a good egg. After he went to the F car darkside he stuck around enough to inform us how difficult and costly DIY stuff was on F cars. Wonder what he is up to these days? Looks like the last time he visited here was Sept of 2014.
Last edited by Mark Harris; 02-08-2015 at 07:40 PM.
02-08-2015, 03:40 PM
#14
Rennlist Member
02-08-2015, 06:22 PM
#15
For next time. http://www.amazon.com/gp/aw/d/B000I1...n-L&ref=plSrch
The crows foot is the start point, if you choose not to use the easy method, previously discussed, regardingo the air chiseling at the base or body of the valve, and collapsing what's left, and putting a 27mm or 1 1/16 socket (not 1 1/8), over the top.
The socket provides the most torque application for removing stubborn, cooked on valves!