Airbag 996 3-spoke Steering wheel in 951 - Now with How-To
 12-10-2006, 01:20 AM
#16
Addict
Rennlist Member
Rennlist Member
Thread Starter
Ok, as promised, here's the How-To:
Part #’s
1) 3-spoke steering wheel from 996 or Boxster - 996 347 804 54
2) Contact ring/Slip ring/Clock Spring – 996 652 211 00
3) Air bag w/colored crest - 996 803 089 02
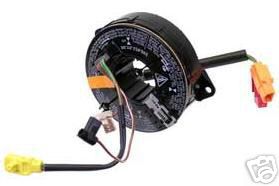
Here’s a pic of the clock spring:
Modifications
1) Steering wheel - The steering shaft of the 944 is shorter than a 996 and so there are not enough threads exposed to attach the 24mm nut to secure the steering wheel to the shaft. I took the wheel to a friends machine shop and we removed ~1/4” of material on the inner side of the steering wheel where the steering shaft goes through, using a 1 3/8” bit. This was enough to allow me to thread the 24mm nut on.
2) The new clockspring is just slightly too large in diameter to fit through the plastic trim piece behind the wheel. The hole needs to be dremelled out by ~1/8" to allow the clock spring to fit through.
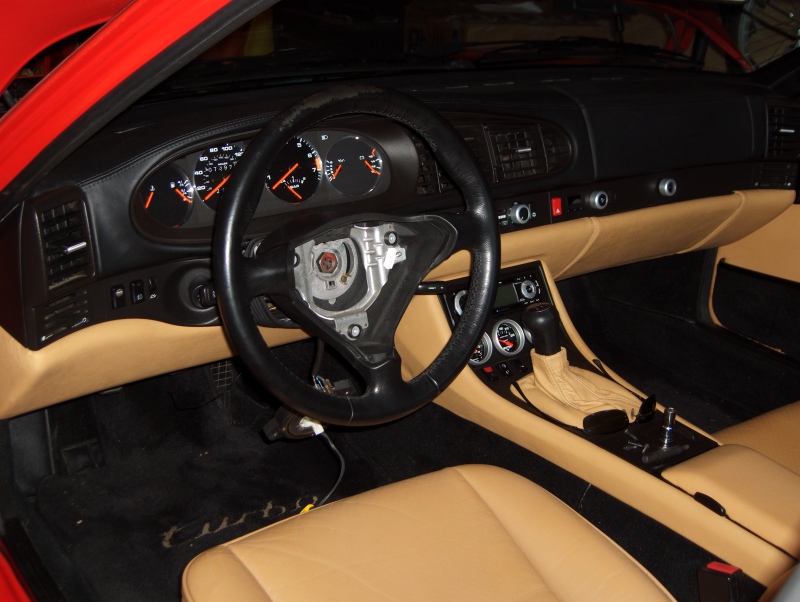
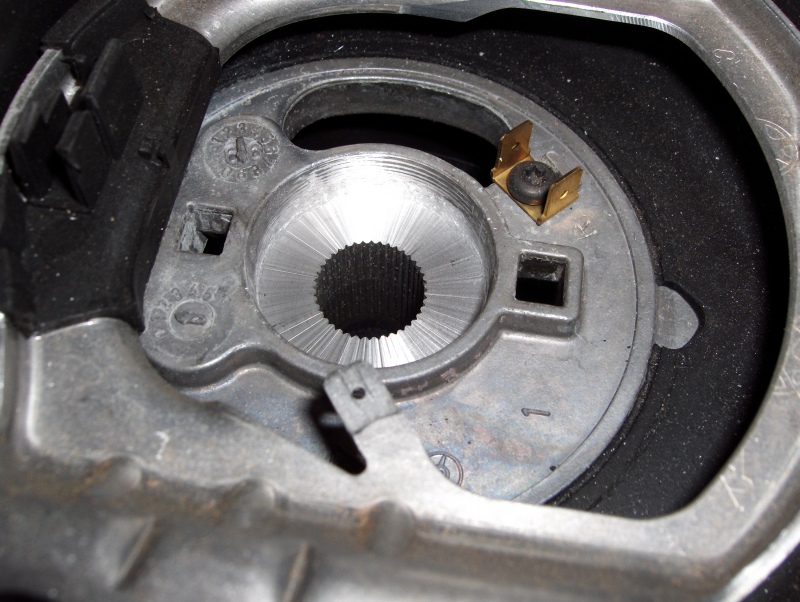
These two pictures show the nut before machining the wheel and the wheel after being machined:
2) Wiring
- The airbag wires coming off the clock spring that go to the car (not to the airbag itself) use the same keyed connector as the 944 so no way to screw up there.
- The 996 horn wires have two grounds (the 944 only has one). Connect the brown/white wire from the clock spring to the brown/white wire on the car. I cut off the connector from the old clock spring for this and spliced it onto the brown/white wire from the clock spring.
- I spliced a longer piece of wire to the solid brown ground coming off the clock spring and ran it to the grounding point above the driver’s side foot well.
- Connect the horn wires off the clock spring the tabs inside the wheel.
- Connect the airbag to the clock spring.
Pricing
I bought the wheel on Ebay for under $70. It had some dye coming off of the top of it (which I repaired, look for another how to on that topic soon). The clock spring was ~$40 on Ebay. The air bag was by far the hardest to find and the most expensive. I bid on several over the past couple of months but they were always too rich for my blood. I ended up buying a brown air bag on Ebay for right at $300. Because it was an odd color it was a little cheaper. I dyed it black and it looks great.
So, for ~$400 I have a spiffy new wheel that looks stock, feels nearly as nice as a Momo and still retains the airbag. I'll probably sell my old wheel and air bag and recoup some of that as well.
Additional notes from another install: (Thanks to Stephenwz968!)
Just to add to the install notes:
I just finished up last night with the install of a 996 3 spoke airbag wheel in my 968. I have a few other things to add, so I'll just give a quick rundown of the process.
1. Buy 3 spoke wheel/airbag and either the 996 or the 993 style clockspring.
2. You must cut the horn connector on the back of the new clockspring and the original.
3. Wire your old connector to same color wire on the back of the new clockspring.
4. Splice on a length of wire to the other horn wire and run it to a grounding point on the body.
5. Install the new clockspring with the grey harness at the top-do do this you may have to move the turn signal/wiper/cruise assembly forward a bit-you gain access to this by removing the plastic piece to the right of the steering column. This is removed by taking off the cover of the heater/ac controls and taking out those 4 screws, taking out the screw under the steering column and screw that hold the piece to the dash. The signal/wiper/cruise assembly has an 8mm bolt on a collar holding it in place loosen it, pull the assembly forward, and then run the wiring behind it and install the clockspring. Push the assembly back as far as it will go, and then tighten the 8mm nut.
6. The plastic cover that goes over the assembly needs to be modified a little bit more than Greg originally expressed. I made the clockspring hole bigger, cut off the plastic spacers on the rear so it fit closer to the signal/wiper/cruise assembly, and made the cutouts for the levers about 1/4" bigger so the levers would still pull forward.
7. Install plastic cover, reinstall trim piece on dash.
8. Install steering wheel that has had 1/4" milled out to gain some threads on the steering shaft.
9. Install airbag, horn contacts in the the wheel.
10. Admire your new airbag equiped wheel!
Hope that helps anyone looking to do this mod...I really like it, and it's a little different than the standard CS wheel install!
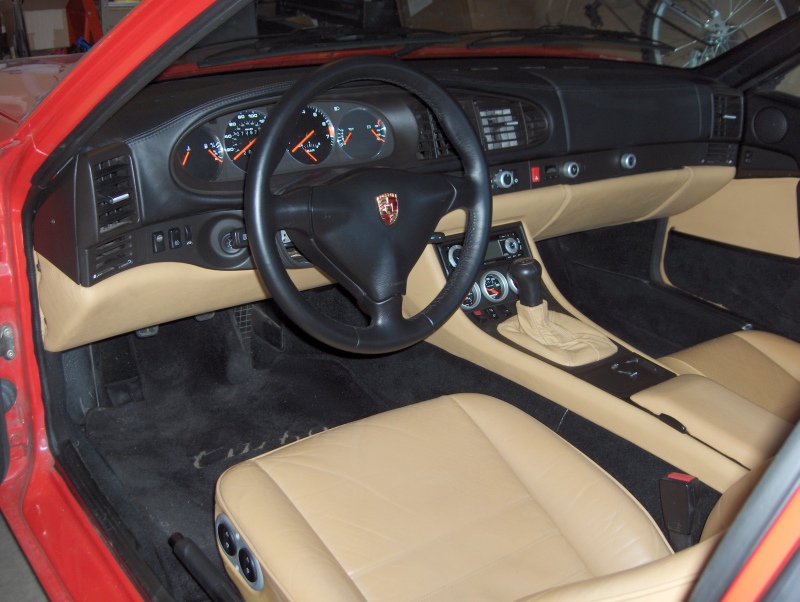
And the final product:
PS Credit for this goes to several pioneers at 968.net. A few guys did this a couple of years ago on that forum with both 4 and 3 spoke 993/996 wheels and I am indebted to them for the information.
Part #’s
1) 3-spoke steering wheel from 996 or Boxster - 996 347 804 54
2) Contact ring/Slip ring/Clock Spring – 996 652 211 00
3) Air bag w/colored crest - 996 803 089 02
Here’s a pic of the clock spring:
Modifications
1) Steering wheel - The steering shaft of the 944 is shorter than a 996 and so there are not enough threads exposed to attach the 24mm nut to secure the steering wheel to the shaft. I took the wheel to a friends machine shop and we removed ~1/4” of material on the inner side of the steering wheel where the steering shaft goes through, using a 1 3/8” bit. This was enough to allow me to thread the 24mm nut on.
2) The new clockspring is just slightly too large in diameter to fit through the plastic trim piece behind the wheel. The hole needs to be dremelled out by ~1/8" to allow the clock spring to fit through.
These two pictures show the nut before machining the wheel and the wheel after being machined:
2) Wiring
- The airbag wires coming off the clock spring that go to the car (not to the airbag itself) use the same keyed connector as the 944 so no way to screw up there.
- The 996 horn wires have two grounds (the 944 only has one). Connect the brown/white wire from the clock spring to the brown/white wire on the car. I cut off the connector from the old clock spring for this and spliced it onto the brown/white wire from the clock spring.
- I spliced a longer piece of wire to the solid brown ground coming off the clock spring and ran it to the grounding point above the driver’s side foot well.
- Connect the horn wires off the clock spring the tabs inside the wheel.
- Connect the airbag to the clock spring.
Pricing
I bought the wheel on Ebay for under $70. It had some dye coming off of the top of it (which I repaired, look for another how to on that topic soon). The clock spring was ~$40 on Ebay. The air bag was by far the hardest to find and the most expensive. I bid on several over the past couple of months but they were always too rich for my blood. I ended up buying a brown air bag on Ebay for right at $300. Because it was an odd color it was a little cheaper. I dyed it black and it looks great.
So, for ~$400 I have a spiffy new wheel that looks stock, feels nearly as nice as a Momo and still retains the airbag. I'll probably sell my old wheel and air bag and recoup some of that as well.
Additional notes from another install: (Thanks to Stephenwz968!)
Just to add to the install notes:
I just finished up last night with the install of a 996 3 spoke airbag wheel in my 968. I have a few other things to add, so I'll just give a quick rundown of the process.
1. Buy 3 spoke wheel/airbag and either the 996 or the 993 style clockspring.
2. You must cut the horn connector on the back of the new clockspring and the original.
3. Wire your old connector to same color wire on the back of the new clockspring.
4. Splice on a length of wire to the other horn wire and run it to a grounding point on the body.
5. Install the new clockspring with the grey harness at the top-do do this you may have to move the turn signal/wiper/cruise assembly forward a bit-you gain access to this by removing the plastic piece to the right of the steering column. This is removed by taking off the cover of the heater/ac controls and taking out those 4 screws, taking out the screw under the steering column and screw that hold the piece to the dash. The signal/wiper/cruise assembly has an 8mm bolt on a collar holding it in place loosen it, pull the assembly forward, and then run the wiring behind it and install the clockspring. Push the assembly back as far as it will go, and then tighten the 8mm nut.
6. The plastic cover that goes over the assembly needs to be modified a little bit more than Greg originally expressed. I made the clockspring hole bigger, cut off the plastic spacers on the rear so it fit closer to the signal/wiper/cruise assembly, and made the cutouts for the levers about 1/4" bigger so the levers would still pull forward.
7. Install plastic cover, reinstall trim piece on dash.
8. Install steering wheel that has had 1/4" milled out to gain some threads on the steering shaft.
9. Install airbag, horn contacts in the the wheel.
10. Admire your new airbag equiped wheel!
Hope that helps anyone looking to do this mod...I really like it, and it's a little different than the standard CS wheel install!
And the final product:
PS Credit for this goes to several pioneers at 968.net. A few guys did this a couple of years ago on that forum with both 4 and 3 spoke 993/996 wheels and I am indebted to them for the information.
Last edited by gregeast; 04-25-2008 at 11:42 AM. Reason: Added notes from Stephenwz986
 12-10-2006, 01:22 AM
#17
Addict
Rennlist Member
Rennlist Member
Thread Starter
Originally Posted by hockeydude
A little OT, but i just noticed the fluid resivoir in your sig. How did you get it to be part of the crest?
12-10-2006, 02:04 AM
#19
Addict
Rennlist Member
Rennlist Member
Thread Starter
Hockeydude: The coolant tank decal started out as a joke. I wanted a new tank but couldn't bring myself to spend $150 for a new one when the old one worked just fine. About that time there was a thread on coolant tanks where people were kicking around different ideas to paint/cover-up they're coolant tanks. I was standing in the garage, looking at the tank when it dawned on me that the shape was roughly the lower left corner of the crest and it was even the right color for the background. I mocked one up with cardboard, kinda liked it and then 35thSLP made it real.

 12-10-2006, 11:20 AM
#23
Addict
Rennlist Member
Rennlist Member
Thread Starter
Originally Posted by JohanvdWalt
Congrats on an amazing car, the best I have seen and believe me I have seen many.
12-10-2006, 12:44 PM
#25
Addict
Rennlist Member
Rennlist Member
Thread Starter
Todd: The color is champagne (or cashmere if you're the 968/993 sort) and it is the color that the stock seats were. I had the dash and console recovered by Rob M Budd in leather, black on top and champagne on the bottom. He also made the french stitched shift boot. He's a Rennlister and a great guy to work with. His website is www.928leather.com You might recognize a the pics of the 944 dash on that site  No affiliation, just a very happy customer who let him use pics of my dash.
No affiliation, just a very happy customer who let him use pics of my dash.
Last edited by gregeast; 12-10-2006 at 02:13 PM.
 12-10-2006, 02:12 PM
#27
Addict
Rennlist Member
Rennlist Member
Thread Starter
Originally Posted by Fishey
993 4 spoke here I come (when I get the moneyz) lol...
 04-25-2008, 08:49 AM
#29
Three Wheelin'
Thanks to Greg for a great write up, and for answering my questions when I got into a jam!!!
Just to add to the install notes:
I just finished up last night with the install of a 996 3 spoke airbag wheel in my 968. I have a few other things to add, so I'll just give a quick rundown of the process.
1. Buy 3 spoke wheel/airbag and either the 996 or the 993 style clockspring.
2. You must cut the horn connector on the back of the new clockspring and the original.
3. Wire your old connector to same color wire on the back of the new clockspring.
4. Splice on a length of wire to the other horn wire and run it to a grounding point on the body.
5. Install the new clockspring with the grey harness at the top-do do this you may have to move the turn signal/wiper/cruise assembly forward a bit-you gain access to this by removing the plastic piece to the right of the steering column. This is removed by taking off the cover of the heater/ac controls and taking out those 4 screws, taking out the screw under the steering column and screw that hold the piece to the dash. The signal/wiper/cruise assembly has an 8mm bolt on a collar holding it in place loosen it, pull the assembly forward, and then run the wiring behind it and install the clockspring. Push the assembly back as far as it will go, and then tighten the 8mm nut.
6. The plastic cover that goes over the assembly needs to be modified a little bit more than Greg originally expressed. I made the clockspring hole bigger, cut off the plastic spacers on the rear so it fit closer to the signal/wiper/cruise assembly, and made the cutouts for the levers about 1/4" bigger so the levers would still pull forward.
7. Install plastic cover, reinstall trim piece on dash.
8. Install steering wheel that has had 1/4" milled out to gain some threads on the steering shaft.
9. Install airbag, horn contacts in the the wheel.
10. Admire your new airbag equiped wheel!
Hope that helps anyone looking to do this mod...I really like it, and it's a little different than the standard CS wheel install!
Steve
04-25-2008, 11:14 AM
#30
Addict
Rennlist Member
Rennlist Member
Thread Starter
Congrats Steve and thanks for taking the time to add to the write up. Would you mind if I cut and pasted your instructions into the my write-up, in case people (this would never happen I know, LOL) don't scroll down to your post?
And, more importantly, we need pictures man!
Congrats again.
And, more importantly, we need pictures man!
Congrats again.